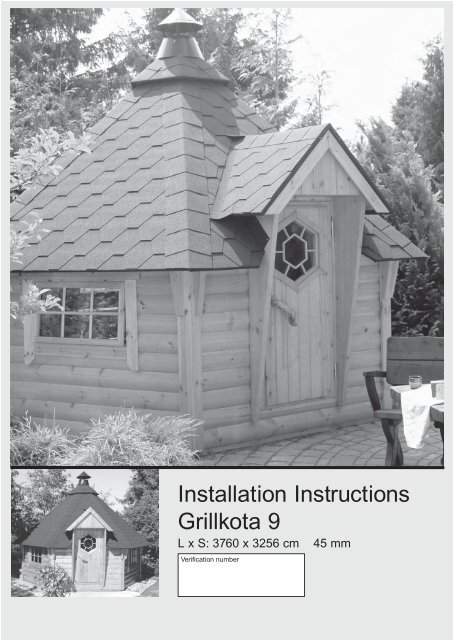
Installation Instructions Grillkota 9
Installation Instructions Grillkota 9
Installation Instructions Grillkota 9

You also want an ePaper? Increase the reach of your titles
YUMPU automatically turns print PDFs into web optimized ePapers that Google loves.
<strong>Installation</strong> <strong>Instructions</strong><br />
<strong>Grillkota</strong> 9<br />
L x S: 3760 x 3256 cm 45 mm<br />
Verif ication number<br />
1
General recommendations and important information<br />
Dearest customer!<br />
Congratulations! You have just purchased an approved product of <strong>Grillkota</strong>! We wish you smooth<br />
installation and pleasing use of the product. Before starting with the installation please be so kind<br />
and carefully get through following tips.<br />
1. Before operating please read this manual thoroughly.<br />
2. Check with the help of the packing list if the product package includes all the details. The list will<br />
also help you to identify all details and to adjust the position of construction girders, slats, etc.<br />
3. Do not store the wooden details on damp or muddy ground; the wooden surface structure will be<br />
diff icult, if not impossible to clean.<br />
4. The product package includes a lot of nails and screws of different length. Please use devices for<br />
fastening referred in the manual, or other devices you would regard as reasonable and required.<br />
Information about wood used for constructing<br />
Wood is a natural construction material. Before processing, timber would be dried up to 18 % of<br />
residual moisture content. Timber’s moisture content can change because of different atmospheric<br />
conditions such as rain, freezing cold or heat, causing wood structure altering. It could also affect the<br />
use of doors and windows. We give you some crucial features as following:<br />
1. Wood can crack during the drying process. It does not mean worsen quality, so the guarantee is<br />
not valid. When the humidness increases, chaps will disappear.<br />
2. A couple of weeks after the construction work, wooden details will undergo adaptation for new<br />
conditions. If necessary, the door has to be f ixed once more. Ultraviolet rays (solar rays) can cause<br />
the change of wood colouring.<br />
Air circulation<br />
For the best function of your grill set and f irm air circulation, the air approach needs to be assured<br />
from side.<br />
Schematic air circulation (Cross-section<br />
of grill house/groundwork)<br />
For the best function of your grill set,<br />
the air approach is essential!<br />
Smoke<br />
collector<br />
set<br />
Grill set<br />
± 0.00<br />
Concrete base, grit<br />
or paving<br />
Air pipe has been installed into<br />
groundwork. Diameter 15 cm<br />
2
Groundwork<br />
Properly constructed base is essential, considering durability and functionality of your <strong>Grillkota</strong>.<br />
Groundwork should be built according to scheme below.<br />
Tools<br />
You will need following tools for installation work: Backsaw, screwdriver, stepladder, measuring tape,<br />
square, spirit level, drill/battery screwdriver, carpet knife, pincers, steel hammer or rubber mallet.<br />
3
Specif ication of details for installation steps 1-9<br />
No.<br />
Description, dimensions<br />
about (mm)<br />
1 Bottom detail<br />
(1854 x 94 x 44)<br />
2 Wall detail with open window<br />
(1880 x 1335)<br />
Detail code Quantity Detail<br />
1090014200 6<br />
109001210X 3<br />
3 Wall detail, entire<br />
(1880 x 1335)<br />
109001110X 2<br />
4 Wall detail, door<br />
(1880 x 1335)<br />
109001310X 1<br />
5 Outside corner detail<br />
(1340 x 94 x 94)<br />
1090083100 6<br />
6 Roof support<br />
(382 x 110 x 23)<br />
1090083200 12<br />
7 Roof support belt, long 1090084100 5<br />
(2047 x 193)<br />
8 Roof support belt, short 1090084200 2<br />
(625 x 193)<br />
9 Corner shelf, big 1090085200 2<br />
590/340/340<br />
10 Corner shelf, small 1090085100 4<br />
320/180/180<br />
11 Roof detail, entire 1090X21100 5<br />
12 Roof detail, door 1090X21200 1<br />
13 Veneer detail covered, long<br />
(2200 x 250)<br />
14 Veneer detail covered right<br />
short, (665 x 250)<br />
14 Veneer detail covered left<br />
short, (665 x 250)<br />
1090X23100 5<br />
1090X23200 1<br />
1090X23300 1<br />
4
No. Description, dimensions<br />
about (mm)<br />
15 Door with doorposts<br />
(1600 x 800)<br />
Detail code Quantity Detail<br />
1090088300 1<br />
16 Door side slat<br />
(1635 x 335)<br />
1090086100 2<br />
Main positional scheme with windows, door and seating boards<br />
Window details can be installed differently<br />
Seating board<br />
Seating board<br />
Grill<br />
Seating board<br />
Window detail, different<br />
installation possibilities<br />
Seating board<br />
Seating board<br />
Window detail, different installation<br />
possibilities<br />
Door<br />
5
Start with installation<br />
1. Bottom details<br />
Take six bottom details (No. 1) and set them on the ground as shown below. Fix all corners with two<br />
5 x 80 woodscrews. Check after f ixing the bottom boards if the diagonal lines are even!<br />
2. <strong>Installation</strong> of walls<br />
Fix the walls onto bottom details. Give special attention to all corners gaining the same altitude. Fix<br />
corners with six 5 x 80 woodscrews.<br />
Wall details must reach over the edge of bottom<br />
boards.<br />
Wall details must be f ixed to each other with<br />
woodscrews from outside. Every corner requires<br />
six screws altogether.<br />
View from outside<br />
Wall detail<br />
Woodscrew 5 x 80<br />
Bottom detail<br />
Attention!<br />
Please be careful to f it the abutments<br />
properly. Then you will not have further<br />
problems with roof installation.<br />
Door details will be last to settle in an indicated<br />
position.<br />
6
3. Preparing outside corner details<br />
You need outside corner details (No. 5) and roof supports (No. 6) for this particular installation task.<br />
Fix the roof supports to outside corner detail. Use 5 x 80 woodscrews.<br />
No. 6<br />
No. 5<br />
Put the upper edges of<br />
roof support to the same<br />
line with outside corner<br />
detail from outside.<br />
Fix them with 5 x 80<br />
woodscrews.<br />
View from top.<br />
You have to prepare<br />
similarly six outside<br />
corners altogether.<br />
4. Fixing outside corner details<br />
Now f ix outside corner details, prepared during the installation step No. 3, to wall beams with screws<br />
from outside. The outside corner’s edge must be exactly on the same line with wall detail’s upper<br />
edge!<br />
Wall detail<br />
Outside corner<br />
View from top. Outside corner<br />
will be f ixed to wall with screws<br />
from outside.<br />
5 x 80 screws<br />
7
5. Roof support belt / roof details<br />
Take devices No 7 and 8. Lift the roof support belt up to wall’s uppermost log. Before f ixing it with<br />
screws, the edge should be straightened properly. Ensure that the belt’s edges will be on the same<br />
line with wall details from inside.<br />
First, install all roof support<br />
belts up to wall’s uppermost<br />
log, straighten the position and<br />
f ix with 5 x 80 woodscrews from<br />
every corner.<br />
Roof support belt<br />
5 X No. 7 2 X No. 8<br />
Ensure that inner sides of the<br />
belts will be exactly on the same<br />
line and against one another.<br />
Before f ixing them be sure that<br />
the diagonal lines will be even!<br />
Fix roof support belts with four<br />
5 x 80 screws to wall/corner slat<br />
from every corner.<br />
6. Installing the corner shelves.<br />
Fix the shelves with screws as shown on the picture. There are different sizes: you can f ind two bigger<br />
corner shelves and four smaller ones.<br />
We recommend drilling the holes beforehand to avoid chaps in wooden shelves.<br />
Use two 5 x 80 woodscrews<br />
for every corner<br />
shelf.<br />
No. 10, corner<br />
shelf (small)<br />
No. 9,<br />
corner shelf<br />
(big)<br />
8
7. Installing roof details<br />
You need 3 or 4 people for installation of roof details. Put the stepladder inside the grill house; 2 people<br />
can stand on it and hold roof details in necessary position.<br />
First, install roof detail left from the door and go on with installation clockwise. Roof details will be f ixed<br />
with screws to roof support belts from below. Use three 5 x 80 screws for every roof detail. Fastening<br />
spots should be within equal distances along the wall.<br />
Fix roof detail with screws to<br />
roof support belt from below.<br />
You will need three 5 x 80<br />
screws.<br />
Attention!<br />
Ensure that the edge of roof<br />
detail will be exactly in the<br />
groove.<br />
When three roof details have<br />
been placed, they will be f ixed<br />
with screws to each other from<br />
inside as well. 5 x 80 screws<br />
for fastening should be placed<br />
at equal distances from each<br />
other.<br />
Fasten roof details with the help<br />
of screws to each other.<br />
Install all roof details as required. Finish with roof detail above the door.<br />
9
8. Cuts in door and roof traverses<br />
Both traverses should be cut with a backsaw. First saw up the wall beam and after that the roof beam.<br />
To be sure sawing wood precisely, mark cutting line with the help of pen and measuring tape.<br />
Cut through the door traverse.<br />
Cutting line goes through cutting<br />
point in same direction as<br />
sawing!<br />
Cut through the roof traverse.<br />
Cutting line goes through cutting<br />
point in same direction as<br />
sawing!<br />
Door and roof traverses have not<br />
taken away yet.<br />
Finally the cut to the bottom of<br />
roof detail will be made, as shown<br />
on the picture (demarcation).<br />
Roof traverse has been<br />
removed.<br />
Wall traverse has been<br />
removed.<br />
Doorframe (The installation of<br />
doorframe follows below.)<br />
8A. <strong>Installation</strong> of covered veneer details<br />
Lay the veneer details out to roof details. Fix them to roof details with short screws from above. For<br />
this installation step you will need f ive details of No. 13 and two details of No. 14.<br />
10
9. <strong>Installation</strong> of doorframe<br />
Take the door out of frame. Put the frame into the doorway. Now you have to straighten the frame so<br />
that it will be on the same line with curvature of wall beams from outside. After that the frame will be<br />
levelled with the help of spirit level both horizontally and vertically. Use setting screws from product<br />
package. Use four screws total.<br />
Inner side<br />
The outer<br />
surface<br />
Doorframe<br />
Convexprof<br />
iled<br />
wall beam<br />
Attention!<br />
The<br />
doorframe<br />
should be<br />
on the same<br />
line with<br />
curvature<br />
of wall<br />
beams from<br />
outside.<br />
Fasten the doorframe to wall<br />
beams with screws from side.<br />
10. Installing door side slats<br />
Install both door side slats from outside against the doorframe and f ix them to roof details with screws<br />
from side. Then side slats will be fastened from inside the house. We recommend drilling holes<br />
beforehand to avoid chaps in wooden details.<br />
Fasten side slats to<br />
bottoms of roof details<br />
from both sides.<br />
Fix both side slats to<br />
wall beams also from<br />
inside.<br />
11
No. Description, dimensions<br />
about (mm)<br />
17 Small roof detail, left<br />
(1100 x 880 x 465)<br />
Detail code Quantity Detail<br />
1090X71500 1<br />
18 Small roof detail, right<br />
(1100 x 880 x 465)<br />
1090X71400 1<br />
19 Roof bottom<br />
(850 x 540)<br />
1090071300 1<br />
20 Front covering slat<br />
(850 x 94)<br />
21 Front covering slat<br />
(850 x 94)<br />
22 Covered triangle<br />
(846 x 470)<br />
1090071604 1<br />
1090071604 1<br />
1090071100 1<br />
23 Lower edge slat<br />
(440 x 70)<br />
24 Lower edge slat<br />
(440 x 70)<br />
25 Support triangle<br />
(1061 x 530)<br />
1090071804 1<br />
1090071804 1<br />
1090071200 1<br />
26 Uncovered triangle<br />
(820 x 454)<br />
1090071900 1<br />
27 Wind veneer, (570 x 33) 1090071700 2<br />
12
11. Preparing small roof<br />
Roof needs f irst to be put together, then installed. Pay attention to where some detail should be placed.<br />
Fix the details with wood screws included.<br />
Small roof detail, left (No. 17)<br />
Small roof detail, right (No. 18)<br />
Roof bottom (No 19)<br />
Front covering slat (No. 20)<br />
Front covering slat (No. 21)<br />
Lower edge slat (No. 23)<br />
Lower edge slat (No. 24)<br />
Covered triangle (No 22)<br />
Support triangle (No. 25)<br />
Wind veneer (No<br />
27)<br />
1. Take roof bottom (No 19) and place it to the ground, bottom up. Then f ix together details No. 22 and<br />
No. 26. Fasten all details with the appropriate screws.<br />
Covered triangle (No. 22)<br />
Roof bottom (No. 19)<br />
Uncovered triangle (No. 26)<br />
2. Put both roof details (No. 17 and 18) to attic, f ix them with appropriate screws. Residual details,<br />
for example details No. 20, 23, 27 etc, will be placed into positions shown above and fastened with<br />
screws.<br />
Small roof detail<br />
(No. 17 and 18)<br />
1 support triangle<br />
(No. 25)<br />
13
Now install the constructed roof detail to door side slats and fasten with screws. We recommend drilling<br />
holes beforehand to avoid chaps in door side slats. Finally the roof detail will be f ixed from inside to<br />
roof detail and wall with screws. Use 5 x 80 woodscrews.<br />
Specif ication of details for installation steps 12-16<br />
No. Description, dimensions<br />
about (mm)<br />
28 Roof covering<br />
(1005 x 320)<br />
29 Connection cover strip<br />
(1005 x 250)<br />
30 Door side cover strip<br />
(1200 x 250)<br />
31 Door side cover strip (for<br />
connecting roof and door roof)<br />
(600 x 250)<br />
Detail code Quantity Detail<br />
1092X23400 1,5<br />
pack of<br />
sheets<br />
2090X23600 1,5<br />
pack of<br />
sheets<br />
1090X23500 2<br />
1090X23500 2<br />
32 Covered pipe detail 1090X81100 1<br />
33 Metal hut 10900245XX 1<br />
34 Metal top 10900246XX 1<br />
34A Roof inner collar 80001115XX 1<br />
12. Covering door side<br />
Take door side cover strip No. 30 and push it under the roof covering material. If already installed roof<br />
covering sheets should glue to roof details, pull them off cautiously. Use roof pins for fastening.<br />
Door side cover strip will be<br />
pushed up to the end.<br />
14
13. Roof / Finishing roof by attic<br />
Door side cover strip No. 31 should be placed as shown on picture to connect roof detail and door<br />
roof detail properly. Then the rest of sheets will be installed.<br />
Fix roof covering with roof pins.<br />
14. Covering roof with sheets<br />
Now start with f inal installation of roof. Place sheets as shown on photos below. Use roof pins<br />
included.<br />
Attention! Do not forget to pull away the plastic strips from behind the sheets. Otherwise the sheets<br />
cannot be glued to each other.<br />
Lift the sheet up, push the next<br />
sheet under the f irst one and<br />
straighten properly.<br />
Fasten the sheets with roof pins<br />
included. Every sheet requires<br />
f ive pins.<br />
Pay attention to sheet sides,<br />
upper sheet should cover lower<br />
one sufficiently. Sheet edges<br />
should be on the same line with<br />
the edge of eave.<br />
Side surplus should be cut off<br />
with carpet knife lengthwise<br />
folding.<br />
If sheets are installed properly,<br />
the result will be as shown<br />
above.<br />
15
15. Covering gable connections<br />
Next, connection cover strips will be placed, to cover six roof details connection areas (gables). Take<br />
one cover strip and fold it together along the perforation line. This way you will get cover strips one at<br />
a time for covering connection areas.<br />
Fold cover strips lengthwise the perforation line and pull apart from each other. This way you will get<br />
33 x 25 cm cover strips for covering connection areas.<br />
Start covering roof by the eave. We recommend using auxiliary line in order to place all cover strips<br />
properly up to the top. It will be much easier to install cover strips along this line.<br />
Auxiliary line<br />
Pull off the<br />
plastic!<br />
Distance<br />
Place the cover strips with 20 cm pitch and f ix with roof pins. Cover strips should be pinned from<br />
corners at sight. This particular installation step will be continued until up to the top.<br />
Instruction for installation of roof covering material you can find in the roof covering packet.<br />
Attention! Do not forget to pull away the plastic strips from behind the sheets. Otherwise the sheets<br />
cannot be glued to each other.<br />
<strong>Installation</strong> work with gables is<br />
completed.<br />
Finally lower surplus over the<br />
roof edge should be cut off with<br />
carpet knife.<br />
16
16. Covering small roof<br />
Next, the upper edge of door roof will be covered. You need same kind of cover strips as in installation<br />
step 15. Cover strips should be tiled scaly and pinned from corners.<br />
Cover strips should be pinned<br />
from corners with the help of<br />
roof pins.<br />
17. Covering / covered pipe detail<br />
Take detail No 32; install it up to the roof and f ix from inside, through the scaffold, with six appropriate<br />
screws.<br />
Pipe detail will be straightened<br />
into the position.<br />
18. Covering / Metal top<br />
Pipe detail will be fixed with<br />
screws from inside.<br />
Take metal hut and metal top. Install metal hut onto the roof spire. Now the smoke collector pipe will<br />
be pushed down through the metal hut. Then the metal hut and its top will be straightened.<br />
If all details have been installed properly, metal top will be f ixed to the roof spire. After that metal top<br />
can be f ixed to metal hut.<br />
View from inside of installed<br />
metal hut.<br />
17
Specif ication of details for installation steps 19-22<br />
No. Description, dimensions Detail code Quantity Detail<br />
about (mm)<br />
35 Roof inner slat (2350 x 70) 1090051104 6<br />
36 Slide tracks for trap 1090082200 2<br />
(335 x 70)<br />
37 Trap 1090082100 1<br />
38 Filling board for the roof, long<br />
(270 x 150 x 130)<br />
39 Filling board for the roof, short<br />
(167 x 130 x 25)<br />
40 Door slat<br />
(1470 x 70)<br />
41 Door slat<br />
(300 x 70)<br />
42 Door slat<br />
(1100 x 70)<br />
43 Door slat<br />
(825 x 70)<br />
1090051900 2<br />
1090052100 2<br />
1090051404 2<br />
1090051804 2<br />
1090051504 1<br />
1090051704 1<br />
19. Inner decoration / Roof inner slats<br />
Begin with inner decoration. First, install roof inner slats (No. 35). Fastening spots with four screws<br />
should be within equal distances along all the length.<br />
Detail No. 35<br />
Six details<br />
Roof inner slats<br />
After fastening the inner slats, place roof inner collar<br />
around the smoke collector pipe. Fix it with selfdrilling<br />
screws to roof.<br />
18
20. Trap<br />
You need two slide tracks (No. 36) and trap (No. 37). Install details as shown below.<br />
Slide tracks<br />
21. Filling boards<br />
First, cover openings from left and right side of the door. Wooden details have already been cut into<br />
appropriate length. Place them and f ix with woodscrews.<br />
No. 38<br />
No 39<br />
22. Door slats<br />
Set door slats in following order, as shown below.<br />
1. Upper door slat (No. 43). 2. Upper door slat (No. 42).<br />
3. Door slat aside (No. 40).<br />
4. Door slat aside (No. 41).<br />
19
Specif ication of details for installation steps 23-24<br />
No. Description, dimensions Detail code Quantity Detail<br />
about (mm)<br />
44 Console 1090042100 10<br />
46 Seating board long, cone 1090041100 3<br />
(1765 x 193)<br />
47 Seating board short, cone 1090041200 3<br />
(1520 x 193)<br />
48 Seat widening (1520 x 193) 1090041200 1<br />
49 Seating board rhomb 1090041300 4<br />
(1767 x 193)<br />
50 Seat widening 1090041300 2<br />
(1767 x 193)<br />
51 Seat widening leg 1090042400 6<br />
52 Floor detail 1090031300 6<br />
53 Floor detail, small 1090031200 1<br />
23. Seat consoles<br />
First, take consoles and install them into four corners onto bottom details. Fix them with woodscrews<br />
to wall details. Use three screws for each console.<br />
Nr. 44 x 10<br />
20
24. Installing seat details<br />
Set seat details onto the consoles as shown below. Fix them with two screws. Pay attention that seat<br />
boards Nr. 48 and 50 can be fold together. This means that every board has two hinges and two<br />
support legs on lower side.<br />
21
26. <strong>Installation</strong> of smoke collector set<br />
Now install the smoke collector. It should be fastened with three metal chains.<br />
Fastening with short iron<br />
screws.<br />
27. <strong>Installation</strong> of small details<br />
All big details have been installed by now. Only small details left, as knobs for door and windows,<br />
wooden f loor etc.<br />
22
27. Colouring and impregnation / avoiding mouldering<br />
Timber is part of the ecological circulation. Nowadays the circulation has been suspended because of<br />
using timber as constructing material. For that reason we have a task to protect wood and take care<br />
of recycling it for further treatment. This means the defence against impairments inf licted by moisture<br />
and solar rays, also the defence against biological damages – mildewing, moulding and rotting.<br />
You will have more pleasure of your <strong>Grillkota</strong>, when you impregnate its wood with impregnation liquids.<br />
For the longer lifespan of your grill house you should primarily impregnate the f loor of <strong>Grillkota</strong>. Use<br />
only environmentally approved products in your garden. In that way you will avoid damaging soil,<br />
plants or environment.<br />
For the best durability of wooden details we recommend you to impregnate timber as following:<br />
Impregnating coat for conifers<br />
Wood glaze<br />
Impregnation<br />
Follow-up treatment<br />
Use impregnating coat for conifers when you treat timber for the<br />
f irst time, to protect wooden details against weather conditions,<br />
rotting, pests and moulding.<br />
All available wood glazes, also thick ones, can be used to<br />
<strong>Grillkota</strong>.<br />
Follow exactly the general instructions on jar label about drying<br />
period, cleaning the tools etc.<br />
Depending on location, impregnation should be repeated every<br />
three to four years.<br />
Detailed information will be available in our special stores.<br />
All dimensions are approximate. Small differences or manufacturer changes could occur.<br />
Changes and mistakes can come true without contradicting proven facts, laws or circumstances.<br />
23