Create successful ePaper yourself
Turn your PDF publications into a flip-book with our unique Google optimized e-Paper software.
<strong>Celica</strong><br />
Brief guide
Brief guide<br />
Index<br />
Introducing <strong>Celica</strong> .................................................. 2<br />
Lock system............................................................ 3<br />
Seats and seat belts ................................................ 4<br />
Bonnet and fuel tank opening ................................ 5<br />
Dashboard.............................................................. 6<br />
Lights and wipers ................................................... 9<br />
Heating and A/C control ........................................ 10<br />
Power windows ...................................................... 11<br />
Gear change........................................................... 11<br />
Tyre change.............................................................12<br />
Service.....................................................................12<br />
1
Introducing <strong>Celica</strong><br />
Congratulations on selecting a new<br />
<strong>Celica</strong>!<br />
Now you can begin enjoying this outstanding vehicle<br />
immediately with this brief guide to basic vehicle<br />
operations.<br />
This brief guide contains a summary description of<br />
basic operations so that you can locate and use the<br />
vehicle’s main equipment and features, quickly and<br />
easily.<br />
This brief guide does not replace or substitute the<br />
Owner’s Manual which you will find in the vehicle’s<br />
glove compartment. It is important that you review<br />
the full Owner’s Manual as well as any further<br />
supplementary manuals. This will allow you to<br />
familiarise yourself with the operating and safety<br />
instructions and to handle the vehicle within its<br />
limitations.<br />
Your dealership and the entire staff of <strong>Toyota</strong> wish<br />
you many years of enjoyable driving in your new<br />
<strong>Celica</strong>.<br />
PS: All information contained in this Brief Guide is current at the time of<br />
printing. <strong>Toyota</strong> reserves the right to make changes at any time without notice.<br />
Think before you drive !<br />
2<br />
Fit child seat<br />
in the back<br />
Stow loose objects<br />
safely in the boot<br />
Adjust seat and<br />
head restraint<br />
10 seconds... that can save your life<br />
European Road Safety Campaign<br />
with the support of the European Commission<br />
Fasten front and<br />
rear seatbelts<br />
at all times
Lock system<br />
Key number plate<br />
Engine immobiliser system<br />
Your key number is shown on<br />
the plate. If you should lose<br />
your keys or if you need<br />
additional keys, duplicates can<br />
be made using the key number.<br />
The engine immobiliser system<br />
is a theft prevention system. The<br />
engine will start, only when the<br />
electronic code in the chip<br />
inside the key corresponds to<br />
the registered ID code for the<br />
vehicle.<br />
Wireless remote control Locking operation. Your vehicle<br />
has a wireless remote control<br />
system that can lock or unlock<br />
all the side doors and back door<br />
from a distance within<br />
approximately 1m (3ft) of the<br />
vehicle.<br />
Double locking. All new <strong>Celica</strong><br />
models have high security<br />
double locks. To double lock the<br />
doors, push the lock button on<br />
the key twice.<br />
Locking operation<br />
Unlocking operation. To lock<br />
and unlock all the side doors<br />
and back door, push the<br />
switches of the key slowly and<br />
securely.<br />
Locking wheel nuts. New<br />
<strong>Celica</strong> vehicles fitted with alloy<br />
wheels are also specified with<br />
locking wheel nuts.<br />
TVSS Alarm*. The <strong>Celica</strong> is<br />
fitted with a <strong>Toyota</strong> Vehicle<br />
Unlocking operation<br />
Security System for the long<br />
term benefit of your car.<br />
(selected models)<br />
International Security Register.<br />
Your new <strong>Celica</strong> has a unique<br />
number etched into all window<br />
glass. The ISR operates a 24<br />
hour service which can provide<br />
peace of mind for your<br />
purchase.<br />
*Category 1 approved<br />
3
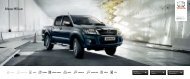
Seats and seat belts<br />
Seats<br />
Adjusting front seats:<br />
1. Seat position adjusting lever<br />
Pull the lever up. Then slide the<br />
seat to the desired position with<br />
slight body pressure and release<br />
the lever.<br />
2. Seat back angle adjusting lever<br />
Lean forward and pull the lever<br />
up. Then lean back to the<br />
desired angle and release the<br />
lever.<br />
3. Seat cushion angle adjusting<br />
knob<br />
Turn the knob either way.<br />
Moving passenger’s seat for rear<br />
seat entry<br />
For easy access to the rear seat,<br />
after seat.<br />
1. Lift the seatback angle adjusting<br />
lever or press the pedal behind<br />
the seatback.<br />
The seat will slide forward.<br />
2. Move the seat to the front-most<br />
position.<br />
After passengers are in, lift up<br />
the seatback and return the seat<br />
until it locks.<br />
Fold-down rear seat<br />
Pull the lock release button and fold<br />
down the seatback.<br />
Each seatback may be folded<br />
separately (50 : 50 split).<br />
This will enlarge the luggage<br />
compartment as far as the front<br />
seatbacks.<br />
Seat belts<br />
Adjust the seat as needed (front<br />
seats only) and sit up straight and<br />
well back in the seat. To fasten your<br />
belt, pull it out of the retractor and<br />
insert the tab into the buckle.<br />
4
Bonnet and fuel<br />
tank opening<br />
Bonnet<br />
To open the bonnet:<br />
1. Pull the bonnet lock<br />
release lever. The bonnet<br />
will spring up slightly.<br />
2. In front of the vehicle,<br />
pull up the auxiliary catch<br />
lever and lift the bonnet.<br />
3. Hold the bonnet open by<br />
inserting the support rod<br />
into the slot.<br />
Fuel tank cap<br />
To open the fuel tank door,<br />
pull the lever up.<br />
To remove the fuel tank cap,<br />
turn the cap slowly counterclockwise,<br />
then pause<br />
slightly before removing it.<br />
After removing the cap,<br />
hang the tether as shown in<br />
the illustration.<br />
Fuel type & tank capacity<br />
Fuel type: unleaded petrol<br />
with a RON of 95 or higher.<br />
Tank capacity: 55 litres.<br />
5
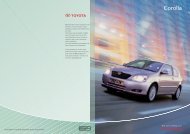
Dashboard<br />
Instrument panel overview<br />
1. Clock<br />
2. Emergency flasher switch<br />
3. Headlight and turn signal<br />
switch, and rear fog<br />
and/or front fog light<br />
switch<br />
4. Wiper and washer<br />
switches<br />
5. Instrument panel light<br />
control knob<br />
6. Window lock switch<br />
7. Headlight beam level<br />
control switch<br />
8. Traction control system<br />
off switch*<br />
6<br />
9. Engine immobiliser<br />
system indicator light<br />
10. Ignition switch<br />
11. Tilt steering wheel lock<br />
release lever<br />
12. Ashtray<br />
13. Cigarette lighter<br />
14. Rear window and outside<br />
rear view mirror defogger<br />
switch<br />
15. Air conditioning controls<br />
16. Car audio<br />
17. Auxiliary box<br />
* on <strong>Celica</strong> T Sport only
Tilt steering wheel<br />
To change the steering wheel<br />
angle, hold the steering wheel,<br />
push the lock release lever, tilt<br />
the steering wheel to the desired<br />
angle and return the lever to its<br />
original position.<br />
7
Instrument cluster overview<br />
1. Tachometer<br />
2. Service reminder indicators<br />
and Indicator lights<br />
3. Speedometer<br />
4. Engine coolant temperature<br />
gauge<br />
Indicator symbols on the instrument panel<br />
8<br />
Brake system<br />
warning light<br />
Discharge<br />
warning light<br />
Low engine oil<br />
pressure warning<br />
light<br />
Malfunction<br />
indicator lamp<br />
Low fuel level<br />
warning light<br />
Driver’s seat belt<br />
reminder light<br />
5. Odometer and two trip<br />
meters<br />
6. Fuel gauge<br />
7. Trip meter reset knob<br />
Front passenger<br />
seat belt<br />
reminder light<br />
Anti-lock brake<br />
system warning<br />
light<br />
SRS warning light<br />
Open door<br />
warning light<br />
Turn signal<br />
indicator lights<br />
Tail light indicator<br />
light<br />
Headlight high<br />
beam indicator<br />
light<br />
Rear fog light<br />
indicator light<br />
Front fog light<br />
indicator light<br />
Automatic<br />
headlight leveling<br />
system warning<br />
light*<br />
Vehicle stability<br />
control system and<br />
traction control<br />
system warning<br />
light*<br />
Slip indicator light*<br />
Traction control<br />
system off<br />
indicator light*<br />
* on <strong>Celica</strong> T Sport only
Lights and wipers<br />
Headlights<br />
Windscreen wipers and<br />
washer<br />
Rear window wiper and<br />
washer<br />
To turn on the following lights:<br />
twist the headlight/turn signal lever<br />
knob.<br />
Position 1: Parking, tail, license plate<br />
and instrument panel lights<br />
Position 2: Headlights and all of the<br />
above.<br />
High-low beams.<br />
For high beams, turn the headlights on<br />
and push the lever away from you<br />
(position 1). Pull the lever toward you<br />
(position 2) for low beams.<br />
Flashing the high beam headlights<br />
(position 3). Pull the lever all the way<br />
back. The high beam headlights turn off<br />
when you release the lever.<br />
To turn on the windscreen wipers,<br />
move the lever to the desired setting.<br />
Position 0: off<br />
Position 1: mist<br />
Position 2: intermittent<br />
Position 3: slow<br />
Position 4: fast<br />
To spray washer fluid, pull the lever<br />
towards you.<br />
To turn on the rear window wiper,<br />
twist the lever knob upwards.<br />
Position 1: Intermittent<br />
Position 2: Normal<br />
Position 3,4: Washer fluid<br />
9
Heating and<br />
A/C control<br />
Manual controls (Standard fitment)<br />
1. Air flow selector<br />
2. Air intake selector<br />
3. Temperature selector<br />
1. Air flow selector<br />
2. Air intake selector<br />
3. Temperature selector<br />
4. “AUTO” button<br />
5. “OFF” button<br />
10<br />
4. Fan speed selector<br />
5. “A/C” button<br />
6. Rear window defogger<br />
switch<br />
Automatic controls (standard on <strong>Celica</strong> 140 bhp with<br />
Premium Pack and <strong>Celica</strong> T Sport)<br />
6. Fan speed selector<br />
7. “A/C” button<br />
8. Rear window defogger<br />
switch
Power windows<br />
Gear change<br />
The windows can be operated<br />
with the switch on the center<br />
console.<br />
The ignition key must be in the<br />
“ON” position.<br />
Operating the driver’s window<br />
Use the switch on the driver’s<br />
side of the center console.<br />
Normal operation: The window<br />
moves as long as you hold the<br />
switch.<br />
Automatic operation: Push the<br />
switch completely down or pull<br />
it completely up, and then<br />
release it. The window will fully<br />
open or close.<br />
To stop the window partway,<br />
lightly move the switch in the<br />
opposite direction and then<br />
release it. The driver’s window<br />
will also close via a one-touch<br />
operation but has a built-in antitrap<br />
facility, where it will<br />
automatically retract if it detects<br />
a foreign subject ‘trapped’<br />
between the window and a<br />
door frame.<br />
Operating the front<br />
passengers window<br />
Use the switch on the<br />
passenger’s side of the center<br />
console.<br />
The window moves as long as<br />
you hold the switch.<br />
Manual transmission<br />
The shift pattern is as shown.<br />
A buzzer will sound when you<br />
shift the gear into “R” (reverse).<br />
11
Tyre change<br />
Required tools and spare tyre<br />
1. Jack<br />
2. Wheel nut wrench<br />
3. Tool bag<br />
4. Spare tyre<br />
5. Jack handle<br />
Positioning the jack<br />
Position the jack at the correct<br />
jack point as shown.<br />
Raising your vehicle<br />
After making sure that no one is<br />
in the vehicle, raise it high<br />
enough so that the spare tyre<br />
can be installed.<br />
Service<br />
Warranty Maintenance<br />
12<br />
Comprehensive<br />
Warranty<br />
Corrosion<br />
perforation<br />
Years<br />
0 1 2<br />
3<br />
10 11<br />
12<br />
60,000 miles<br />
Each<br />
20,000/<br />
2 years<br />
miles/year<br />
Each<br />
10,000/<br />
1 year<br />
Intermediate<br />
(oil & filter change)<br />
Full<br />
Health<br />
& Safety<br />
CEL11-0502ENUK-03-00
CEL11-0502ENUK-03-00