66-2070R 07-09 Expedition Rear Install instructions.pdf - ReadyLift
66-2070R 07-09 Expedition Rear Install instructions.pdf - ReadyLift
66-2070R 07-09 Expedition Rear Install instructions.pdf - ReadyLift

Create successful ePaper yourself
Turn your PDF publications into a flip-book with our unique Google optimized e-Paper software.
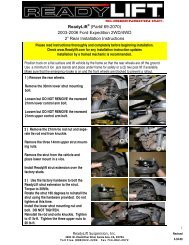
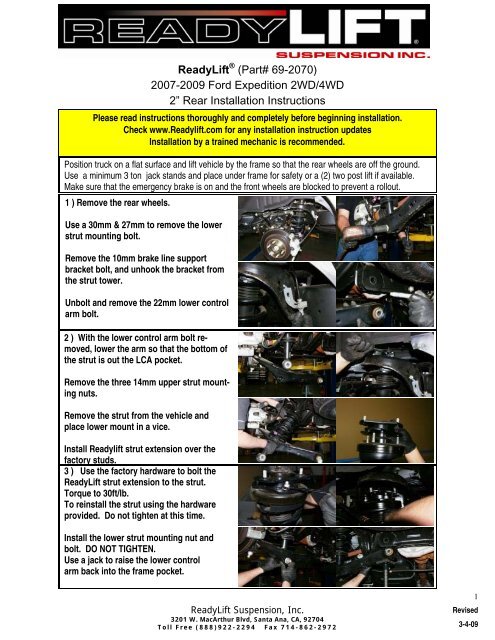
<strong>ReadyLift</strong> ® (Part# 69-2<strong>07</strong>0)<br />
20<strong>07</strong>-20<strong>09</strong> Ford <strong>Expedition</strong> 2WD/4WD<br />
2” <strong>Rear</strong> <strong>Install</strong>ation Instructions<br />
Please read <strong>instructions</strong> thoroughly and completely before beginning installation.<br />
Check www.Readylift.com for any installation instruction updates<br />
<strong>Install</strong>ation by a trained mechanic is recommended.<br />
Position truck on a flat surface and lift vehicle by the frame so that the rear wheels are off the ground.<br />
Use a minimum 3 ton jack stands and place under frame for safety or a (2) two post lift if available.<br />
Make sure that the emergency brake is on and the front wheels are blocked to prevent a rollout.<br />
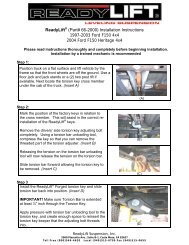
1 ) Remove the rear wheels.<br />
Use a 30mm & 27mm to remove the lower<br />
strut mounting bolt.<br />
Remove the 10mm brake line support<br />
bracket bolt, and unhook the bracket from<br />
the strut tower.<br />
Unbolt and remove the 22mm lower control<br />
arm bolt.<br />
2 ) With the lower control arm bolt removed,<br />
lower the arm so that the bottom of<br />
the strut is out the LCA pocket.<br />
Remove the three 14mm upper strut mounting<br />
nuts.<br />
Remove the strut from the vehicle and<br />
place lower mount in a vice.<br />
<strong>Install</strong> Readylift strut extension over the<br />
factory studs.<br />
3 ) Use the factory hardware to bolt the<br />
<strong>ReadyLift</strong> strut extension to the strut.<br />
Torque to 30ft/lb.<br />
To reinstall the strut using the hardware<br />
provided. Do not tighten at this time.<br />
<strong>Install</strong> the lower strut mounting nut and<br />
bolt. DO NOT TIGHTEN.<br />
Use a jack to raise the lower control<br />
arm back into the frame pocket.<br />
<strong>ReadyLift</strong> Suspension, Inc.<br />
3201 W. MacArthur Blvd, Santa Ana, CA, 92704<br />
Toll Free (888)922-2294 Fax 714-862-2972<br />
1<br />
Revised<br />
3-4-<strong>09</strong>
<strong>ReadyLift</strong> ® (Part# 69-2<strong>07</strong>0)<br />
20<strong>07</strong>-20<strong>09</strong> Ford <strong>Expedition</strong> 2WD/4WD<br />
2” <strong>Rear</strong> <strong>Install</strong>ation Instructions<br />
Please read <strong>instructions</strong> thoroughly and completely before beginning installation.<br />
Check www.Readylift.com for any installation instruction updates<br />
<strong>Install</strong>ation by a trained mechanic is recommended.<br />
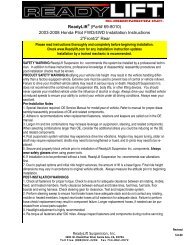
4 ) <strong>Install</strong> the lower control arm bolt and<br />
flag nut. Make sure that the tab of the nut<br />
locates into the hole in the frame when<br />
you tighten it down. Snug the bolt to 37<br />
lb-ft. Tighten the upper strut nuts to 30 lbft.<br />
You will need to relocate the brake line<br />
support bracket down. You will need to<br />
drill two new holes and tap the lower hole.<br />
<strong>Install</strong> the brake line support bracket in its<br />
new location.<br />
OE Holes<br />
New Holes<br />
5 ) Repeat steps 1-4 on opposite side.<br />
When completed, install both wheels onto<br />
the vehicle, lower the vehicle so that the<br />
weight of the vehicle is on the wheel and<br />
tires.<br />
Torque the lower arm to frame bolt to 221<br />
lb-ft.<br />
Torque the shock absorber lower bolt to<br />
350 lb-ft.<br />
Be sure to check that all fasteners are too<br />
factory specifications.<br />
<strong>ReadyLift</strong> Suspension, Inc.<br />
3201 W. MacArthur Blvd, Santa Ana, CA, 92704<br />
Toll Free (888)922-2294 Fax 714-862-2972<br />
2<br />
Revised<br />
3-4-<strong>09</strong>
<strong>ReadyLift</strong> ® (Part# 69-2<strong>07</strong>0)<br />
20<strong>07</strong>-20<strong>09</strong> Ford <strong>Expedition</strong> 2WD/4WD<br />
2” <strong>Rear</strong> <strong>Install</strong>ation Instructions<br />
Please read <strong>instructions</strong> thoroughly and completely before beginning installation.<br />
Check www.Readylift.com for any installation instruction updates<br />
<strong>Install</strong>ation by a trained mechanic is recommended.<br />
Wheel Alignment; a Certified Alignment Technician that is experienced with lifted vehicles is recommended<br />
to perform the alignment.<br />
*It is recommended that you have your vehicle’s alignment checked whenever installing suspension parts.<br />
*It is also recommended that you adjust your headlights whenever your vehicle’s ride height is altered.<br />
After <strong>ReadyLift</strong>® 69-2<strong>07</strong>0 Kit 22x9 +25offset on 35x12.50R22 Super Swamper Trxs STS Tires<br />
Vehicle Handling Warning<br />
Vehicles with larger wheels and tires will handle<br />
differently than stock vehicles.<br />
Take time to familiarize yourself with the<br />
handling of your vehicle.<br />
DRIVE SAFELY and WEAR YOUR<br />
SEATBELT.<br />
<strong>Install</strong>ation Warning<br />
Always wear proper safety equipment and use<br />
the correct tools when installing any suspension<br />
upgrade. Make sure vehicle is on a flat surface<br />
and you are using jack stands or a lift rated<br />
for the weight of the vehicle.<br />
Warning! This <strong>ReadyLift</strong> ® Kit is designed and engineered to lift and level a truck<br />
with no prior modifications. The use of this kit along with items such as rear lift<br />
blocks or spacers, add-a-leafs, airbags, suspension lifts, body lifts or any other type<br />
of lifting accessory shall be done at the vehicle owners risk and will void any and all<br />
warranties in effect or implied by <strong>ReadyLift</strong> ® .<br />
<strong>ReadyLift</strong> Suspension, Inc.<br />
3201 W. MacArthur Blvd, Santa Ana, CA, 92704<br />
Toll Free (888)922-2294 Fax 714-862-2972<br />
3<br />
Revised<br />
3-4-<strong>09</strong>