Quick Tips for Installing Vinyl Siding - The Vinyl Siding Institute
Quick Tips for Installing Vinyl Siding - The Vinyl Siding Institute
Quick Tips for Installing Vinyl Siding - The Vinyl Siding Institute

Create successful ePaper yourself
Turn your PDF publications into a flip-book with our unique Google optimized e-Paper software.
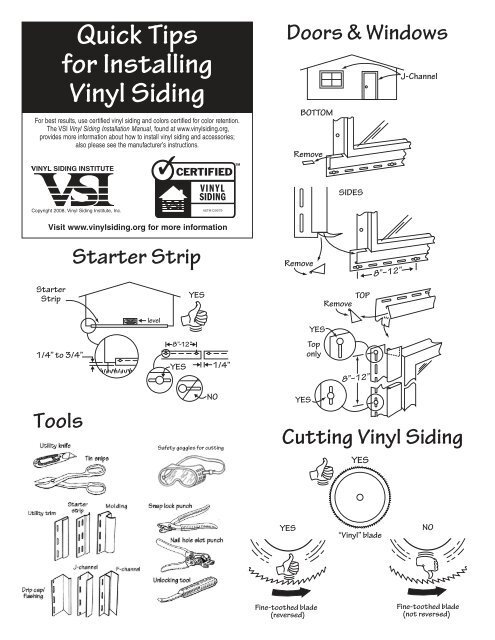
<strong>Quick</strong> <strong>Tips</strong><br />
<strong>for</strong> <strong>Installing</strong><br />
<strong>Vinyl</strong> <strong>Siding</strong><br />
Doors & Windows<br />
For best results, use certified vinyl siding and colors certified <strong>for</strong> color retention.<br />
<strong>The</strong> VSI <strong>Vinyl</strong> <strong>Siding</strong> Installation Manual, found at www.vinylsiding.org,<br />
provides more in<strong>for</strong>mation about how to install vinyl siding and accessories;<br />
also please see the manufacturer’s instructions.<br />
VINYL<br />
SIDING<br />
Copyright 2008, <strong>Vinyl</strong> <strong>Siding</strong> <strong>Institute</strong>, Inc.<br />
ASTM D3679<br />
Visit www.vinylsiding.org <strong>for</strong> more in<strong>for</strong>mation<br />
Starter Strip<br />
Tools<br />
Safety goggles <strong>for</strong> cutting<br />
Cutting <strong>Vinyl</strong> <strong>Siding</strong>
<strong>Installing</strong> Panels<br />
1. Fasten nails or other fasteners in the center of the nailing<br />
slot and make sure the fastener penetrates a minimum of<br />
3/4” into a nailable surface.<br />
YES<br />
NO<br />
Nailing<br />
1/4” Space at top of wall<br />
2. Do not drive the nail tight against the siding nail hem.<br />
3. Leave approximately 1/32” clearance (about the thickness<br />
of a dime) between the fastener head and the siding.<br />
4. Make sure that the panels and accessories move freely<br />
side-to-side when fastened.<br />
NO<br />
NO<br />
8”-12”<br />
5. Leave 1/4” clearance inside all receiving channels at all<br />
openings and stops <strong>for</strong> expansion and contraction.<br />
6. When panels overlap, make sure they overlap by 1” on<br />
the face of the panel.<br />
NO<br />
7. Overlap panels away from entrances and away from the<br />
point of greatest traffic.<br />
8. Do not face-nail through siding, except <strong>for</strong> the one nail<br />
needed to finish at top of a gable.<br />
Panel Alignment<br />
Locking Panels<br />
Finishing: