Installation Guide - Gossen
Installation Guide - Gossen
Installation Guide - Gossen

You also want an ePaper? Increase the reach of your titles
YUMPU automatically turns print PDFs into web optimized ePapers that Google loves.
Building with <strong>Gossen</strong>® Porch Board is similar to building with traditional tongue & groove materials. <strong>Installation</strong> must be compliant<br />
with local building codes and the installation guidelines below. <strong>Gossen</strong> Corporation accepts no liability or responsibility for the<br />
improper installation of this product. <strong>Gossen</strong> may not be suitable for every application and it is the sole responsibility of the<br />
installer to be sure that <strong>Gossen</strong> Porch board meets all requirements for the intended use. Since all installations are unique, it is<br />
also the installer’s responsibility to determine specific requirements for each Porch application. Refer to the “Factors to Consider”<br />
section. <strong>Gossen</strong> Corporation recommends that a licensed architect, engineer or local building official review all applications before<br />
installation. If you need further assistance, please call the DeckPro at 1-800-558-8984 or visit our website at www.gossencorp.com.<br />
General Information<br />
<strong>Gossen</strong> porch flooring is manufactured similarly to our <strong>Gossen</strong> deck board—solid core cellular PVC with no inconsistent organic<br />
fillers. Porch Board colors match <strong>Gossen</strong> Deck Board colors. The <strong>Gossen</strong> porch board can be installed in a covered or uncovered<br />
application however, drainage with a tongue and groove board is limited and should be taken into consideration. Recommended<br />
pitch for proper drainage is a minimum of 1/16” per linear foot away from the house. If replacing an existing porch floor, make sure<br />
all joists are structurally sound and free of nails.<br />
Tools Needed<br />
• Miter saw—using a 12” 60 tooth carbide tipped blade typically<br />
provides best results<br />
• Power drill/Pneumatic floor nailer<br />
• Miter-box<br />
• Carpenters square<br />
• Blue chalk line—red chalk lines will stain boards’ surface<br />
• Safety glasses<br />
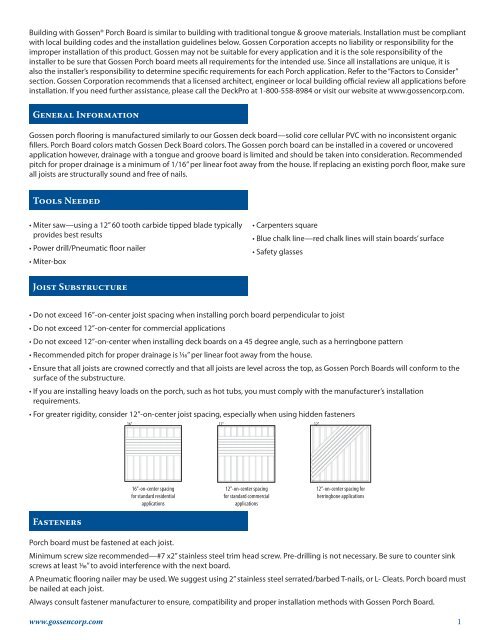
Joist Substructure<br />
• Do not exceed 16”-on-center joist spacing when installing porch board perpendicular to joist<br />
• Do not exceed 12”-on-center for commercial applications<br />
• Do not exceed 12”-on-center when installing deck boards on a 45 degree angle, such as a herringbone pattern<br />
• Recommended pitch for proper drainage is 1/16” per linear foot away from the house.<br />
• Ensure that all joists are crowned correctly and that all joists are level across the top, as <strong>Gossen</strong> Porch Boards will conform to the<br />
surface of the substructure.<br />
• If you are installing heavy loads on the porch, such as hot tubs, you must comply with the manufacturer’s installation<br />
requirements.<br />
• For greater rigidity, consider 12”-on-center joist spacing, especially when using hidden fasteners<br />
16”-on-center spacing<br />
for standard residential<br />
applications<br />
12”-on-center spacing<br />
for standard commercial<br />
applications<br />
12”-on-center spacing for<br />
herringbone applications<br />
Fasteners<br />
Porch board must be fastened at each joist.<br />
Minimum screw size recommended—#7 x2” stainless steel trim head screw. Pre-drilling is not necessary. Be sure to counter sink<br />
screws at least 1/16” to avoid interference with the next board.<br />
A Pneumatic flooring nailer may be used. We suggest using 2” stainless steel serrated/barbed T-nails, or L- Cleats. Porch board must<br />
be nailed at each joist.<br />
Always consult fastener manufacturer to ensure, compatibility and proper installation methods with <strong>Gossen</strong> Porch Board.<br />
www.gossencorp.com 1