Deck & Porch Installation Guide - Gossen
Deck & Porch Installation Guide - Gossen
Deck & Porch Installation Guide - Gossen

Create successful ePaper yourself
Turn your PDF publications into a flip-book with our unique Google optimized e-Paper software.
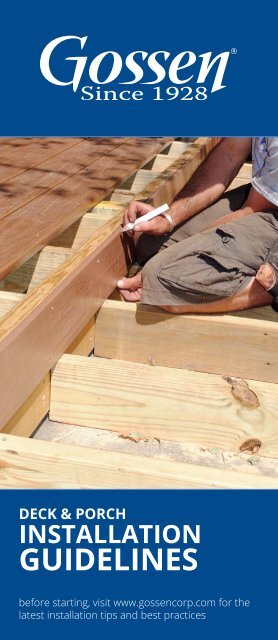
DECK & PORCH<br />
INSTALLATION<br />
GUIDELINES<br />
before starting, visit www.gossencorp.com for the<br />
latest installation tips and best practices
DECKING INSTALLATION<br />
Building with <strong>Gossen</strong>® <strong>Deck</strong>ing is similar to building<br />
with traditional decking materials. <strong>Installation</strong><br />
must be compliant with local building codes<br />
and the <strong>Installation</strong> <strong>Guide</strong>lines below. <strong>Gossen</strong><br />
Corporation accepts no liability or responsibility for<br />
the improper installation of this product. <strong>Gossen</strong><br />
may not be suitable for every application, and it<br />
is the sole responsibility of the installer to be sure<br />
that <strong>Gossen</strong> <strong>Deck</strong>ing meets all requirements for<br />
the intended use. Since all installations are unique,<br />
it is the installer’s responsibility to determine<br />
specific requirements for each <strong>Deck</strong> application.<br />
Refer to the “Factors to Consider” section. The<br />
following of <strong>Installation</strong> <strong>Guide</strong>lines differing from<br />
<strong>Gossen</strong>’s <strong>Guide</strong>lines will void the Warranty. <strong>Gossen</strong><br />
Corporation recommends that a licensed architect,<br />
engineer or local building official review all<br />
applications before installation. If you need further<br />
assistance, please call us at 800-558-8984 or visit our<br />
website at www.<strong>Gossen</strong>Corp.com.<br />
TOOLS NEEDED<br />
• 100 tooth Circular or Miter saw using a<br />
carbide-tipped blade (The Amana Tool Saw Blade is<br />
designed for Plastic/PVC)<br />
• Power drill<br />
• Miter-box<br />
• Tape measure<br />
• Carpenters square<br />
• Blue chalk line – red chalk lines will stain<br />
Boards’ surface<br />
• Safety glasses<br />
• 4’ level<br />
MATERIAL REQUIREMENTS<br />
After designing your <strong>Deck</strong>, calculate the square<br />
footage. If your <strong>Deck</strong> is a rectangle, square footage<br />
(area) is width times length. If you are using 12-foot<br />
Boards, divide the square footage by 5.5; for 16-foot<br />
Boards, divide by 7.3; and for 20-foot Boards, use 9.2.<br />
These calculations give you the number of Boards<br />
you will need. Be sure to always round up and add for<br />
scrap. Always measure twice—cut once.<br />
JOIST SUBSTRUCTURE<br />
• Do not exceed 16”-on-center joist spacing when<br />
installing <strong>Deck</strong> Board perpendicular to joist.<br />
• Do not exceed 12”-on-center for<br />
commercial applications.<br />
• Do not exceed 12”-on-center when installing<br />
<strong>Deck</strong> Boards on a 45 degree angle, such as a<br />
herringbone pattern.<br />
• Recommended pitch for proper drainage is 1/16” per<br />
linear foot away from the house.<br />
• Ensure that all joists are crowned correctly and that<br />
all joists are level across the top, as <strong>Gossen</strong> <strong>Deck</strong>ing<br />
will conform to the surface of the substructure.<br />
• If you are installing heavy loads on the <strong>Deck</strong>, such as<br />
hot tubs, you must comply with the manufacturer’s<br />
installation requirements.<br />
12”-on-center<br />
spacing for<br />
commercial<br />
applications<br />
16”-on-center<br />
spacing for<br />
residential<br />
applications<br />
12”-on-center<br />
spacing for<br />
herringbone<br />
applications<br />
STAIR TREADS/SUBSTRUCTURE<br />
• Do not exceed 10”-on-center for stair<br />
treads (stringers).<br />
• Face screw only with stainless steel screws # 8,<br />
minimum 2-1/4” long.<br />
• Do not use hidden fasteners on stair installations.<br />
For a hidden fastener look, use Starborn Pro<br />
Plug System.<br />
• Overhang should not exceed 1/2.”<br />
For example: 20’ x 20’ <strong>Deck</strong> = 400 sq. ft. divided by<br />
5.5 (if using 12’ Boards) = 72.7 Boards. Round up<br />
and add for scrap.<br />
10” 10”<br />
1 2
FASTENERS<br />
<strong>Gossen</strong> recommends a high quality fastener that<br />
meets the following specifications:<br />
• #8 stainless steel screw (Trim head screws are<br />
most common) Coordinating colors are available.<br />
• Minimum length 2-1/4” (for elevations above<br />
6,000 feet a minimum length of 2-3/4” inches<br />
long is required)<br />
• Pre-drilling is not required.<br />
• Do not use composite deck screws.<br />
Face screwing directly to the joist is <strong>Gossen</strong>’s<br />
recommended method of installation. For a hidden<br />
fastener look, use Starborn Pro Plug System.<br />
RECOMMENDED FASTENER SYSTEMS:<br />
The following Fastener Systems have been 3rd party<br />
tested and approved with <strong>Gossen</strong> <strong>Deck</strong>ing.<br />
• Starborn Pro Plug System<br />
(Approved for use with Solid <strong>Deck</strong> Boards)<br />
• Starborn Headcote Stainless Steel Screws<br />
(Approved for use with Solid <strong>Deck</strong> Boards)<br />
• Grabber <strong>Deck</strong>master G5 Clips<br />
(Approved for use with Kerfed <strong>Deck</strong> Boards)<br />
• Mantis <strong>Deck</strong> Clip System<br />
(Approved for use with Kerfed <strong>Deck</strong> Boards)<br />
IMPORTANT CONSIDERATIONS WHEN SELECTING<br />
A HIDDEN FASTENER:<br />
• Fasteners must hold Board securely to the joist<br />
(do not use fasteners that allow for Board<br />
movement of any kind).<br />
• Groove dimensions: 5/32” wide x 3/8” deep<br />
(0.420” profile)<br />
• Hidden fasteners are not recommended for<br />
installations above 6,500 feet.<br />
• For greater rigidity, consider 12”-on-center joist<br />
spacing, especially when using hidden fasteners.<br />
• To prevent movement, face-screw or toe-screw<br />
at butt joints.<br />
• Grabber <strong>Deck</strong>master G5 clips and Mantis clips<br />
have been tested and approved for use with<br />
<strong>Gossen</strong> Kerfed <strong>Deck</strong>ing. Other hidden fastening<br />
systems not mentioned have not been third<br />
party tested. Therefore, <strong>Gossen</strong> does not<br />
recommend them.<br />
OTHER HIDDEN FASTENERS<br />
<strong>Gossen</strong>’s Warranty does not cover<br />
any movement, contraction, waving,<br />
squeaking, or bounce that is the<br />
direct result of the fasteners not<br />
holding the <strong>Deck</strong> Board in place.<br />
These issues must be communicated<br />
to your installer and/or the fastener<br />
company. Movement of Boards due<br />
to fastener failure is not covered by<br />
<strong>Gossen</strong>’s Warranty.<br />
<strong>Gossen</strong> <strong>Deck</strong>ing is available with an optional factory<br />
grooved edge designed for use with hidden fasteners.<br />
Each fastener must hold the Board securely to<br />
the substructure.<br />
Grabber G5 clip<br />
3 4
VENTILATION<br />
• Minimum 1/4” space from any solid structure<br />
• Minimum 1/4” space around the <strong>Deck</strong> post<br />
• Minimum 6” between bottom joist and ground<br />
• Recommended side-by-side spacing of a minimum<br />
of 1/8”. For hidden fasteners, refer to fastener<br />
manufacturer’s spacing requirements.<br />
• To prevent heat and moisture build-up, an<br />
unobstructed airflow is required below the <strong>Deck</strong> (try<br />
adding flow-through vents at various locations<br />
around rim joist to increase air flow).<br />
1/4"<br />
gap<br />
min<br />
1/8"<br />
gap<br />
EXPANSION AND CONTRACTION<br />
It is not necessary to space for expansion at butt<br />
joints. Boards will not expand in width. When properly<br />
installed, they will have minimal contraction. The<br />
contraction encountered may result in slight gaps,<br />
which might be noticed at the ends of Boards or at<br />
butt joints. Fastening the <strong>Deck</strong> Boards according to<br />
<strong>Gossen</strong> guidelines will help minimize contraction.<br />
• Fasten Boards within 1/2” from the end of the Board.<br />
• Butt joints must be tight (do not gap).<br />
• Minimum 1/4” space from any solid structure<br />
• Minimum 1/4” space around the <strong>Deck</strong> post<br />
• For best results, stagger butt joints and miters across<br />
<strong>Deck</strong> surface so that all butt joints and miters do not<br />
break on the same joist.<br />
• Install Boards as soon after cutting as possible.<br />
• Best practice is to either double joist or scab in<br />
additional framing at butt joints. Most fastener<br />
manufacturers and many area building codes<br />
require this.<br />
• Contraction is most significant where extreme<br />
temperature change exists.<br />
UNDERDECK SYSTEMS AND<br />
ROOFTOP & PATIO DECKS<br />
SUBSTRUCTURE MUST BE:<br />
• Solidly attached to roof or existing patio. Boards<br />
should not be attached to any kind of a “floating” or<br />
unsecured substructure.<br />
• Allow for a minimum of 6” of space between the<br />
bottom of the joists and under <strong>Deck</strong> system, rooftop,<br />
or ground.<br />
• Must be adequately ventilated to ensure<br />
Board temperature does not exceed 160<br />
degrees Fahrenheit.<br />
• For enclosed watershed systems under deck,<br />
watershed manufacturer <strong>Installation</strong> <strong>Guide</strong>lines<br />
must be followed, and watershed ventilation<br />
standards must meet <strong>Gossen</strong> <strong>Deck</strong>ing<br />
temperature requirements.<br />
RIMBOARD (FASCIA)<br />
<strong>Gossen</strong> RimBoards are designed to cover rim joists.<br />
They are solid colored with a deep wood grain<br />
surface texture.<br />
• Dimension: Thickness-5/8”, length-12’, width-7-1/4”<br />
or 11-1/4”<br />
• #8 stainless steel screw (Trim head screws are most<br />
common) Coordinating colors are available.<br />
• Fasten Boards within 1/2” from the edge/top/bottom<br />
of the Board.<br />
• Use 2 screws every 16” for the 7-1/4” wide Boards.<br />
• Use 3 screws every 16” for 11-1/4 “ wide Boards.<br />
• RimBoards must be fastened along it’s full length<br />
and width to a supporting structure of the <strong>Deck</strong>.<br />
For example 11-1/4” Boards must attach to a<br />
minimum of a 2”x10” rim joist.<br />
• To help minimize contraction, consider adding a<br />
screw through the edge of mitered corners.<br />
5 6
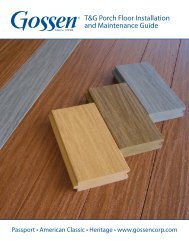
T&G PORCH INSTALLATION<br />
<strong>Gossen</strong>® T&G <strong>Porch</strong> Flooring is made like our<br />
<strong>Gossen</strong> <strong>Deck</strong> Board—solid core cellular PVC<br />
with no inconsistent organic fillers. The <strong>Gossen</strong><br />
<strong>Porch</strong> Board can be installed in a covered or<br />
uncovered application. However, drainage with<br />
a Tongue and Groove Board is limited and must<br />
be taken under consideration. <strong>Porch</strong> Boards<br />
are not water tight and should not be used over<br />
enclosed living spaces.<br />
TOOLS NEEDED<br />
• 100 tooth Circular or Miter saw using a<br />
carbide-tipped blade(The Amana Tool Saw Blade<br />
is designed for Plastic/PVC)<br />
• Power drill<br />
• Miter-box<br />
• Tape measure<br />
• Carpenters square<br />
• Blue chalk line – red chalk lines will stain<br />
Boards’ surface<br />
• Safety glasses<br />
• 4’ level<br />
JOIST SUBSTRUCTURE<br />
FASTENERS<br />
Minimum size recommended — #7 x 2” stainless<br />
steel trim head screw. Pre-drilling is not necessary.<br />
Be sure to counter sink screws at least 1/16” to<br />
avoid interference with the next Board. Manual or<br />
pneumatic floor-nailers may be used. When using a<br />
floor-nailer use stainless steel 2” serrated T nails.<br />
VENTILATION<br />
• Minimum 1/4” space from any solid structure<br />
• Minimum 1/4” space around the <strong>Deck</strong> post<br />
• Minimum 6” between bottom joist and ground<br />
• Must be adequately ventilated to ensure Board<br />
temperature does not exceed 160 degrees F.<br />
• To prevent heat and moisture build-up, an<br />
unobstructed airflow is required below the <strong>Porch</strong> (try<br />
adding flow-through vents at various locations<br />
around rim joists to increase airflow).<br />
EXPANSION AND CONTRACTION<br />
When properly fastened to the substructure, <strong>Porch</strong><br />
Boards will have minimal expansion and contraction.<br />
It is not necessary to space for expansion at butt joints.<br />
The contraction encountered may result in slight gaps,<br />
which might be noticed at the ends of Boards or at<br />
butt joints. Fastening the <strong>Porch</strong> Boards according to<br />
<strong>Gossen</strong> <strong>Guide</strong>lines will help minimize contraction.<br />
• Do not exceed 16”-on-center joist spacing when<br />
installing <strong>Porch</strong> Board perpendicular to joist.<br />
• Do not exceed 12”-on-center for<br />
• Keep butt ends and miters tight.<br />
commercial applications.<br />
• All butt joints must be fastened at the end of each<br />
• Do not exceed 12”-on-center when installing <strong>Porch</strong><br />
Board to a solid joist.<br />
Boards on a 45 degree angle, such as a<br />
herringbone pattern.<br />
• Fasten each Board within 1/2” from the end of Board.<br />
• If you are installing heavy loads on the <strong>Porch</strong>, such<br />
• Minimum 1/4” space around the <strong>Deck</strong> post<br />
as hot tubs, you must comply with the<br />
• Minimum 1/4” space from any solid structure<br />
manufacturer’s installation requirements.<br />
• Recommended pitch for proper drainage is a<br />
• For best results, stagger butt joints and miters across<br />
minimum of 1/16” per linear foot away from<br />
<strong>Porch</strong> surface so that all butt joints and miters do not<br />
the house.<br />
break on the same joist.<br />
• Ensure that all joists are crowned correctly and that • Install Boards as soon after cutting as possible.<br />
all joists are level across the top, as <strong>Gossen</strong> <strong>Porch</strong> will • Some area building codes may require double<br />
conform to the surface of the substructure.<br />
joisting when joining Boards end to end. Always<br />
• If replacing an existing <strong>Porch</strong> Floor, make sure all<br />
check with your local code authority for specific<br />
joists are structurally sound and free of nails.<br />
requirements before installation.<br />
7 8
PERIMETER TRIM SUGGESTIONS<br />
There are a couple of options available to finish<br />
the perimeter of the porch:<br />
• <strong>Gossen</strong> RimBoards in color matched<br />
• <strong>Gossen</strong> 5-1/2” <strong>Deck</strong> Boards for perimeter strips.<br />
<strong>Porch</strong> Boards color match <strong>Gossen</strong> <strong>Deck</strong> Boards.<br />
Please note that there is no start or end board of the<br />
<strong>Gossen</strong> Tongue & Groove <strong>Porch</strong> Boards. In order to<br />
create a finished look on the porch, please use one of<br />
the above options to finish the perimeter of the porch.<br />
FACTORS TO CONSIDER<br />
• Excessive heat-build on the surface of <strong>Gossen</strong><br />
Products from external sources, such as, but not<br />
limited to, fire or reflected sunlight can potentially<br />
lead to damage. For example, sunlight reflected<br />
by low-emissive (Low-E) glass can lead to damage<br />
of exterior building products, due to elevation of<br />
surface temperatures, which far exceed that of<br />
normal exposure of the same materials to direct<br />
sunlight. Possible damage by such reflected<br />
concentrated light might include sagging, warping,<br />
distortion, increased contraction and unusual<br />
weathering. <strong>Deck</strong> & <strong>Porch</strong> Board core temperature<br />
cannot exceed 160 degrees.<br />
• <strong>Gossen</strong> <strong>Deck</strong> & <strong>Porch</strong> Boards are manufactured with<br />
surface finishing technology on three sides. Boards<br />
should be stored face up on a dry, flat surface.<br />
Do not store on gravel driveways or roads.<br />
• Cellular PVC <strong>Deck</strong> & <strong>Porch</strong> Boards are less rigid than<br />
treated wood or composite boards. For greater<br />
rigidity, consider 12”-on-center joist spacing,<br />
especially when using hidden fasteners.<br />
• When cutting Boards, consider flipping the Board<br />
over and making your cuts starting on the back side<br />
for a cleaner cut.<br />
• IMPORTANT: Do not allow dust from tile, concrete,<br />
landscape blocks, or any masonry product to<br />
accumulate on the <strong>Deck</strong> or <strong>Porch</strong> surface as it may<br />
damage the surface. Never cut any construction<br />
materials on or near the <strong>Gossen</strong> <strong>Deck</strong> or <strong>Porch</strong>.<br />
CARE & CLEANING<br />
• Mild soap, such as Simple Green®, and a garden hose will<br />
clean up the <strong>Deck</strong> in most cases. If a stain proves<br />
particularly stubborn, use Krud Kutter® and a soft cotton<br />
cloth or a diluted chlorine bleach solution (about 4:1 water<br />
to bleach). Avoid use of abrasive scrubbers. A soft-bristled<br />
brush can be effective.<br />
• Minor surface scratches on the <strong>Deck</strong> Boards can be<br />
removed by using Soft Scrub with Bleach® (green label).<br />
Put a small amount of Soft Scrub® on a non-abrasive cotton<br />
cloth and gently rub it on the scratched surface. It will not<br />
remove gouges, but it will help with minor scratches.<br />
Be sure to rinse the <strong>Deck</strong> Boards with water after using<br />
any cleaner.<br />
• There should be no need to pressure-wash the <strong>Deck</strong>. If you<br />
choose to do so, be sure to use a fan-tip and keep the spray<br />
at least 10” above the <strong>Deck</strong>, and do not exceed 1200 psi.<br />
• <strong>Gossen</strong> does not recommend the placement of rubber or<br />
vinyl materials such as those in grill mats, rubber backed<br />
welcome mats, vinyl or PVC potted containers, etc. on<br />
the surface of <strong>Gossen</strong> <strong>Deck</strong> & <strong>Porch</strong> for extended periods<br />
of time. Additives in the rubber and PVC products have<br />
a tendency to migrate from these materials to <strong>Gossen</strong><br />
<strong>Deck</strong> & <strong>Porch</strong>, resulting in discoloration of the Boards. If<br />
discoloration occurs, a heat gun will restore the Boards.<br />
Hold the heat gun 12” away from the Board’s surface using<br />
a back and forth motion until color is restored.<br />
• Do not use PVC glue or similar product on the surface<br />
of <strong>Gossen</strong> <strong>Deck</strong> & <strong>Porch</strong> Boards as it may discolor and<br />
permanently damage the <strong>Deck</strong> or <strong>Porch</strong> surface.<br />
• Exposing the <strong>Deck</strong> or <strong>Porch</strong> surface to sunscreens that<br />
contain Benzyl alcohol or bug sprays that contain Deet<br />
can damage the Boards. If you spill these substances on<br />
the <strong>Deck</strong>, clean it off immediately. Check product labels and<br />
consult with the manufacturer as to product compatibility<br />
with plastic materials prior to use on or near your <strong>Gossen</strong><br />
<strong>Deck</strong> or <strong>Porch</strong>.<br />
• For snow and ice removal, you can use most products<br />
containing calcium chloride without damaging the <strong>Deck</strong> &<br />
<strong>Porch</strong> Boards (Magnesium Chloride is also an excellent<br />
Green De-icer). Be cautious when using rock salt; it can<br />
cause minor scratching. If you are physically removing snow<br />
or ice, use a plastic shovel without a metal edge.<br />
• Never use paint removing solvents, such as Goof Off®, as<br />
it will permanently damage the <strong>Deck</strong> or <strong>Porch</strong> surface. Do<br />
not use any product not specified in the Care and Cleaning<br />
section without consulting <strong>Gossen</strong> 800-558-8984.<br />
9 10
TROUBLE SHOOTING GUIDE<br />
DECK SQUEAKS WHEN WALKED ON<br />
COMMON CAUSES:<br />
• <strong>Deck</strong> Boards not properly secured to joists (possible<br />
fastener failure or improper installation).<br />
• The sub-structure is moving.<br />
• Or a combination of both<br />
POTENTIAL SOLUTIONS:<br />
• Contact the fastener manufacturer (possible<br />
installation or fastener failure).<br />
• Face screw with two screws one on each side of the<br />
Board at the location of the squeak. Use Starborn Pro<br />
Plug Systems for a hidden fastener look.<br />
• Ensure the joists are properly blocked and<br />
substructure is solid.<br />
DECK HAS A “WAVY” LOOK<br />
COMMON CAUSES:<br />
• Joists are not level.<br />
• <strong>Deck</strong> Boards not properly secured to joists (possible<br />
installation or fastener failure).<br />
• Improper venting below <strong>Deck</strong> generating excessive<br />
heat can cause Board to warp (+160 degree<br />
Fahrenheit Board temperature).<br />
• Reflected sunlight generating excessive heat can<br />
cause Board to warp (+160 degree Fahrenheit<br />
Board temperature).<br />
POTENTIAL SOLUTIONS:<br />
• Properly secure Boards to joists as instructed above.<br />
• Level joists per installation instructions.<br />
• Ensure the joists are properly blocked and<br />
substructure is solid.<br />
• To reduce heat build-up, create an unobstructed<br />
airflow below the <strong>Deck</strong> (try adding flow-through<br />
vents at various locations around rim joists to<br />
increase airflow).<br />
• Install window screens or contact the window<br />
manufacturer regarding potential damage caused by<br />
low-emissive (Low-E) glass/reflected sunlight.<br />
DECK BOARDS CONTRACTING BEYOND EXPECTATIONS<br />
COMMON CAUSES:<br />
POTENTIAL SOLUTIONS:<br />
• Face screw within 1/2 inch of the end of the<br />
Board-one on each side of the Board. Only do this if<br />
the fasteners along the length of the Board have been<br />
properly secured to prevent movement. Use Starborn<br />
Pro Plug System for a hidden fastener look.<br />
• Secure the structure and correctly block joists.<br />
DECK HAS SPRINGY OR BOUNCY FEEL WHEN<br />
WALKED ON<br />
NOTE: Cellular PVC is less rigid than traditional materials.<br />
However, Boards are code-approved and will not fail when<br />
properly installed a minimum of 16”-on-center.<br />
COMMON CAUSES:<br />
• <strong>Deck</strong> Boards are not properly secured to joists<br />
(possible fastener failure or improper installation).<br />
• Improper joist spacing<br />
POTENTIAL SOLUTIONS:<br />
• Face screw with 2 screws on every joist as instructed<br />
above. Use Starborn Pro Plug System for a hidden<br />
fastener look.<br />
• Reduce joist spacing to 12- inch on center.<br />
WATER STANDING OR POOLING ON DECK<br />
COMMON CAUSES:<br />
• <strong>Deck</strong> is not properly pitched away from house.<br />
• <strong>Deck</strong> Boards are not properly secured to joists<br />
(Board must be level on joist).<br />
• Joists are not properly leveled.<br />
POTENTIAL SOLUTIONS:<br />
• Pitch <strong>Deck</strong> 1/16” per linear-foot away from house (per<br />
installation instructions)<br />
• Face screw with 2 screws on every joist as instructed<br />
above. Use Starborn Pro Plug Systems for a hidden<br />
fastener look.<br />
• Properly level joists<br />
DECK SURFACE DISCOLORED BY RUBBER/VINYL<br />
MATS ETC.<br />
POTENTIAL SOLUTION:<br />
• Apply dry heat to the area; most effective is a heat<br />
• <strong>Deck</strong> Boards are not properly secured to joists<br />
gun. Keep the gun 12” above the <strong>Deck</strong> surface and<br />
(possible fastener failure or improper installation).<br />
use a continuous movement. Be sure not to scorch<br />
• Sub-structure is moving.<br />
the <strong>Deck</strong> surface.<br />
11 12
www.gossencorp.com<br />
Let your whole home<br />
perform like a <strong>Gossen</strong> home<br />
• DECK<br />
• SHEETS<br />
• TRIMBOARD<br />
• T&G PORCH FLOORING<br />
• DECORATIVE EXTERIOR<br />
MILLWORK<br />
Customer Service: 800-558-8984<br />
Main Office: 414-228-9800 • Fax:<br />
414-228-9077<br />
2030 West Bender Road • Milwaukee, WI 53209<br />
817-IN091514