
Create successful ePaper yourself
Turn your PDF publications into a flip-book with our unique Google optimized e-Paper software.
ADJUSTING WEIGHT<br />
Helix, Nexus and Eclipse: These bows are adjustable over<br />
a range of approximately 10%. Factors which affect this<br />
include limb length, limb construction, and limb design and<br />
brace height.<br />
1. Using one of the two supplied Allen wrenches; loosen<br />
the tiller bolt locking screw (see Standard Hoyt Dovetail (B)<br />
image on pg. 5). If you plan to increase weight you will need<br />
to loosen this screw by more turns than you plan to add to<br />
the tiller screw.<br />
2. Unstring the bow.<br />
3. Turn the weight/tiller adjustment bolt clockwise to increase<br />
bow weight. Turn it counter-clockwise to decrease bow weight.<br />
4. Using both Allen wrenches, and holding the tiller bolt in<br />
place, re-lock the tiller bolt locking screw.<br />
5. Restring the bow.<br />
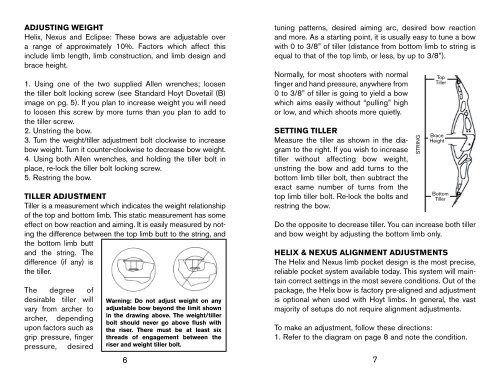
TILLER ADJUSTMENT<br />
Tiller is a measurement which indicates the weight relationship<br />
of the top and bottom limb. This static measurement has some<br />
effect on bow reaction and aiming. It is easily measured by noting<br />
the difference between the top limb butt to the string, and<br />
the bottom limb butt<br />
and the string. The<br />
difference (if any) is<br />
the tiller.<br />
The degree of<br />
desirable tiller will<br />
vary from archer to<br />
archer, depending<br />
upon factors such as<br />
grip pressure, finger<br />
pressure, desired<br />
Warning: Do not adjust weight on any<br />
adjustable bow beyond the limit shown<br />
in the drawing above. The weight/tiller<br />
bolt should never go above flush with<br />
the riser. There must be at least six<br />
threads of engagement between the<br />
riser and weight tiller bolt.<br />
6<br />
tuning patterns, desired aiming arc, desired bow reaction<br />
and more. As a starting point, it is usually easy to tune a bow<br />
with 0 to 3/8” of tiller (distance from bottom limb to string is<br />
equal to that of the top limb, or less, by up to 3/8”).<br />
Normally, for most shooters with normal<br />
finger and hand pressure, anywhere from<br />
0 to 3/8” of tiller is going to yield a bow<br />
which aims easily without “pulling” high<br />
or low, and which shoots more quietly.<br />
SETTING TILLER<br />
Measure the tiller as shown in the diagram<br />
to the right. If you wish to increase<br />
tiller without affecting bow weight,<br />
unstring the bow and add turns to the<br />
bottom limb tiller bolt, then subtract the<br />
exact same number of turns from the<br />
top limb tiller bolt. Re-lock the bolts and<br />
restring the bow.<br />
Do the opposite to decrease tiller. You can increase both tiller<br />
and bow weight by adjusting the bottom limb only.<br />
HELIX & NEXUS ALIGNMENT ADJUSTMENTS<br />
The Helix and Nexus limb pocket design is the most precise,<br />
reliable pocket system available today. This system will maintain<br />
correct settings in the most severe conditions. Out of the<br />
package, the Helix bow is factory pre-aligned and adjustment<br />
is optional when used with Hoyt limbs. In general, the vast<br />
majority of setups do not require alignment adjustments.<br />
To make an adjustment, follow these directions:<br />
1. Refer to the diagram on page 8 and note the condition.<br />
7<br />
STRING<br />
Top<br />
Tiller<br />
Brace<br />
Height<br />
Bottom<br />
Tiller