Installation Instructions
Installation Instructions
Installation Instructions
You also want an ePaper? Increase the reach of your titles
YUMPU automatically turns print PDFs into web optimized ePapers that Google loves.
Join theGreen Revolution<br />
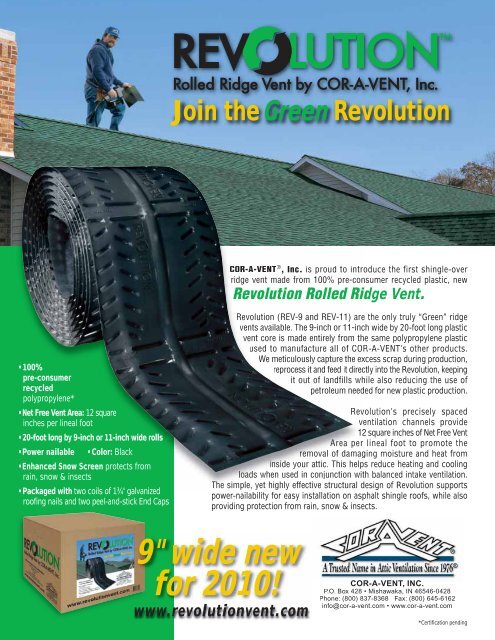
COR-A-VENT ® , Inc. is proud to introduce the first shingle-over<br />
ridge vent made from 100% pre-consumer recycled plastic, new<br />
Revolution Rolled Ridge Vent.<br />
•100%<br />
pre-consumer<br />
recycled<br />
polypropylene*<br />
•Net Free Vent Area: 12 square<br />
inches per lineal foot<br />
•20-foot long by 9-inch or 11-inch wide rolls<br />
•Power nailable •Color: Black<br />
•Enhanced Snow Screen protects from<br />
rain, snow & insects<br />
•Packaged with two coils of 1¾" galvanized<br />
roofing nails and two peel-and-stick End Caps<br />
Revolution (REV-9 and REV-11) are the only truly “Green” ridge<br />
vents available. The 9-inch or 11-inch wide by 20-foot long plastic<br />
vent core is made entirely from the same polypropylene plastic<br />
used to manufacture all of COR-A-VENT’s other products.<br />
We meticulously capture the excess scrap during production,<br />
reprocess it and feed it directly into the Revolution, keeping<br />
it out of landfills while also reducing the use of<br />
petroleum needed for new plastic production.<br />
Revolution’s precisely spaced<br />
ventilation channels provide<br />
12 square inches of Net Free Vent<br />
Area per lineal foot to promote the<br />
removal of damaging moisture and heat from<br />
inside your attic. This helps reduce heating and cooling<br />
loads when used in conjunction with balanced intake ventilation.<br />
The simple, yet highly effective structural design of Revolution supports<br />
power-nailability for easy installation on asphalt shingle roofs, while also<br />
providing protection from rain, snow & insects.<br />
9" wide new<br />
for 2010!<br />
www.revolutionvent.com<br />
COR-A-VENT, INC.<br />
P.O. Box 428 • Mishawaka, IN 46546-0428<br />
Phone: (800) 837-8368 Fax: (800) 645-6162<br />
info@cor-a-vent.com • www.cor-a-vent.com<br />
*Certification pending
Revolution <strong>Installation</strong> <strong>Instructions</strong><br />
WRAP END FROM TOP<br />
TO UNDERSIDE OF VENT<br />
1. Measure a 3" slot, 1½" each side of ridge centerline.<br />
This allows for a 2x ridge board or smaller. Snap chalk<br />
lines the entire length of the ridge. Cut slot with circular<br />
saw and clean out debris. Set saw depth so as not to<br />
cut roof rafters. Stop slot 12" short of any ridge end,<br />
intersecting ridge or obstruction (such as a chimney).<br />
2. Cut clear band around roll, leaving colored band to<br />
hold all but the starter section together. Vent installs<br />
with legs down and fl at cap on top.<br />
3. Remove backing from 1 Peel-&-Stick end cap<br />
section. Apply half of the section to end of the vent,<br />
starting with the top cap. Wrap other half of end cap<br />
down and underneath vent legs and Snow Screen to<br />
close off end of vent.<br />
4. Beginning at end of ridge, apply vent with minimum<br />
1¾" nails (2 coils provided in box) following “NAIL HERE”<br />
guides along vent cap. Only apply nails within the area<br />
between leg cavities – DO NOT apply nails outside of<br />
“NAIL HERE” guide marks. Vent may be power nailed<br />
or hand nailed. Do not overdrive nails. Apply fi rst four<br />
nails (two on each side), then remove colored band to<br />
unroll rest of vent. Continue to apply according to marked<br />
guides. Repeat Step 3 to seal opposite end of vent.<br />
5. For runs longer than 20 feet, additional vent rolls<br />
can be applied. Line up end of additional vent roll with<br />
previous roll by overlapping at offset lip, then apply<br />
Peel-&-Stick end cap to seal junction. Follow Step 4<br />
to apply rest of vent.<br />
6. Center shingle cap on vent and nail along “NAIL<br />
HERE” guideline. Continue applying caps until all vent<br />
is covered with ridge caps. Do not overdrive nails.<br />
Nail head should be fl ush with top of shingle, without<br />
indenting it. Pre-forming caps in cold weather helps<br />
avoid cracking.<br />
Be careful not to touch knife blade. Always cut in a direction<br />
away from yourself. Wear proper hand and eye protection.<br />
12 Square inches Net Free Vent Area per lineal foot.<br />
20' long x 9" or 11" wide x 5/8" thick.<br />
For use on roof pitches 3/12 - 16/12.<br />
Call our technical department for<br />
any special application questions.<br />
7. For shorter runs of vent, trim areas provided every 12".<br />
Cut with utility knife, snips or saw, taking care to follow<br />
recognized manufacturers’ safety procedures for each.<br />
Important notes: COR-A-VENT ridge vents should always<br />
be installed with soffit/eave/intake vents of equal or greater<br />
area. All other vent openings (except soffi ts) should<br />
be closed off. The air passage way or “Ventilation<br />
Chute” between the inlet (soffi t/eave/intake) and the<br />
outlet (ridge) vent must not be blocked or restricted.<br />
COR-A-VENT products meet or exceed all nationally<br />
recognized building codes for ventilation.<br />
Covered under Patent #6,039,646<br />
Other Patents pending<br />
COR-A-VENT, Inc.<br />
P.O. Box 428 • Mishawaka, IN 46546-0428<br />
Phone: (800) 837-8368 Fax: (800) 645-6162<br />
E-mail: info@cor-a-vent.com<br />
www.cor-a-vent.com<br />
www.revolutionvent.com<br />
© 2009 COR-A-VENT, Inc. Made in the USA Revolution Flier/Instruction 03/10


