CafeFresco 410 - Nivona
CafeFresco 410 - Nivona
CafeFresco 410 - Nivona

You also want an ePaper? Increase the reach of your titles
YUMPU automatically turns print PDFs into web optimized ePapers that Google loves.
<strong>CafeFresco</strong><br />
Coffee Machine with integrated coffee grinder<br />
Operating Instructions and Useful Tips<br />
A passion for coffee.<br />
<strong>410</strong>
Operating Instructions and Useful Tips<br />
Dear Customer,<br />
Congratulations and many thanks for choosing a high-quality<br />
NIVONA product. To get the most out of your NIVONA machine,<br />
please read this manual carefully before use. Please start by<br />
reading the safety notes.<br />
Please keep this manual in a safe place. You may want to use<br />
it as reference guide or hand it on to any further users of your<br />
machine.<br />
Purchase made at<br />
Place, date<br />
2
3<br />
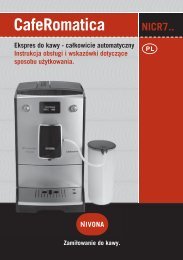
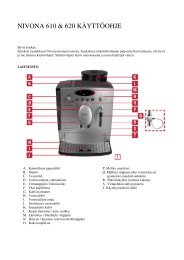
Equipment<br />
A Rotating bean container with H Water reservoir<br />
aroma protection lid<br />
with easy-access lid<br />
B<br />
C<br />
D<br />
E<br />
F<br />
G<br />
A<br />
B<br />
C<br />
D<br />
E<br />
F<br />
G<br />
Grinder settings indicator<br />
Filter release catch<br />
Coffee funnel<br />
Pivoting filter base with filter<br />
holder, aroma protection cover<br />
and anti-drip valve<br />
Stainless steel thermos jug<br />
with lid<br />
Base for thermos jug<br />
I<br />
J<br />
K<br />
L<br />
M<br />
N<br />
O<br />
1<br />
Water level indicator<br />
On / Off button<br />
Illuminated text display<br />
Program button ‘P’ and<br />
control knob ‘P’<br />
Automatic timer button ‘A’<br />
Power cord storage compartment<br />
(rear / underside)<br />
H<br />
Model nameplate (underside)<br />
I<br />
J<br />
K<br />
L<br />
M<br />
N<br />
0
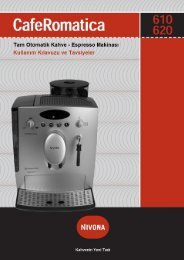
Equipment<br />
2 3 4<br />
5<br />
8<br />
11<br />
6<br />
9<br />
7<br />
10
Contents<br />
1. Safety instructions<br />
2. Before use<br />
3. Set up<br />
3.1 Preparing the machine<br />
3.2 Getting started<br />
4. Making coffee<br />
4.1 Using pre-ground coffee<br />
4.2 Programming the machine to use pre-ground coffee<br />
4.3 Operating the coffee-grinder<br />
4.4 Using fresh coffee from the coffee-grinder<br />
4.5 Programming the machine to use fresh coffee from<br />
the coffee-grinder<br />
5. General settings for operating the coffee-grinder<br />
5.1 Selecting the number of cups / quantity of coffee<br />
5.2 Selecting the coffee strength<br />
6. General settings / useful tips<br />
6.1 Deactivating the timer function<br />
6.2 Switching the machine off<br />
6.3 Removing the coffee jug before brewing is complete<br />
6.4 Pouring coffee<br />
7. Cleaning<br />
7.1 Cleaning the coffee grinder<br />
7.2 Cleaning the coffee machine<br />
8. Descaling<br />
9. Further instructions
1. Safety instructions<br />
6<br />
The machine is for domestic use<br />
only and is not suitable for commercial<br />
applications.<br />
Operating voltage must be the<br />
same as mains voltage. Please<br />
note the sticker on the underside<br />
of the machine (Fig. 1/0).<br />
Keep the power cord away from<br />
hot parts.<br />
Do not operate the machine if<br />
the power cord or machine case<br />
is damaged.<br />
Do not unplug the machine by<br />
pulling on the power cord.<br />
Certain machine parts, such as<br />
the filter base, become very hot<br />
during operation. Only handle<br />
the machine using the grips and<br />
controls provided for the purpose.<br />
Never open the reservoir lid<br />
while coffee is being brewed, as<br />
you may burn yourself.<br />
Do not pour water into the<br />
machine when hot – turn the<br />
coffee machine off first and let<br />
it cool for at least 5 minutes.<br />
Make sure to switch off and<br />
unplug the machine before<br />
maintenance or cleaning.<br />
Do not submerge the machine<br />
in water.<br />
Use the coffee grinder for grinding<br />
roasted coffee beans only –<br />
do not use it to grind other<br />
foods. Always make sure there is<br />
nothing but coffee beans in the<br />
beans container, otherwise<br />
guarantee will not apply.<br />
Note: Do not use beans which<br />
have been treated with supplements<br />
such as sugar during or<br />
after roasting. Supplements can<br />
damage the grinding mechanism<br />
and any repair costs arising as a<br />
result are not covered by the<br />
guarantee.<br />
Place the machine on a level,<br />
solid surface and use it indoors<br />
only.<br />
Do not place the machine on a<br />
hot surface or near open flames.<br />
Keep the machine away from<br />
children.<br />
Always unplug the machine<br />
during extended periods of<br />
absence.<br />
Do not put the machine or individual<br />
parts in the dishwasher.<br />
Wipe the outside with a damp<br />
cloth only.
... 1. Safety instructions<br />
Unplug immediately if there is a<br />
defect (do not pull the cord or<br />
machine to unplug).<br />
Liability for damages cannot be<br />
accepted if the machine is incorrectly<br />
operated, subject to<br />
improper use or non-professional<br />
servicing. In such cases, services<br />
will not be provided under the<br />
guarantee.<br />
This machine is not suitable for<br />
individuals (including children)<br />
with physical, sensory or mental<br />
impairments, including individuals<br />
who do not have sufficient<br />
experience or knowledge, unless<br />
they are shown how to operate<br />
the machine or initially supervised<br />
by someone responsible<br />
for their safety.<br />
If repair services are required, in -<br />
cluding replacement of the power<br />
cord, please send the machine to<br />
the dealer from whom it was<br />
purchased, or to NIVONA Central<br />
Customer Services.<br />
Caution! Electrical appliances<br />
must be repaired by qualified personnel!<br />
Non-professional repairs<br />
can expose the user to significant<br />
risks. Liability for damages cannot<br />
be accepted if the machine is<br />
used for any other than the in -<br />
tended purpose, incorrectly maintained<br />
or serviced.<br />
CE – This machine conforms to<br />
the following EC guidelines:<br />
73/23/EWG dated 19/02/1973<br />
“Low Voltage Directive”, including<br />
amendment 93/68/EWG.<br />
89/336/EWG dated 03/05/1989<br />
“EMV Directive”, including<br />
amendment 92/31/EWG.<br />
Specifications<br />
Mains voltage: 220 – 240 V<br />
Power input: 1000 W<br />
Note: Your coffee machine has a<br />
cord storage compartment – if the<br />
power cord is too long, any surplus<br />
can be accommodated in the<br />
storage area on the underside of<br />
the machine to avoid accidents.<br />
7
2. Before use<br />
Unpacking<br />
➔ Carefully extract the machine<br />
and all parts from the packaging<br />
and remove all protective seals.<br />
Caution: Please remove the protective<br />
seal on the pivoting filter!<br />
In order to do this, open the lid of<br />
the water reservoir and remove the<br />
aroma protection cover and filter<br />
holder (fig. 1/E, fig. 7, fig. 8).<br />
Remove the seal which fixes the<br />
filter to the water reservoir and<br />
replace the filter holder and aroma<br />
protection cover afterwards.<br />
Note: If you need to return your<br />
machine for servicing, it can be<br />
sent by post in the original packaging.<br />
Please keep all packaging<br />
and protective material for this<br />
purpose.<br />
Important: This machine was<br />
inspected and tested with coffee<br />
before leaving the factory. Although<br />
the machine was thoroughly<br />
cleaned, coffee traces may remain<br />
in the machine. It is nonetheless<br />
brand new.<br />
8<br />
Setting the time<br />
The time must be set before the<br />
machine is first operated – otherwise<br />
it can not be switched on.<br />
Please follow the instructions<br />
below:<br />
➔ Plug the machine into the<br />
mains power supply. The display<br />
shows in German “Zeit, Std.”<br />
(“Time, hrs”).<br />
➔ To enter the time (hours), turn<br />
the control knob P (fig. 1/L) until<br />
the correct hour appears. Confirm<br />
by pressing the button ‘P’<br />
(fig. 1/L).<br />
➔ Now turn the control knob P<br />
again to adjust the minute. Confirm<br />
by pressing the button ‘P’<br />
(fig. 1/L).<br />
You have now set the time. Unless<br />
you press the button ‘P’ again<br />
with in 3 seconds in order to<br />
adjust the coffee quantity settings<br />
(aroma selection), the default<br />
setting in German “8, Mittel”<br />
(“8, me dium”) appears.
3. Set up<br />
3.1 Preparing the machine<br />
➔ Before making coffee for the<br />
first time, please carry out the<br />
brew ing operation once or twice<br />
with the maximum amount of<br />
water, but no coffee. This gives<br />
the machine a thorough clean.<br />
➔ To do this, plug the machine<br />
into the mains power supply (see<br />
previous point), once fully un -<br />
packed. Fill the water reservoir<br />
(fig 1/H) to the upper cup limit<br />
(MAX) with cold water (no<br />
mineral water!)<br />
➔ Turn the thermos jug lid clock -<br />
wise to close (fig. 1/F) and place<br />
the jug on the base (fig. 1/G).<br />
The lid must always be on the jug<br />
during brewing, as it opens the<br />
anti-drip valve. Freshly brewed<br />
coffee drips down into the thermos<br />
jug through a special opening in<br />
the lid.<br />
➔ Switch the machine on and let<br />
the water run down without coffee<br />
or filter paper into the coffee jug,<br />
pressing the On / Off button (fig.<br />
I/J) to start. Pour the water away.<br />
Repeat a second time if required.<br />
3.2 Getting started<br />
Filling the water reservoir<br />
Lift the lid covering the water re -<br />
servoir (fig. 1/H and fig. 4) and fill<br />
it with fresh, cold tap water up to<br />
the desired level (as shown by the<br />
cup markings on the water level<br />
indicator on the side of the re -<br />
servoir (fig. 1/I and 2)). This indicator<br />
is accurate for fresh water<br />
only – as the coffee grains soak up<br />
some of the water during the<br />
brew ing operation, the quant ity of<br />
coffee actually brewed will be<br />
slightly lower.<br />
Important: Never fill with hot<br />
water, nor, under any circum -<br />
stances, with milk, tea, brewed<br />
coffee, etc.!<br />
Inserting filter paper<br />
➔ Insert filter paper size 4 in the<br />
filter holder. Fold the perforated<br />
edges of the filter paper flat in the<br />
usual manner. The water reservoir<br />
lid must be kept open for this<br />
step.<br />
➔ To prevent any loss of aroma<br />
during grinding and brewing, your<br />
coffee machine is fitted with an<br />
aroma protection cover (fig. 8)<br />
9
... 3. Set up<br />
which must be removed to insert<br />
the filter paper. When the size 4<br />
filter paper has been inserted,<br />
make sure the aroma protection<br />
cover is correctly fitted. On one<br />
side it has a semi-circular rib<br />
which fits into the corresponding<br />
groove in the filter holder.<br />
➔ When the filter is in place, shut<br />
the water reservoir lid.<br />
4. Making coffee<br />
➔ You can brew your coffee in<br />
various ways: using pre-ground<br />
coffee or fresh coffee beans, for<br />
immediate or timer-operated start.<br />
In each case the machine switches<br />
off automatically after brewing.<br />
➔ If you use fresh coffee beans<br />
and the integrated grinder, you<br />
can choose between various aroma<br />
and quantity settings. If you use<br />
traditional pre-ground coffee,<br />
<strong>CafeFresco</strong> operates like a normal<br />
coffee machine.<br />
4.1 Using pre-ground coffee<br />
➔ Fill the water reservoir with<br />
water as detailed above (see point<br />
3.2) and insert a filter (size 4).<br />
10<br />
Install the coffee jug<br />
➔ Now place the closed coffee<br />
jug on the machine base (fig.<br />
1/G). The lid must always be on<br />
the jug, as it opens the anti-drip<br />
valve. The freshly brewed coffee<br />
drips down into the thermos jug<br />
through a special opening in the<br />
lid.<br />
Fill the filter with the desired<br />
amount of ground coffee and place<br />
the coffee jug on the base. Switch<br />
the machine on using the On / Off<br />
button (fig. 1/J). The red light<br />
comes on and the brewing oper -<br />
ation begins.<br />
Hint: To avoid overfilling, make<br />
sure that you do not use more<br />
ground coffee than is necessary to<br />
make 10 cups of coffee (general<br />
rule: 1 heaped spoon per cup).<br />
Only use ground coffee suitable<br />
for filter coffee – do not use preground<br />
espresso coffee.<br />
4.2 Programming the machine to<br />
use pre-ground coffee<br />
As for the previous point, fill the<br />
reservoir with water and insert filter
... 4. Making coffee<br />
paper (see point 3.2). Then add<br />
ground coffee to the filter and<br />
place the thermos jug on the base<br />
(fig. 1/G). Select a start time for<br />
the brewing operation as follows:<br />
➔ Press the button ‘P’ (fig. 1/L).<br />
The display reads in German<br />
“Brühen?” (“Brew?”).<br />
➔ Turn the control knob ‘P’ and<br />
the display reads in German<br />
“Zeit?” (“Time?”).<br />
➔ Press ‘P’ again and the display<br />
reads in German “Autostart: Zeit?”<br />
(“Autostart: time?”).<br />
➔ After pressing ‘P’, select the<br />
desired start time (hours) by turn -<br />
ing the control knob ‘P’.<br />
➔ Confirm by pressing the button<br />
‘P’.<br />
➔ Now select the number of<br />
minutes in the same way, con -<br />
firming by pressing the button ‘P’.<br />
➔ When you have selected a start<br />
time, it appears for a few seconds<br />
in the display as confirmation.<br />
➔ As soon as the start time dis -<br />
appears, activate the automatic<br />
timer by pressing the button ‘A’<br />
(fig. 1/M).<br />
The display shows the programmed<br />
start time and the green light in<br />
the button ‘A’ comes on. The brewing<br />
operation will then start at the<br />
given time. The second line of the<br />
display does not mean anything in<br />
this function. When the given time<br />
arrives, the green light goes off<br />
and the red light comes on for the<br />
duration of the brewing operation.<br />
Tip: Unless you wish to change<br />
the start time, you can activate<br />
the programmed settings simply<br />
by pressing button ‘A’ (after<br />
having filled the water reservoir<br />
and set in place filter paper,<br />
ground coffee and coffee jug!).<br />
4.3 Operating the coffee grinder<br />
Fill the bean container<br />
➔ There is a bean container locat ed<br />
above the coffee grinder of your<br />
<strong>CafeFresco</strong> (fig. 1/A and fig. 5), de -<br />
signed to keep your coffee beans as<br />
fresh as possible. Please fill the bean<br />
container with fresh coffee beans.<br />
Grinding settings<br />
➔ You can adjust the fineness of<br />
the grind to suit your preferences<br />
and the roast of the beans (fig. 1/B<br />
and fig. 6). Simply turn the rotating<br />
bean container (fig. 1/A and fig. 5).<br />
Tip: We recommend that you start<br />
with a medium setting, as this is<br />
suitable for most coffee types<br />
avail able in the shops. You can<br />
11
... 4. Making coffee<br />
ascertain the current setting by<br />
reading the scale (fig. 1/B and<br />
fig. 6).<br />
➔ The basic principle is that the<br />
smaller the dot, the finer the grind:<br />
A light roast requires a finer<br />
grind<br />
A dark roast requires a coarser<br />
grind<br />
4.4 Brewing coffee using fresh<br />
coffee from the coffee grinder<br />
Fill the water reservoir with water<br />
and insert filter paper (see point<br />
3.2). Make sure that there are<br />
enough coffee beans in the bean<br />
container. Then place the coffee<br />
jug on the base.<br />
Select the desired brewing sett ings:<br />
➔ Press the button ‘P’. The dis -<br />
play reads in German “Brühen?”<br />
(“Brew?”).<br />
➔ Press the button ‘P’ again and<br />
the display reads in German<br />
“Brühen: Jetzt” (“Brew: now”).<br />
➔ Having again pressed the button<br />
‘P’, you can select the desired<br />
quantity of ground coffee and<br />
cups (4, 6, 8 or 10 cups) by turn -<br />
ing the control knob ‘P’.<br />
➔ Confirm by pressing the button<br />
‘P’.<br />
12<br />
➔ Now select the coffee strength<br />
(aroma selection) settings in the<br />
same way: “Mild, Mittel, Stark”<br />
(“mild, medium or strong”).<br />
➔ Confirm the desired choice by<br />
pressing the button ‘P’.<br />
After you have selected the brew -<br />
ing settings, swing the filter base<br />
(fig. 1/E) out to the left until it clicks<br />
into place (fig. 1/E) and press the<br />
‘On’ button. The red light then<br />
comes on and coffee grinding be -<br />
gins. When the grind ing process is<br />
complete, the filter automatically<br />
swings back into brewing position<br />
and the brewing operation begins.<br />
Note: There may be slight dis -<br />
crepancies in quantities when the<br />
grinder is used for the first time.<br />
4.5 Programming the machine to<br />
use fresh coffee from the coffee<br />
grinder<br />
Fill the water reservoir with water<br />
and insert filter paper (see point<br />
3.2). Make sure that there are<br />
enough coffee beans in the bean<br />
container. Place the coffee jug on<br />
the base. Now select the desired<br />
brewing options (quantity, strength<br />
and time settings):
... 4. Making coffee<br />
➔ Press the button ‘P’ (fig. 1/L).<br />
The display reads in German<br />
“Brühen?” (“Brew?”).<br />
➔ Press the button ‘P’ again and<br />
the display reads in German<br />
“Brühen: Jetzt” (“Brew: now”).<br />
➔ Turn the control knob ‘P’ (fig. 1/L)<br />
and the display reads in German<br />
“Brühen: Auto” (“Brew: auto”).<br />
➔ After pressing the button ‘P’<br />
you can select grinding and cup<br />
quantities (4, 6, 8 or 10 cups) by<br />
turning the control knob ‘P’.<br />
➔ Confirm by pressing the button<br />
‘P’.<br />
➔ Now select the desired coffee<br />
strength (aroma selection) in the<br />
same way: “Mild, Mittel, Stark”<br />
(“mild, medium or strong”)<br />
➔ Confirm your selection by press -<br />
ing the button ‘P’.<br />
➔ Press the button ‘P’ again. The<br />
display reads in German “Brühen?”<br />
(“Brew?”).<br />
➔ Turn the control knob ‘P’ and<br />
the display reads in German<br />
“Zeit?” (“Time?”).<br />
➔ Press the button ‘P’ again and<br />
the display reads in German “Autostart:<br />
Zeit?” (“Autostart: time?”).<br />
➔ After pressing the button ‘P’,<br />
select the desired start time (hours)<br />
by turning the control knob ‘P’.<br />
➔ Confirm by pressing the button<br />
‘P’.<br />
➔ Now select the desired minute<br />
setting in the same way.<br />
➔ After you have selected the start<br />
time, it appears for a few seconds<br />
in the display as con firmation.<br />
➔ As soon as the start time dis -<br />
appears, activate the automatic<br />
timer by pressing the button ‘A’<br />
(fig. 1/M).<br />
➔ The display shows the pro -<br />
grammed start time, and the green<br />
light in the button ‘A’ comes on.<br />
Now swing the filter base (fig. 1/E)<br />
out to the left until it clicks into<br />
place.<br />
The grinding and brewing operation<br />
starts automatically at the given<br />
time. When the given time arrives,<br />
the green light goes off and the red<br />
light comes on for the duration of<br />
the brewing operation. After the<br />
grind ing process, the filter swings<br />
automatically back into brewing<br />
position and the brewing operation<br />
begins.<br />
Tip: Unless you wish to change the<br />
start time, you can activate the<br />
programmed settings simply by<br />
pressing the button ‘A’ (after having<br />
filled the water reservoir and bean<br />
container, set in place filter paper<br />
and coffee jug and swung the filter<br />
base out to the left!).<br />
13
5. General settings for operating the coffee grinder<br />
5.1 Selecting the number of cups<br />
Even numbers of cups can be<br />
selected (4, 6, 8 or 10) by turning<br />
and pressing the ‘P’ control knob,<br />
as described in 4.4. The number<br />
of cups selected then appears on<br />
the left in the second line of the<br />
display.<br />
6. General settings / useful tips<br />
6.1 Deactivating the timer function<br />
If you have activated the timer<br />
function by pressing the button ‘A’<br />
(fig. 1/M) but would not like the<br />
program to run, simply press the<br />
button ‘A’ again. The green light<br />
goes off again and the program is<br />
deactivated.<br />
6.2 Switching off<br />
If you would like to end the brew -<br />
ing operation before it is complete,<br />
switch the machine off by press -<br />
ing the On / Off button (fig. 1/J).<br />
6.3 Removing the coffee jug<br />
during the brewing operation<br />
When the jug is removed, the antidrip<br />
valve prevents any drips from<br />
14<br />
5.2 Selecting the coffee strength<br />
You can select coffee strength settings<br />
by pressing the button ‘P’ as<br />
described in point 4.4. The dis play<br />
reads in German “Mild, Mittel,<br />
Stark” (“mild”, medium or strong”)<br />
to show whether mild, medium or<br />
strong coffee is to be brewed.<br />
falling onto the base. If you are in<br />
a hurry, you can therefore briefly<br />
remove the thermos jug during<br />
the brewing operation, pour out 1<br />
– 2 cups and replace it within<br />
20 seconds to continue the brew -<br />
ing operation.<br />
6.4 Pouring out coffee<br />
To pour coffee from the thermos<br />
jug, remove it when the brewing<br />
operation is complete and open by<br />
turning the lid counter-clockwise<br />
until the dot symbol is level with<br />
the jug’s spout.<br />
Tip: In order to ensure that the<br />
coffee is of even strength<br />
throughout, gently move it back<br />
and forth in the thermos jug when<br />
the brew ing operation is complete.
7. Cleaning<br />
Note: It is essential to observe the<br />
following instructions for cleaning.<br />
7.1 Cleaning the coffee grinder<br />
The grinder funnel occasionally<br />
needs to be cleaned (at the latest<br />
when it blocks!) to keep it clear of<br />
oily coffee residues. Follow the<br />
instructions below (when the bean<br />
container is empty!):<br />
➔ First unplug the machine.<br />
➔ Hold the grinder funnel cover<br />
(fig. 10) by the front and lift the<br />
cover slowly off towards the front.<br />
➔ Open the water reservoir lid<br />
(fig. 4) and remove the aroma protection<br />
cover (fig. 8).<br />
➔ Place a filter in the filter holder<br />
and swing it out to the left until it<br />
clicks into grinding position.<br />
➔ Remove any coffee residues<br />
from the grinder funnel (fig. 11),<br />
not forgetting the rear section of<br />
the funnel, using a suitable instrument<br />
(e.g. a clean paint brush), so<br />
that it falls into the filter paper. A<br />
suitable vacuum cleaner accessory<br />
also works well.<br />
➔ Wipe out the grinder funnel and<br />
empty bean container with a dry<br />
cloth.<br />
➔ Press the release button (fig. 9)<br />
to swing the filter back into brew -<br />
ing position.<br />
➔ Empty the filter paper and put<br />
the grinder funnel cover back on<br />
(push it in at the front until it<br />
audibly clicks into place).<br />
➔ Finally make sure the aroma<br />
protection cover is correctly fitted,<br />
and shut the water reservoir lid.<br />
The machine is now operational<br />
again.<br />
Tip: If lighter coffee beans are<br />
used, the grinder funnel does not<br />
need to be cleaned as regularly as<br />
when darker, oilier coffee beans<br />
are used.<br />
Avoid blockages in the grinder<br />
funnel as follows:<br />
➔ Do not use frozen coffee beans,<br />
as thawing causes condensation<br />
which can cause blockages.<br />
➔ Do not swing the filter out into<br />
the grinding position immediately<br />
after brewing, as the steam rising<br />
from the coffee grounds can cause<br />
blockages.<br />
➔ Do not place the coffee machine<br />
next to a hob or deep fryer, as fat<br />
can cause blockages.<br />
➔ Always keep the coffee bean<br />
container closed, and occasionally<br />
wipe out any oily coffee residues<br />
using a dry cloth.<br />
15
... 7. Cleaning<br />
7.2 Cleaning the coffee machine<br />
The filter holder can be removed<br />
for easy emptying and cleaning<br />
(see fig. 7).<br />
➔ Remove the thermos jug and<br />
open fully the lid of the water<br />
reservoir (fig. 4)<br />
➔ Remove the aroma protection<br />
cover. Then use your finger to find<br />
the rear grip indentation in the<br />
filter holder and pull out the filter<br />
holder using the pop-up handle.<br />
You can now clean it, not for -<br />
getting to actuate the anti-drip<br />
valve several times.<br />
➔ Replace the filter holder, keep -<br />
ing the pop-up handle upright.<br />
Then lay the handle flat in the<br />
direction of the water reservoir.<br />
Make sure the holder is correctly<br />
inserted. The filter holder is now<br />
locked in place.<br />
16<br />
Then replace the aroma protection<br />
cover, close the water reservoir lid<br />
and set the thermos jug back on<br />
the base.<br />
Caution! Use a damp cloth only to<br />
clean the outside of the machine,<br />
and never submerge in water. The<br />
parts of your high-quality NIVONA<br />
coffee machine are not suitable<br />
for the dishwasher.
8. Descaling<br />
Your coffee machine will retain its<br />
high quality longer if you descale<br />
regularly.<br />
Your <strong>CafeFresco</strong> comes with an<br />
automatic descaling reminder<br />
function. After 800 cups of coffee<br />
have been brewed, in German<br />
„Entkalken“ (“Descale”) appears<br />
in the display. Follow the steps as<br />
indicated. If the descaling re -<br />
minder has not appeared after<br />
3 months:<br />
We recommend that, as a pre -<br />
caution, you descale your machine<br />
every 3 months. (If you have purchased<br />
a reusable gold tone filter<br />
please remove it from the filter<br />
holder before descaling.)<br />
Only use ecological descaling<br />
agents for descaling and follow<br />
the instructions provided by the<br />
manufacturer. Never use descaling<br />
agents based on concentrated<br />
formic acid and ideally no agents<br />
in powder form. Never use vinegar<br />
or acetic acid based agents for<br />
descaling. Use standard liquid<br />
products recommended for use on<br />
coffee machines.<br />
Descaling procedure:<br />
➔ Fill the water reservoir with<br />
water, then add the descaling<br />
agent – never the other way round!<br />
➔ Set the thermos jug on the base<br />
and leave the descaling agents for<br />
about 15 minutes, then turn on<br />
the machine.<br />
➔ Start the cycle by pressing the<br />
On / Off button (fig. 1/J). When all<br />
the descaling agent has run<br />
through, turn the machine off<br />
again.<br />
➔ Repeat if necessary. For each<br />
descaling cycle, however, perform<br />
at least two subsequent cycles<br />
with clean water only.<br />
Rinse the coffee jug, coffee jug lid<br />
and filter holder thoroughly under<br />
running water after the descaling<br />
operation. Remember to actuate<br />
the anti-drip valve several times.<br />
17
9. Further instructions<br />
➔ If the machine is unplugged or<br />
there is a power cut, the settings<br />
entered remain saved for about<br />
3 minutes. They must be reentered<br />
if the power supply is cut<br />
for any longer period of time.<br />
➔ If the filter swings out to the<br />
left by accident, swing it back to<br />
the right by pressing the release<br />
catch (fig. 1/C and fig. 9).<br />
18<br />
What to do, if ...<br />
... the filter does not automatically<br />
swing back into brewing position?<br />
➔ Make sure the filter holder is<br />
correctly fitted.<br />
➔ Make sure the aroma protection<br />
cover is correctly fitted.<br />
... the coffee runs too slowly into<br />
the coffee jug?<br />
➔ Clean the anti-drip valve.<br />
➔ Descale the machine.<br />
➔ Select a coarser grinder setting<br />
(see 4.3, grinder settings).
... 9. Further instructions<br />
Please keep the original packaging<br />
and protective material for storage<br />
and transport purposes.<br />
Spare parts / accessories<br />
You can purchase spare parts and<br />
descaling agents from any wellstocked<br />
specialist retailer.<br />
Customer service<br />
NIVONA products are designed to<br />
meet the highest quality standards.<br />
However, if questions do arise while<br />
you operate your machine, we<br />
would like to hear from you. Your<br />
support is essential to our mission<br />
to further develop and improve our<br />
products so that they fully meet<br />
your needs.<br />
Guarantee and customer service<br />
conditions<br />
Please consult the detailed<br />
guaran tee and customer service<br />
conditions in the appropriate<br />
information booklet.<br />
Protecting the environment<br />
Electric and electronic ap -<br />
pliances often contain valuable<br />
or harmful materials<br />
which should not be processed<br />
in the same way as normal<br />
household waste. If incorrectly<br />
processed, they can harm human<br />
health and the environment.<br />
Please therefore do not put your<br />
machine in the dustbin with normal<br />
waste. Instead submit it to the<br />
“collection point for the disposal<br />
and recycling of electric and electronic<br />
appliances” provided by<br />
your local council. You can obtain<br />
further information from your local<br />
council, the waste collection<br />
services or the specialist retailer<br />
who sold you the product.<br />
19
Notices<br />
20
Notices<br />
21
<strong>Nivona</strong> Apparate GmbH<br />
Fritz-Haber-Straße 10<br />
D-90449 Nürnberg<br />
www.nivona.com<br />
© 2008 by NIVONA