Guide to make I-bus CAN connection in Saab 9-3 T7 - DatorKungen
Guide to make I-bus CAN connection in Saab 9-3 T7 - DatorKungen
Guide to make I-bus CAN connection in Saab 9-3 T7 - DatorKungen

Create successful ePaper yourself
Turn your PDF publications into a flip-book with our unique Google optimized e-Paper software.
<strong>Guide</strong> <strong>to</strong> <strong>make</strong> I-<strong>bus</strong> <strong>CAN</strong> <strong>connection</strong> <strong>in</strong> <strong>Saab</strong> 9-3 <strong>T7</strong><br />
JO<br />
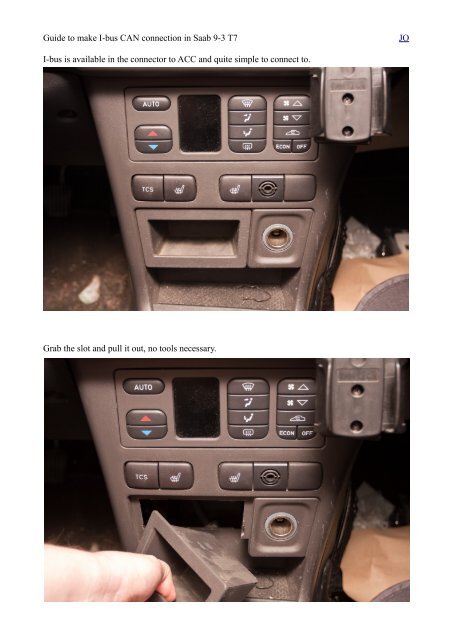
I-<strong>bus</strong> is available <strong>in</strong> the connec<strong>to</strong>r <strong>to</strong> ACC and quite simple <strong>to</strong> connect <strong>to</strong>.<br />
Grab the slot and pull it out, no <strong>to</strong>ols necessary.
<strong>Guide</strong> <strong>to</strong> <strong>make</strong> I-<strong>bus</strong> <strong>CAN</strong> <strong>connection</strong> <strong>in</strong> <strong>Saab</strong> 9-3 <strong>T7</strong><br />
JO<br />
Push the but<strong>to</strong>ns for tcs, and seat heat<strong>in</strong>g out from beh<strong>in</strong>d, then reach up and push the ACC panel<br />
out<br />
Prepare a 9-p<strong>in</strong> female d-sub connec<strong>to</strong>r with three wires (about 25cm/10” of length is quite enough,<br />
remember <strong>to</strong> twist the wires <strong>to</strong> keep good signal quality), p<strong>in</strong> 2 is <strong>CAN</strong>_L, p<strong>in</strong> 7 is <strong>CAN</strong>_L and<br />
either of p<strong>in</strong> 3 or 6 for signal ground. (only one ground is necessary)
<strong>Guide</strong> <strong>to</strong> <strong>make</strong> I-<strong>bus</strong> <strong>CAN</strong> <strong>connection</strong> <strong>in</strong> <strong>Saab</strong> 9-3 <strong>T7</strong><br />
JO<br />
Connect the green wire <strong>to</strong> your <strong>CAN</strong>_H, the white <strong>to</strong> <strong>CAN</strong>_L and black <strong>to</strong> GND. Crimp, solder or<br />
use wire tap connec<strong>to</strong>r like <strong>in</strong> the image.<br />
Reassemble <strong>in</strong> opposite order and you're done.There's also room <strong>to</strong> hide the connec<strong>to</strong>r beh<strong>in</strong>d the<br />
slot so you don't have <strong>to</strong> see it all the time.