WP SaltScan inst.sheet - Welcome to Sechang Instruments!
WP SaltScan inst.sheet - Welcome to Sechang Instruments!
WP SaltScan inst.sheet - Welcome to Sechang Instruments!

Create successful ePaper yourself
Turn your PDF publications into a flip-book with our unique Google optimized e-Paper software.
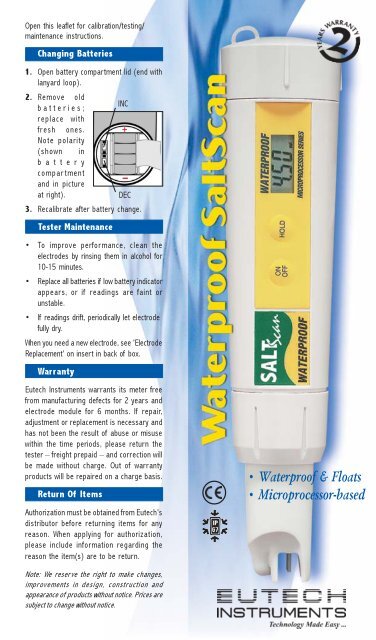
Open this leaflet for calibration/testing/<br />
maintenance <strong>inst</strong>ructions.<br />
Changing Batteries<br />
1. Open battery compartment lid (end with<br />
lanyard loop).<br />
2. Remove old<br />
batteries;<br />
INC<br />
replace with +<br />
fresh ones. +<br />
Note polarity<br />
(shown in<br />
battery<br />
_<br />
compartment _<br />
and in picture<br />
at right).<br />
DEC<br />
3. Recalibrate after battery change.<br />
Tester Maintenance<br />
• To improve performance, clean the<br />
electrodes by rinsing them in alcohol for<br />
10-15 minutes.<br />
• Replace all batteries if low battery indica<strong>to</strong>r<br />
appears, or if readings are faint or<br />
unstable.<br />
• If readings drift, periodically let electrode<br />
fully dry.<br />
When you need a new electrode, see 'Electrode<br />
Replacement' on insert in back of box.<br />
Warranty<br />
Eutech <strong>Instruments</strong> warrants its meter free<br />
from manufacturing defects for 2 years and<br />
electrode module for 6 months. If repair,<br />
adjustment or replacement is necessary and<br />
has not been the result of abuse or misuse<br />
within the time periods, please return the<br />
tester – freight prepaid – and correction will<br />
be made without charge. Out of warranty<br />
products will be repaired on a charge basis.<br />
Return Of Items<br />
Authorization must be obtained from Eutech's<br />
distribu<strong>to</strong>r before returning items for any<br />
reason. When applying for authorization,<br />
please include information regarding the<br />
reason the item(s) are <strong>to</strong> be return.<br />
• Waterproof & Floats<br />
• Microprocessor-based<br />
Note: We reserve the right <strong>to</strong> make changes,<br />
improvements in design, construction and<br />
appearance of products without notice. Prices are<br />
subject <strong>to</strong> change without notice.
<strong>WP</strong> <strong>SaltScan</strong> Instructions<br />
Before You Begin<br />
Remove electrode cap. Soak electrode for a<br />
few minutes in alcohol <strong>to</strong> remove oils.<br />
Calibration<br />
Tester is fac<strong>to</strong>ry calibrated. However, <strong>to</strong><br />
ensure accuracy, calibrate <strong>SaltScan</strong> Tester<br />
regularly.<br />
Select a calibration standard appropriate for<br />
the <strong>SaltScan</strong> Tester. To achieve stated<br />
accuracy, calibrate <strong>to</strong> a standard between<br />
4.00 ppt and 6.00 ppt.<br />
1. Open battery INC<br />
compartment lid<br />
(end with +<br />
lanyard loop).<br />
The two white<br />
but<strong>to</strong>ns are<br />
Increment _<br />
(INC) and<br />
Decrement DEC<br />
(DEC) calibration keys.<br />
2. Rinse electrode in deionized<br />
water, then rinse in calibration<br />
standard, then dip in<strong>to</strong> a<br />
container of calibration standard.<br />
3. Switch unit on (ON/OFF key).<br />
Wait several minutes for display<br />
<strong>to</strong> stabilize.<br />
4. Press the INC or DEC keys <strong>to</strong><br />
adjust reading <strong>to</strong> match the<br />
calibration standard value.<br />
5. After 3 seconds without a key<br />
press, the display flashes 3 times,<br />
then shows 'ENT'. The tester<br />
accepts calibration value; returns<br />
<strong>to</strong> measurement mode.<br />
6. Replace battery cap.<br />
Testing<br />
1. Remove electrode cap. Switch unit on (ON/<br />
OFF key).<br />
2. Dip electrode in<strong>to</strong> test solution. Make sure<br />
sensor is fully covered.<br />
3. Wait for reading <strong>to</strong> stabilize (Au<strong>to</strong>matic<br />
Temperature Compensation corrects for<br />
temperature changes). Note reading.<br />
4. Press ON/OFF <strong>to</strong> turn off tester. Replace<br />
electrode cap. Note: Tester au<strong>to</strong>matically<br />
shuts off after 8.5 minutes of non-use.<br />
HOLD Function<br />
Press HOLD key <strong>to</strong> freeze display. Press HOLD<br />
again <strong>to</strong> release.<br />
Setting Conversion Fac<strong>to</strong>r<br />
This tester lets you select Conductivity-<strong>to</strong>-ppt<br />
conversion fac<strong>to</strong>r of 0.4 <strong>to</strong> 1.0.<br />
The <strong>SaltScan</strong> is fac<strong>to</strong>ry set at 0.5; ideal for testing<br />
NaCl. You may want <strong>to</strong> change the fac<strong>to</strong>r if<br />
working with different salts.<br />
1. Open battery compartment lid. With meter<br />
on, press the HOLD key, then press the<br />
INC key (INC key is inside battery<br />
compartment; see diagram at left).<br />
2. Press the INC or DEC keys <strong>to</strong> adjust the<br />
fac<strong>to</strong>r.<br />
3. After 3 seconds without a key press, the<br />
display flashes 3 times, then shows 'ENT'.<br />
Tester accepts fac<strong>to</strong>r and returns <strong>to</strong><br />
measurement mode.<br />
4. Replace battery cap.<br />
68X247777 1/02 Rev 0
(Picture A)<br />
REMOVE THE OLD ELECTRODE<br />
Replaceable<br />
electrode<br />
Lanyard<br />
connection<br />
(Picture B)<br />
REPLACE THE ELECTRODE<br />
Twist-off<br />
battery<br />
compartment<br />
• Push but<strong>to</strong>n calibration<br />
• Fast, stable, repeatable readings<br />
• Available through authorized distribu<strong>to</strong>rs<br />
SPECIFICATIONS<br />
Range 0.0 <strong>to</strong> 10.00 ppt<br />
Resolution 0.10 ppt<br />
Accuracy 0.00 <strong>to</strong> 7.00 ppt: ±1% FS<br />
above 7.00 ppt: ±3% FS<br />
TDS Fac<strong>to</strong>r fac<strong>to</strong>ry set for NaCl at 0.5<br />
Calibration calibration <strong>to</strong> NaCl value<br />
Standard between 4.00 ppt<br />
Range <strong>to</strong> 6.00 ppt<br />
Calibration 1 point<br />
ATC 0 <strong>to</strong> 50 °C (2% per °C)<br />
Operating 0 <strong>to</strong> 50 °C<br />
Temperature<br />
Power Four 1.5V alkaline batteries<br />
(Eveready A76BP; supplied)<br />
150 hrs. continuous use<br />
Alternate replacement Model<br />
Eveready 303 silver oxide,<br />
70 hrs. continuous use.<br />
Dimensions 6.5”L x 1.5” dia.<br />
(165 x 38mm)<br />
Weight 3.25 oz (90 gms)<br />
Manufactured By:<br />
Eutech <strong>Instruments</strong> Pte Ltd<br />
Blk 55, Ayer Rajah Crescent,<br />
#04-14/24, Singapore 139949<br />
Tel: (65)778 6876 Fax: (65)773 0836<br />
E-Mail: marketing@eutech<strong>inst</strong>.com<br />
Web-Site: http://www.eutech<strong>inst</strong>.com<br />
Made in Singapore<br />
68X247841 1/02 Rev 0<br />
Electrode Replacement<br />
You can replace the electrode module<br />
at the fraction of the cost of a new<br />
tester. When the tester fails <strong>to</strong> calibrate<br />
or gives fluctuating readings in<br />
calibration standards, you need <strong>to</strong><br />
cahnage the electrode.<br />
1. With dry hands, grip the ribbed Tester<br />
collar with electrode facing you. Twist the<br />
collar counter clockwise. (see picture A).<br />
Save the ribbed Tester collar and O-ring<br />
for later use.<br />
2. Pull the old electrode module away from<br />
the Tester.<br />
3. Align the four tabs on the new module so<br />
they match the four slots on teh tester.<br />
(see picture B).<br />
4. Gently push the module on<strong>to</strong> the slots <strong>to</strong><br />
seat it in position. Push the smaller O-<br />
ring fully on<strong>to</strong> the new electrode module.<br />
Push the collar over the module and<br />
thread it in<strong>to</strong> place by firmly twisting<br />
clockwise.<br />
Applications<br />
pools • aquariums • aquaculture •<br />
water quality testing • water and<br />
wastewater treatment • hydroponics<br />
• labs • boilers • fac<strong>to</strong>ries • ecology<br />
studies • and more!