
Create successful ePaper yourself
Turn your PDF publications into a flip-book with our unique Google optimized e-Paper software.
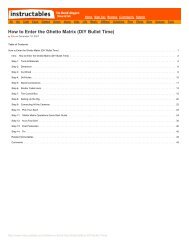
Optional: perform a leak test. Pressurize your chamber to 80 psi. Fill a 5 gallon bucket with water and dip the assembly, look for any bubbles. Tighten and add<br />
pipe joint <strong>com</strong>pound to areas with leaks. If the PVC joints are leaking on the pressure chamber, you can apply a vacuum and suck super glue into the voids.<br />
Image Notes<br />
1. Assembled pressure chamber and trigger valve. Ready for function and leak testing.<br />
Step 6: Bend Launcher Arms<br />
In this step we will build a bending jig, and use it to bend four launcher arms to a specific angle. Make sure annotations are turned on when viewing the video.<br />
Launcher arm supplies<br />
4 13" lengths of 1/2" pipe<br />
2 1/2" PVC caps DO NOT PRIME OR GLUE THEM<br />
Sand, at least two cups worth<br />
Heat gun, propane torch or candle<br />
Wood scrap and 3 2" screws to make bending jig<br />
Leather gloves<br />
Assembly<br />
Choose a launcher tube angle. A 17 or 19 degree angle will give you longer range but you may need the high performance tractors. A 21 or 23 degree angle will<br />
give you quicker opening shorter range netting, a safer bet if you are going to use soda bottle tractors. Choose and print out one of the PDF templates below.<br />
They should be printed in landscape mode on 8 1/2" by 11" paper at 100% scale.<br />
<strong>Build</strong> bending jig. My example bending jig is built on a scrap of 2x4 wood. Hold the template to the surface and put a screw in the pivot position Fig 1. Hold one of<br />
the arms against the pivot screw and sink screw #2 using the edge of the pipe as a guide Fig 2. Again, with the pipe held against the pivot screw, sink screw #3<br />
using the pipe edge as a guide Fig 3.<br />
Cut four 13" lengths of 1/2" pipe, these are the launcher arms. Measure and mark, with permanent marker, 3" in from one end of each arm. This mark, the pivot<br />
mark, will indicate where to heat the pipe for bending, and indicate the point to line up with the pivot screw of the bending jig.<br />
Bend the launcher arms. Tap in place, but DO NOT GLUE, a 1/2" cap on end of the arm. Fill pipe with sand, and tamp to get as tightly packed as possible Fig 4.<br />
Fill the second 1/2" cap half full with sand and tap on the open end of the arm. The sand keeps the pipe from kinking. With both caps on the pipe the sand<br />
shouldn't slosh when shaken, if it does, add more sand. Put on leather gloves and heat arm as locally as possible on the pivot mark. Rotate the pipe rapidly for<br />
even heating and to prevent blistering the pipe. The arm is ready for bending when it will sag under its own weight held horizontally. Align pivot mark with pivot<br />
screw, the remaining short length should be captured by screw #2, immediately bend longer length of pipe over and lodge against screw #3. Allow to cool on the<br />
jig, if PVC is removed while it is still warm it will begin to straighten and lose the correct angle. Once PVC is room temp, remove from jig, remove both caps, and<br />
pour out the sand. The heating can also be ac<strong>com</strong>plished with a candle, have a look at robert's instructable step #3. Both tk4717 and ome33 had good results<br />
with the candle technique.<br />
Repeat for the remaining three arms.<br />
http://www.instructables.<strong>com</strong>/id/<strong>Build</strong>-A-<strong>Net</strong>-<strong>Gun</strong>/