BENUTZERHANDBUCH USER MANUAL NAVODILA ZA ... - Smartkat
BENUTZERHANDBUCH USER MANUAL NAVODILA ZA ... - Smartkat
BENUTZERHANDBUCH USER MANUAL NAVODILA ZA ... - Smartkat

You also want an ePaper? Increase the reach of your titles
YUMPU automatically turns print PDFs into web optimized ePapers that Google loves.
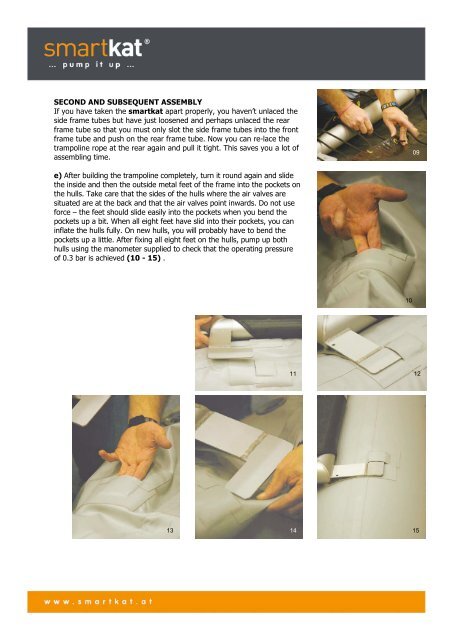
SECOND AND SUBSEQUENT ASSEMBLY<br />
If you have taken the smartkat apart properly, you haven’t unlaced the<br />
side frame tubes but have just loosened and perhaps unlaced the rear<br />
frame tube so that you must only slot the side frame tubes into the front<br />
frame tube and push on the rear frame tube. Now you can re-lace the<br />
trampoline rope at the rear again and pull it tight. This saves you a lot of<br />
assembling time.<br />
06<br />
09<br />
e) After building the trampoline completely, turn it round again and slide<br />
the inside and then the outside metal feet of the frame into the pockets on<br />
the hulls. Take care that the sides of the hulls where the air valves are<br />
situated are at the back and that the air valves point inwards. Do not use<br />
force – the feet should slide easily into the pockets when you bend the<br />
pockets up a bit. When all eight feet have slid into their pockets, you can<br />
inflate the hulls fully. On new hulls, you will probably have to bend the<br />
pockets up a little. After fixing all eight feet on the hulls, pump up both<br />
hulls using the manometer supplied to check that the operating pressure<br />
of 0.3 bar is achieved (10 - 15) .<br />
10<br />
11 12<br />
13 14 15