NetPoint Pro 3x2.4 Quick Installation Guide - Netronics Networks
NetPoint Pro 3x2.4 Quick Installation Guide - Netronics Networks
NetPoint Pro 3x2.4 Quick Installation Guide - Netronics Networks

Create successful ePaper yourself
Turn your PDF publications into a flip-book with our unique Google optimized e-Paper software.
<strong>NetPoint</strong> <strong>Pro</strong> <strong>3x2.4</strong> <strong>Quick</strong> <strong>Installation</strong> <strong>Guide</strong><br />
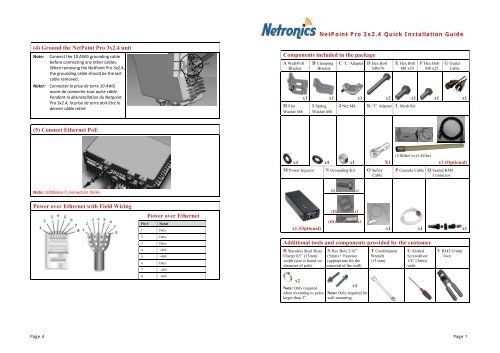
(4) Ground the <strong>NetPoint</strong> <strong>Pro</strong> <strong>3x2.4</strong> unit<br />
Note:<br />
Connect the 10 AWG grounding cable<br />
before connecting any other cables.<br />
When removing the <strong>NetPoint</strong> <strong>Pro</strong> <strong>3x2.4</strong>,<br />
the grounding cable should be the last<br />
cable removed.<br />
II<br />
III<br />
I<br />
10AWG<br />
Components included in the package<br />
A Wall/Poll<br />
Bracket<br />
B Clamping<br />
Bracket<br />
C ‘L’ Adapter D Hex Bolt<br />
M8x70<br />
E Hex Bolt<br />
M8 x39<br />
F Hex Bolt<br />
M8 x25<br />
G Outlet<br />
Cable<br />
Noter: Connecter la prise de terre 10 AWG<br />
avant de connecter tout autre câble.<br />
Pendant la désinstallation du Netpoint<br />
<strong>Pro</strong> <strong>3x2.4</strong>, la prise de terre doit être le<br />
dernier câble retiré.<br />
H Flat<br />
Washer M8<br />
x1 x1 x1 x2 x1 x1 x1<br />
J Nut M8 K ‘T’ Adapter L Mesh Kit<br />
I Spring<br />
Washer M8<br />
(5) Connect Ethernet PoE<br />
x4 x4 x1 X1<br />
(5.8Ghz) or (5.4Ghz)<br />
x1 (Optional)<br />
M Power Injector N Grounding Kit O Safety<br />
Cable<br />
P Console Cable Q Sealed RJ45<br />
Connector<br />
Note: 1000Base T connection (N/A).<br />
(I)<br />
x1<br />
Power over Ethernet with Field Wiring<br />
Power over Ethernet<br />
Pin # Signal<br />
1 Data<br />
x1 (Optional)<br />
22B(II)<br />
23B(III)<br />
x1<br />
x1<br />
x1 20Bx1<br />
21Bx1<br />
2 Data<br />
3 Data<br />
4 +48V<br />
5 +48V<br />
6 Data<br />
7 -48V<br />
Additional tools and components provided by the customer<br />
R Stainless Steel Hose<br />
Clamp 0.5” (13mm)<br />
width (size is based on<br />
diameter of pole)<br />
S Hex Bolt 3/16”<br />
(5mm) + Fastener<br />
(appropriate for the<br />
material of the wall)<br />
T Combination<br />
Wrench<br />
(13 mm)<br />
U Slotted<br />
Screwdriver<br />
1/8” (3mm)<br />
wide<br />
V RJ45 Crimp<br />
Tool<br />
8 -48V<br />
x2<br />
Note: Only required<br />
when mounting to poles<br />
larger than 3”.<br />
x4<br />
Note: Only required for<br />
wall mounting.<br />
Page 4 Page 1
<strong>Installation</strong> <strong>Pro</strong>cedure<br />
(2C) Large pole (larger than 3”<br />
diameter)<br />
(2D) Wall mounting<br />
(1) Assemble the ‘L’ adapter to the<br />
<strong>NetPoint</strong> <strong>Pro</strong> <strong>3x2.4</strong> unit<br />
E<br />
F<br />
G<br />
C<br />
(2) Install the mounting brackets<br />
Note:<br />
When mounting the <strong>NetPoint</strong> <strong>Pro</strong> <strong>3x2.4</strong>, the pole or wall mounting must support a<br />
minimum of 61.6 lbs (28 kg). In addition, the pole or wall mounting must support the wind<br />
loads from the <strong>NetPoint</strong> <strong>Pro</strong> <strong>3x2.4</strong>. For example, the wind load at a wind velocity of 100<br />
mph (160 km/h) is 24.2 lbs (11 kg) and the wind load at a wind velocity of<br />
165 mph (264 km/h) is 66.1 lbs (30 kg).<br />
Noter: Lorsque vous montez la <strong>NetPoint</strong> <strong>Pro</strong> <strong>3x2.4</strong>, le poteau ou le montage mural doit supporter<br />
d'un minimum de 61.6 lbs (28 kg). En outre, le montage sur le poteau ou sur le mur doit<br />
appuyer les surcharges dues au vent de la <strong>NetPoint</strong> <strong>Pro</strong> <strong>3x2.4</strong><br />
(par exemple, 24.2 lbs (11 kg) pour la vitesse du vent de 100 mph (160 km/h),<br />
66.1 lb (30 kg) pour l'énergie éolienne Vitesse de 165 mph (264 km/h)).<br />
(3A) Mount the unit on vertical pole<br />
(3B) Assemble the Safety cable to the<br />
side<br />
(3C) Mount the unit on horizontal<br />
pole<br />
(3D) Assemble the Safety cable to the<br />
side<br />
(2A) Narrow pole (1”-1.75” diameter)<br />
(2B) Normal pole (1”-1.75” diameter)<br />
Pole<br />
Pole<br />
A<br />
B<br />
D<br />
A<br />
G<br />
G<br />
Note: Wrap the Safety cable around the pole first<br />
and then assemble.<br />
Note: Wrap the Safety cable around the pole first<br />
and then assemble.<br />
D<br />
B<br />
Page 2 Page 3