Payroll Processing - Franklin County Auditor
Payroll Processing - Franklin County Auditor
Payroll Processing - Franklin County Auditor

Create successful ePaper yourself
Turn your PDF publications into a flip-book with our unique Google optimized e-Paper software.
PAYROLL PROCESSING<br />
<strong>Payroll</strong> is generated at 4:00 p.m. on the Monday following the last day of each pay<br />
period. The generated payroll is available for key-entry beginning at 8:00 a.m. Tuesday<br />
mornings.<br />
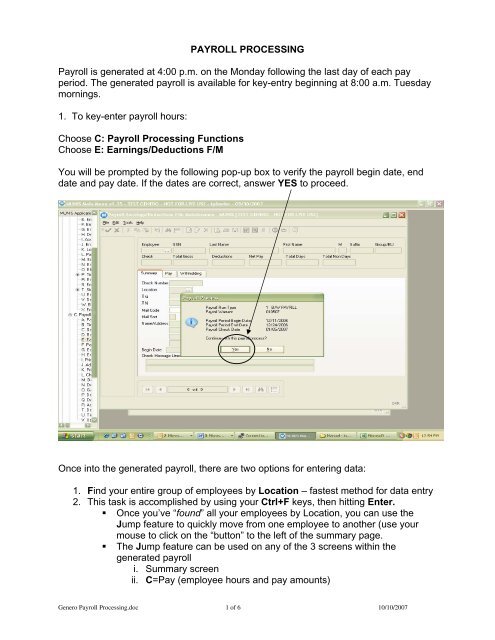
1. To key-enter payroll hours:<br />
Choose C: <strong>Payroll</strong> <strong>Processing</strong> Functions<br />
Choose E: Earnings/Deductions F/M<br />
You will be prompted by the following pop-up box to verify the payroll begin date, end<br />
date and pay date. If the dates are correct, answer YES to proceed.<br />
Once into the generated payroll, there are two options for entering data:<br />
1. Find your entire group of employees by Location – fastest method for data entry<br />
2. This task is accomplished by using your Ctrl+F keys, then hitting Enter.<br />
• Once you’ve “found” all your employees by Location, you can use the<br />
Jump feature to quickly move from one employee to another (use your<br />
mouse to click on the “button” to the left of the summary page.<br />
• The Jump feature can be used on any of the 3 screens within the<br />
generated payroll<br />
i. Summary screen<br />
ii. C=Pay (employee hours and pay amounts)<br />
Genero <strong>Payroll</strong> <strong>Processing</strong>.doc 1 of 6 10/10/2007
iii. Withholding screen (employee deductions)<br />
3. Find individual employees by Employee # – use to make entries individually<br />
C=Pay<br />
From the generated payroll Summary screen, choose the Pay (C=Pay) tab by<br />
clicking on it with your mouse.<br />
All active, full-time employees are generated into each payroll with the standard<br />
hours found on their Base Pay (usually 100 - Regular) record in Employee<br />
Job/Salary. All “leave” pay codes (sick, vacation, comp, personal, etc.) are designed<br />
to reduce the number of Regular Hours when key-entered through C=Pay.<br />
On this screen, you can:<br />
1. Choose Ctrl+ U, use your DOWN arrow key or tab through fields, down to the<br />
appropriate pay type code, enter the hours used during the pay period, hit<br />
Enter.<br />
Genero <strong>Payroll</strong> <strong>Processing</strong>.doc 2 of 6 10/10/2007
2. Enter “on-the-fly” pay types not found on the Employee Master Job/Salary.<br />
From the screen above, choose Ctrl + A (or icon). A screen will appear over<br />
the C=Pay screen. If you know the number of the pay type code you wish to<br />
use, you can enter it in the Pay Code field. If not, use your mouse and click<br />
the drop down file adjacent to the field to see the available list of pay type<br />
codes. Scroll down, highlight the pay type you want to use. You can either hit<br />
Enter or use your mouse and click the green check mark.<br />
Most of the data on the screen will automatically fill. Tab through the screen to<br />
the HOURS field, enter the number of hours required, rate of pay (if blank) and<br />
hit Enter.<br />
**NOTE: Some of the pay type codes will automatically fill in the RATE OF PAY.<br />
Before you exit the screen, make sure there is a rate – if the rate doesn’t<br />
automatically appear, you MUST ENTER A RATE FOR THE EMPLOYEE TO<br />
BE PAID FOR THE HOURS KEY ENTERED.<br />
**Do not enter a rate on the following Leave Without Pay codes – the rate must<br />
be 0.00 for proper calculation: 205 Leave w/o Pay, 206 Absent w/o Leave, 210<br />
Suspension, 212 Vacation Suspension, 215 Military Leave w/o Pay, 220 FMLA<br />
Unpaid.<br />
Genero <strong>Payroll</strong> <strong>Processing</strong>.doc 3 of 6 10/10/2007
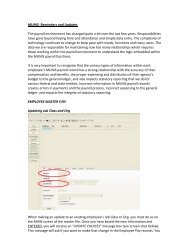
ADDING AN EMPLOYEE INTO THE GENERATED PAYROLL:<br />
Occasionally, you might need to add an inactive employee into a payroll that has<br />
already been generated. This function is especially useful when an employee is to be<br />
paid Term Sick Pay. By leaving the employee inactive and adding them into the payroll<br />
manually, it lessens the chance that they will be paid their regular pay in subsequent<br />
payrolls -- you will not need to activate the employee, then remember to inactivate them<br />
again.<br />
From the summary screen, choose Ctrl + A; enter the employee number. A warning box<br />
will appear with the message “Employee Status is NOT Active. Continue?” Type a Y<br />
for Yes if you wish to continue and add the employee into the generated payroll. Tab<br />
down to the Check # field and type a “0”. Another box will appear (see below) with<br />
several automatically filled questions. Tab through the first two questions. It is<br />
IMPERATIVE that you type in the correct Deduction Cycle to ensure the employee<br />
deductions are both included and calculated properly for that particular payroll.<br />
Deduction Cycle 1 = first pay of the month; Deduction Cycle 2 = second pay of the<br />
month; Deduction Cycle 3 = third pay of the month. Enter once more. The employee<br />
record is now in the current payroll; continue with the appropriate time and attendance<br />
key-entry.<br />
This same process can also be done for new employees whose Employee Master File<br />
and Job/Salary were not entered into MUNIS/Genero ® prior to the payroll generate. You<br />
must enter all of the employee data in Employee Master File Maintenance and Job<br />
Salary prior to adding “on the fly” into a generated payroll.<br />
Genero <strong>Payroll</strong> <strong>Processing</strong>.doc 4 of 6 10/10/2007
W = WITHHOLDINGS<br />
From the generated payroll summary or the Pay screen, choose the Withholding tab.<br />
This screen contains all deductions for the specifically generated payroll. It shows<br />
employee and employer deduction amounts.<br />
Generally, you will not need to make changes to employee deductions in the payroll,<br />
unless you receive a change AFTER the current payroll has been generated. If the<br />
change is effective ONLY FOR THE CURRENT PAY, you can update the amount<br />
directly on this screen.<br />
If the change is to be PERMANENT, you must update the Employee Master Deduction<br />
record.<br />
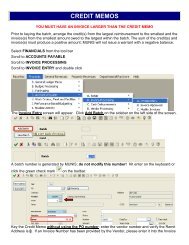
PRINTING A PAYROLL PROOF<br />
Choose C: <strong>Payroll</strong> <strong>Processing</strong> Functions<br />
Choose G: Earnings/Deductions Proof<br />
You will again be prompted by the pop-up box to verify the payroll begin date, end date<br />
and pay date. If the dates are correct, answer YES to proceed.<br />
The first time you access this screen, you will need to DEFINE the proof by entering the<br />
fields as seen below. You should ALWAYS choose B – Detail Proof as the Proof<br />
Option. You may use either the drop down box, or key enter the letter B.<br />
Genero <strong>Payroll</strong> <strong>Processing</strong>.doc 5 of 6 10/10/2007
You can either click the printer icon at the top of the page, or go to the File option in the<br />
upper left-hand corner, click and choose Output. This begins the printing process.<br />
Choose Output to print your proof. When the Print window appears, your default printer<br />
number should in the window (Call Bob x7343 to have this set-up if it doesn’t appear).<br />
Genero <strong>Payroll</strong> <strong>Processing</strong>.doc 6 of 6 10/10/2007