Sukhoi 29S 50E V.2 - MANUAL INTRO - Sebart
Sukhoi 29S 50E V.2 - MANUAL INTRO - Sebart
Sukhoi 29S 50E V.2 - MANUAL INTRO - Sebart

Create successful ePaper yourself
Turn your PDF publications into a flip-book with our unique Google optimized e-Paper software.
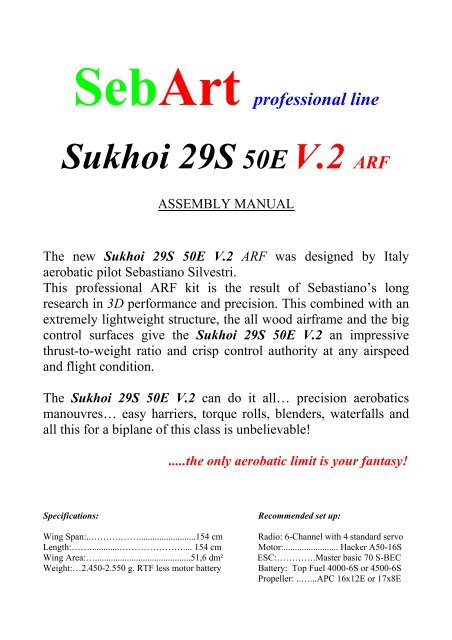
SebArt professional line<br />
<strong>Sukhoi</strong> <strong>29S</strong> <strong>50E</strong> <strong>V.2</strong> ARF<br />
ASSEMBLY <strong>MANUAL</strong><br />
The new <strong>Sukhoi</strong> <strong>29S</strong> <strong>50E</strong> <strong>V.2</strong> ARF was designed by Italy<br />
aerobatic pilot Sebastiano Silvestri.<br />
This professional ARF kit is the result of Sebastiano’s long<br />
research in 3D performance and precision. This combined with an<br />
extremely lightweight structure, the all wood airframe and the big<br />
control surfaces give the <strong>Sukhoi</strong> <strong>29S</strong> <strong>50E</strong> <strong>V.2</strong> an impressive<br />
thrust-to-weight ratio and crisp control authority at any airspeed<br />
and flight condition.<br />
The <strong>Sukhoi</strong> <strong>29S</strong> <strong>50E</strong> <strong>V.2</strong> can do it all… precision aerobatics<br />
manouvres… easy harriers, torque rolls, blenders, waterfalls and<br />
all this for a biplane of this class is unbelievable!<br />
.....the only aerobatic limit is your fantasy!<br />
Specifications:<br />
Recommended set up:<br />
Wing Span:..……….…….........................154 cm Radio: 6-Channel with 4 standard servo<br />
Length:…….............………………….... 154 cm Motor:........................ Hacker A50-16S<br />
Wing Area:…..........................................51,6 dm² ESC:………….Master basic 70 S-BEC<br />
Weight:…2.450-2.550 g. RTF less motor battery Battery: Top Fuel 4000-6S or 4500-6S<br />
Propeller: ..…...APC 16x12E or 17x8E
Required radio, motor and battery<br />
Radio equipment:<br />
• Minimum 6-channel radio system<br />
• 4 standard digital JR DS 8301 or DS 9511<br />
• 2 servo extensions 500mm, for elevator and rudder servos<br />
Recommended electric motor for best performance:<br />
• Hacker A50-16S + Jeti Master Basic 70A SBec + APC 16x12 or 17x8E<br />
• Battery pack Top Fuel 4000-6S or 4500-6S<br />
Additional required item, tools and adhesives<br />
Tools:<br />
• Drill<br />
• Drill bits: 1,5mm; 2mm; 2,5mm; 3mm<br />
• Phillips screwdriver<br />
• Hobby knife<br />
• Masking tape<br />
• Paper towels<br />
• Rubbing alcohol<br />
• Sand paper<br />
• Soldering iron<br />
• synthetic oil<br />
Adhesives:<br />
• 5-minute epoxy<br />
• thin CA<br />
• medium CA<br />
Warning<br />
This RC aircraft is not a toy!<br />
If misused, it can cause serious bodily harm and damage to property.<br />
Fly only in open areas, preferably in official flying sites, following all instructions included with<br />
your radio and motor.<br />
This plane is a compromise between Aerobatics and 3D flying, and not a pylon racer.<br />
It is built with a very light structure and for this reason we hardly recommend:<br />
→ Do NOT fly your airplane at high speeds, because this may cause structural<br />
failures or flutter due to the extremely large control surfaces.
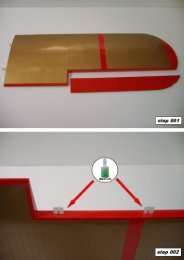
Before starting assembly<br />
Before starting the assembly of your <strong>Sukhoi</strong> <strong>29S</strong> <strong>50E</strong> <strong>V.2</strong>, remove each part from its bag and<br />
protection for a prior inspection. Closely inspect the fuselage, wing panels, rudder, and stabilizer for<br />
damage. If you find any damage or missing parts, contact the place of purchase.<br />
If you find any wrinkles in the covering, use a heat gun or covering iron to remove them. Use<br />
caution while working around areas where the covering material overlap to prevent separating the<br />
covers.<br />
Warranty information<br />
SebArt garantees this kit to be free from defects in both material and workmanship at the date of<br />
purchase.<br />
This warranty does not cover any parts damage by use or modification, and in no case shall<br />
SebArt’s liability exceed the original cost of the purchased kit.<br />
Further, SebArt reserve the right to change or modify this warranty without notice.<br />
In that SebArt has no control over the final assembly or material used for the final assembly, no<br />
liability shall be assumed or accepted for any damage of the final user-assembled product. By the<br />
act of using the product, the user accepts all resulting liability.<br />
If the buyer is not prepared to accept the liability associated with the use of this product, the buyer<br />
is advised to return this kit immediately in new and unused condition to the place of purchase.<br />
Control throws<br />
Please, follow the recommended linkage setups:<br />
For the AILERON we recommend the following throws:<br />
Low rate: 20° up / 20° down Expo: 40%<br />
3D rate: 45° up / 45° down Expo: 80%<br />
For the ELEVATOR we recommend the following throws:<br />
Low rate: 20° up / 20° down Expo: 25%<br />
3D rate: 60° up / 60° down Expo: 80%<br />
For the RUDDER we recommend the following throws:<br />
Low rate: 30° left / 30° right Expo: 30%<br />
3D rate: 50° left / 50° right Expo: 60%<br />
Note: the Expo is (+) for JR systems, and (–) for Futaba systems.
Mixing<br />
For best performance, we recommend a linear-mix*:<br />
Rudder → Elevator UP<br />
When you give full rudder to the right or left side, the elevator have to go up (positive) approx. 8%<br />
Rudder → Ailerons<br />
When you give full rudder to right the ailerons need to go left approx. 2%<br />
When you give full rudder to left the ailerons need to go right approx. 2%<br />
* if you have a programmable computer radio.<br />
Recommended CG<br />
The recommended Center of Gravity location is 145mm behind the leading edge of the wing<br />
against the fuselage.<br />
‣ 140mm is good for aerobatics<br />
‣ 150mm or more is good for 3D<br />
You can use the battery pack, moving it forward or backward, to achieve the correct balance.<br />
Range test your radio<br />
Before fly, be sure to range check your radio as manufacturer’s instruction manual of you<br />
radio-system recommend.<br />
Double-check all controls (aileron, elevator, rudder and throttle) move in the correct<br />
direction.<br />
Be sure that your batteries are fully charged, as per the instructions included with your<br />
batteries and that your radio is fully charged as per its instructions.<br />
...good flights!<br />
SebArt di Sebastiano Silvestri<br />
Via Trento 69/3<br />
38017 Mezzolombardo (TN) – Italy<br />
www.sebart.it