DIEM⢠Immediate Occlusal Loading⢠Guidelines ... - Dental-Depot
DIEM⢠Immediate Occlusal Loading⢠Guidelines ... - Dental-Depot
DIEM⢠Immediate Occlusal Loading⢠Guidelines ... - Dental-Depot

Create successful ePaper yourself
Turn your PDF publications into a flip-book with our unique Google optimized e-Paper software.
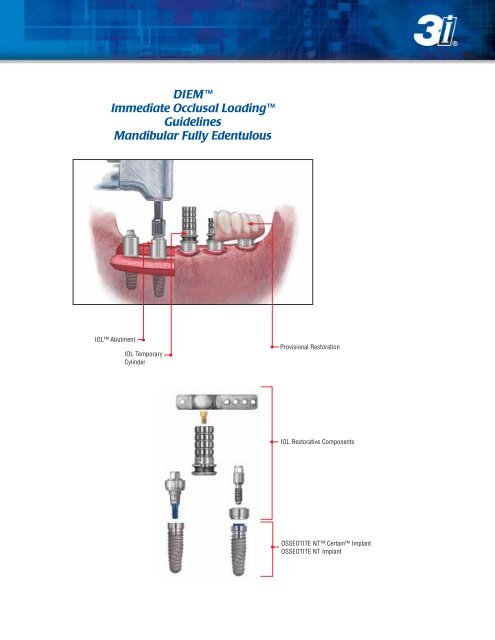
DIEM<br />
<strong>Immediate</strong> <strong>Occlusal</strong> Loading<br />
<strong>Guidelines</strong><br />
Mandibular Fully Edentulous<br />
IOL Abutment<br />
IOL Temporary<br />
Cylinder<br />
Provisional Restoration<br />
IOL Restorative Components<br />
OSSEOTITE NT Certain Implant<br />
OSSEOTITE NT Implant
Table Of Contents<br />
Introduction Page 2<br />
Treatment Planning Considerations Page 3<br />
IOL Product Chart Page 4<br />
IOL <strong>Guidelines</strong> For Fully Edentulous Mandible<br />
Standard Diameter 4.1mm implant platform Page 6<br />
Icon Key:<br />
OSSEOTITE NT Certain Internal<br />
Connection Implant System:<br />
OSSEOTITE ® External Hex<br />
Connection Implant System:<br />
OSSEOTITE NT Certain Internal<br />
and OSSEOTITE External Hex<br />
Connection Implant System:<br />
1
Introduction<br />
These guidelines were designed to serve as a reference<br />
for the dental practitioner to utilize 3i implants and surgical<br />
instruments in immediate occlusal loading of the fully<br />
edentulous mandible.<br />
Initially, occlusal loading of dental implants was governed<br />
by a strict protocol. 1,2 <strong>Immediate</strong> occlusal loading of dental<br />
implants in some cases in the 1960’s resulted in fibrous<br />
encapsulation of the implants, implant mobility and loss of<br />
implants. 3 There are significant differences between immediate<br />
occlusal loading of dental implants and the immediate<br />
restoration of dental implants without occlusal function.<br />
<strong>Immediate</strong> occlusal loading requires multiple implants rigidly<br />
splinted by a fixed prosthesis. <strong>Immediate</strong> restoration of dental<br />
implants can be accomplished with single implants, but the<br />
restorations are contoured to have no occlusal contact in<br />
centric occlusion, lateral working or balancing movements.<br />
Authors have reported favorable results on immediate loading<br />
of dental implants. In 1997, Tarnow et al reported 98%<br />
cumulative survival rates (CSR) 1 to 6 years post-implant<br />
treatment. 4 In 2000, Cooper et al reported 98% CSR 18 months<br />
post-implant treatment. 5 Testori et al (2003) reported one<br />
failure, due to infection, in a study involving 92 OSSEOTITE ®<br />
Implants that were immediately loaded with fixed prostheses<br />
in edentulous mandibles. Testori et al reported a CSR for<br />
OSSEOTITE Implants of 98.9%, which was achieved for up to<br />
48 months of follow-up. 6 The prosthetic cumulative success<br />
rate for the same period was 100%. 6<br />
DIEM, the latin word for day, has been chosen by 3i as the<br />
name for our initiative to incorporate immediate loading<br />
procedures into your practice. Evidence based research will<br />
drive the development of clinician driven guidelines for each<br />
type of immediate loading procedure. This initiative by 3i is<br />
divided into 4 phases:<br />
1. <strong>Immediate</strong> occlusal loading of the fully edentulous mandible.<br />
2. <strong>Immediate</strong> occlusal loading of the fully edentulous maxilla.<br />
<strong>Immediate</strong> non-occlusal loading of the partially edentulous<br />
mandible/maxilla.<br />
3. <strong>Immediate</strong> occlusal loading of the partially edentulous<br />
mandible/maxilla.<br />
4. <strong>Immediate</strong> non-occlusal loading of the single tooth implant.<br />
The following DIEM <strong>Guidelines</strong> for the fully edentulous<br />
mandible have been developed for clinicians by consensus<br />
from a peer leading group of implant surgeons and restorative<br />
dentists. It is intended to provide clinicians interested in<br />
treating patients with <strong>Immediate</strong> <strong>Occlusal</strong> Loading (IOL),<br />
using 3i OSSEOTITE Implants and IOL Components, with<br />
guidelines relative to patient selection, diagnostic work-ups,<br />
surgical parameters and restorative techniques. The guidelines<br />
illustrate the use of OSSEOTITE NT Implants and a new line<br />
of IOL Abutments and IOL Cylinders that were designed for this<br />
treatment concept. The guidelines have been specifically<br />
developed to emphasize simplicity and flexibility in multiple<br />
clinical situations. Patients may be edentulous or dentulous<br />
on the day of surgery. If they are edentulous, implants can be<br />
placed crestally or sub-crestally. If the patient presents with a<br />
hopeless mandibular dentition, the teeth will be extracted and<br />
an alveolectomy performed in order to obtain optimal surgical<br />
sites for implant placement. In addition, it is the responsibility<br />
of the implant clinician to determine the benefits and<br />
limitations of a particular treatment protocol for each patient.<br />
DIEM <strong>Guidelines</strong> are intended to serve as a roadmap to<br />
immediate loading. Once the doctor has become comfortable<br />
performing immediate load procedures they may take a variety<br />
of personally selected detours to enhance their technique.<br />
There are two main objectives to Phase 1 of the DIEM <strong>Guidelines</strong>:<br />
1. To create a full-arch, fixed, implant-supported provisional<br />
restoration for the immediate occlusal loading of an<br />
edentulous mandible.<br />
2. To create a full-arch, fixed, implant-supported provisional<br />
restoration for the immediate occlusal loading of a partially<br />
edentulous mandible, which is to be rendered fully<br />
edentulous as part of the IOL procedure.<br />
Before<br />
After<br />
A determination needs to be made prior to performing an<br />
immediate loading procedure; (1) are the surgical and prosthetic<br />
procedures to be rendered in the same office or (2) is the<br />
patient moving from the surgical office to the prosthetic office.<br />
If the patient is to move between offices, coordination of<br />
appointments is critical.<br />
2
DIEM<br />
<strong>Immediate</strong> <strong>Occlusal</strong> Loading<br />
<strong>Guidelines</strong><br />
Mandibular Fully Edentulous<br />
PRE-TREATMENT DIAGNOSTICS:<br />
(Surgeon, Restorative Dentist And Laboratory Technician)<br />
• Medical work up<br />
• Clinical and radiographic evaluation<br />
(1) Periapical X-rays<br />
(2) Panoramic X-rays<br />
(3) CT Scans<br />
• Pre-prosthetic evaluation, articulated casts with record<br />
of vertical dimension<br />
• Verified wax try-in(s) set to 1st molar occlusion if<br />
implants will only be placed between the mental foramina<br />
(if a provisional denture is made)<br />
• Measure gingival thickness. This will facilitate IOL<br />
abutment selection<br />
TREATMENT INDICATIONS:<br />
• Adequate bone quality equal to or greater than Type III<br />
• Bone height equal to or greater than 12mm<br />
to allow for a minimum 10mm implant<br />
• Bone width equal to or greater than 6mm<br />
to allow for a minimum 4mm diameter implant<br />
• Adequate curvature of the arch and space between<br />
mental foramina to permit proper anterior/posterior<br />
spread measurement will allow functional cantilevers<br />
to first molar occlusion<br />
TREATMENT CONTRAINDICATIONS:<br />
• Health complications<br />
• Para-functional habits<br />
• Poor bone quality - Type IV (not able to achieve<br />
primary stability)<br />
• Limited curvature of the arch and space between mental<br />
foramina (will not allow good anterior/posterior spread<br />
measurement to achieve functional cantilevers to 1st<br />
molar occlusion)<br />
• Bone height less than 12mm<br />
• Bone width less than 6mm<br />
A/P SPREAD DEFINED:<br />
• The A/P, or anterior/posterior, spread measurement is a<br />
formula used to calculate the maximum indicated cantilever<br />
length off the posterior-most implant on a fixed restoration.<br />
It is calculated by measuring the distance between two<br />
parallel lines, one drawn across the distal of the posteriormost<br />
implants and one drawn through the center of the<br />
anterior-most implant, and multiplying the result by 1.5. 7<br />
Distal of Posterior-Most Implants<br />
A/P x 1.5 = Cantilever<br />
Center of the Anterior-Most Implant<br />
3
IOL Product Chart<br />
IOL ABUTMENTS:<br />
For 4.1mm Platform 3i Implants<br />
CERTAIN IOL ABUTMENTS<br />
Description:<br />
• Two-piece non-hexed (external hex)<br />
• One-piece non-hexed (Certain)<br />
• Titanium alloy<br />
Diameter:<br />
• 4.1mm platform<br />
• 4.5mm abutment collar diameter<br />
Collar Heights:<br />
• 2.0mm<br />
• 3.0mm<br />
• 4.0mm<br />
• 5.5mm<br />
• 7.0mm<br />
Instrumentation:<br />
• PAD00 or PAD24 abutment driver<br />
• RASA3 abutment driver tip<br />
Abutment Screw Recommended Torque:<br />
• 20Ncm<br />
IOL TITANIUM TEMPORARY CYLINDER:<br />
Description:<br />
• Titanium alloy<br />
• Knurled surface to aid in mechanical locking of acrylic<br />
to cylinder<br />
• Notch at bottom of cylinder retains the rubber dam<br />
and inhibits dam movement<br />
• Trimmed with a carbide cross-cut bur<br />
• Secured with a hex Gold-Tite Retaining Screw (GSH30)<br />
(An abutment waxing screw [WSK10] may be used<br />
during luting.)<br />
Height:<br />
• 10mm<br />
Instrumentation:<br />
• PHD02N or PHD03N large hex driver<br />
• RASH3N or RASH8N large hex driver tip<br />
Retaining Screw Recommended Torque:<br />
• 10Ncm<br />
IIOL20T<br />
2mm<br />
IOL20T<br />
2mm<br />
IIOL30T<br />
3mm<br />
IOL30T<br />
3mm<br />
IOL ABUTMENTS<br />
4.5mm<br />
4.1mm<br />
IIOL40T<br />
4mm<br />
IOL40T<br />
4mm<br />
IIOL55T<br />
5.5mm<br />
EXTERNAL HEX IOL ABUTMENTS<br />
(Two-piece)<br />
H<br />
IOL55T<br />
5.5mm<br />
IIOL70T<br />
7mm<br />
IOL70T<br />
7mm<br />
IOL TEMPORARY CYLINDER<br />
AND HEX RETAINING SCREW<br />
IOLTC<br />
GSH30<br />
(GSH30 and IOLTC are packaged separately.)<br />
4
IOL DISTAL EXTENSION:<br />
Description:<br />
• Titanium alloy<br />
• Placed on the two posterior-most temporary cylinders<br />
• Provides up to 8mm of distal support for provisional<br />
denture cantilevers<br />
• Length may be adjusted when necessary with carbide<br />
cross-cut bur<br />
• Retained in place with acrylic resin<br />
3.2mm<br />
IOL DISTAL EXTENSION<br />
7.9mm<br />
IOL HEALING CAP:<br />
Description:<br />
• One-piece<br />
• Titanium alloy<br />
• Height 4.3mm<br />
IOL IMPRESSION COPINGS:*<br />
Pick-Up Impression Coping<br />
Description:<br />
• Two-piece (coping and guide pin)<br />
• Stainless steel<br />
Transfer Impression Coping<br />
Description:<br />
• One-piece<br />
• Stainless steel<br />
IOL ANALOG:*<br />
Description:<br />
• Replicates IOL Abutment<br />
• Stainless steel<br />
GOLD CYLINDERS:*<br />
Description:<br />
• Used for definitive framework<br />
• Gold/palladium alloy<br />
• Secured with a hex Gold-Tite Retaining Screw (GSH30)<br />
IOL HEALING CAP<br />
4.3mm<br />
2.8mm<br />
4.5mm<br />
IOLHC<br />
IOL PICK-UP<br />
IMPRESSION<br />
COPING<br />
IOLDE<br />
IOL TRANSFER<br />
IMPRESSION<br />
COPING<br />
IOL GOLD CYLINDER<br />
WITH SLEEVE<br />
3.9mm<br />
4.5mm<br />
IOLGC<br />
IOL ANALOG<br />
*Indicates prosthetic components to be used for definitive restoration.<br />
IOLPIC<br />
IOLTIC<br />
IOLLAS<br />
5
DIEM<br />
<strong>Immediate</strong> <strong>Occlusal</strong> Loading<br />
<strong>Guidelines</strong><br />
Mandibular Fully Edentulous<br />
OSSEOTITE NT Certain<br />
1. PRE-OPERATIVE<br />
A. Surgeon<br />
Order 4mm diameter OSSEOTITE NT or OSSEOTITE NT Certain<br />
Implants in lengths determined during treatment planning.<br />
OSSEOTITE NT<br />
10mm 11.5mm 13mm<br />
Distal Extension<br />
Gold-Tite retaining screw<br />
IOL Temporary Cylinder<br />
IOL Abutment<br />
or<br />
Certain External Hex<br />
B. Surgeon Or Restorative Dentist<br />
• Order IOL Abutment Components.<br />
• Other required materials:<br />
Light to medium rubber dam and punch<br />
Impression adhesive<br />
Impression bite putty (Blue Mousse)<br />
Heavy body impression putty<br />
Equipment to polish acrylic<br />
Syringe for acrylic resin<br />
Dappen dishes<br />
Small paint brushes<br />
Cross-cut carbide bur for titanium<br />
Acrylic resin (hard autopolymerizing or light cure)<br />
Acrylic bur<br />
Articulating paper<br />
• Instruments needed:<br />
Abutment Driver (PAD00 or PAD02)<br />
Abutment Driver Tip (RASA3)<br />
Large Hex Driver (PHD02N or PHD03N)<br />
Large Hex Driver Tip (RASH3N or RASH8N)<br />
Torque Device<br />
Surgical Kit<br />
C. Restorative Dentist And Laboratory<br />
• Fabricate a surgical guide stent by duplicating the patient’s<br />
existing denture in clear acrylic resin.<br />
OR<br />
• Using an immediate or provisional denture, fabricate<br />
surgical guide stent in clear acrylic resin from the wax try-in.<br />
OR<br />
• The immediate or provisional denture may be used as<br />
the surgical guide stent.<br />
6
D. Prepare Surgical Guide Stent<br />
• Drill guide holes in the clear guide stent or provisional<br />
denture from 1st premolar to 1st premolar where 5-6<br />
implants will be positioned between the mental foramina<br />
to achieve a good Anterior/Posterior (A/P) spread and<br />
provide cross arch stabilization.<br />
• Open the lingual side of the surgical guide stent using an<br />
acrylic bur.<br />
• Placement beyond the mental foramina is okay if there is<br />
adequate bone.<br />
E. Prepare <strong>Immediate</strong> Or Provisional Denture<br />
• Process the immediate or provisional denture in acrylic<br />
resin from the wax try-in. Make the denture a little thicker<br />
buccolingually than usual for the prosthesis. This will<br />
provide additional strength to the prosthesis.<br />
• Relieve the denture approximately 8mm beyond the<br />
posterior-most implant locations and to the proper depth<br />
if distal extensions are used.<br />
2. SURGERY AND IMPLANT PLACEMENT<br />
A. Try-in Of Denture And Surgical Stent<br />
• If the patient is partially edentulous, cut all remaining teeth<br />
off at gingival crest.<br />
•Verify that the opposing occlusion is stable. If necessary,<br />
add denture adhesive.<br />
• Place adhesive bilaterally in free-end saddle areas of<br />
denture and surgical guide stent.<br />
• Add thin layers of bite registration material to free-end<br />
saddle areas of denture and have patient bite to place. This<br />
will ensure a stable and reproducible seat for the denture.<br />
• Place adhesive bilaterally on occlusal surfaces of<br />
posterior teeth on the denture.<br />
• Place bite registration material on posterior occlusal<br />
surfaces on the denture. Return denture to position and<br />
have patient occlude in maximum intercuspation. This will<br />
produce a stable and reproducible occlusal position.<br />
• Repeat the above process for the surgical stent.<br />
Clinical Tip: Some surgeons prefer to have the bite<br />
registration for the stent recorded in protrusive to improve<br />
access for implant site preparation and implant placement.<br />
• Remove denture(s).<br />
7
DIEM<br />
<strong>Immediate</strong> <strong>Occlusal</strong> Loading<br />
<strong>Guidelines</strong><br />
Mandibular Fully Edentulous<br />
B. Ridge Preparation<br />
• Make a mid-crestal incision extending along the ridge and<br />
continue beyond the mental foramina, where a releasing<br />
incision is made buccal to lingual. If the patient is partially<br />
edentulous, extend the incision sulcularly around the<br />
remaining roots.<br />
• Visually locate the mental foramina and alveolar nerve<br />
bundles and separate flap 5-10mm beyond this landmark.<br />
• On the alveolar ridge, with a round bur, mark the location<br />
of the inferior alveolar nerve as it exists the mental<br />
foramina for landmarks.<br />
• If the patient is partially edentulous, extract the residual<br />
tooth roots at this time.<br />
• Reduce uneven bone contours to create a level plane.<br />
C. Surgical Placement Of OSSEOTITE NT<br />
Or OSSEOTITE NT Certain Implants<br />
• Position the guide stent in the mouth by seating it on the<br />
retromolar pads and placing the buccal and lingual flanges<br />
in the vestibules as positioning guides.<br />
• Place anterior-most implant first followed by the two<br />
posterior-most implants. Next, split the difference<br />
between the anterior and posterior implants and place<br />
the final implants.<br />
• Place implants using the OSSEOTITE NT Drilling Sequence<br />
for crestal or sub-crestal placement to achieve adequate<br />
primary stability for immediate loading.<br />
NOTE:<br />
When placing External Hex Implants do not remove the<br />
implant mounts at this time.<br />
D. <strong>Immediate</strong> Load Determination<br />
• Place the IIPDTS or IIPDTL placement driver (for Certain)<br />
or a MDR10 hand-piece connector (for external hex) in a<br />
torque device.<br />
• Apply forward torque of 20Ncm to each implant to<br />
check stability.<br />
• If the implant does not move and is stable in the bone, the<br />
implant may be immediately loaded.<br />
• If the implant moves and does not feel stable in the bone, the<br />
implant should not be immediately loaded. A single or twostage<br />
surgical technique may be used on a non-loaded implant.<br />
• <strong>Immediate</strong> <strong>Occlusal</strong> Loading ideally includes all implants in<br />
the arch. However, if at least 4 implants are determined to<br />
be stable, the provisional prosthesis may be attached to<br />
and supported by them while the others are not loaded.<br />
8
E. For External Connection Implants<br />
• Remove all mounts from the external hex implants.<br />
F. Select And Place IOL Abutments<br />
• Select an IOL Abutment height for each implant so that the<br />
interface will be 1-2mm above the level of the gingiva. The<br />
abutment platforms should be as level as possible.<br />
• Place an IOL Abutment on each implant using the<br />
Abutment Driver.<br />
• Torque the abutment screws to 20Ncm using the Abutment<br />
Driver Tip and a torque device.<br />
G. Suture Gingiva<br />
• Suture the gingival tissue closed around the IOL Abutments<br />
using resorbable suture.<br />
• If the patient is to be sent to the restorative dentist, place<br />
the IOL Healing Caps on the abutments using the large<br />
hex driver.<br />
9
DIEM<br />
<strong>Immediate</strong> <strong>Occlusal</strong> Loading<br />
<strong>Guidelines</strong><br />
Mandibular Fully Edentulous<br />
3. RESTORATIVE<br />
A. Surgeon Or Restorative Dentist<br />
Provisional Restoration<br />
• Cut a piece of rubber dam to follow the anterior arch curve.<br />
• Cut holes at the implant locations using a rubber dam<br />
punch so it fits over the abutments.<br />
• Adapt the rubber dam to the ridge where acrylic will be<br />
added into the denture. This will separate the surgical and<br />
prosthetic fields.<br />
• Fill the anterior portion of the denture with heavy bodied<br />
impression putty.<br />
• Articulate the lower denture with the opposing using the<br />
bite registration and have the patient close onto the IOL<br />
Abutments. Allow the putty to set.<br />
• Remove the denture(s) and drill holes in the provisional<br />
denture at the abutment locations. Drill each hole to the<br />
approximate diameter of the temporary cylinders.<br />
B. Place IOL Temporary Cylinders<br />
• Place the IOL Temporary Cylinders on the abutments<br />
and attach using hand tightened hex Gold-Tite<br />
retaining screws.<br />
• Reposition the rubber dam into the grooves of the IOL<br />
Temporary Cylinders (see insert).<br />
C. Place IOL Distal Extensions<br />
• If you are using the distal extensions, slide the distal<br />
extension support bars over the two posterior-most<br />
temporary cylinders and position them so they will support<br />
the distally extended posterior teeth (see insert).<br />
• Apply a small amount of acrylic resin around the distal<br />
extensions to hold them in proper position.<br />
10
D. Adjust The Denture<br />
• Try in the provisional denture over the temporary cylinders<br />
and distal extensions.<br />
• Relieve the acrylic resin at the cylinder and distal extension<br />
locations as needed so the denture passively seats on the<br />
edentulous ridge and retromolar pads.<br />
E. Verify Occlusion<br />
• Evaluate the occlusion to verify that there is no interference<br />
with the cylinders and the denture is fully seated. If one or<br />
more cylinders interferes, reduce its height only enough to<br />
clear the opposing occlusion at this time. Do not prepare<br />
the cylinder flush with the denture at this time unless the<br />
occlusion requires it.<br />
• Place access hole filler (cotton, wax, etc.) inside the<br />
cylinders to prevent acrylic resin from entering the<br />
access openings.<br />
F. Lute Denture To Temporary Cylinders<br />
• Mix hard autopolymerizing acrylic resin and place in<br />
a syringe.<br />
• Place the acrylic resin inside the denture relief area and<br />
into the retention groove around the temporary cylinder<br />
on the anterior-most implant.<br />
• Have the patient close into the established vertical using<br />
the bite registration to verify the denture is in the correct<br />
position. Maintain centric occlusion while the acrylic resin<br />
is setting.<br />
• Allow the acrylic resin to set per the manufacturer’s<br />
instructions.<br />
• Remove the access hole filler from the luted cylinder and<br />
remove the hex screw.<br />
• Continue with luting all other cylinders into the denture.<br />
11
DIEM<br />
<strong>Immediate</strong> <strong>Occlusal</strong> Loading<br />
<strong>Guidelines</strong><br />
Mandibular Fully Edentulous<br />
G. Remove Denture From Mouth<br />
And Reduce Cylinders<br />
• Remove all access hole filler from the temporary cylinders.<br />
• Unscrew the retaining screws and remove the denture<br />
from the abutments.<br />
• Remove the rubber dam from the mouth.<br />
• Using a carbide cross-cut bur adjust the heights of the<br />
cylinders to conform with the lingual surface of the denture.<br />
H. Modify Denture Into Fixed Provisional<br />
Restoration<br />
• Place polishing protectors onto the cylinder interfaces.<br />
• Add acrylic resin to any areas with voids.<br />
• Verify the stability of the cylinders.<br />
• Using an acrylic bur remove all flanges, the acrylic resin<br />
on ridge contact areas and all excess acrylic from the<br />
bottom of the denture between the cylinders and posterior<br />
of the first molars.<br />
• Remove the polishing protectors.<br />
I. Adjust Occlusion<br />
• Place the provisional restoration on the IOL Abutments<br />
and attach using retaining screws until finger tight.<br />
• Adjust the occlusion using articulating paper into group<br />
function to ensure even distribution of support, minimizing<br />
lateral forces.<br />
• Mark any areas where acrylic may be contacting the tissue.<br />
• Remove the provisional restoration.<br />
12
J. Polish The Fixed Provisional Restoration<br />
• Place polishing protectors onto the cylinder interfaces.<br />
• Relieve any marked areas.<br />
• They are in place! Polish the entire provisional denture<br />
so surfaces are smooth.<br />
• Remove the polishing protectors.<br />
K. Seat The Fixed Provisional Restoration<br />
• Place the provisional denture back onto the IOL Abutments<br />
and attach using the Hex Gold-Tite Retaining Screws.<br />
•Torque the screws to 10Ncm using the large hex driver tip<br />
and a torque device.<br />
L. Complete Fixed Provisional Restoration<br />
• Place a protective material over the screw heads, seal<br />
the access holes with acrylic resin and polish.<br />
• The provisional denture should not be removed or<br />
loosened during the following six weeks.<br />
• Instruct the patient on hygiene care of the<br />
provisional restoration.<br />
• Place the patient on a soft diet for two weeks.<br />
• Patient should be seen after two weeks for follow-up.<br />
13
M. Final Impression For Definitive Restoration<br />
• The final impression of the definitive restoration may be<br />
made 4-6 weeks after the surgical appointment.<br />
• Refer to the 3i Restorative Manual for instructions on<br />
fabrication of the definitive restoration.<br />
This manual will instruct practitioners in the use of 3i’s implant systems. The success of any dental implant system depends upon proper use of the components and<br />
instrumentation. This manual is not intended for use as a substitute for professional training and experience.<br />
1. Branemark, P.I., Hansson, B.O., Adell, R., Breine, U., Lindstrom, J., “Osseointegrated implants in the treatment of the edentulous jaw: experience from a 10-year period.” Scand J Plast Reconstr Surg 1977; 2 (Suppl 16): 1-132<br />
2. Albrektsson, T., Zarb, G.A., Worthington, P., Eriksson, A.R., “The long-term efficacy of currently used dental implants: a review and proposed criteria for success.” Inter J Oral Maxillofac Implants: 1986; 1: 11-25<br />
3. Linkow, L., Charchee, R.,“Theories and Techniques of Oral Implantology.” St. Louis: Mosby: 1970; 1: 74-76<br />
4. Tarnow, D., Emtiaz, S., Classi, A., “<strong>Immediate</strong> loading of threaded implant at stage I surgery in edentulous arches: ten consecutive case reports with 1 to 5 year data.” Inter J Oral Maxillofac Implants: 1997; 12: 319-324<br />
5. Cooper, L.F., Rahman, A., Moriarty, J., Chafee, N., Sacco, D., “<strong>Immediate</strong> mandibular rehabilitation with endosseous implants: simultaneous extraction, implant placement and loading.” Inter J Oral Maxillofac Implants: 2002; 17: 517-525<br />
6. Testori, T., Del Fabbro, M., Szmukler-Moncler, S., Francetti, L., Weinstein, R., “<strong>Immediate</strong> occlusal loading of osseotite implants in the completely edentulous mandible.” Inter J Oral Maxillofac Implants: 2003; 18: 544-551<br />
7. English, C. E.,” The critical A-P Spread” The Implant Society: 1990; Mar-Apr; 1 (1): 2-3<br />
Implant Innovations, Inc.<br />
Global Headquarters<br />
4555 Riverside Drive<br />
Palm Beach Gardens, FL 33410<br />
1.800.342.5454<br />
Outside U.S.: + 561.776.6700<br />
Fax: + 561.776.1272<br />
www.3i-online.com<br />
3i, design and OSSEOTITE are registered trademarks and OSSEOTITE NT, Diem, IOL,<br />
<strong>Immediate</strong> <strong>Occlusal</strong> Loading, Gold-Tite and Certain are trademarks of Implant<br />
Innovations, Inc. © 2003 Implant Innovations, Inc. All rights reserved.<br />
ART860<br />
Rev. A 11/03<br />
SUBSIDIARIES<br />
BRAZIL<br />
Phone: +55-11-5081-4405<br />
Fax: +55-11-5081-7484<br />
SPAIN<br />
Phone: +34-93-470-59-50<br />
Fax: +34-93-372-11-25<br />
AUSTRIA<br />
Wieladent<br />
Phone: +43-7672-93901<br />
Fax: +43-7672-93903<br />
EL SALVADOR<br />
Dentimerc SA de CV<br />
Phone: +503-263-6350<br />
Fax: +503-263-6676<br />
KOREA<br />
Jungsan Biomed Corp.<br />
Phone: +82-2-516-1808<br />
Fax: +82-2-514-9434<br />
SINGAPORE<br />
Asia Implant Support & Services<br />
Phone: +65-6223-3229<br />
Fax: +65-6220-3538<br />
CANADA<br />
Phone: +514-956-9843<br />
Fax: +514-956-9844<br />
FRANCE<br />
Phone: +33-1-41054343<br />
Fax: +33-1-41054340<br />
GERMANY<br />
Phone: +49-721-6314-220<br />
Fax: +49-721-6314-233<br />
MEXICO<br />
Phone: +52-55-5679-1619<br />
Fax: +52-55-5684-8098<br />
SWITZERLAND<br />
Phone: +41-1-3804646<br />
Fax: +41-1-3834655<br />
U.K.<br />
Phone: +44-1628-829314<br />
Fax: +44-1628-820182<br />
DISTRIBUTORS<br />
ARGENTINA<br />
<strong>Dental</strong>max, SA<br />
Phone: +541-1482-71001<br />
Fax: +541-1482-67373<br />
BENELUX<br />
Titamed, NV<br />
Phone: +32-2-5410290<br />
Fax: +32-2-5410291<br />
CHILE<br />
Cybel, SA<br />
Phone: +56-2-2321883<br />
Fax: +56-2-2330176<br />
COLOMBIA<br />
Implantes y Componentes<br />
Phone: +571-612-9362<br />
Fax: +571-620-5450<br />
GREECE<br />
Kostas Kornisorlis and Co.<br />
Phone: +302310-269-079<br />
Fax: +302310-555-573<br />
ISRAEL<br />
H.A. Systems<br />
Phone: +972-3-6138777<br />
Fax: +972-3-6138778<br />
ITALY<br />
Biomax, srl.<br />
Phone: +39-0444-913410<br />
Fax: +39-0444-913695<br />
LEBANON<br />
Tamer Freres s.a.l.<br />
Phone: +961-1-485690<br />
Fax: +961-1-510233<br />
PANAMA<br />
Odontomedica, S.A.<br />
Phone: +507-2-239622<br />
Fax: +507-2-239621<br />
PARAGUAY<br />
Andres H. Arce y Cia SRL<br />
Phone: +595-21-208185<br />
Fax: +595-21-496291<br />
TAIWAN<br />
Kuo Hwa <strong>Dental</strong> Suppliers Co., Ltd.<br />
Phone: +886-2-2226-1770<br />
Fax: +886-2-2226-8747<br />
THAILAND<br />
PT Endeavour Co., Ltd.<br />
Phone: +662-264-2574<br />
Fax: +662-264-2573<br />
UKRAINE<br />
Porcelain Ltd.<br />
Phone: +380-44-246-9679<br />
Fax: +380-44-246-8468<br />
NORDIC REGION<br />
Phone: +46-40-17-6090<br />
Fax: +46-40-17-6099<br />
AUSTRALIA<br />
Rudolf Gunz & Co. Pty., Ltd.<br />
Phone: +61-2-9935-6655<br />
Fax: +61-2-9935-6650<br />
COSTA RICA<br />
Implantec S.A.<br />
Phone: +506-2-256411<br />
Fax: +506-2-247620<br />
JAPAN<br />
Implant Innovations Japan<br />
Phone: +81-66-868-3012<br />
Fax: +81-66-868-2444<br />
POLAND<br />
<strong>Dental</strong> <strong>Depot</strong><br />
Phone: +48-71-341-3091<br />
Fax: +48-71-343-6560<br />
URUGUAY<br />
Jelenko Distribution SRL<br />
Phone: +598-408-3003<br />
Fax: +598-2-7-12-5399