Build Your Own Underwater Video Camera - Underwater Projects ...
Build Your Own Underwater Video Camera - Underwater Projects ...
Build Your Own Underwater Video Camera - Underwater Projects ...

Create successful ePaper yourself
Turn your PDF publications into a flip-book with our unique Google optimized e-Paper software.
The camera was suspended by it's own power cable. A bracket was<br />
manufactured out of a 3 1/2" corner L brace for this purpose. The brace was cut<br />
off approximately 1 1/2" from the corner. The short end was bent up and the<br />
sharp edge filed smooth, the same was done to the edge on the sawed off piece.<br />
The small straight piece was then bolted to the bent up end of the L piece. Next<br />
two holes were drilled on the small piece. Two hose clamps were slipped over<br />
the housing and the bracket was inserted under both, (the long side of the<br />
bracket lays flat against the housing) and fastened by turning both screws . Two<br />
wire ties were inserted in the small holes drilled in the movable part, and the<br />
wire was attached by looping the ties around the cable and pulling the ends<br />
tightly. Enough slack was left as to allow the movable part of the bracket to be<br />
adjusted in any direction, this enables the camera to point up or down.<br />
An alternative would be an aluminum strap bracket. To build, cut it, and bend it to wrap the PVC housing snugly, drill a hole on the<br />
top end and get a length of the same material and drill 3 more holes on it, two at both ends. You next insert a bolt trough the strap and<br />
flat bar, tighten with a nut. The remaining holes are for wire ties you'll need them to secure the down wire to the bracket. At this point<br />
you'll drill a hole in the PVC housing large enough to insert the down wire. Look at the next picture for details.<br />
PUTTING IT ALL TOGETHER<br />
Electronics<br />
If you find these blueprints intimidating go on to my next project. It uses a power adapter.<br />
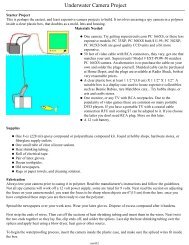
<strong>Your</strong> finished camera should look like this! The white wire on the<br />
threads is the microphone cable not used for this project. As tested<br />
this camera did not need any extra weight to sink. I did have<br />
problems with leaks and future projects used a fixed window and a<br />
cleanout adapter to access the camera. See tyco camera for details.<br />
First start by building your PVC housing. Then drill a hole slightly larger than the downwire. Next insert the downwire through the hole<br />
LED Array<br />
Disregard this section if you intend to use an external light source, such as sunlight, flashlight... Flashlights are much easier to use and<br />
provide more<br />
more light. <strong>Underwater</strong> Kinetics has several inexpensive watertight flashlights at reasonable prices. These camera are perfect for our<br />
project as they come with two places where one can loop hose clamps and attach it to the underwater camera housing. Wire ties may<br />
also be used to secure the flashlight.<br />
http://freepistonjetengine.741.com