Assembly and Operating Instruction - Novaplan.no
Assembly and Operating Instruction - Novaplan.no
Assembly and Operating Instruction - Novaplan.no

Create successful ePaper yourself
Turn your PDF publications into a flip-book with our unique Google optimized e-Paper software.
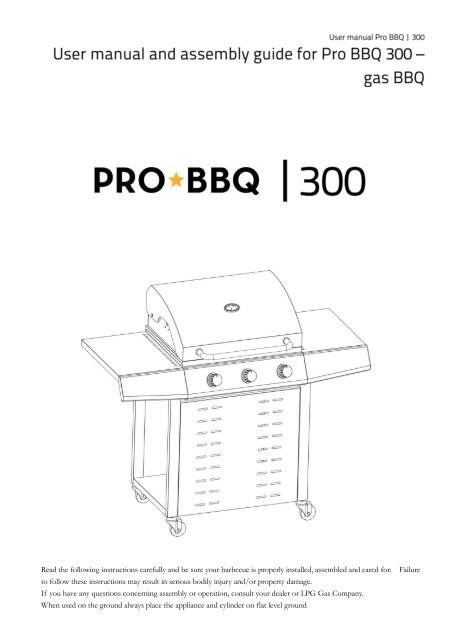
Read the following instructions carefully <strong>and</strong> be sure your barbecue is properly installed, assembled <strong>and</strong> cared for. Failure<br />
to follow these instructions may result in serious bodily injury <strong>and</strong>/or property damage.<br />
If you have any questions concerning assembly or operation, consult your dealer or LPG Gas Company.<br />
When used on the ground always place the appliance <strong>and</strong> cylinder on flat level ground
Technical Information:<br />
APPLIANCE CODE:<br />
XC09113C<br />
TOTAL HEAT INPUT:<br />
13.2 kW (942g/h)<br />
GAS CATEGORY: I 3+(28-30/37)<br />
TYPES OF GAS: Butane I 3B/P(30) I 3B/P(50)<br />
GAS PRESSURE: 28-30 mbar Propane LPG GAS MIXTURES<br />
INJECTOR SIZE: 1.00mm 37 mbar 30 mbar 50 mbar<br />
IDENTIFICATION CODE: 359CL1143 1.00 mm 0.90 mm<br />
SERIAL NUMBER<br />
Appliance code-2010-0000000<br />
DATE CODE<br />
FOR USE OUTDOORS<br />
AND IN WELL<br />
VENTILATED AREAS<br />
WARNING: ACCESSIBLE PARTS MAY BE VERY HOT. KEEP YOUNG CHILDREN<br />
AWAY<br />
READ THE INSTRUCTION LITERATURE BEFORE USING THE APPLIANCE.<br />
Ignition: Single shot piezo ignition unit with transient pilot<br />
.
NO Description Drawing Qty.<br />
01 LID 1<br />
02 Warming rack 1<br />
03 Cooking Grid 2<br />
04 Flame Tamer 3
05 M6X15 Screw 3<br />
06 Burner 3<br />
07 Body 1<br />
08 M6X10 Screw 14<br />
09 Left side board 1<br />
10 M6X70 Screw 8<br />
11 After left Leg 1<br />
12 Left before Leg 1<br />
13 Brake Wheel 2<br />
14 Wheel 2<br />
15 M4X10 Screw 4<br />
16 Bottom Panel 1<br />
17 Front panel 1<br />
18<br />
Right before<br />
Leg<br />
1<br />
19 After right Leg 1<br />
20<br />
Right side<br />
board<br />
1<br />
21 Oil cup 1<br />
22 Oil cup bracket 1
Attention! The supplied ignition instructions must be pasted on the front panel of the grill, as shown<br />
above. Choose one of the languages you prefer <strong>and</strong> place it on the front panel.
CONNECTING THE GAS CYLINDER TO THE APPLIANCE<br />
This appliance is only suitable for use with low-pressure butane or propane gas <strong>and</strong> fitted with the appropriate<br />
low-pressure regulator via a flexible hose. The hose should be secured to the regulator <strong>and</strong> the appliance with<br />
hose clips. This barbecue is set to operate a 28 mbar regulator with butane gas <strong>and</strong> a 37 mbar regulator with<br />
propane gas. Use a suitable regulator certified to BSEN 12864: 2001. Please consult your LPG dealer for<br />
information regarding a suitable regulator for the gas cylinder.<br />
Regulator <strong>and</strong> Hose<br />
The hose <strong>and</strong> regulator are <strong>no</strong>t supplied with this appliance. Only hose complying with the national situation of the<br />
country of destination must be fitted to the appliance. A regulator with the appropriate outlet pressure for the<br />
country of destination must also be fitted. This regulator must comply with the requirements of EN 12684: 2001.<br />
The use of the wrong regulator or hose is unsafe; always check that you have the correct items before operating the<br />
barbecue.<br />
The hose used must conform to the relevant st<strong>and</strong>ard for the country of use. The<br />
length of the hose must be 1.5 metres (maximum). Worn or damaged hose must be<br />
replaced. Ensure that the hose is <strong>no</strong>t obstructed, kinked, or in contact with any part<br />
of the barbecue other than at its connection.<br />
Storage of Appliance<br />
Storage of an appliance indoors is only permissible if the cylinder is disconnected <strong>and</strong> removed from the appliance.<br />
When the appliance is <strong>no</strong>t to be used for a period of time it should be stored in its original packaging <strong>and</strong> stored in<br />
a dry dust free environment.
Gas Cylinder<br />
The gas cylinder should <strong>no</strong>t be dropped or h<strong>and</strong>led roughly! If the appliance is <strong>no</strong>t in use, the cylinder must be<br />
disconnected. Replace the protective cap on the cylinder after disconnecting the cylinder from the appliance.<br />
Cylinders must be stored outdoors in an upright position <strong>and</strong> out of the reach of children. The cylinder must<br />
never be stored where temperatures can reach over 50C. Do <strong>no</strong>t store the cylinder near flames, pilot lights or<br />
other sources of ignition. DO NOT SMOKE.<br />
This barbecue is designed for use outdoors, away from any flammable materials. It is important that there are <strong>no</strong><br />
overhead obstructions <strong>and</strong> that there is a minimum distance of 1 m from the side or rear of the appliance. It is<br />
important that the ventilation openings of the appliance are <strong>no</strong>t obstructed. The barbecue must be used on a level,<br />
stable, <strong>no</strong>n-flammable surface. The appliance should be protected from direct draughts <strong>and</strong> shall be positioned or<br />
protected against direct penetration by any trickling water (e.g. rain). If used on a wooden table the table must be<br />
protected with a <strong>no</strong>n-flammable covering to avoid any discolouring of the wood.<br />
Parts sealed by the manufacturer or his agent must <strong>no</strong>t be altered by the user. No modifications should<br />
be made to any part of this barbecue <strong>and</strong> repairs <strong>and</strong> maintenance should only be carried out by a CORGI<br />
registered service engineer.<br />
Connection to Appliance<br />
Before connection, ensure that there is <strong>no</strong> debris caught in the head of the gas cylinder, regulator, burner <strong>and</strong><br />
burner ports. Spiders <strong>and</strong> insects can nest within <strong>and</strong> clog the burner/venturi tube at the orifice. A clogged<br />
burner can lead to a fire beneath the appliance.<br />
Clean burner holes with a heavy-duty pipe cleaner.<br />
Fit the hose to the appliance using a spanner to tighten it onto the connection thread. If the hose is replaced it<br />
must be secured to the appliance <strong>and</strong> regulator connections with hose clips. Disconnect the regulator from the<br />
cylinder (according to the directions supplied with the regulator) when the barbecue is <strong>no</strong>t in use.<br />
The Barbecue must be used in a well ventilated area. Do <strong>no</strong>t obstruct the flow of combustion air to the burner<br />
when the barbecue is in use. ONLY USE THIS BARBECUE OUTDOORS.<br />
BEFORE USE CHECK FOR LEAKS<br />
Never check for leaks with a naked flame, always use a soapy water solution
TO CHECK FOR LEAKS<br />
Make 2-3 fluid ounces of leak detecting solution by mixing one part washing up liquid with 3 parts water.<br />
Ensure the control valve is “OFF”.<br />
Connect the regulator to the cylinder <strong>and</strong> ON/OFF valve to the burner, ensure the connections are secure then<br />
turn ON the gas.<br />
Brush the soapy solution onto the hose <strong>and</strong> all joints. If bubbles appear you have a leak, which must be rectified<br />
before use.<br />
Retest after fixing the fault<br />
Turn OFF the gas at the cylinder after testing.<br />
If leakage is detected <strong>and</strong> can<strong>no</strong>t be rectified. Do <strong>no</strong>t attempt to cure leakage but consult your gas dealer.
LIGHTING YOUR BARBECUE<br />
Lighting <strong>Instruction</strong>s<br />
1. Turn the control k<strong>no</strong>b clockwise to “OFF” position.<br />
2. Open the hood before use.<br />
3. Connect the regulator to the gas bottle. Turn the gas supply “ON” at the regulator. Check with the use of soapy<br />
water for any gas leakage between the bottle <strong>and</strong> the regulator<br />
4. Push down the LEFT control k<strong>no</strong>b <strong>and</strong> turn it anti-clockwise to the “Full rate” position, a click will be heard,<br />
this will light the burner. If <strong>no</strong>t repeat this process 3 or 4 times.<br />
5. If the burner has <strong>no</strong>t lit, wait 5 minutes <strong>and</strong> repeat step 4.<br />
6. When the left h<strong>and</strong> burner is alight, the middle burner can be lit by turning the middle control k<strong>no</strong>b<br />
anti-clockwise to the full rate position. The burner will crosslight off the left h<strong>and</strong> burner. The right h<strong>and</strong> burner<br />
can be lit after the middle burner by following the same process as for the middle burner. All burners MUST be lit<br />
in sequence from left to right.<br />
7. If the burners have <strong>no</strong>t lit, wait 5 minutes <strong>and</strong> repeat step 6.<br />
8. Adjust the heat by turning the k<strong>no</strong>b to the High/Low position.<br />
9. To turn the barbecue „OFF‟: turn the cylinder valve or regulator switch to the „OFF‟ position <strong>and</strong> then turn all<br />
control k<strong>no</strong>bs on the appliance clockwise to the „OFF‟ position.<br />
Warning: If the burner fails to ignite, turn all control k<strong>no</strong>bs off (clockwise) <strong>and</strong> also turn the cylinder valve off.<br />
Wait five minutes before attempting to relight with ignition sequence.<br />
Before cooking for the first time, operate the barbecue for about 15 minutes with the lid closed <strong>and</strong> the gas turned<br />
on HIGH. This will “heat clean” the internal parts <strong>and</strong> dissipate odour from the painted finish.<br />
Clean your barbecue after each USE. DO NOT use abrasive or flammable cleaners, as it will damage the parts of<br />
the product <strong>and</strong> may start a fire. Clean in warm soapy water.<br />
WARNING: Accessible parts may be very hot. Keep young children away from the hot appliance at all times<br />
(even while cooling down!). It is recommended that protective gloves (eg oven gloves) be used when h<strong>and</strong>ling<br />
particularly hot components.<br />
CLEANING AND CARE<br />
CAUTION: All cleaning <strong>and</strong> maintenance should be carried out when the barbecue is cool <strong>and</strong> with the fuel supply<br />
turned OFF at the gas cylinder.
CLEANING<br />
“Burning off ” the barbecue after every use (for approx 15 minutes) will keep excessive food residue to a minimum.<br />
OUTSIDE SURFACE<br />
Use mild detergent or baking soda <strong>and</strong> hot water solution. Non-abrasive scouring powder can be used on<br />
stubborn stains, then rinse with water.<br />
If the inside surface of the barbecue lid has the appearance of pealing paint, baked on grease build-up has turned<br />
to carbon <strong>and</strong> is flaking off. Clean thoroughly with strong hot soapy water solution. Rinse with water <strong>and</strong> allow<br />
to completely dry. NEVER USE OVEN CLEANER.<br />
INTERIOR OF BARBECUE BOTTOM<br />
Remove residue using brush, scraper <strong>and</strong>/or cleaning pad then wash with a soapy water solution. Rinse with water<br />
<strong>and</strong> allow to dry.<br />
PLASTIC SURFACES<br />
Wash with a soft cloth <strong>and</strong> hot soapy water solution. Rinse with water. Do <strong>no</strong>t use abrasive cleaners, degreasers<br />
or a concentrated barbecue cleaner on plastic parts.<br />
WOODEN SURFACES<br />
Wooden surfaces should be wiped with a damp cloth. For stubborn marks wipe with a detergent solution.<br />
COOKING GRID<br />
Use a mild soapy water solution. Non-abrasive scouring power can be used on stubborn stains then rinse with<br />
water.
CLEANING THE BURNER ASSEMBLY<br />
Turn the gas OFF at the control k<strong>no</strong>b <strong>and</strong> disconnect the cylinder.<br />
Remove cooling grate.<br />
Clean the burner with a soft brush or blow clean with compressed air <strong>and</strong> wipe with a cloth.<br />
Clean any clogged ports with a pipe cleaner or stiff wire (such as an opened paper clip).<br />
Inspect burner for any damage (cracks or holes). If damage is found, replace with a new burner. Reinstall the<br />
burner, check to ensure that the Gas valve orifices are correctly positioned <strong>and</strong> secured inside the burner inlet<br />
(venturi).<br />
SERVICING<br />
Your gas barbecue should be serviced annually by a competent registered person.<br />
IGNITION INSTRUCTIONS ON THE FRONT PANEL OF THE GRILL<br />
The ignition instructions must be pasted on the front panel of the grill. The instructions are in 4 languages<br />
(Norwegian, Swedish, Finnish <strong>and</strong> English). Select your preferred language <strong>and</strong> then stick this on the front panel of<br />
the grill, as shown on page 7.<br />
Importer:<br />
<strong>Novaplan</strong> AS<br />
Grini Næringspark 12<br />
1361 ØSTERÅS<br />
Tlf: 22 13 32 00<br />
www.<strong>no</strong>vaplan.<strong>no</strong>