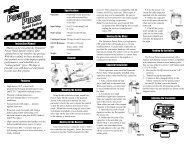
Platinum .21 SG Off-Road Manual - Dynamite RC
Platinum .21 SG Off-Road Manual - Dynamite RC
Platinum .21 SG Off-Road Manual - Dynamite RC

Create successful ePaper yourself
Turn your PDF publications into a flip-book with our unique Google optimized e-Paper software.
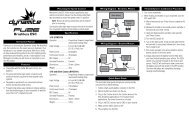
<strong>Platinum</strong> <strong>.21</strong> <strong>SG</strong><br />
Owner’s <strong>Manual</strong><br />
Congratulations on your purchase of a <strong>Dynamite</strong> ®<br />
<strong>Platinum</strong> Series (DPS ) <strong>.21</strong> racing engine! Precision<br />
manufactured and assembled, your DPS 21 will<br />
provide you with trouble-free performance if you read<br />
and follow these instructions.<br />
Using the Proper Fuel and Glow Plug<br />
Using the proper fuel and glow plug is critical in order<br />
to achieve maximum performance and reliability.<br />
You must use fuel, glow plugs and air filters that<br />
are specifically designed for model car/truck/buggy<br />
applications. Never use any type of model airplane<br />
glow fuel! Use of model airplane fuel can damage<br />
your engine and immediately void any warranty.<br />
We recommend using <strong>Dynamite</strong> Blue Thunder <br />
Race Formula fuel with 20% nitro, providing the<br />
best combination of power and fuel economy.<br />
<strong>Dynamite</strong> Blue Thunder fuels are vigorously tested,<br />
researched and formulated to deliver excellent power<br />
as well as engine protection.<br />
A glow plug has been included and is ideal for<br />
breaking in your new engine. In fact, during the<br />
break-in procedure, it is not uncommon to go through<br />
one or two glow plugs, as microscopic bits of metal<br />
(from the cylinder/piston wearing in) bond themselves<br />
to the plug element causing glow plug failure. We<br />
recommend the <strong>Dynamite</strong> McCoy MC59 Glow Plug<br />
(DYN2508) as the absolute best glow plug for this<br />
engine. The MC59 Plug has been designed to deliver<br />
an ideal balance of performance and longevity.<br />
All car engines must use a properly oiled air filter to<br />
keep dirt out of the engine. Any dirt that enters the<br />
carburetor can immediately destroy your engine. We<br />
recommend DYN2614 as an excellent choice for a<br />
quality air cleaner.<br />
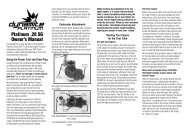
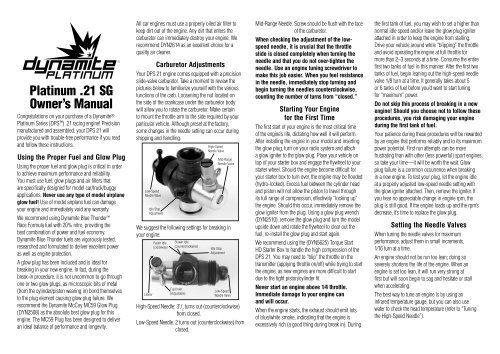
Carburetor Adjustments<br />
Your DPS 21 engine comes equipped with a precision<br />
slide-valve carburetor. Take a moment to review the<br />
pictures below to familiarize yourself with the various<br />
functions of the carb. Loosening the nut located on<br />
the side of the crankcase under the carburetor body<br />
will allow you to rotate the carburetor. Make certain<br />
to mount the throttle arm to the side required by your<br />
particular vehicle. Although preset at the factory,<br />
some changes in the needle setting can occur during<br />
shipping and handling.<br />
Low-Speed<br />
Needle Valve<br />
Idle Stop<br />
Adjustment<br />
We suggest the following settings for breaking in<br />
your engine:<br />
Leaner<br />
Faster Idle<br />
(clockwise)<br />
Slower Idle<br />
(counterclockwise)<br />
Fuel Inlet<br />
(Adjustable)<br />
High-Speed<br />
Needle Valve<br />
Mid-Range<br />
Needle Valve<br />
Idle Stop<br />
Adjustment<br />
Low-Speed<br />
Needle Valve<br />
High-Speed Needle: 3 1 / 2<br />
turns out (counterclockwise)<br />
from closed.<br />
Low-Speed Needle: 2 turns out (counterclockwise) from<br />
closed.<br />
Mid-Range Needle: Screw should be flush with the face<br />
of the carburetor.<br />
When checking the adjustment of the lowspeed<br />
needle, it is crucial that the throttle<br />
slide is closed completely when turning the<br />
needle and that you do not over-tighten the<br />
needle. Use an engine tuning screwdriver to<br />
make this job easier. When you feel resistance<br />
in the needle, immediately stop turning and<br />
begin turning the needles counterclockwise,<br />
counting the number of turns from “closed.”<br />
Starting Your Engine<br />
for the First Time<br />
The first start of your engine is the most critical time<br />
of the engine’s life, dictating how well it will perform.<br />
After installing the engine in your model and inserting<br />
the glow plug, turn on your radio system and attach<br />
a glow igniter to the glow plug. Place your vehicle on<br />
top of your starter box and engage the flywheel to your<br />
starter wheel. Should the engine become difficult for<br />
your starter box to turn over, the engine may be flooded<br />
(hydro-locked). Excess fuel between the cylinder head<br />
and piston will not allow the piston to travel through<br />
its full range of compression, effectively “locking up”<br />
the engine. Should this occur, immediately remove the<br />
glow igniter from the plug. Using a glow plug wrench<br />
(DYN2510), remove the glow plug and turn the model<br />
upside down and rotate the flywheel to clear out the<br />
fuel, re-install the glow plug and start again.<br />
We recommend using the (DYN5625) Torque Start<br />
HD Starter Box to handle the high compression of the<br />
DPS 21. You may need to “blip” the throttle on the<br />
transmitter (applying throttle on/off) while trying to start<br />
the engine, as new engines are more difficult to start<br />
due to the tight piston/cylinder fit.<br />
Never start an engine above 1⁄4 throttle.<br />
Immediate damage to your engine can<br />
and will occur.<br />
When the engine starts, the exhaust should emit lots<br />
of blue/white smoke, indicating that the engine is<br />
excessively rich (a good thing during break in). During<br />
the first tank of fuel, you may wish to set a higher than<br />
normal idle speed and/or leave the glow plug igniter<br />
attached in order to keep the engine from stalling.<br />
Drive your vehicle around while “blipping” the throttle<br />
and avoid operating the engine at full throttle for<br />
more than 2–3 seconds at a time. Consume the entire<br />
first two tanks of fuel in this manner. After the first two<br />
tanks of fuel, begin leaning out the high-speed needle<br />
valve 1/8 turn at a time. It generally takes about 5<br />
or 6 tanks of fuel before you’d want to start tuning<br />
for “maximum” power.<br />
Do not skip this process of breaking in a new<br />
engine! Should you choose not to follow these<br />
procedures, you risk damaging your engine<br />
during the first tank of fuel.<br />
Your patience during these procedures will be rewarded<br />
by an engine that performs reliably and to its maximum<br />
power potential. First run attempts can be more<br />
frustrating than with other (less powerful) sport engines,<br />
so take your time—it will be worth the wait. Glow<br />
plug failure is a common occurrence when breaking<br />
in a new engine. To test your plug, let the engine idle<br />
at a properly adjusted low-speed needle setting with<br />
the glow igniter attached. Then, remove the igniter. If<br />
you hear no appreciable change in engine rpm, the<br />
plug is still good. If the engine loads up and the rpm’s<br />
decrease, it’s time to replace the glow plug.<br />
Setting the Needle Valves<br />
When tuning the needle valves for maximum<br />
performance, adjust them in small increments,<br />
1⁄16 turn at a time.<br />
An engine should not be run too lean; doing so<br />
severely shortens the life of the engine. When an<br />
engine is set too lean, it will run very strong at<br />
first but will soon begin to sag and hesitate or stall<br />
when accelerating.<br />
The best way to tune an engine is by using an<br />
infrared temperature gauge, but you can also use<br />
water to check the head temperature (refer to “Tuning<br />
the High-Speed Needle”).
Tuning the High-Speed Needle<br />
To obtain the correct high-speed needle setting, start<br />
the engine and drive your vehicle around for a minute<br />
or two, applying full throttle frequently. Place a drop<br />
of water on the cylinder head. If the water sizzles away<br />
(evaporates immediately), the needle setting is too<br />
lean. A correct needle setting will result in the water<br />
evaporating after 3-5 seconds. If the water does not<br />
evaporate, chances are good that the needle setting is<br />
too rich. Lean the needle 1/16 of a turn and run the<br />
engine again, adjusting the needle setting to get the<br />
desired evaporation time.<br />
Check the temperature each time you change<br />
the needle mixture. Do not let the engine<br />
overheat, as this will damage the engine.<br />
Tuning the Low-Speed Needle<br />
The low-speed needle (also referred to as the idle<br />
mixture or idle needle) should be set after you’re<br />
satisfied with the high-speed needle setting. After<br />
achieving the proper operating temperature, reduce the<br />
engine throttle to idle and pinch the fuel line with your<br />
fingers close to the carb fuel inlet nipple. If the engine<br />
dies immediately, the low-speed needle is set too lean.<br />
If the rpm’s increase dramatically, the setting is too rich.<br />
The ideal setting results in the rpm’s increasing just a<br />
slight amount after pinching the fuel line.<br />
Tuning the Mid-Range Needle<br />
The mid-range adjustment screw adjusts the<br />
air/fuel mixture at half throttle and can dramatically<br />
effect mid-range throttle response. For best results,<br />
start with adjustment screw flush with the face of the<br />
carburetor. This setting will provide a slightly rich midrange.<br />
For a crisper leaner mid-range, desirable on<br />
high traction tracks where maximum acceleration<br />
is needed, turn the mid-range screw out<br />
(counterclockwise) 1 full turn. To soften the mid-range<br />
response (richer), turn the mid-range screw clockwise 1<br />
full turn for a softer feel during acceleration, best suited<br />
for low traction conditions.<br />
Note: The mid-range adjustment screw and<br />
low-speed needle work in unison. Any time<br />
the mid-range adjustment screw is adjusted<br />
it will be necessary to readjust the low-speed<br />
needle. When turning the mid-range screw<br />
in, the low-speed needle will need to be<br />
backed out. When the mid-range screw is<br />
backed out, the low-speed needle will need to<br />
be adjusted inward.<br />
Idle Stop Adjustment<br />
The last setting to be made is the idle stop screw.<br />
Turning this screw clockwise increases the idle speed,<br />
whereas turning the screw counterclockwise will<br />
make the engine idle at a lower speed. Ideally, the<br />
engine should idle just fast enough to be reliable in<br />
acceleration and transition from idle to full speed.<br />
Avoid an idle speed that is too fast, as it will cause<br />
damage to your clutch.<br />
Carburetor Restrictors<br />
The DPS 21 engine features a slide-valve carburetor<br />
and includes three inserts of various diameters. These<br />
carburetor inserts are used to alter the power curve<br />
of the engine. The three diameters included have the<br />
following effect:<br />
7.5mm<br />
Develops good mid-range power; easier to control than<br />
the 9mm insert; best for medium traction, average-sized<br />
tracks/areas.<br />
8.5mm<br />
Increased power for high traction, medium-to largesize<br />
tracks; slight decrease in fuel mileage over the<br />
7.5mm insert.<br />
9mm<br />
<strong>Off</strong>ers explosive, sometimes difficult to control<br />
acceleration; uses the most fuel; used only for high<br />
traction, large track/open areas; for expert drivers only.<br />
Engine Maintenance<br />
Periodic maintenance must be performed in order<br />
to keep your engine in proper operating condition.<br />
After each day of running, it’s critical to use high quality<br />
after-run oil to protect the internals of the engine and<br />
help prevent corrosion. The methanol used in the fuel<br />
attracts moisture that can cause corrosion (particularly<br />
in the ball bearings). Follow these steps after running<br />
your engine:<br />
1) Empty all fuel from the tank and fuel lines.<br />
2) Remove the glow plug and air filter and add<br />
5 to 6 drops of a quality after-run oil into the<br />
carburetor and cylinder head openings. Turn<br />
the engine over a few times to distribute the oil<br />
throughout the engine.<br />
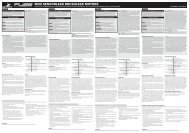
Problem<br />
Engine won’t start<br />
Troubleshooting Guide<br />
Engine starts, then dies<br />
Engine starts and runs<br />
for 1⁄2 tank, then quits<br />
Possible Cause/Solution<br />
• Clogged fuel line<br />
• Bad or improper glow<br />
plug<br />
• Glow igniter not<br />
charged<br />
• Engine flooded<br />
• Pressure line blocked or<br />
disconnected<br />
• Bad glow plug<br />
• High-speed needle too<br />
lean<br />
• Hole or tear in fuel line<br />
• Bad glow plug or idle<br />
speed set too low<br />
• Overheated engine<br />
(too lean)<br />
• Improper needle<br />
settings<br />
3) Clean and inspect the engine, air cleaner and<br />
fuel system.
Warranty<br />
Limited Warranty Period<br />
Horizon Hobby, Inc. guarantees this product to be free<br />
from defects in both material and workmanship at the<br />
date of purchase.<br />
Limited Warranty & Limits of Liability<br />
Pursuant to this Limited Warranty, Horizon Hobby, Inc.<br />
will, at its option, (i) repair or (ii) replace, any product<br />
determined by Horizon Hobby, Inc. to be defective.<br />
In the event of a defect, these are your<br />
exclusive remedies.<br />
This warranty does not cover cosmetic damage or<br />
damage due to acts of God, accident, misuse, abuse,<br />
negligence, commercial use, or modification of or<br />
to any part of the product. This warranty does not<br />
cover damage due to improper installation, operation,<br />
maintenance, or attempted repair by anyone other than<br />
an authorized Horizon Hobby, Inc. service center. This<br />
warranty is limited to the original purchaser and is not<br />
transferable. In no case shall Horizon Hobby’s liability<br />
exceed the original cost of the purchased product and<br />
will not cover consequential, incidental or collateral<br />
damage. Horizon Hobby, Inc. reserves the right to<br />
inspect any and all equipment involved in a warranty<br />
claim. Repair or replacement decisions are at the sole<br />
discretion of Horizon Hobby, Inc. Further, Horizon<br />
Hobby reserves the right to change or modify this<br />
warranty without notice.<br />
REPAIR OR REPLACEMENT AS PROVIDED UNDER<br />
THIS WARRANTY IS THE EXCLUSIVE REMEDY<br />
OF THE CONSUMER. HORIZON HOBBY, INC.<br />
SHALL NOT BE LIABLE FOR ANY INCIDENTAL OR<br />
CONSEQUENTIAL DAMAGES.<br />
As Horizon Hobby, Inc. has no control over<br />
use, setup, final assembly, modification or<br />
misuse, no liability shall be assumed nor<br />
accepted for any resulting damage or injury.<br />
By the act of use, setup or assembly, the user<br />
accepts all resulting liability.<br />
If you as the purchaser or user are not prepared to<br />
accept the liability associated with the use of this<br />
product, you are advised to return this product<br />
immediately in new and unused condition to the<br />
place of purchase.<br />
Safety Precautions<br />
This is a sophisticated hobby product and not a toy.<br />
It must be operated with caution and common sense<br />
and requires some basic mechanical ability. Failure to<br />
operate this product in a safe and responsible manner<br />
could result in injury or damage to the product or other<br />
property. This product is not intended for use by<br />
children without direct adult supervision.<br />
The product manual contains instructions<br />
for safety, operation and maintenance.<br />
It is essential to read and follow all the<br />
instructions and warnings in the manual, prior<br />
to assembly, setup or use, in order to operate<br />
correctly and avoid damage or injury.<br />
Questions, Assistance, and Repairs<br />
Your local hobby store and/or place of purchase cannot<br />
provide warranty support or repair. Once assembly,<br />
setup or use of the product has been started, you must<br />
contact Horizon Hobby, Inc. directly. This will enable<br />
Horizon to better answer your questions and service<br />
you in the event that you may need any assistance.<br />
Questions or Assistance<br />
For questions or assistance, please direct your<br />
email to productsupport@horizonhobby.com, or call<br />
877.504.0233 toll free to speak to a service technician.<br />
Inspection or Repairs<br />
If your product needs to be inspected or repaired,<br />
please call for a Return Merchandise Authorization<br />
(RMA). Pack the product securely using a shipping<br />
carton. Please note that original boxes may be included,<br />
but are not designed to withstand the rigors of shipping<br />
without additional protection. Ship via a carrier that<br />
provides tracking and insurance for lost or damaged<br />
parcels, as Horizon Hobby, Inc. is not responsible<br />
for merchandise until it arrives and is accepted at<br />
our facility. Include your complete name, address,<br />
phone number where you can be reached during<br />
business days, RMA number, and a brief summary of<br />
the problem. Be sure your name, address, and RMA<br />
number are clearly written on the shipping carton.<br />
Warranty Inspection and Repairs<br />
To receive warranty service, you must include your<br />
original sales receipt verifying the proof-of-purchase<br />
date. Providing warranty conditions have been met,<br />
your product will be repaired or replaced free of<br />
charge. Repair or replacement decisions are at the sole<br />
discretion of Horizon Hobby.<br />
Non-Warranty Repairs<br />
Should your repair not be covered by warranty and<br />
the expense exceeds 50% of the retail purchase cost,<br />
you will be provided with an estimate advising you of<br />
your options. You will be billed for any return freight<br />
for non-warranty repairs. Please advise us of your<br />
preferred method of payment. Horizon Hobby accepts<br />
money orders and cashiers checks, as well as Visa,<br />
MasterCard, American Express, and Discover cards. If<br />
you choose to pay by credit card, please include your<br />
credit card number and expiration date. Any repair left<br />
unpaid or unclaimed after 90 days will be considered<br />
abandoned and will be disposed of accordingly.<br />
Electronics and engines requiring inspection<br />
or repair should be shipped to the following<br />
address (freight prepaid):<br />
Horizon Service Center<br />
4105 Fieldstone <strong>Road</strong><br />
Champaign, Illinois 61822<br />
All other products requiring inspection or<br />
repair should be shipped to the following<br />
address (freight prepaid):<br />
Horizon Product Support<br />
4105 Fieldstone <strong>Road</strong><br />
Champaign, Illinois 61822<br />
© 2006 Horizon Hobby, Inc.<br />
<strong>Dynamite</strong> engines are manufactured in<br />
Taiwan and distributed worldwide by:<br />
Horizon Hobby, Inc.<br />
4105 Fieldstone Rd.<br />
Champaign, IL 61822<br />
www.horizonhobby.com<br />
9280
Spare Parts Listing<br />
DPS <strong>.21</strong><br />
REAR EXHAUST<br />
DYNP5321<br />
DYNP5320<br />
DYNP5322<br />
DYNP5320<br />
DYNP5325<br />
DYNP5326<br />
DYNP5320<br />
DYNP5323<br />
DYNP5320<br />
DYNP5320<br />
DYNP5327<br />
DYNP5320<br />
DYNP5334<br />
DYNP5314<br />
DYNP5333<br />
DYNP5319<br />
DYNP5318<br />
DYNP5317<br />
DYNP5331<br />
DYNP5328<br />
DYNP5329<br />
DYNP5330<br />
DYNP5320<br />
DYNP5324<br />
DYNP5311<br />
DYNP5309<br />
DYNP5332<br />
DYNP5301<br />
DYNP5302<br />
DYNP5303<br />
DYNP5304<br />
DYNP5305<br />
DYNP5306<br />
DYNP5307<br />
DYNP5308<br />
DYNP5316<br />
DYNP5310<br />
DYNP5313<br />
DYNP5315<br />
DYNP5312<br />
Stock # Description<br />
DYNP5301 CYLINDER HEAD, BLUE: DPS 21<br />
DYNP5302 HEAD BUTTON: DPS 21<br />
DYNP5303 HEAD SHIM .1MM (3): DPS 21<br />
DYNP5304 HEAD SHIM .2MM (3): DPS 21<br />
DYNP5305 PISTON / SLEEVE (9-PORT): DPS 21<br />
DYNP5306 WRIST PIN: DPS 21<br />
DYNP5307 WRIST PIN CLIPS (2): DPS 21/28<br />
DYNP5308 CONNECTING ROD: DPS 21/28<br />
DYNP5309 CRANKSHAFT, <strong>SG</strong>: DPS 21<br />
DYNP5310 FRONT BEARING: DPS 21/28<br />
DYNP5311 REAR BEARING (14X25X6): DPS 21<br />
DYMP5312 CRANKCASE: DPS 21<br />
DYNP5313 COLLET: DPS 21/28<br />
DYNP5314 BACKPLATE w/O-RING: DPS 21/28<br />
DYNP5315 CARB RETAINER POST: DPS 21/28<br />
DYNP5316 SLIDE CARBURETOR (3-NEEDLE):<br />
DPS 21<br />
DYNP5317 CARB RESTRICTOR 7.5MM:<br />
DPS 21/28<br />
DYNP5318 CARB RESTRICTOR 8.5MM:<br />
DPS 21/28<br />
DYNP5319 CARB RESTRICTOR 9MM: DPS 21/28<br />
DYNP5320 2&3 NEEDLE CARB O-RING SET:<br />
DPS 21/28<br />
DYNP5321 HIGH-SPEED ADJ. NEEDLE:<br />
DPS 21/28<br />
DYNP5322 HIGH-SPEED NEEDLE HOLDER:<br />
DPS 21/28<br />
DYNP5323 MID-RANGE ADJ. SPRAY BAR:<br />
DPS 21<br />
DYNP5324 LOW-SPEED ADJ. NEEDLE: DPS 21/28<br />
DYNP5325 FUEL INLET NIPPLE: DPS 21/28<br />
DYNP5326 IDLE SCREW: DPS 21/28<br />
DYNP5327 CARB BODY (3 NEEDLE): DPS 21<br />
DYNP5328 THROTTLE RETURN SPRING:<br />
DPS 21/28<br />
DYNP5329 THROTTLE BARREL BOOT: DPS 21/28<br />
DYNP5330 THROTTLE BARREL: DPS 21<br />
DYNP5331 CARB BALL LINK/BALL END:<br />
DPS 21/28<br />
DYNP5332 HEAD SCREWS 3 X 16MM (4):<br />
DPS 21/28<br />
DYNP5333 BACKPLATE SCREWS 3 X 8MM (4):<br />
DPS 21/28<br />
DYNP5334 ENGINE HEADER SEAL: DPS 21/28