NSVI Installation Guide - IXL Masonry
NSVI Installation Guide - IXL Masonry
NSVI Installation Guide - IXL Masonry

You also want an ePaper? Increase the reach of your titles
YUMPU automatically turns print PDFs into web optimized ePapers that Google loves.
Application Tips<br />
Arches<br />
With or Without Corners<br />
<br />
<br />
<br />
For a full‐veneer look, use corners as<br />
shown in the photo (right).<br />
For a more uniform appearance, a<br />
soldiers‐course can be installed using<br />
only flats as shown (below).<br />
Bracing is generally not required, but<br />
mortar consistency is important.<br />
Concord shown<br />
Sydney (Overgrout) shown<br />
Corners (Outside, 90 Degree Only)<br />
<br />
<br />
<br />
Start at the bottom.<br />
Stagger leg lengths.<br />
Maintain level leg and returns, excluding<br />
irregular stone (i.e. fieldstone & mosaic).<br />
Virginia & Hudson Ledgestone Only<br />
For every corner, integrate 2—3 flats<br />
above it to avoid a vertical jagged line.<br />
<br />
Refer to downloadable flyer:<br />
http://nsvi.com/<strong>NSVI</strong>_virgledge_corners.pdf<br />
Virginia Ledgestone shown<br />
Drystacking (TIGHT<br />
TIGHT‐Fit<br />
joints)<br />
Columns<br />
CMU or Wood Substrates are Typical<br />
<br />
<br />
<br />
Ledgestone is typically installed with tight‐fit<br />
joints. (All <strong>NSVI</strong> products can be done similarly.)<br />
<strong>NSVI</strong> recommends ThinSet for all tight‐fit<br />
applications. (Not truly mortar‐less. See Pg. 4 “Mortar”.)<br />
Cured Thinset mortar color is usually white or<br />
gray, however, a color additive can be mixed in<br />
with gray ThinSet to better compliment the<br />
natural stone hues. Follow instructions on<br />
manufacturer’s label to ensure proper and consistent<br />
proportions.<br />
CMU — (Preferred)<br />
Begin with corners, staggering the lengths.<br />
Follow instructions for CMU on Pg. 3.<br />
Wood Substrate —<br />
Column should be of sturdy, sound construction, and internally<br />
braced to prevent twisting and to minimize movement.<br />
Columns should be designed so that stone does not bear the<br />
load of other structural or aesthetic elements.<br />
Apply weather resistant barrier as needed (see Pg. 4)<br />
Wire lath must be wrapped 16 inches min. around the corners.<br />
Lath should wrap around and meet at or near center of one of<br />
the column sides, overlapping by at least 1 inch.<br />
Follow remaining procedures on Pages 4 and 5.<br />
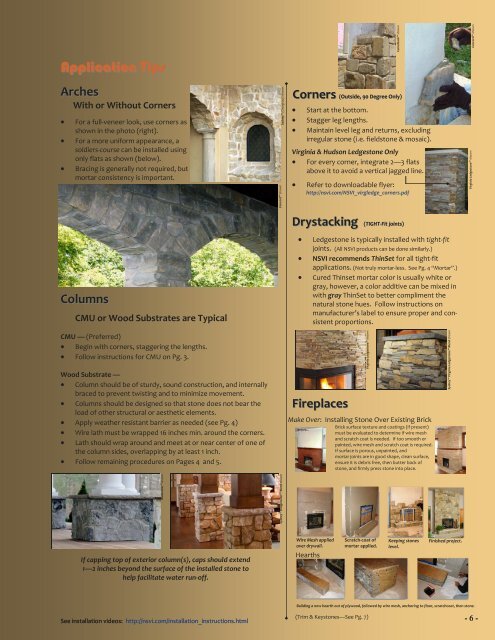
Fireplaces<br />
Make Over: Installing Stone Over Existing Brick<br />
Brick surface texture and coatings (if present)<br />
must be evaluated to determine if wire mesh<br />
and scratch coat is needed. If too smooth or<br />
painted, wire mesh and scratch coat is required.<br />
If surface is porous, unpainted, and<br />
mortar joints are in good shape, clean surface,<br />
ensure it is debris free, then butter back of<br />
stone, and firmly press stone into place.<br />
Bluewater shown<br />
Sydney Bridgewater Blend shown<br />
Camelback shown<br />
Concord shown<br />
Before...<br />
Virginia Ledgestone shown<br />
After...<br />
Sydney Virginia Ledgestone Blend shown<br />
If capping top of exterior column(s), caps should extend<br />
1—2 inches beyond the surface of the installed stone to<br />
help facilitate water run‐off.<br />
Wire Mesh applied<br />
over drywall.<br />
Hearths<br />
Scratch‐coat of<br />
mortar applied.<br />
Keeping stones<br />
level.<br />
Finished project.<br />
Building a new hearth out of plywood, followed by wire mesh, anchoring to floor, scratchcoat, then stone.<br />
(Trim & Keystones—See Pg. 7)<br />
See installation videos: http://nsvi.com/installation_instructions.html<br />
- 6 -