Download the PDF - Origami Tessellations
Download the PDF - Origami Tessellations
Download the PDF - Origami Tessellations

Create successful ePaper yourself
Turn your PDF publications into a flip-book with our unique Google optimized e-Paper software.
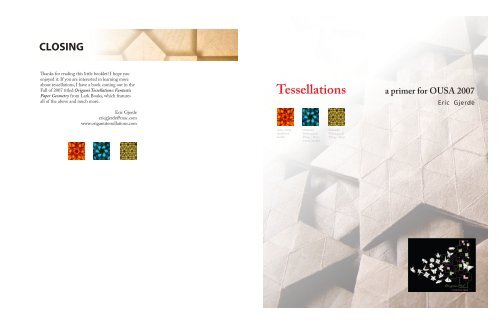
CLOSING<br />
Thanks for reading this little booklet! I hope you<br />
enjoyed it. If you are interested in learning more<br />
about tessellations, I have a book coming out in <strong>the</strong><br />
Fall of 2007 titled <strong>Origami</strong> <strong>Tessellations</strong>: Fantastic<br />
Paper Geometry from Lark Books, which features<br />
all of <strong>the</strong> above and much more.<br />
<strong>Tessellations</strong> a primer for OUSA 2007<br />
Eric Gjerde<br />
Eric Gjerde<br />
ericgjerde@mac.com<br />
www.origamitessellations.com<br />
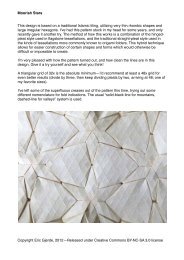
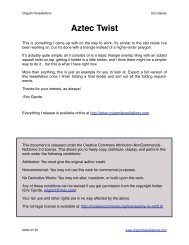
Aztec Twist,<br />
tessellated,<br />
backlit<br />
Deltoidal<br />
Trihexagonal<br />
Tiling + Stars,<br />
reverse, backlit<br />
Deltoidal<br />
Trihexagonal<br />
Tiling + Stars
2 | <strong>Tessellations</strong>: a Primer OUSA 2007<br />
TESSELLATION BASICS<br />
NOTES<br />
This booklet is a brief introduction into origami<br />
tessellations, and a few of <strong>the</strong> basic techniques<br />
used to create complex designs out of simple<br />
repeating shapes. It is by no means complete, but<br />
hopefully will whet your appetite for trying out this<br />
interesting and unique style of folding.<br />
WHAT IS A TESSELLATION?<br />
Have you ever looked at <strong>the</strong> patterns on a tile floor?<br />
The tiles you saw were most likely tessellations -<br />
repeating patterns of specific shapes. In fact, <strong>the</strong><br />
word “tessellation” comes from <strong>the</strong> Latin “tessella”<br />
meaning “small square” - which <strong>the</strong> Romans used<br />
for making mosaics and tile designs.<br />
only one shape. These tessellations each consist of a<br />
single, repeating shape: equilateral triangles, squares,<br />
or hexagons.<br />
PRE-CREASING<br />
One of <strong>the</strong> fundamental basics of origami<br />
tessellations is <strong>the</strong> concept of a pre-creased grid.<br />
Typically, this is used as a framework for <strong>the</strong><br />
ORIGAMI TESSELLATIONS<br />
<strong>Origami</strong> tessellations are geometric designs folded<br />
from a single sheet of paper, creating a complex<br />
repeating pattern of shapes from folded pleats and<br />
twists. They range from simple square tilings to<br />
extremely intricate pieces inspired by Islamic art,<br />
from twisted architectural flourishes to realistic<br />
faces formed from tessellated shapes.<br />
TILINGS<br />
There are three basic tessellation patterns, called<br />
“regular tessellations” which tile infinitely using<br />
placement and orientation of twists and pleats,<br />
which line up with <strong>the</strong> geometry of <strong>the</strong> grid itself.<br />
The two basic grid patterns that are used are squares
6 | <strong>Tessellations</strong>: a Primer OUSA 2007<br />
<strong>Tessellations</strong>: a Primer OUSA 2007 | 3<br />
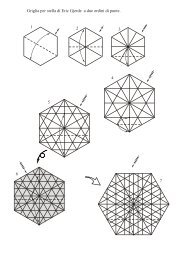
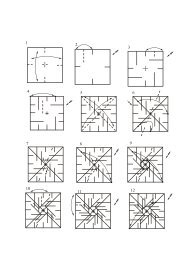
5. The paper should collapse along <strong>the</strong> valley folds<br />
so <strong>the</strong> entire piece is folded in half.<br />
6. Once <strong>the</strong> twist is folded in half, open <strong>the</strong> two<br />
halves of <strong>the</strong> ‘book’ while holding <strong>the</strong> base<br />
toge<strong>the</strong>r.<br />
7. The twist should open up and lie flat.<br />
Once <strong>the</strong> hex twist has been folded, it locks <strong>the</strong><br />
paper into place, and it can be quite difficult to<br />
unfold. This makes it a very useful tool when folding<br />
complicated patterns, as it does a good job of<br />
holding complex folded designs toge<strong>the</strong>r.<br />
and equilateral triangles, since all three regular<br />
tessellations (triangles, squares, and hexagons) can<br />
be created from <strong>the</strong>se two grids.<br />
Accuracy is of critical importance when folding<br />
<strong>the</strong>se patterns. Since you are creating <strong>the</strong> majority<br />
of <strong>the</strong> creases in your tessellation as part of <strong>the</strong><br />
grid, it’s a necessity for your lines to match up with<br />
each o<strong>the</strong>r and for <strong>the</strong> pleats to be of equal width.<br />
If you find that you are off a bit at first, focus your<br />
efforts on making your first few folds as accurate<br />
as possible, as <strong>the</strong>y are <strong>the</strong> cornerstone of <strong>the</strong><br />
foundation in your pre-creased grid.<br />
PLEAT INTERSECTIONS<br />
Folding pleat intersections is one of <strong>the</strong><br />
fundamental concepts in origami tessellations. These<br />
can take <strong>the</strong> form of twists, such as <strong>the</strong> triangle,<br />
square, or hexagon twist we will see later on, or <strong>the</strong>y<br />
can be a simple arrangement laying on top of one<br />
ano<strong>the</strong>r. Almost every tessellation is constructed<br />
from a combination of <strong>the</strong>se two ideas.<br />
90 DEGREE PLEAT INTERSECTION<br />
120 DEGREE PLEAT INTERSECTION<br />
This is a very simple pleat intersection, using a<br />
triangular grid.<br />
1. Identify <strong>the</strong> pleats that you wish to fold; pinch<br />
<strong>the</strong> paper toge<strong>the</strong>r to form <strong>the</strong> actual pleat itself.<br />
2. When all <strong>the</strong> pleats are pinched toge<strong>the</strong>r, fold<br />
<strong>the</strong> pleats over in <strong>the</strong> direction you want <strong>the</strong>m<br />
to lay.<br />
3. The pleats should now be laying flat on <strong>the</strong><br />
paper.<br />
1.<br />
2.<br />
3.<br />
4.<br />
5.<br />
6.<br />
7.<br />
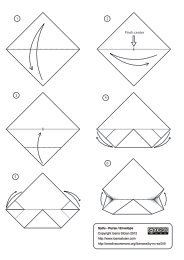
Using a square grid, fold a single pleat.<br />
Unfold <strong>the</strong> first pleat, and fold a second pleat<br />
crossing over <strong>the</strong> first one.<br />
Unfold this pleat as well, and <strong>the</strong>n pinch <strong>the</strong><br />
folds toge<strong>the</strong>r along <strong>the</strong> diagonal creases shown.<br />
Fold <strong>the</strong> lower flaps outwards, and fold <strong>the</strong> tip<br />
over on <strong>the</strong> diagonal lines.<br />
It should lie flat on <strong>the</strong> paper when finished.<br />
This pleat intersection can be changed in several<br />
different ways. Often <strong>the</strong> lower flaps are folded<br />
inwards, to make a flap that can be used for<br />
interesting purposes in tessellation designs.<br />
To fold this, just change <strong>the</strong> orientation for <strong>the</strong><br />
lower flaps so <strong>the</strong>y fold inwards ra<strong>the</strong>r than from<br />
valley to mountain folds.
4 | <strong>Tessellations</strong>: a Primer OUSA 2007<br />
<strong>Tessellations</strong>: a Primer OUSA 2007 | 5<br />
8. The finished fold should lie flat on <strong>the</strong> paper,<br />
and should look a bit like a bird’s mouth.<br />
3.<br />
4.<br />
Hold down <strong>the</strong> three corners of <strong>the</strong> triangle and<br />
pull on <strong>the</strong>m slightly. This will exert pressure<br />
on <strong>the</strong> center of <strong>the</strong> triangle, and make it start<br />
to spread out. Encourage this process along by<br />
pushing down on <strong>the</strong> center of <strong>the</strong> triangle.<br />
Continue pushing <strong>the</strong> triangular section flat,<br />
going all <strong>the</strong> way out to <strong>the</strong> corners. Your<br />
triangle twist is complete!<br />
place- it’s much faster and quite satisfying to do,<br />
almost like popping bubble-wrap.<br />
1.<br />
2.<br />
3.<br />
4.<br />
5.<br />
6.<br />
Identify your mountain and valley folds on your<br />
square grid, and pre-crease <strong>the</strong> diagonal creases.<br />
Start folding <strong>the</strong> paper along <strong>the</strong>se creases.<br />
Collapse <strong>the</strong> paper inwards, following <strong>the</strong> crease<br />
lines.<br />
While collapsing, fold <strong>the</strong> paper in half.<br />
Fold <strong>the</strong> paper along <strong>the</strong> remaining unfolded<br />
valley folds.<br />
Open <strong>the</strong> paper up so it lies flat. That’s all <strong>the</strong>re<br />
is to it!<br />
HEX TWIST<br />
1. To fold <strong>the</strong> twist, start with a triangular grid.<br />
This twist can also be made by squashing a sixpleat<br />
intersection, similar to <strong>the</strong> triangle and<br />
square twist. However it is a bit tricky to do this,<br />
so a learning method is illustrated here.<br />
2. Identify <strong>the</strong> pleat lines to be used, and fold <strong>the</strong>m<br />
accordingly with mountain or valley folds as<br />
indicated.<br />
3. Collapse <strong>the</strong> paper inwards, along <strong>the</strong> crease<br />
lines.<br />
4. Start to twist <strong>the</strong> paper slightly, while folding it<br />
half.<br />
TRIANGLE TWIST<br />
1.<br />
2.<br />
Start with a pre-creased grid of triangles (as<br />
shown in earlier basics segment). Locate your<br />
three pleats, and fold <strong>the</strong>m along <strong>the</strong> mountain /<br />
valley folds indicated on <strong>the</strong> diagram.<br />
The pleats will start to pull toge<strong>the</strong>r - you’ll<br />
notice that paper builds up in <strong>the</strong> center. This<br />
extra paper is required for <strong>the</strong> paper to twist.<br />
Help this along by folding <strong>the</strong> pleats over in<br />
<strong>the</strong> same direction, rotating around <strong>the</strong> central<br />
meeting point of <strong>the</strong> pleats. The result will be a<br />
triangular peak at <strong>the</strong> center.<br />
SQUARE TWIST<br />
This twist can be made more quickly by simply<br />
squashing a 90 degree pleat intersection; this is an<br />
easier way to learn it, initially. Once you understand<br />
how <strong>the</strong> twist works, feel free to squash it into