Download our Product Instructions - Learning Resources
Download our Product Instructions - Learning Resources
Download our Product Instructions - Learning Resources

Create successful ePaper yourself
Turn your PDF publications into a flip-book with our unique Google optimized e-Paper software.
LER 9199<br />
<br />
<strong>Instructions</strong> / Mode d’emploi / Anleitung / Instrucciones<br />
! WARNING:<br />
CHOKING HAZARD - Small parts.<br />
Not for children under 3 years.<br />
DANGER DE SUFFOCATION. Petites<br />
pièces. Pas p<strong>our</strong> les enfants en dessous de 3 ans.<br />
ERSTICKUNGSGEFAHR. Kleine Teile.<br />
Nicht geeignet für Kinder unter 3 Jahren.<br />
PELIGRO DE AHOGO. Partes pequeñas.<br />
No recomendado para niños menores de 3 años.<br />
RISCHIO DI SOFFOCAMENTO. Contiene<br />
pezzi piccoli. Non adatto ai bambini di età inferiore ai 3 anni.<br />
© <strong>Learning</strong> Res<strong>our</strong>ces, Inc., Vernon Hills, IL (U.S.A.)<br />
<strong>Learning</strong> Res<strong>our</strong>ces, Ltd., King’s Lynn, Norfolk (U.K.)<br />
Please retain <strong>our</strong> address for future reference.<br />
Made in Korea<br />
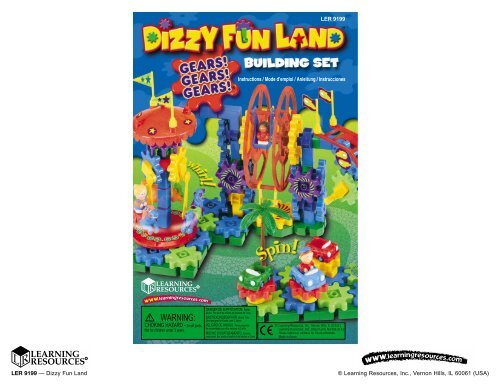
LER 9199 — Dizzy Fun Land<br />
© <strong>Learning</strong> Res<strong>our</strong>ces, Inc., Vernon Hills, IL 60061 (USA)
There’s no waiting in lines at this amusement park! Build the rides<br />
shown in this guide or make y<strong>our</strong> own custom creations! There is no<br />
wrong way to build. Just follow these instructions to help you get<br />
started.<br />
Note: Before you begin, make sure you have 2 new "AA" batteries in<br />
the motor’s red hand control. See the last page in this guide for more<br />
information on proper battery care.<br />
*Small Gear (24) *Medium Gear (2)<br />
Large Gear (3)<br />
Crown Gear (1)<br />
Motor (1)<br />
¡No hay que esperar en colas en este parque de diversiones! ¡Construya<br />
los recorridos que aparecen en esta guía o haga sus propias creaciones<br />
especiales! No hay ningún modo de crear que sea incorrecto. Sólo<br />
tendrá que seguir estas instrucciones como ayuda para ponerse en<br />
marcha.<br />
Nota: Antes de comenzar, asegúrese de que tiene dos baterías "AA"<br />
nuevas en el control de mano derecha del motor. Vea la última página<br />
de esta guía para obtener más información sobre el cuidado adecuado<br />
de las baterías.<br />
34° Angle Pillar (1)<br />
Pillar (5) Pillar Axle (7) 6 Way Axle (1)<br />
Pillar<br />
Connector (8) T-Connector (2) L-Connector (2)<br />
Palm Tree (2)<br />
Arm Crank (3)<br />
1<br />
/2 Pillar (14) Peg (6)<br />
Bumper Car<br />
Holder (3)<br />
Kein Warten in langen Schlangen bei diesem Vergnügungspark! Bauen<br />
Sie die in dieser Anleitung gezeigten Bahnen oder entwerfen Sie Ihre<br />
eigenen Kreationen! Es gibt keine falschen Aufbauideen. Befolgen Sie<br />
als Starthilfe einfach die Anleitungen.<br />
Hinweis: Bevor Sie anfangen, vergewissern Sie sich, dass zwei neue<br />
„AA" Batterien in der roten Handsteuerung des Motors eingebaut sind.<br />
Auf der letzten Seite dieser Anleitungen finden Sie zusätzliche<br />
Informationen zur Batteriepflege.<br />
Small<br />
Base (4)<br />
Medium<br />
Base (1)<br />
Bumper Cars (3) Kids (4)<br />
Large<br />
Base (1) Large Square Base (3)<br />
Carousel<br />
Horses (3)<br />
Crank Handle (1)<br />
(2) (2)<br />
*Flags<br />
Aucun besoin de faire la queue p<strong>our</strong> ce parc d'attractions. Construis les<br />
manèges présentés dans ce guide ou tes propres créations ! Il n'y a pas<br />
de mauvaise façon de construire le manège. Tu n'as qu'à suivre ces<br />
instructions p<strong>our</strong> t'aider au début.<br />
Note : Avant de commencer, assure-toi d'avoir 2 nouvelles piles ‘AA’<br />
dans le contrôle manuel rouge du moteur. Consulte la dernière page du<br />
guide p<strong>our</strong> plus d'information sur l'entretien des piles.<br />
5 Way Axle (1) *Merry-Go-Round top (1) *Merry-Go-Round base (1)<br />
*Roller Coaster Car (1)<br />
Top (1) Middle (1) Bottom (1)<br />
*Ferris Wheel (1)<br />
Roller Coaster Track<br />
1 Sheet of Stickers * Stickers are applied to these pieces. See front of box for placement.<br />
LER 9199 — Dizzy Fun Land<br />
© <strong>Learning</strong> Res<strong>our</strong>ces, Inc., Vernon Hills, IL 60061 (USA)
MERRY - GO - ROUND<br />
TM<br />
TM<br />
STEP 1<br />
Join two square bases.<br />
Building Hint:<br />
Try to build from<br />
the base up.<br />
STEP 2<br />
Add eight small gears.<br />
BUMPER CARS<br />
DIZZY FUN LAND is built<br />
in sections. The completed<br />
rides will be joined<br />
together in the last steps.<br />
STEP 3<br />
Build three cars.<br />
STEP 1<br />
Build a tower<br />
to hold the horses.<br />
The Ferris wheel<br />
will attach here.<br />
Snap a peg<br />
inside 1 /2 pillar<br />
above.<br />
(Step 2)<br />
You can<br />
add drivers<br />
too.<br />
STEP 2<br />
Build three carousel<br />
horses with gears.<br />
STEP 4<br />
Put the cars on<br />
the gears.<br />
Arm crank<br />
Add a rider<br />
(Step 2)<br />
STEP 5<br />
Put a palm tree on the last gear.<br />
It will turn as the cars go around.<br />
Building Hint:<br />
Always snap a<br />
peg into place.<br />
All the cars gears should move together.<br />
You have finished the first ride.<br />
Large gear<br />
Large base<br />
Small gear<br />
Small base<br />
LER 9199 — Dizzy Fun Land<br />
© <strong>Learning</strong> Res<strong>our</strong>ces, Inc., Vernon Hills, IL 60061 (USA)
STEP 1<br />
Build this support on<br />
the base. The motor<br />
should turn this gear<br />
and the three gears<br />
on the base.<br />
Add a medium<br />
gear to the side pin.<br />
TM<br />
The merry-go-round<br />
will connect here.<br />
FERRIS WHEEL<br />
motor<br />
STEP 3<br />
Attach this side of the Ferris<br />
wheel to the support you<br />
built in Step 1.<br />
STEP 5<br />
Build this support<br />
for the other side<br />
of the Ferris wheel.<br />
STEP 2<br />
Add two large gears<br />
to the Ferris wheel.<br />
STEP 6<br />
Attach the center of the<br />
other side of the Ferris<br />
wheel to this pin.<br />
Put three small gears<br />
on a square base.<br />
STEP 4<br />
Add a medium gear<br />
and medium base.<br />
STEP 7<br />
Attach this small base<br />
to the medium base.<br />
LER 9199 — Dizzy Fun Land<br />
© <strong>Learning</strong> Res<strong>our</strong>ces, Inc., Vernon Hills, IL 60061 (USA)
TM<br />
PUT ALL THE SECTIONS TOGETHER<br />
TM<br />
Join the Ferris wheel<br />
and roller coaster track<br />
to the merry-go-round.<br />
ROLLER COASTER<br />
STEP 1<br />
Build the support for<br />
the top of the roller<br />
coaster track.<br />
The two bases join<br />
together here.<br />
Next add the<br />
bumper cars.<br />
STEP 2<br />
Add two small gears<br />
and a hand crank.<br />
STEP 3<br />
Build the track<br />
base.<br />
STEP 5<br />
Add two flags.<br />
STEP 4<br />
Build the roller<br />
coaster track.<br />
Add flags to<br />
the top of the<br />
merry-go-round<br />
and roller<br />
coaster.<br />
Put a car and<br />
driver on<br />
the top.<br />
STEP 6<br />
Attach the<br />
support.<br />
Turning the<br />
crank will<br />
release the<br />
car and driver!<br />
STEP 8<br />
Attach the<br />
track support<br />
to the Ferris<br />
wheel.<br />
STEP 7<br />
Attach the track base<br />
to the bottom of the<br />
roller coaster track.<br />
You've done it!<br />
The Dizzy Fun Land<br />
is now complete.<br />
LER 9199 — Dizzy Fun Land<br />
© <strong>Learning</strong> Res<strong>our</strong>ces, Inc., Vernon Hills, IL 60061 (USA)
Now use the pieces from<br />
y<strong>our</strong> Dizzy Fun Land<br />
Amusement Park to<br />
build the following models<br />
one at a time.<br />
STEP 3<br />
Build a pair of wheels<br />
using large gears.<br />
Put a small<br />
gear on outside.<br />
Small gear<br />
DIZZY ROLLER<br />
STEP 1<br />
Start by building<br />
a support.<br />
STEP 4<br />
Add f<strong>our</strong> small gears<br />
to each side. Add handle<br />
to one gear as shown.<br />
Snap a peg<br />
inside this part.<br />
wheel<br />
STEP 2<br />
Place the support on<br />
the motor and add more<br />
pieces to the front.<br />
STEP 5<br />
Attach the wheels to<br />
each side of the motor.<br />
wheel<br />
LER 9199 — Dizzy Fun Land<br />
© <strong>Learning</strong> Res<strong>our</strong>ces, Inc., Vernon Hills, IL 60061 (USA)
STEP 1<br />
Start by building<br />
a pair of legs.<br />
STEP 2<br />
Add two flags<br />
to the top of<br />
the legs.<br />
DIZZY ROBOT<br />
STEP 8<br />
Build the head.<br />
STEP 3<br />
Add arm cranks<br />
to each legs.<br />
STEP 4<br />
Join the legs<br />
together with the<br />
motor in the middle.<br />
STEP 9<br />
Put a small gear<br />
on the back of<br />
the head.<br />
STEP 5<br />
Add an extra gear<br />
to the motor in front.<br />
STEP 6<br />
Attach three<br />
gears to each leg.<br />
STEP 7<br />
Add six more gears to the back,<br />
three on each leg.<br />
The motor should<br />
turn all the gears.<br />
STEP 10<br />
Attach merry-go-round base,<br />
peg, 1 /2 pillar and medium<br />
gears to the extra gear on<br />
the front of the motor.<br />
LER 9199 — Dizzy Fun Land<br />
© <strong>Learning</strong> Res<strong>our</strong>ces, Inc., Vernon Hills, IL 60061 (USA)
STEP 1<br />
Build a square<br />
frame with pillar<br />
axles and a motor.<br />
STEP 3<br />
Add seven small gears to<br />
the top of the frame so that<br />
it looks like this.<br />
STEP 2<br />
Add f<strong>our</strong> legs<br />
using blue pillars.<br />
DIZZY<br />
SWINGING CARS<br />
STEP 4<br />
Make three cars<br />
with drivers on<br />
small gears and<br />
arm cranks.<br />
Motor<br />
STEP 5<br />
Attach arm cranks<br />
on the bottom of the<br />
cars to the gear base<br />
as shown here.<br />
Turn on the motor for<br />
dizzy swinging car action.<br />
LER 9199 — Dizzy Fun Land<br />
© <strong>Learning</strong> Res<strong>our</strong>ces, Inc., Vernon Hills, IL 60061 (USA)
CAUTION:<br />
• Use only 2 ‘’AA” batteries.<br />
• To remove batteries, slide cover off hand-control (See arrow). Remove old batteries and replace with new batteries.<br />
Be sure to insert batteries correctly according to (+) and (-) symbols on battery compartment.<br />
• Be sure to insert batteries correctly with adult supervision and always follow the toy and battery manufacturer’s<br />
instructions.<br />
• Do not mix old and new batteries.<br />
• Do not mix alkaline, standard (carbon-zinc), or rechargeable (nickel-cadmium) batteries.<br />
• Rechargeable batteries are to be removed from the toy before being charged.<br />
• Non-rechargeable batteries are not to be recharged.<br />
• Rechargeable batteries are only to be charged under adult supervision.<br />
• Only batteries of the same or equivalent type as recommended are to be used.<br />
• The supply terminals are not to be short-circuited.<br />
• Always remove weak or dead batteries from the product.<br />
• Remove batteries if the product will be stored for an extended period of time.<br />
• Check the cord frequently and do not use if wire is damaged or exposed.<br />
Please retain these instructions for future reference.<br />
Mise en garde:<br />
• Utilise seulement 2 piles ‘AA’.<br />
• P<strong>our</strong> retirer les piles, glisse le couvercle p<strong>our</strong> le sortir du contrôle manuel (voir la flèche). Retire les vieilles piles<br />
et remplace-les avec des neuves. Assure-toi d'insérer les piles correctement en suivant les symboles (+) et (-) dans<br />
le compartiment de piles.<br />
• Insère les piles correctement avec l'aide d'un adulte et suis touj<strong>our</strong>s les instructions du fabricant de piles et du jouet.<br />
• Ne mélange pas les piles, nouvelles et vieilles.<br />
• Ne mélange pas de piles alcalines, standard (carbone-zinc) ou rechargeables (nickel-cadmium)<br />
• Tu dois retirer les piles rechargeables du jouet avant de les recharger.<br />
• Les piles non-rechargeables ne peuvent pas être rechargées.<br />
• Les piles rechargeables doivent être chargées seulement sous la supervision d'un adulte.<br />
• Tu dois utiliser seulement les types de piles recommandées ou l'équivalent.<br />
• Il ne faut pas c<strong>our</strong>t-circuiter les bornes d'alimentation.<br />
• Retire touj<strong>our</strong>s les piles faibles ou mortes du produit.<br />
• Si tu prévois ranger le produit pendant assez longtemps, retire les piles.<br />
• Vérifie souvent le cordon et ne l'utilise pas si le fil est endommagé ou exposé.<br />
Conserve ces instructions p<strong>our</strong> référence ultérieure.<br />
Vorsicht:<br />
• Nur 2 „AA" Batterien verwenden.<br />
• Zum Entfernen der Batterien, schieben Sie zunächst die Abdeckung von der Handsteuerung (siehe Pfeil). Entfernen<br />
Sie die alten Batterien und ersetzen Sie sie mit neuen. Beachten Sie dabei die korrekte Lage der Batterien<br />
entsprechend der (+) and (-) Symbole am Batteriefach.<br />
• Die Batterien müssen korrekt unter Aufsicht Erwachsener eingelegt werden; befolgen Sie stets die Anleitungen<br />
der Spielzeug- und Batteriehersteller.<br />
• Verwenden Sie nie alte und neue Batterien zusammen.<br />
• Verwenden Sie nie Alkali- oder Standardbatterien (Kohle-Zink) bzw. aufladbare Akkus (Nickel-Kadmium)<br />
zusammen.<br />
• Aufladbare Akkus müssen vor dem Aufladen aus dem Spielzeug entfernt werden.<br />
• Nicht aufladbare Batterien dürfen nicht geladen werden.<br />
• Aufladbare Akkus dürfen nur unter Aufsicht Erwachsener geladen werden.<br />
• Nur Batterien der gleichen Type oder einer empfohlenen gleichwertigen Type verwenden.<br />
• Die Versorgungsklemmen nicht kurzschließen.<br />
• Schwache oder leere Batterien immer aus dem Produkt entfernen.<br />
• Entfernen Sie die Batterien, wenn Sie das Produkt für längere Zeit aufbewahren.<br />
• Überprüfen Sie das Kabel regelmäßig und verwenden Sie es nicht, wenn ein Draht beschädigt oder frei ist.<br />
PRECAUCIÓN<br />
• Use sólo 2 baterías "AA".<br />
• Para retirar las baterías, deslice la cubierta hacia afuera del control manual (vea la flecha). Retire las baterías<br />
usadas y reemplácelas con otras nuevas. Asegúrese de insertarlas correctamente de conformidad con los<br />
signos (+) y (-) que se muestran en el compartimiento correspondiente.<br />
• Asegúrese de insertar las baterías correctamente con supervisión de un adulto y siga siempre las instrucciones<br />
de los fabricantes de los juguetes y las baterías.<br />
• No mezcle baterías nuevas con otras usadas.<br />
• No combine baterías alcalinas con otras estándar (carbono-zinc) o recargables (níquel-cadmio).<br />
• Las baterías recargables se deberán retirar del juguete antes de cargarlas.<br />
• Las baterías no recargables no se deberán volver a cargar.<br />
• Las baterías recargables sólo se deberán cargar bajo supervisión de adultos.<br />
• Sólo se deberán utilizar baterías del mismo tipo u otro equivalente que se recomiende.<br />
• Las terminales de alimentación no se deberán poner en cortocircuito.<br />
• Retire siempre del producto las baterías débiles o agotadas.<br />
• Quite las baterías si se va a almacenar el producto durante un periodo prolongado.<br />
• Inspeccione el cable con frecuencia y no use el producto si está dañado o al desnudo.<br />
Tenga la bondad de conservar estas instrucciones para consultas futuras.<br />
LRM9199-<br />
LER 9199 — Dizzy Fun Land<br />
© <strong>Learning</strong> Res<strong>our</strong>ces, Inc., Vernon Hills, IL 60061 (USA)