Instructions for the Sealey CHARGE107 Battery ... - Sitebox Ltd
Instructions for the Sealey CHARGE107 Battery ... - Sitebox Ltd
Instructions for the Sealey CHARGE107 Battery ... - Sitebox Ltd

You also want an ePaper? Increase the reach of your titles
YUMPU automatically turns print PDFs into web optimized ePapers that Google loves.
<strong>Instructions</strong> <strong>for</strong>:<br />
12/24V 230V<br />
battery chargerS<br />
MODEL Nos: CHARGE106, <strong>CHARGE107</strong>, CHARGE110, CHARGE112, CHARGE115, CHARGE124<br />
Thank you <strong>for</strong> purchasing a <strong>Sealey</strong> product. Manufactured to a high standard this product will give you years of trouble free per<strong>for</strong>mance if <strong>the</strong>se instructions are carefully followed and <strong>the</strong><br />
product is correctly maintained.<br />
IMPORTANT: PLEASE READ THESE INSTRUCTIONS CAREFULLY. NOTE THE SAFE OPERATIONAL REQUIREMENTS, WARNINGS AND CAUTIONS. USE THIS<br />
PRODUCT CORRECTLY AND WITH CARE FOR THE PURPOSE FOR WHICH IT IS INTENDED. FAILURE TO DO SO MAY CAUSE DAMAGE AND/OR PERSONAL<br />
INJURY AND WILL INVALIDATE THE WARRANTY. PLEASE RETAIN THESE INSTRUCTIONS FOR FUTURE USE.<br />
1. SAFETY INSTRUCTIONS<br />
1.1. ELECTRICAL SAFETY<br />
WARNING! It is <strong>the</strong> responsibility of <strong>the</strong> owner and <strong>the</strong> operator to read, understand and comply with <strong>the</strong> following:<br />
You must check all electrical products, be<strong>for</strong>e use, to ensure that <strong>the</strong>y are safe. You must inspect power cables, plugs, sockets and any o<strong>the</strong>r<br />
connectors <strong>for</strong> wear or damage. You must ensure that <strong>the</strong> risk of electric shock is minimised by <strong>the</strong> installation of appropriate safety devices. A<br />
Residual Current Circuit Breaker (RCCB) should be incorporated in <strong>the</strong> main distribution board. We also recommend that a Residual Current<br />
Device (RCD) is used. It is particularly important to use an RCD with portable products that are plugged into a supply which is not protected<br />
by an RCCB. If in any doubt consult a qualified electrician. You may obtain a Residual Current Device by contacting your <strong>Sealey</strong> dealer.<br />
You must also read and understand <strong>the</strong> following instructions concerning electrical safety.<br />
1.1.1. The Electricity at Work Act 1989 requires that all portable electrical appliances, if used on business premises, are tested by a<br />
qualified electrician, using a Portable Appliance Tester (PAT), at least once a year.<br />
1.1.2. The Health & Safety at Work Act 1974 makes owners of electrical appliances responsible <strong>for</strong> <strong>the</strong> safe condition of those appliances<br />
and <strong>the</strong> safety of <strong>the</strong> appliance operators. If in any doubt about electrical safety, contact a qualified electrician.<br />
1.1.3. Ensure that <strong>the</strong> insulation on all cables and on <strong>the</strong> appliance is safe be<strong>for</strong>e connecting it to <strong>the</strong> power<br />
supply. See 1.1.1. and 1.1.2. and use a Portable Appliance Tester.<br />
1.1.4. Ensure that cables are always protected against short circuit and overload.<br />
1.1.5. Regularly inspect power supply cables and plugs <strong>for</strong> wear or damage and check all connections to ensure<br />
that none is loose.<br />
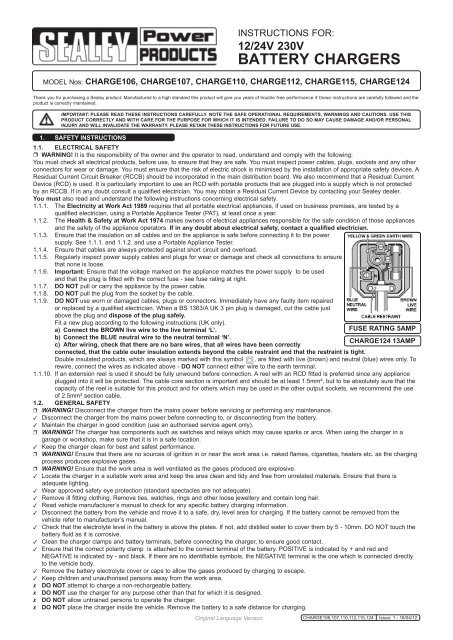
1.1.6. Important: Ensure that <strong>the</strong> voltage marked on <strong>the</strong> appliance matches <strong>the</strong> power supply to be used<br />
and that <strong>the</strong> plug is fitted with <strong>the</strong> correct fuse - see fuse rating at right.<br />
1.1.7. DO NOT pull or carry <strong>the</strong> appliance by <strong>the</strong> power cable.<br />
1.1.8. DO NOT pull <strong>the</strong> plug from <strong>the</strong> socket by <strong>the</strong> cable.<br />
1.1.9. DO NOT use worn or damaged cables, plugs or connectors. Immediately have any faulty item repaired<br />
or replaced by a qualified electrician. When a BS 1363/A UK 3 pin plug is damaged, cut <strong>the</strong> cable just<br />
above <strong>the</strong> plug and dispose of <strong>the</strong> plug safely.<br />
Fit a new plug according to <strong>the</strong> following instructions (UK only).<br />
a) Connect <strong>the</strong> BROWN live wire to <strong>the</strong> live terminal ‘L’.<br />
FUSE RATING 5AMP<br />
b) Connect <strong>the</strong> BLUE neutral wire to <strong>the</strong> neutral terminal ‘N’.<br />
CHARGE124 13AMP<br />
c) After wiring, check that <strong>the</strong>re are no bare wires, that all wires have been correctly<br />
connected, that <strong>the</strong> cable outer insulation extends beyond <strong>the</strong> cable restraint and that <strong>the</strong> restraint is tight.<br />
Double insulated products, which are always marked with this symbol , are fitted with live (brown) and neutral (blue) wires only. To<br />
rewire, connect <strong>the</strong> wires as indicated above - DO NOT connect ei<strong>the</strong>r wire to <strong>the</strong> earth terminal.<br />
1.1.10. If an extension reel is used it should be fully unwound be<strong>for</strong>e connection. A reel with an RCD fitted is preferred since any appliance<br />
plugged into it will be protected. The cable core section is important and should be at least 1.5mm², but to be absolutely sure that <strong>the</strong><br />
capacity of <strong>the</strong> reel is suitable <strong>for</strong> this product and <strong>for</strong> o<strong>the</strong>rs which may be used in <strong>the</strong> o<strong>the</strong>r output sockets, we recommend <strong>the</strong> use<br />
of 2.5mm² section cable.<br />
1.2. GENERAL SAFETY<br />
WARNING! Disconnect <strong>the</strong> charger from <strong>the</strong> mains power be<strong>for</strong>e servicing or per<strong>for</strong>ming any maintenance.<br />
Disconnect <strong>the</strong> charger from <strong>the</strong> mains power be<strong>for</strong>e connecting to, or disconnecting from <strong>the</strong> battery.<br />
Maintain <strong>the</strong> charger in good condition (use an authorised service agent only).<br />
WARNING! The charger has components such as switches and relays which may cause sparks or arcs. When using <strong>the</strong> charger in a<br />
garage or workshop, make sure that it is in a safe location.<br />
Keep <strong>the</strong> charger clean <strong>for</strong> best and safest per<strong>for</strong>mance.<br />
WARNING! Ensure that <strong>the</strong>re are no sources of ignition in or near <strong>the</strong> work area i.e. naked flames, cigarettes, heaters etc. as <strong>the</strong> charging<br />
process produces explosive gases.<br />
WARNING! Ensure that <strong>the</strong> work area is well ventilated as <strong>the</strong> gases produced are explosive.<br />
Locate <strong>the</strong> charger in a suitable work area and keep <strong>the</strong> area clean and tidy and free from unrelated materials. Ensure that <strong>the</strong>re is<br />
adequate lighting.<br />
Wear approved safety eye protection (standard spectacles are not adequate).<br />
Remove ill fitting clothing. Remove ties, watches, rings and o<strong>the</strong>r loose jewellery and contain long hair.<br />
Read vehicle manufacturer’s manual to check <strong>for</strong> any specific battery charging in<strong>for</strong>mation.<br />
Disconnect <strong>the</strong> battery from <strong>the</strong> vehicle and move it to a safe, dry, level area <strong>for</strong> charging. If <strong>the</strong> battery cannot be removed from <strong>the</strong><br />
vehicle refer to manufacturer’s manual.<br />
Check that <strong>the</strong> electrolyte level in <strong>the</strong> battery is above <strong>the</strong> plates. If not, add distilled water to cover <strong>the</strong>m by 5 - 10mm. DO NOT touch <strong>the</strong><br />
battery fluid as it is corrosive.<br />
Clean <strong>the</strong> charger clamps and battery terminals, be<strong>for</strong>e connecting <strong>the</strong> charger, to ensure good contact.<br />
Ensure that <strong>the</strong> correct polarity clamp is attached to <strong>the</strong> correct terminal of <strong>the</strong> battery. POSITIVE is indicated by + and red and<br />
NEGATIVE is indicated by - and black. If <strong>the</strong>re are no identifiable symbols, <strong>the</strong> NEGATIVE terminal is <strong>the</strong> one which is connected directly<br />
to <strong>the</strong> vehicle body.<br />
Remove <strong>the</strong> battery electrolyte cover or caps to allow <strong>the</strong> gases produced by charging to escape.<br />
Keep children and unauthorised persons away from <strong>the</strong> work area.<br />
DO NOT attempt to charge a non-rechargeable battery.<br />
DO NOT use <strong>the</strong> charger <strong>for</strong> any purpose o<strong>the</strong>r than that <strong>for</strong> which it is designed.<br />
DO NOT allow untrained persons to operate <strong>the</strong> charger.<br />
DO NOT place <strong>the</strong> charger inside <strong>the</strong> vehicle. Remove <strong>the</strong> battery to a safe distance <strong>for</strong> charging.<br />
Original Language Version CHARGE106,107,110,112,115,124 Issue: 1 - 16/04/12
DO NOT allow <strong>the</strong> charger terminal clamps to touch each o<strong>the</strong>r when <strong>the</strong> power is on or <strong>the</strong> charger fuse will blow. Remember that gases<br />
are produced which may ignite if sparks occur.<br />
DO NOT get <strong>the</strong> charger wet or use in damp or wet locations or areas where <strong>the</strong>re is condensation.<br />
DO NOT operate <strong>the</strong> charger if it is damaged.<br />
DO NOT attempt to modify or open <strong>the</strong> charger.<br />
When not in use, unplug from <strong>the</strong> mains power supply and store in a safe, dry, childproof area.<br />
WARNING! Be vigilant and cautious during battery charging as <strong>the</strong> electrolyte is highly corrosive and <strong>the</strong> emitted gases are explosive.<br />
1.3. PERSONAL PRECAUTIONS<br />
Ensure that <strong>the</strong>re is ano<strong>the</strong>r person within hearing of your voice and close enough to come to your aid,<br />
should a problem arise when working near a lead-acid battery.<br />
Wear safety eye protection and protective clothing. Avoid touching eyes while working near battery.<br />
Have fresh water and soap nearby in case battery acid contacts skin, clothing, or eyes.<br />
Wash immediately with soap and water if battery acid contacts skin or clothing. If acid enters eye, flush eye immediately with cool, clean<br />
running water <strong>for</strong> at least 15 minutes and seek immediate medical attention.<br />
Remove personal metallic items such as rings, bracelets, necklaces and watches. A lead-acid battery can produce a short-circuit current<br />
high enough to weld a ring to metal, which would cause severe burns.<br />
Ensure that hands, clothing (especially belts) are clear of fan blades and o<strong>the</strong>r moving or hot parts of <strong>the</strong> engine. Remove ties and contain<br />
long hair.<br />
DO NOT smoke or allow a spark or flame in <strong>the</strong> vicinity of battery or engine.<br />
This appliance is not intended <strong>for</strong> use by persons (including children) with reduced physical, sensory or mental capabilities or lack of<br />
experience and knowledge, unless <strong>the</strong>y have been given supervision or instruction concerning <strong>the</strong> use of <strong>the</strong> appliance by a person responsible<br />
<strong>for</strong> <strong>the</strong>ir safety. Children should be supervised to ensure that <strong>the</strong>y do not play with <strong>the</strong> appliance.<br />
2. introduction & specifications<br />
3.<br />
DANGER! BE AWARE, LEAD-ACID BATTERIES GENERATE EXPLOSIVE GASES DURING NORMAL BATTERY OPERATION. FOR THIS<br />
REASON, IT IS VERY IMPORTANT TO READ AND FOLLOW THESE INSTRUCTIONS CAREFULLY, EACH TIME YOU USE THE CHARGER.<br />
Follow <strong>the</strong>se instructions and those published by <strong>the</strong> battery and vehicle manufacturers and <strong>the</strong> manufacturer of any equipment<br />
you intend to use in <strong>the</strong> vicinity of <strong>the</strong> battery. Remember to review warning marks on all products and on engines.<br />
Supplied in steel case with carry handle, <strong>the</strong>se single phase chargers feature plenty of ventilation to help maintain low trans<strong>for</strong>mer temperatures.<br />
A large ammeter displays rate of charge and a dash-mounted fuse provides polarity protection in <strong>the</strong> event that clips are connected incorrectly.<br />
Rocker switches control variable output to <strong>the</strong> battery to maintain peak condition. Suitable <strong>for</strong> regular and low maintenance batteries. Supplied<br />
with 2200mm length output cables with heavy-duty crocodile clips and are fitted with ASTA/BS approved non-rewirable 3-pin safety plug.<br />
MODEL No. CHARGE106 <strong>CHARGE107</strong> CHARGE110 CHARGE112 CHARGE115 CHARGE124<br />
Rated charging current: 6A 7A 10A 12A 15A 24A<br />
Maximum charging current (Boost): 8A 11A 14A 16A 19A 28A<br />
Charging capacity: 10-95Ah 20-105Ah 20-120Ah 20-200Ah 20-250Ah 25-320Ah<br />
Volts Output: 12/24V 12/24V 12/24V 12/24V 12/24V 12/24V<br />
Volts Input: 230V 230V 230V 230V 230V 230V<br />
Watts Input: 100W 150W 200W 200W 700W 1000W<br />
Charging Rates: 2 2 2 2 2 2<br />
Polarity protection Fuse (1 x 15A) Fuse (1 x 15A) Fuse (1 x 20A) Fuse (1 x 30A) Fuse (1 x 30A) Fuse (1 x 40A)<br />
Input Protection Fuse T3A T3A T4A T5A T5A T6A<br />
CHARGING instructions<br />
3.1. Preparation<br />
It is important to correctly prepare <strong>for</strong> charging, ensuring that you follow Section 1 safety instructions carefully. Check that <strong>the</strong> capacity<br />
of <strong>the</strong> battery is compatible with <strong>the</strong> charger output. Charging current (amps) should not exceed one tenth of <strong>the</strong> value of <strong>the</strong> battery<br />
capacity (amp hours).<br />
3.1.1. Follow <strong>the</strong> vehicle manufacturer’s instructions <strong>for</strong> charging <strong>the</strong> battery. Note special instructions <strong>for</strong> charging vehicle batteries in situ.<br />
3.1.2. Check <strong>the</strong> battery to ensure that <strong>the</strong> POSITIVE and NEGATIVE terminals are clearly identifiable be<strong>for</strong>e removing <strong>the</strong> battery from <strong>the</strong><br />
vehicle.<br />
3.1.3. Subject to 3.1.1. above, disconnect and remove <strong>the</strong> battery from <strong>the</strong> vehicle and place in an appropriate safe area ready <strong>for</strong> charging.<br />
3.1.4. If possible, remove <strong>the</strong> battery electrolyte cover or caps to allow <strong>the</strong> gases produced by charging to escape.<br />
3.1.5. Check that <strong>the</strong> electrolyte is covering <strong>the</strong> plates inside. If not, add distilled water so that <strong>the</strong> plates are covered by 5-10mm.<br />
3.1.6. The charge status of <strong>the</strong> battery may be determined by use of a hydrometer to measure <strong>the</strong> specific gravity (relative density) of <strong>the</strong><br />
electrolyte: 1.28 = Fully charged 1.21 = Half charged 1.14 = Fully discharged.<br />
WARNING! Be cautious and vigilant - <strong>the</strong> electrolyte is a highly corrosive acid.<br />
3.2. Connecting <strong>the</strong> charger to <strong>the</strong> battery. Ensure that <strong>the</strong> battery charger is unplugged from <strong>the</strong> mains power supply be<strong>for</strong>e connecting<br />
<strong>the</strong> leads to <strong>the</strong> battery.<br />
3.2.1. Select <strong>the</strong> charger voltage to match that of <strong>the</strong> battery by setting <strong>the</strong> rocker switch to ei<strong>the</strong>r 12 or 24 volts.<br />
3.2.2. Initially, always set <strong>the</strong> Charge Rate rocker switch to 'MIN'.<br />
3.2.3. Check that <strong>the</strong> charger clamps and battery terminals are clean and free from oxidation.<br />
3.2.4. Connect <strong>the</strong> chargers POSITIVE (red) lead to <strong>the</strong> POSITIVE (+) terminal on <strong>the</strong> battery, and <strong>the</strong> NEGATIVE (black)<br />
lead to <strong>the</strong> NEGATIVE (-) terminal on <strong>the</strong> battery.<br />
3.3. Charging <strong>the</strong> battery<br />
3.3.1. Connect <strong>the</strong> charger to <strong>the</strong> mains power supply and turn it on with <strong>the</strong> front panel mounted ON/OFF switch.<br />
fig.1<br />
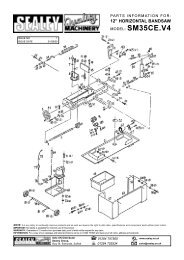
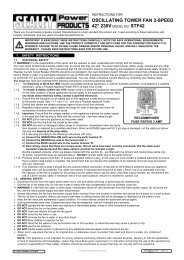
3.3.2. Check <strong>the</strong> current delivery to <strong>the</strong> battery by reading <strong>the</strong> ammeter on <strong>the</strong> front of <strong>the</strong> battery charger. During charging<br />
<strong>the</strong> pointer on <strong>the</strong> ammeter will slowly move to <strong>the</strong> left according to <strong>the</strong> capacity and condition of <strong>the</strong> battery (see fig.1, meter<br />
face may vary according to model).<br />
3.3.3. If a boost charge is required, ensure that an initial charge has built up first be<strong>for</strong>e moving <strong>the</strong> Charge Rate rocker switch to 'BOOST'.<br />
3.3.4. To indicate that <strong>the</strong> battery is fully charged <strong>the</strong> reading on <strong>the</strong> ammeter should be at <strong>the</strong> “0” output indicator. To correspond with<br />
this <strong>the</strong> electrolyte in <strong>the</strong> battery will begin to gas. Stop charging at this point in order to protect <strong>the</strong> battery plates from damage.<br />
Original Language Version CHARGE106,107,110,112,115,124 Issue: 1 - 16/04/12
WARNING! The charger will not switch off automatically. The state of charge should be regularly monitored by <strong>the</strong> person with<br />
resposibility <strong>for</strong> charging <strong>the</strong> battery. Do not leave <strong>the</strong> charger operating unattended or overnight.<br />
3.3.5. Unplug <strong>the</strong> charger from <strong>the</strong> mains power supply and <strong>the</strong>n disconnect <strong>the</strong> clamps from <strong>the</strong> battery terminals. Clean and store <strong>the</strong><br />
charger in a safe, dry area.<br />
3.3.6. Replace <strong>the</strong> battery electrolyte cover or caps. Wipe up any splashes or spillages, remembering that <strong>the</strong> electrolyte is a corrosive acid.<br />
Return <strong>the</strong> battery to <strong>the</strong> vehicle, secure according <strong>the</strong> manufacturer’s instructions and re-connect <strong>the</strong> power leads. Check to ensure<br />
that all tools are removed be<strong>for</strong>e closing <strong>the</strong> bonnet or boot.<br />
3.4. WARNING! LOW MAINTENANCE or SEALED “NO MAINTENANCE” BATTERY CHARGING<br />
3.4.1. A low, or no maintenance battery, must be charged slowly. DO NOT use <strong>the</strong> 'Boost' setting. Continually monitor <strong>the</strong> voltage across <strong>the</strong><br />
battery terminals and when it reaches 14.4 volts, stop charging.<br />
4.<br />
MULTIPLE BATTERY charging<br />
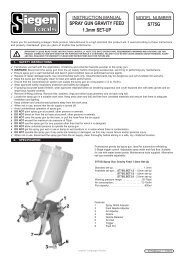
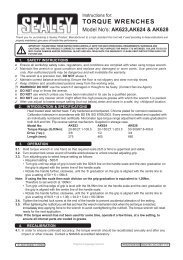
4.1. A number of batteries may be charged at <strong>the</strong> same time. To do so we recommend<br />
“parallel connection” as shown in fig.2A<br />
4.2. Two 12 volt batteries may be charged in series using <strong>the</strong> 24 volt output as shown in<br />
fig.2B. This is only recommended if both batteries are of similar capacity and<br />
are in a similar state of discharge.<br />
5. FUSE & <strong>the</strong>rmal protection<br />
5.1. Your charger is equipped with two front panel mounted fuses. The output protection<br />
fuse on <strong>the</strong> left will interrupt <strong>the</strong> circuit in <strong>the</strong> following circumstances:<br />
a) Overload: too high a current to <strong>the</strong> battery.<br />
b) Short circuit: clamps touch, or <strong>the</strong> polarity on battery is reversed.<br />
If <strong>the</strong> output fuse blows take <strong>the</strong> following action:<br />
5.1.1. Disconnect <strong>the</strong> charger from <strong>the</strong> mains power supply.<br />
5.1.2. Allow <strong>the</strong> unit to cool down, establish <strong>the</strong> reason <strong>for</strong> fuse blowing and correct.<br />
5.1.3. Replace <strong>the</strong> fuse using only a <strong>Sealey</strong> replacement fuse.<br />
5.2. The input protection fuse is situated to <strong>the</strong> right hand side of <strong>the</strong> control panel. If this fuse blows, replace only with a <strong>Sealey</strong> fuse of <strong>the</strong><br />
same value.<br />
5.3. Thermal Protection. When a high current causes <strong>the</strong> charger to overheat <strong>the</strong> internal <strong>the</strong>rmal protection will cut off <strong>the</strong><br />
current. When <strong>the</strong> charger has cooled sufficiently it will automatically reconnect.<br />
fig.2<br />
CHARGE106<br />
CHARGE124<br />
CHARGE115<br />
CHARGE110<br />
Parts support is available <strong>for</strong> <strong>the</strong>se product. To obtain a parts listing and/or diagram, please log on to<br />
www.sealey.co.uk, email sales@sealey.co.uk or phone 01284 757500.<br />
NOTE: It is our policy to continually improve products and as such we reserve <strong>the</strong> right to alter data, specifications and component parts without prior notice.<br />
IMPORTANT: No liability is accepted <strong>for</strong> incorrect use of this product.<br />
WARRANTY: Guarantee is 12 months from purchase date, proof of which will be required <strong>for</strong> any claim.<br />
INFORMATION: For a copy of our latest catalogue and promotions call us on 01284 757525 and leave your full name and address, including postcode.<br />
Sole UK Distributor, <strong>Sealey</strong> Group,<br />
Kempson Way, Suffolk Business Park,<br />
Bury St. Edmunds, Suffolk,<br />
IP32 7AR<br />
01284 757500<br />
Web<br />
www.sealey.co.uk<br />
01284 703534 email sales@sealey.co.uk<br />
Original Language Version CHARGE106,107,110,112,115,124 Issue: 1 - 16/04/12