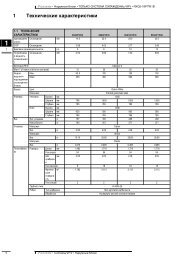
technical data
technical data
technical data

Create successful ePaper yourself
Turn your PDF publications into a flip-book with our unique Google optimized e-Paper software.
• Wall mounted unit • FXAQ20-63MVE<br />
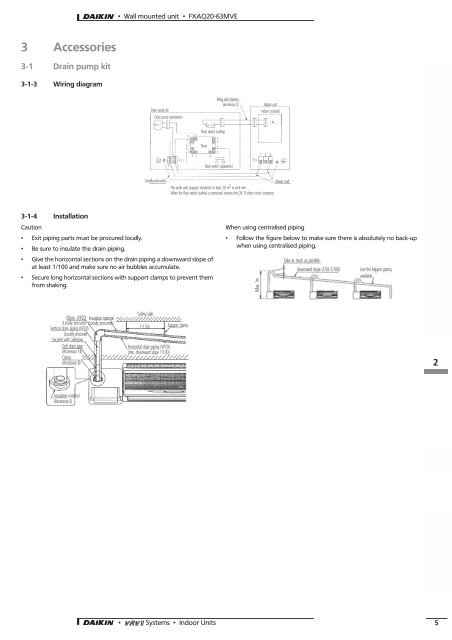
3 Accessories<br />
3-1 Drain pump kit<br />
3-1-3 Wiring diagram<br />
Drain pump kit<br />
Drain pump mechanism<br />
Relay wire harness<br />
(accessory 2)<br />
Indoor unit<br />
Indoor p-board<br />
Float switch (safety)<br />
Timer<br />
Float switch (operation)<br />
(Locally procured)<br />
The earth wire (copper) should be at least 2.0 m 2 or ø1.6 mm.<br />
When the float switch (safety) is connected, remove the CN 15 short-circuit connector.<br />
Power cord<br />
3-1-4 Installation<br />
Caution<br />
• Exit piping parts must be procured locally.<br />
• Be sure to insulate the drain piping.<br />
• Give the horizontal sections on the drain piping a downward slope of<br />
at least 1/100 and make sure no air bubbles accumulate.<br />
• Secure long horizontal sections with support clamps to prevent them<br />
from shaking.<br />
When using centralised piping<br />
• Follow the figure below to make sure there is absolutely no back-up<br />
when using centralised piping.<br />
Max. 1m<br />
Take as much as possible<br />
downward slope (1/50-1/100)<br />
Use the biggest piping<br />
available<br />
Elbow (VP20) Insulation material<br />
(Locally procured (Locally procured)<br />
Vertical drain piping (VP20)<br />
(Locally procured<br />
Secured with adhesive<br />
Soft drain pipe<br />
(Accessory 14)<br />
Clamp<br />
(Accessory 8)<br />
Ceiling slab<br />
1-1.5m<br />
Horizontal drain piping (VP20)<br />
(min. downward slope 1/100)<br />
Support clamp<br />
2<br />
Insulation material<br />
(Accessory 6)<br />
• Systems • Indoor Units 5