please read and understand this manual before using ... - Simplex
please read and understand this manual before using ... - Simplex
please read and understand this manual before using ... - Simplex

Create successful ePaper yourself
Turn your PDF publications into a flip-book with our unique Google optimized e-Paper software.
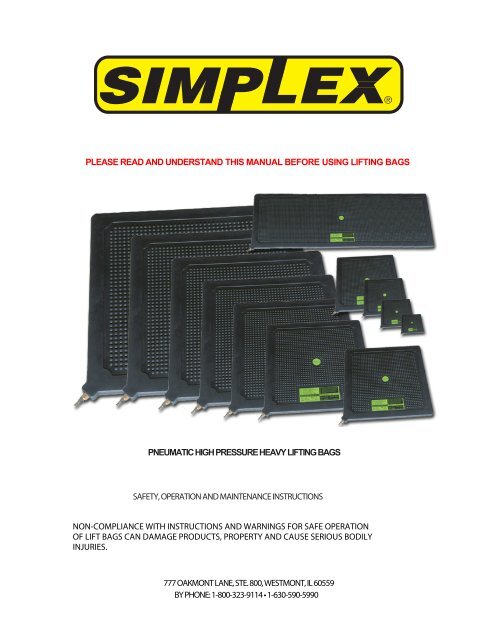
PLEASE READ AND UNDERSTAND THIS MANUAL BEFORE USING LIFTING BAGS<br />
PNEUMATIC HIGH PRESSURE HEAVY LIFTING BAGS<br />
SAFETY, OPERATION AND MAINTENANCE INSTRUCTIONS<br />
NON-COMPLIANCE WITH INSTRUCTIONS AND WARNINGS FOR SAFE OPERATION<br />
OF LIFT BAGS CAN DAMAGE PRODUCTS, PROPERTY AND CAUSE SERIOUS BODILY<br />
INJURIES.<br />
777 OAKMONT LANE, STE. 800, WESTMONT, IL 60559<br />
BY PHONE: 1-800-323-9114 • 1-630-590-5990
HEAVY LIFT BAGS INSTRUCTION MANUAL<br />
WARNING!<br />
Before <strong>using</strong> Lifting Air Bags, carefully <strong>read</strong> these instructions. Non-compliance with recommendations can<br />
result in product damage <strong>and</strong> personal injury.<br />
Never work under a load without safety supports<br />
Never exceed the inflation pressure of 8 bar (118 PSI)<br />
Never place more than two lifting air bags one upon another<br />
Information<br />
This booklet contains technical information about lifting air bags <strong>and</strong> basic instructions for use. The selection<br />
<strong>and</strong> application of air bags depend on various factors such as lifting requirements, capacity, lifting height, <strong>and</strong><br />
shape of objects. The manufacturer doesn't assume any responsibility for personal injuries or material<br />
damages arising from improper use or misuse of lifting air bags <strong>and</strong> their constituents. The figures beside the<br />
text are shown for information only. Actual conditions of lifting techniques <strong>and</strong> characteristics depend on the<br />
particular application.<br />
Recommendations for safe <strong>and</strong> efficient work<br />
When <strong>using</strong> air bags, always wear protective clothing. Firemen <strong>and</strong> rescue-team members must be equipped<br />
completely in accordance with all requirements; other users should wear safety helmet, safety glasses <strong>and</strong><br />
gloves or other equipment if required.<br />
Proper transportation of air bags is of great importance. Care should be taken that air bags are always being<br />
carried with the inflation nozzle facing upwards to avoid impact damage to the inflation mechanism. Large,<br />
heavy air bags are to be carried by two persons. When air bags are stored or transported in horizontal position,<br />
the inflation nozzle must face a direction so that it can be easily seen when an air bag is to be moved, <strong>and</strong> that<br />
the work can be done safely without risk of damage.<br />
When the surface temperature of the object to be lifted exceeds 55°C (131°F), the part of the air bag in contact<br />
with the object is to be protected by means of a fiberboard. Heat <strong>and</strong> temperatures exceeding the permissible<br />
level can damage the air bag. Alternatively, in cold conditions, air bags have been tested <strong>and</strong> proven to<br />
perform as specified to at least -20°C (-4°F)<br />
Even though it is simple to place <strong>and</strong> to inflate the air bag in the dark, it is dangerous. The work area should be<br />
well illuminated. Sometimes, when due to the effect of shading or poor visibility during the day it is<br />
recommended to use additional sources of light.<br />
High-pressure cylinders <strong>and</strong> pressure regulators<br />
Every time the pressure regulator is attached to a cylinder the following safety <strong>and</strong> operating precautions must<br />
be used. Deviation from the following safety <strong>and</strong> operating instructions may result in fire, explosion, damage to<br />
the regulator or injury to the operator.<br />
High-pressure cylinder/regulator care<br />
1. Before removing the protective cap, secure the cylinder to a wall, post or cart to prevent it from falling.<br />
2. Inspect the cylinder valve for damaged th<strong>read</strong>s, dirt, dust, oil or grease. Remove contamination with a<br />
clean cloth.<br />
3. Crack open the cylinder valve for an instant to blow out dust <strong>and</strong> foreign matter that could clog or<br />
damage the regulator. Do not place any part of your body near the airflow, as high-pressure air-jetseven<br />
at relatively low velocity-have been known to tip the cylinder over, accelerate projectiles,<br />
penetrate skin, dislocate eyeballs <strong>and</strong> cause other serious injury.<br />
2 of 9
4. Inspect regulator <strong>and</strong> clean if foreign matter is present. Regulators do not require regular periodic<br />
maintenance unless they show signs of malfunction. If there is a problem noticed, remove the<br />
regulator from service <strong>and</strong> return to Sava Trade Inc. for inspection <strong>and</strong> servicing.<br />
5. If you have a piston regulator, no user adjustments are necessary, ignore steps 6-11<br />
6. If you have a diaphragm regulator, turn the regulator-adjusting h<strong>and</strong>le counter-clockwise until the<br />
adjusting spring pressure is released (off position) then install the regulator onto the cylinder valve. Do<br />
not use grease, Teflon tape or sealants, as the compression fitting is self-sealing. Tighten compression<br />
nut with a wrench <strong>using</strong> firm pressure (excessive force is not necessary <strong>and</strong> can damage th<strong>read</strong>s). If<br />
the nut is knurled <strong>and</strong> meant to be h<strong>and</strong>-tightened, do not use a wrench, vice-grip or pliers.<br />
7. Carefully <strong>and</strong> slowly, slightly open the high-pressure valve on the cylinder turning counter-clockwise.<br />
Check for leaks.<br />
8. To check for leaks, open the low-pressure regulator-adjusting h<strong>and</strong>le one turn clockwise (pressure<br />
should be indicated on the low pressure gauge). Then close the high-pressure cylinder valve.<br />
9. If the high pressure gauge <strong>read</strong>ing drops then there is a leak in cylinder valve, inlet fitting or high<br />
pressure gauge. If the low pressure gauge <strong>read</strong>ing drops then there is a leak in the output fitting. If<br />
there are no leaks present close the low-pressure regulator-adjusting h<strong>and</strong>le <strong>and</strong> connect the output<br />
hose, controller(s), <strong>and</strong> lifting apparatus.<br />
10. Open high-pressure valve only if leaks or malfunctions are not present. Open valve completely (to the<br />
valve stop) to seal the valve packing.<br />
11. Test entire apparatus <strong>before</strong> actual use to determine proper operation <strong>and</strong> sealing of connections <strong>and</strong><br />
apparatus.<br />
12. It is remotely possible for a slight amount of air to continually flow from a connected high-pressure<br />
source even if control valves are off. Do not leave equipment unattended. Continuously monitor<br />
pressure levels.<br />
How the single <strong>and</strong> double controller inflation system operates<br />
Prior to use, connect the regulator to the high-pressure cylinder. Turn the<br />
regulator output control valve off (counter-clockwise). Open the high-pressure<br />
cylinder valve all the way. Set the regulator output pressure to 0.8 Mpa (8 bar,<br />
116 PSI) <strong>using</strong> the regulator output pressure-control valve.<br />
If you are <strong>using</strong> a regulated air compressor to supply air, set the regulator to<br />
supply at least 115 PSI.<br />
Close the controller’s deflation control valve (screw clockwise) to prevent air<br />
loss while inflating. Close the controller’s red inflation control valve (shown in<br />
the off position). Connect the air bags to one (red) hose; connect controller<br />
inline between that (red) hose <strong>and</strong> another (yellow) hose. Connect the<br />
yellow supply hose to the air source. Place the bag in position <strong>before</strong><br />
inflating. Open the controller inflation valve. Monitor the pressure gauge <strong>and</strong><br />
the air bag for proper operation during inflation. When you are <strong>read</strong>y to<br />
lower the load, close the controller inflation valve. To deflate the bag, open<br />
the deflation control valve, which is on top of the pressure relief valve (on the<br />
controller). Remove the air bags from under the load, disconnect them,<br />
press out the remaining air, <strong>and</strong> clean them.<br />
Lifting <strong>using</strong> a single air bag<br />
Position the air bag in a prearranged place or a constructed foundation (Figure 2). A fully emptied air bag<br />
contains very little air.<br />
Air bags can be protected from sharp objects <strong>using</strong> flexible or non-flexible mats. When placing an air bag on<br />
the ground, cribbing, mats or other surfaces, consider the effect of the weight on the entire supporting surface<br />
structure. Be certain the surface structure will be able to support the total weight without significant distortion or<br />
displacement.<br />
3 of 9
As the bag fills, <strong>and</strong> develops a spherical shape, there is less <strong>and</strong><br />
less surface area in contact with the load. This will result in less<br />
lifting force as the height increases. The amount of weight that can<br />
be lifted is directly related to the amount of surface area in contact<br />
with the load (Figure 3). Thus, maximum force can be attained only<br />
at the beginning of inflation, when the lifting height is low <strong>and</strong><br />
maximum surface area is in contact with the load. (see diagrams).<br />
Figure 3’<br />
When the air bag is fully inflated, the contact surface <strong>and</strong> lifting<br />
capacity reach their minimum, <strong>and</strong> the lifting height its maximum<br />
(Figure 4), To be able to correctly operate the air bag, a user must<br />
be acquainted with the data about maximum lifting force,<br />
maximum lifting height <strong>and</strong> maximum lifting capacity at maximum<br />
lifting height. See graphs at the end of <strong>this</strong> <strong>manual</strong> for application<br />
range <strong>and</strong> lifting height vs. weight ratios.<br />
Figure 4<br />
1. Clean the work area of all glass fragments <strong>and</strong> other<br />
foreign particles, which might damage the air bag. If<br />
the air bag is placed on a smooth or slippery surface,<br />
sprinkle the surface with s<strong>and</strong> or other suitable,<br />
granulated material. If the air bag is used on soft<br />
ground, a solid support or a fiberboard should be<br />
placed under the air bag.<br />
(Figure 5)<br />
(Figure 6)<br />
2. When there is more than 2 ¾” (70 mm)<br />
space between the ground <strong>and</strong> the<br />
object to be lifted, a firm, high enough<br />
foundation should be built, leaving just<br />
enough space to insert the deflated<br />
bag(s). The upper surface of the foundation should be flat, without any gaps. The<br />
airbag is not designed to span surface gaps greater than 1/8”.<br />
4 of 9
3. On each side of the air bag foundation, additional safety supports, such as cribbing, matting or<br />
blocking, (or combination of all) should be used, progressively during lifting. This prevents load-shift<br />
failure or lift bag failure (Figure 6). This also reduces the height, from which the load would fall in case<br />
of air bag or inflation system malfunction or failure.<br />
4. The air bag should be placed in the middle of the object load so that the inflation nozzle is pointing to<br />
the front side. Always distribute the load weight as evenly as possible <strong>and</strong> to as large of surface area<br />
as possible. Small contact surface area can cause the object to slide during inflation, ca<strong>using</strong> the air<br />
bag pop out or the object to shift considerable distance. Small contact area could also stress the bag.<br />
5. When lifting a load higher than the lift<br />
capacity of the bag(s), it is necessary to<br />
support the load, deflate the bag(s), <strong>and</strong><br />
then add a foundation under the bag(s)<br />
to lift incrementally higher (Figure 7).<br />
Have sufficient personnel available to<br />
continuously add safety supports as<br />
recommended. It is necessary to<br />
build the safety support structure<br />
simultaneously while lifting. Lift an<br />
inch, crib an inch.<br />
(Figure 7)<br />
6. To lower the load, slowly deflate the air bag, allowing the object load to rest entirely upon the safety<br />
supports when the bag is near the deflated position. Remove the air bag foundation incrementally in<br />
the same fashion as lifting.<br />
WARNING!<br />
With any lifting operation, the safety support structures are of essential importance. Any work<br />
under a load supported only by an inflated air bag is extremely dangerous <strong>and</strong> is contrary to all<br />
safety guidelines <strong>and</strong> instructions.<br />
Do not leave an inflated bag unattended for any length of time. Due to the natural porosity of rubber<br />
bags <strong>and</strong> rubber o-rings (in the inflation apparatus), air can leak out of the bag slowly. Also it is<br />
possible for a slight amount of air to continually enter the bag from a connected high-pressure<br />
source even if control valves are off.<br />
5 of 9
Lifting <strong>using</strong> two air bags<br />
Using one larger bag is always easier <strong>and</strong> safer than <strong>using</strong> two smaller bags. But if <strong>this</strong> is not<br />
possible it is acceptable to configure multiple bags to do the same work as a larger bag.<br />
Up to two air bags can be stacked in order to increase lifting height. Placing the next size smaller<br />
bag in the center, <strong>and</strong> on top, of the larger one.<br />
Inflation nipples for both bags should be on the same side (Figure 8), Never stack more than two air<br />
bags together.<br />
Construct a foundation as necessary similar to the use of a single bag.<br />
Inflate the lower, larger air bag first, so as to allow the smaller (upper) one to touch the object to be<br />
lifted if possible.<br />
Then fully inflate the upper air bag <strong>and</strong>, if necessary, the lower one again, until the required lifting<br />
height is achieved.<br />
Safety supports are to be added under the load with care. When lowering, slowly empty the top air<br />
bag first, then the lower bag last.<br />
Increasing lifting capacity weight or increasing lifting capacity height<br />
Stacking two air bags (one upon another) will only increase lifting height capacity.<br />
A side-by-side arrangement will only increase lifting weight capacity.<br />
With two air bags stacked, the combined weight-lifting capacity of the bags is equal only to the weight<br />
lifting capacity of the smaller air bag (Figure 10). Likewise, a side-by-side arrangement will increase<br />
weight lifting capacity.<br />
Figure 9 shows two air bags, placed side-by-side on cribbing foundations. The first air bag can lift 8<br />
tons, the second 12 tons. Neither of the bags can lift the load of 15 tons. However, when side-byside,<br />
<strong>and</strong> inflated<br />
together at the<br />
same time, they are<br />
able to lift 20 tons.<br />
Figure 9<br />
Lifting height can be increased by stacking one air bag on top of another<br />
(Figure 10). If the possible lifting height of one bag is 7” (18 cm) max <strong>and</strong><br />
of the other 8-1/2 (22 cm), (both together <strong>and</strong> fully inflated can achieve the<br />
lifting height of 15 ¾” (40 crn),<br />
WARNING!<br />
(Figure 10)<br />
Never stack more than two air bags one upon another. Smaller bag goes on top of the larger one.<br />
6 of 9
By constructing foundation supports with blocking, cribbing <strong>and</strong> mats we can achieve higher lifting<br />
heights.<br />
Lifting objects with unusual shapes<br />
Lifting an I-beam or pipe<br />
When lifting I-beams or pipes <strong>using</strong> an air bag, problems arise, as the<br />
object doesn't contact the entire surface of the bag. Further, twisting<br />
can damage the air bag’s reinforcing Kevlar cord. For that reason a<br />
steel plate or fiberglass board of suitable strength should be inserted<br />
between the air bag <strong>and</strong> the object to be lifted, in order to permit the<br />
lifting force to be equally distributed over the entire lifting surface of the<br />
air bag (Figure 11),<br />
Figure 11<br />
Lifting a cylindrical object<br />
Large cylindrical objects, such as pipes or tanks may require two or<br />
more air bags. If such objects are not firmly fastened they can shift<br />
<strong>and</strong>/or roll away as soon as the single air bag begins exp<strong>and</strong>ing to its<br />
inflated spherical shape. Inflate both bags at the same time to minimize<br />
danger (Figure 12).<br />
Figure 12<br />
Separating <strong>and</strong> pushing, <strong>using</strong> air bags<br />
Air bags can also be used to separate<br />
<strong>and</strong> to move objects, usually without special difficulties. Problems arise<br />
if an object has thin walls, which could be bent or broken by the<br />
pressure of the air bag. For that reason the air bag is to be reclined<br />
against a rib, a pillar or another tough <strong>and</strong> rigid element. If <strong>this</strong> is not<br />
possible, insert a wide steel or fiberglass board between the air bag<br />
<strong>and</strong> the object to increase the surface area that the air bag force<br />
exerts upon (Figure 13).<br />
Figure 13<br />
7 of 9
Clean air bags after each use. Oil or grease spots can cause air bags to slide. Prolonged contact with<br />
petroleum-based liquids can also cause some types of rubber to degrade prematurely. The presence of<br />
dirt in the nozzle can cause leaks or prevent hose connection. In the upright position with the nozzle at<br />
the top, the air bag is to be knocked against the floor to shake off the dirt. Check the opening in the<br />
nozzle. If it is full of dirt, remove it <strong>using</strong> a thin piece of wire. Do not push the dirt inside the bag draw it<br />
out.<br />
To remove accumulated dirt or mud from the air bag surface, use a<br />
dry brush with hard bristles. Move the brush in all directions. Don't<br />
use sharp objects to remove dirt from the air bag surface. After<br />
cleaning all the agglutinated dirt, soak the spots with a light solution of<br />
warm water <strong>and</strong> a dish washing detergent, <strong>and</strong> <strong>using</strong> the brush,<br />
remove the remaining dirt (Figure 14).<br />
Figure 14<br />
Rinse the surface with cold, fresh water (Figure 15), Strong water jet<br />
shall remove all the dirt <strong>and</strong> detergent which might have remained on<br />
the air bag surface.<br />
With the air bag in the upright position, wipe the nozzle <strong>using</strong> a clean<br />
cloth. Let the air bag dry. Don't speed up drying by putting the air bag<br />
in a drier or close to a source of heat.<br />
Figure 15<br />
Inspection, storage <strong>and</strong> preventive maintenance<br />
Adequate maintenance <strong>and</strong> care for air bags require more than cleaning after use. Air bags call for<br />
inspection, <strong>and</strong> preventive maintenance throughout the period of storage.<br />
Check after use<br />
1. When dry, check the air bag for any blistering, cuts or worn out segments<br />
that might be hidden under the dirt. If you observe any deep cuts, damage or deep wear, mark it<br />
with a chalk, <strong>and</strong> consult the manufacturer or an authorized service.<br />
2. Check the nozzle for any wear or damage, which could hinder a positive connection or cause leaks.<br />
Replace the nozzle, if necessary.<br />
8 of 9
Metric<br />
Metric<br />
Technical data - lifting bags<br />
Metric SLK SLK SLK SLK SLK SLK SLK SLK SLK SLK SLK<br />
MT/cm 1/7 3/13 6/15 8/18 12/22 19/27 24/30 31/36 40/42 54/45 64/51<br />
Size - deflated cm x cm 15 x 15 23 x 23 30 x 30 38 x 38 45 x 45 55 x 55 61 x 61 69 x 69 78 x 78 87 x 87 91 x 91<br />
Item number # 77973 77974 77975 76734 76735 76736 76737 76738 76739 76794 76740<br />
American<br />
USA<br />
SLK SLK SLK SLK 13.3/9 SLK SLK SLK SLK SLK SLK<br />
T/in. 1.1/2.8 3.5/5 6.8/6 8.8/7 SLK 21/11 26/12 34/14 44/17 59/18 70/20<br />
Size - deflated sq./in. 6X6 9X9 12X12 15X15 18X18 22X22 24X24 27X27 31X31 35X35 36X36<br />
SAE USA<br />
9 of 9