POLYAIR INSTALLATION INSTRUCTIONS - Airsprings.cc
POLYAIR INSTALLATION INSTRUCTIONS - Airsprings.cc
POLYAIR INSTALLATION INSTRUCTIONS - Airsprings.cc

Create successful ePaper yourself
Turn your PDF publications into a flip-book with our unique Google optimized e-Paper software.
Use this procedure for all hose connections:<br />
A. Slide a hose clamp onto the tubing.<br />
B. Push the tubing over the barbed stem.<br />
C. Compress the ears on the hose clamp<br />
with pliers and slide it forward to fully<br />
cover the barbed section.<br />
Figure 6<br />
Figure 7<br />
l<br />
:'..<br />
Figure 8<br />
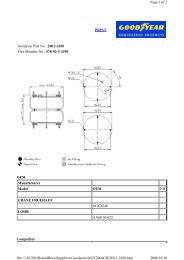
TEE HOSE ROUTING<br />
A. Locate desired "tee" location on the frame<br />
rail or cross member.<br />
B. Determine and cut adequate length of<br />
tubing to reach from tee to left and right<br />
side on air cylinders.<br />
CAUTION: LEAVE SUFFICIENT HOSE<br />
SLACK TO PREVENT ANY STRAIN ON<br />
FITTINGS DURING AXLE MOTIONS.<br />
C. Slide a hose clamp onto the tubing.<br />
D. Push the tubing over one side of the "tee"<br />
until all the barbs are covered. Repeat<br />
procedure for other leg of tee (Figure 6).<br />
E. With pliers slide the hose clamp forward<br />
until it fully covers the barbed section.<br />
Repeat for the other leg of tee (Figure 6).<br />
F. Route tubing along cross member and<br />
either lower control arm or upper spring<br />
seat to left and right air cylinder (Figure 7).<br />
G. Insert tubing through spring seat, spacer<br />
and slide on a hose clamp.<br />
H. Push the tubing onto the stem, covering all<br />
the barbs (Figure 8).<br />
I. With pliers slide the hose clamp upward<br />
until it fully covers the barbed section.<br />
J. Push the remaining tubing over the last<br />
fitting on tee and route along frame to<br />
desired inflation valve location. Attach<br />
with plastic straps or wire.<br />
TO PREVENT TUBING FROM MELTING,<br />
KEEP IT AT LEAST SIX INCHES FROM<br />
EXHAUST SYSTEM.<br />
K. Select a location for inflation valve in the<br />
gas cap well, trunk, rear bumper, fender<br />
flange or behind the license plate, insuring<br />
that the valve will be protected and<br />
a<strong>cc</strong>essible with air hose (Figures 7, 9).<br />
L. Drill a 5/16" hole for inflation valve and<br />
mount as in illustration (Rubber washer is<br />
for outside weather seal - Figure 9).