
Create successful ePaper yourself
Turn your PDF publications into a flip-book with our unique Google optimized e-Paper software.
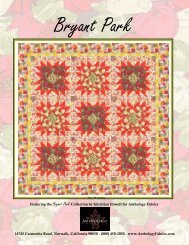
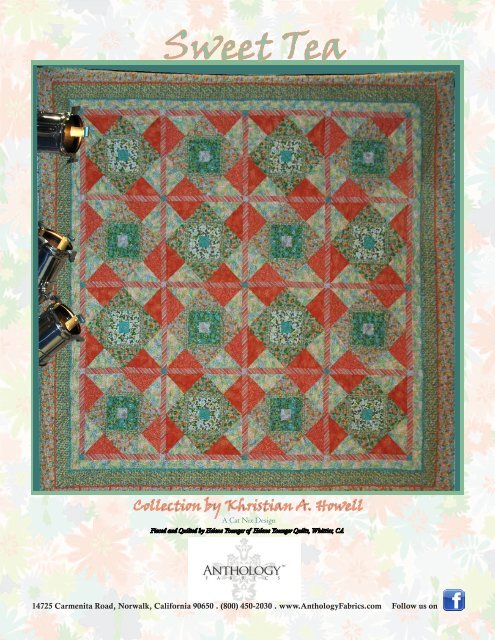
<strong>Sweet</strong> <strong>Tea</strong><br />
Collection by Khristian A. Howell<br />
A Cat Nix Design<br />
Pieced and Quilted by Helene Younger of Helene Younger Quilts, Whittier, CA<br />
14725 Carmenita Road, Norwalk, California 90650 . (800) 450-2030 . www.<strong>Anthology</strong><strong>Fabrics</strong>.com Follow us on
<strong>Fabrics</strong> and Yardage Requirements<br />
Please read all instructions thoroughly before you begin<br />
PR-522 PR-523 PR-524 PR-525 PR-526 PR-527 PR-528 PR-529<br />
1/2 Yard 1/2 Yard 1 Yard* 3/4 Yard 1 1/2 Yards* 1 Yard 1/2 Yard 1/4 Yard<br />
Fabric A Fabric B Fabric C Fabric D Fabric E Fabric F Fabric G Fabric H<br />
Dimensions: 82 in. x 82 in.<br />
Suggested Backing: PR-531 > 6 Yards<br />
(not included in yardage above)<br />
Suggested Binding: PR-525 > 3/4 yard<br />
(Included in yardage above)<br />
*Yardage is figured to cut the Borders<br />
from the length of the fabric<br />
to provide maximum stability. Strips are pieced.<br />
You will also need:<br />
• Batting: 90 in. x 90 in. (includes 4 in. all around)<br />
Design and quality are principles on which we have based <strong>Anthology</strong> <strong>Fabrics</strong>. We offer only the best quilting fabrics with<br />
rich, high quality and world-class design; from the soft sturdiness of the fabric to the beauty and innovation of the design.<br />
<strong>Sweet</strong> <strong>Tea</strong> Pattern is the property of <strong>Anthology</strong> <strong>Fabrics</strong> and provided for personal use. Pattern designed by Cat Nix for <strong>Anthology</strong> <strong>Fabrics</strong>.<br />
Every effort has been made to present a well written, well illustrated, quilter-friendly pattern. No warranty is given, nor results guaranteed.<br />
<strong>Anthology</strong> <strong>Fabrics</strong> and Cat Nix disclaim any liability for unfavorable results.<br />
Please direct questions to Cat Nix, Creative Director of <strong>Anthology</strong> <strong>Fabrics</strong> – cat@anthologyfabrics.com.<br />
PR-522<br />
Fabric A<br />
PR-523<br />
Fabric B<br />
PR-524<br />
Fabric C<br />
PR-525<br />
Fabric D<br />
Cutting Instructions<br />
Unless instructed otherwise, fold fabrics in half, selvage to selvage, wrong sides together and cut from Width of Fabric (WOF)<br />
Block 1<br />
From WOF:<br />
1. Cut (2) 2 1/2 in. x 44 in. strips<br />
2. Cut (1) 6 1/2 in. x 44 in. strips<br />
PR-526<br />
• Cross-cut (16) 2 1/2 in. x 6 1/2 Fabric E<br />
in. patches<br />
Label and set aside<br />
Block 2<br />
From WOF:<br />
1. Cut (2) 2 1/2 in. x 44 in. strips<br />
2. Cut (1) 6 1/2 in. x 44 in. strips<br />
• Cross-cut (16) 2 1/2 in. x 6 1/2<br />
in. patches<br />
Label and set aside<br />
Sashing Strips<br />
From LENGTH OF FABRIC,<br />
cut (2) 15 1/2 in. strips<br />
• Cross-cut (40) 1 1/2 in. strips<br />
Label and set aside<br />
Binding<br />
From WOF, cut (8) 3 in. x 44 in.<br />
strips<br />
Label and set aside<br />
PR-530 PR-531 PR-532 PR-533 PR-534<br />
2 Yards* 3/4 Yard 3/4 Yard 1/8 Yard 2 Yards*<br />
Fabric I Fabric J Fabric K Fabric L Fabric M<br />
PR-527<br />
Fabric F<br />
Blocks 1 & 2<br />
From LENGTH of FABRIC,<br />
1. Cut (1) 6 1/2 in. strip<br />
• Cross-cut (32) 1 1/4 in. x 6 1/2<br />
in. patches<br />
2. Cut (1) 8 in. strip<br />
• Cross cut (32)<br />
1 1/4 in. x 8 in. strips<br />
Border Two<br />
From Remaining LENGTH of FABRIC,<br />
1. Cut (7) 3 1/2 in. strips<br />
Label all pieces and set aside<br />
Block 2<br />
From WOF, cut (2) 8 1/2 in. x 44 in.<br />
strips<br />
• Cross cut (8) 8 1/2 in. squares<br />
• Cut twice diagonally to make (32) 1/4<br />
Square Triangles<br />
Folded Accent Border 2<br />
From WOF, cut (7) 1 in. x 44 in. strips<br />
Label all pieces and set aside<br />
2
PR-528<br />
Fabric G<br />
PR-529<br />
Fabric H<br />
Block 2<br />
From WOF, cut (1) 2 1/2 in x 44 in.<br />
strip<br />
Sashing Keystones<br />
From WOF, cut (1) 1 1/2 in. x 44 in.<br />
strip<br />
• Cross cut (13) 1 1/2 in. squares<br />
Folded Accent Border 1<br />
From WOF, cut (8) 1 in. x 44 in.<br />
strips<br />
Label all pieces and set aside<br />
Sashing Keystones<br />
From WOF, cut (1) 1 1/2 in. x 44 in.<br />
strip<br />
• Cross cut (12) 1 1/2 in. squares<br />
Label all pieces and set aside<br />
Cutting Instructions Continued<br />
PR-531<br />
Fabric J<br />
PR-532<br />
Fabric K<br />
PR-533<br />
Fabric L<br />
Block 2<br />
From WOF, cut (2) 8 1/2 in. x 44 in.<br />
strips<br />
• Cross cut (8) 8 1/2 in. squares<br />
• Cut twice diagonally to make (32) 1/4<br />
Square Triangles<br />
Label and set aside<br />
Block 1<br />
From WOF, cut (2) 8 1/2 in. x 44 in.<br />
strips<br />
• Cross cut (8) 8 1/2 in. squares<br />
• Cut twice diagonally to make (32) 1/4<br />
Square Triangles<br />
Label all pieces and set aside<br />
Block 1<br />
From WOF, cut (1) 2 1/2 in x 44 in.<br />
strip<br />
PR-530<br />
Fabric I<br />
Block 1<br />
From WOF, cut (2) 8 1/2 in. strips<br />
• Cross cut (8) 8 1/2 in. squares<br />
• Cut twice diagonally to make (32)<br />
1/4 square triangles<br />
Outer Border<br />
From remaining<br />
LENGTH of FABRIC,<br />
cut (8) 3 1/2 in. strips<br />
Label all pieces and set aside<br />
Block Assembly PR-534<br />
1/4 in. Seam Allowance Fabric Throughout K<br />
Blocks 1 & 2<br />
From WOF, cut (4) 8 1/2 in. x 44 in.<br />
strips<br />
• Cross cut (16) 8 1/2 in. squares<br />
• Cut twice diagonally to make (64) 1/4<br />
Square Triangles<br />
Border One<br />
From remaining LENGTH of FABRIC,<br />
cut (7) 2 1/2 in. strips<br />
Label all pieces and set aside<br />
Block 1 Assemble Blocks Block 2<br />
1/4 in. seams used throughout<br />
2 You may chain piece, if you like.<br />
1. Sew strips together, as shown<br />
1 1<br />
in diagrams 1. Press seams<br />
toward the outer edge. Crosscut<br />
(8) 2 1/2 in. units. Set<br />
Join fabrics A & L<br />
aside.<br />
Join fabrics B & G<br />
Cross-Cut (8) units<br />
2. Join 1 1/4 in. x 6 1/2 in. strip Cross-Cut (8) units<br />
<strong>Fabrics</strong> E & A of fabric E to a 2 1/2 x 6 1/2<br />
<strong>Fabrics</strong> E & B<br />
4<br />
in. strip of A or B, as shown<br />
in diagrams 2. Press seams<br />
toward the outer edge.<br />
4<br />
3<br />
Make 8 Center Units for Block 1<br />
3. Sew 1 unit from step 2 to either<br />
side of a center unit from<br />
step 1, as shown in diagrams<br />
3. Press seams toward outer<br />
edge.<br />
4. Sew an 1 1/4 in. x 8 in. strip of<br />
fabric E to the top and bottom,<br />
as shown in diagrams 4.<br />
Press seams toward the outer<br />
edge.<br />
The Center Square will measure 8 ins.<br />
3<br />
Make 8 Center Units for Block B 3
Block 1 Assemble Blocks cont. Block 2<br />
1/4 in. seams used throughout<br />
You may chain piece, if you like.<br />
5 5<br />
Add Quarter Triangles<br />
5. Add a 1/4 square triangle of<br />
either fabric I or J to the left<br />
and right side of the Center<br />
Unit, as shown in diagrams<br />
5. Press seams toward outer<br />
edge.<br />
Add 1/4 Square Triangle of Fabric I<br />
Square will measure 11 inches<br />
6<br />
Add another 1/4 square<br />
triangle of either I or J to the<br />
top and bottom. Press seams<br />
toward outer edge.<br />
Snip off “dog ears”<br />
Make Corner Triangle Units<br />
6. Sew a 1/4 square triangle<br />
of fabric M to a 1/4 square<br />
triangle of fabric F or K along<br />
the short edge, as shown in<br />
diagrams 6. Press seams<br />
toward F or K.<br />
Add 1/4 Square Triangle of Fabric J<br />
Square will measure 11 inches<br />
6<br />
Make 32<br />
Make 32<br />
7<br />
Add Corner Units<br />
7. As in Step 5, sew a Corner<br />
Unit to each side, as shown<br />
in diagrams 7. Press seams<br />
toward outer edge<br />
.<br />
Snip off “dog ears”<br />
7<br />
Square block to approximately<br />
15 1/2 inches<br />
Make (8)<br />
Block will measure approximately<br />
15 1/2 inches<br />
Make (8)<br />
Block will measure approximately<br />
15 1/2 inches<br />
4
Assemble Quilt Center & Add Borders<br />
1/4 in. Seam Allowance Throughout<br />
Arrange Blocks<br />
Refer to the Quilt Lay Out Diagram (pg. 6) to arrange Blocks 1 & 2. You will have 4 rows of 4 blocks.<br />
Sashing Rows<br />
Make Sashing Rows by alternating Keystone Squares and Sashing Strips. Note the placement in the Quilt Lay<br />
Out Diagram.<br />
Each Sashing Row will begin and end with a Keystone. Press seams toward the Sashing strip.<br />
Make (5) Sashing Rows.<br />
Block Rows<br />
Make Block Rows by sewing sashing strips to the Blocks. Each row will begin and end with a sashing strip.<br />
Press seams toward Sashing.<br />
Put it all Together<br />
Alternate sewing Sashing Rows to Block Rows, as shown in the Quilt Lay Out Diagram, to complete the body<br />
of the quilt. Press seams toward Sashing.<br />
Clean up the edges of the completed top<br />
Add Border I & Folded Accent Border 1<br />
Sew 2 1/2 in. strips of fabric M together to create one continuous strip for Border I<br />
Sew 1 in. strips of fabric G together to create one continuous strip for Accent Border 1. Press in half<br />
lengthwise so that you have a 1/2 in. wide Accent Border.<br />
Left & Right Border<br />
1. To find the average length of the quilt body, measure the quilt center from top to bottom on the left,<br />
middle and right side.<br />
2. Cut two Border strips and two Accent Border strips to this exact measurement.<br />
3. Sew borders to the left and right sides of the quilt body.<br />
4. Press seams toward the outer edge.<br />
5. Align Accent Border 1 along the outside edge of Border I, matching raw edges, and machine baste to<br />
Border I with a 1/8 in. seam allowance.<br />
Top & Bottom Border<br />
6. Add the 2 1/2 in. top and bottom border in the same manner by measuring the quilt body from left to<br />
right through its horizontal midpoint (including the border).<br />
7. Press seams toward the outer edge.<br />
8. Cut the top and bottom Accent Border 1 to the same measurement as the top and bottom Border. Align<br />
Accent Border 1 along the outside edge of Border I, matching raw edges, and machine baste to Border I<br />
with a 1/8 in. seam allowance.<br />
Add Border II, Folded Accent Border 2 and the Outer Border<br />
Repeat the steps above for Border II, Accent Border 2 and the Outer Border.<br />
5
Quilt Lay Out Diagram<br />
1/4 in. Seam Allowance Throughout<br />
Binding<br />
Outer Border<br />
Border II & Acent Border 2<br />
Border I & Acent Border 1<br />
Sashing Row<br />
R<br />
O<br />
W<br />
1<br />
Sashing Row<br />
R<br />
O<br />
W<br />
2<br />
R<br />
O<br />
W<br />
3<br />
R<br />
O<br />
W<br />
4<br />
Finishing<br />
1. Square up the quilt top.<br />
1. Prepare Backing to measure 90 in. x 90 in. (includes 4” on all sides)<br />
2. Cut Batting the same size as Backing.<br />
3. Layer Backing, Batting & Top.<br />
Quilt as you like, and bind to finish! ENJOY!<br />
6