Speaker Selectors
Speaker Selectors
Speaker Selectors

Create successful ePaper yourself
Turn your PDF publications into a flip-book with our unique Google optimized e-Paper software.
Audio Systems<br />
OWNER’S MANUAL<br />
SS8P / SS4P<br />
<strong>Speaker</strong> <strong>Selectors</strong><br />
INTRODUCTION<br />
Proficient <strong>Speaker</strong> <strong>Selectors</strong> allow the operation of multiple<br />
pairs of speakers when using one amplifier or receiver. Once<br />
the speakers are connected to the speaker selector, individual<br />
pairs may be turned on or off as desired using the push buttons<br />
on the front panel. One pair, all pairs or any assortment<br />
of pairs may be played. When engaged, a protection circuit<br />
allows the amplifier to operate safely, even when all selected<br />
speakers are playing. Installation utilizing the Removable<br />
Terminal Connectors makes wiring the selector to your speakers<br />
quick and easy. With a simple turn of a screw, wires are<br />
solidly fastened and a secure electrical bond is created. The<br />
process is quick, simple and eliminates the worry of wires<br />
becoming loose.<br />
INSTALLATION<br />
Guidelines<br />
• Use the <strong>Speaker</strong> <strong>Selectors</strong> only with amplifiers rated at 125<br />
watts per channel or less.<br />
• The Removable Terminal Connectors on the SS8P and SS4P<br />
accept wire up to 14 AWG. If you are not sure about the<br />
gauge of the wire you intend to use, please consult your<br />
Proficient installing dealer.<br />
• To avoid possible damage to your amplifier, pay careful attention<br />
to the section titled “Operation” on page 3.<br />
• Do not connect impedance matching volume controls to the<br />
speaker outputs of the selectors. Standard volume controls,<br />
such as Proficient models VCS60, VC60SIR, VC60SL and VC60AW<br />
should be used if separate room control is desired.<br />
Placement<br />
The suction feet hold the speaker selectors in place when buttons<br />
are depressed.<br />
• One set of adhesive area labels are included for identifying<br />
the locations of speakers on the front of the <strong>Speaker</strong> Selector.<br />
• Do not daisy chain (hook the outputs of one selector into the<br />
inputs of another) speaker selectors together.<br />
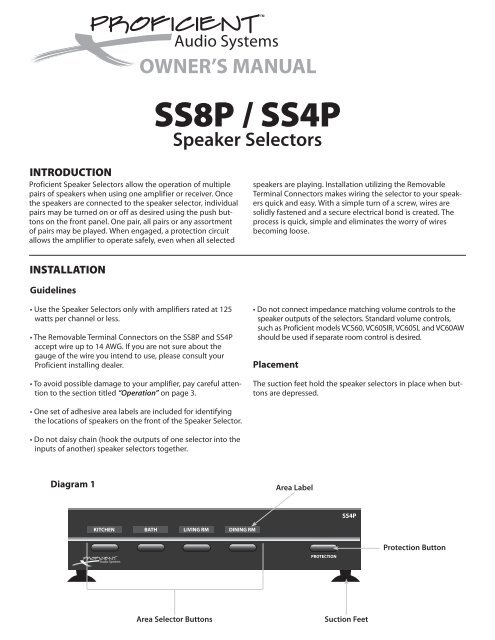
Diagram 1<br />
Area Label<br />
SS4P<br />
KITCHEN BATH LIVING RM DINING RM<br />
PROTECTION<br />
Protection Button<br />
Area Selector Buttons<br />
Suction Feet
Connecting Wires to the <strong>Speaker</strong> Selector<br />
CAUTION: Please make sure your amplifier or receiver is turned off before proceeding.<br />
The Removable Terminal Connectors simplify connecting the speaker and amplifier wires to the <strong>Speaker</strong> Selector. (See Diagram 2)<br />
Diagram 2<br />
Continuous<br />
Protection Switch<br />
Continuous<br />
Protection<br />
Off On<br />
Amplifier<br />
Input<br />
AMPLIFIER<br />
L+ L- R- R+<br />
<strong>Speaker</strong><br />
Output<br />
4<br />
SPEAKERS<br />
L+ L- R- R+<br />
<strong>Speaker</strong><br />
Output<br />
3<br />
SPEAKERS<br />
L+ L- R- R+<br />
<strong>Speaker</strong><br />
Output<br />
2<br />
SPEAKERS<br />
L+ L- R- R+<br />
<strong>Speaker</strong><br />
Output<br />
1<br />
SPEAKERS<br />
L+ L- R- R+<br />
Removable Terminal Connector<br />
for Wires from Amplifier or Receiver<br />
Removable Terminal Connectors<br />
for <strong>Speaker</strong> Wire<br />
For best results, use speaker wire that is at least 16 gauge. For runs longer than 75 feet, 14 gauge wire is recommended. For best<br />
results, strip all wire insulation no more than 3⁄8" from the end before inserting into the connector.<br />
1. Remove the Terminal Connectors from their locations on the back of the cabinet. This will make it easier to connect the wires.<br />
(See Diagram 3)<br />
2. Connect the wires from the speakers to the appropriate location under “SPEAKERS” on the removable terminals. Please observe<br />
proper polarity (+, –) of the connections. (See Diagram 3)<br />
3. Insert the wired terminal connector into the appropriate speaker output on the back of the speaker selector.<br />
4. Connect the amplifier or receiver speaker output to the appropriate location under ”AMPLIFIER” on the removable terminal.<br />
Please observe proper polarity (+, –) of the connections. (See Diagram 3)<br />
5. Insert the wired terminal connector into the amplifier input on the back of the speaker selector.<br />
Diagram 3<br />
STEP 2.<br />
Tighten wire clamp screw<br />
with screwdriver.<br />
STEP 1.<br />
Strip speaker wires’ insulation to<br />
3/8" from the end and insert into<br />
proper slot in the <strong>Speaker</strong><br />
Terminal Connector.<br />
SPEAKERS<br />
L+ L- R- R+<br />
STEP 3.<br />
Install <strong>Speaker</strong> Terminal<br />
Connector into back of the<br />
<strong>Speaker</strong> Selector.<br />
STEP 4.<br />
Connect Amp wires to the<br />
Amplifier Terminal Connector<br />
in the same manner.<br />
SPEAKER WIRE<br />
2
CAUTION: If the ”AMPLIFIER” and ”SPEAKERS” connections are reversed, a short could result across the amplifier or receiver output<br />
terminals, which may seriously damage your amplifier or receiver. Please double-check all connections before turning on<br />
your amplifier or receiver.<br />
Labeling the front of the <strong>Speaker</strong> Selector (See Diagram 4)<br />
There is one set of adhesive labels included to be used on the front of the <strong>Speaker</strong> Selector. These labels make it easy to identify<br />
which area has been selected when the button is depressed. There are indentations above each button on the front of the<br />
Selector. Place the appropriate label into each of these locations. If you can't find the label you need, you can create your own by<br />
writing on one of the blank labels using a pen or small marker.<br />
Area Label<br />
KITCHEN BATH LIVING RM DINING RM<br />
Area Selector Button<br />
Diagram 4<br />
OPERATION<br />
Understanding the Protection Circuit<br />
To prevent damage to your amplifier or receiver, the SS8P and SS4P feature protection circuitry. When engaged, the protection<br />
feature prevents damage from occurring to your amplifier or receiver.<br />
When to Use the Front Mounted Protection Button<br />
The front Protection button (See Diagram 5) should be engaged under the following<br />
KITCHEN circumstances to best protect BATH your amplifier LIVING or receiver. RM Protection DINING is ”ON” RM when the<br />
button is depressed:<br />
<strong>Speaker</strong>s Selected<br />
Front Protection Button<br />
1 or 2 pairs of 8 Ω speakers OFF<br />
3 or more pairs of 8 Ω speakers ON<br />
1 pair of 4 Ω speakers OFF<br />
2 or more pairs of 4 Ω speakers ON<br />
A combination of 4 and 8 Ω speakers<br />
ON<br />
PROTECTION<br />
SS4P<br />
Diagram 5<br />
When to Use the Rear Mounted Protection Switch<br />
On the back of the selector there is a slide switch labeled ”Continuous Protection”<br />
(See Diagram 6). When this switch is in the ”ON” position, it will override the front<br />
Protection button and assure that the protection circuitry is always on, no matter<br />
what the position of the front button.<br />
This switch should be placed in the ”ON” position if you are concerned that someone<br />
unfamiliar with the system may fail to properly use the front protection button.<br />
Continuous<br />
Protection<br />
Off On<br />
Diagram 6<br />
Amp<br />
In<br />
AMP<br />
L+ L-<br />
Selecting <strong>Speaker</strong>s<br />
To turn on a pair of speakers, simply depress the button associated with that pair. Please take precautions to make sure that the<br />
amplifier volume is not set at a high level before you depress the button.<br />
3
Specifications<br />
SS4P<br />
SS8P<br />
# of <strong>Speaker</strong>s Supported: 4 Pairs 8 Pairs<br />
Power Handling: 125 Watts Per Channel 125 Watts Per Channel<br />
Frequency Response: 20Hz - 20kHz ±0dB 20Hz - 20kHz ±0dB<br />
Protection: Front Button & Rear Override Switch Front Button & Rear Override Switch<br />
Dimensions (H x W x D): 23⁄16" x 83⁄8" x 613⁄32" 23⁄16" x 17" x 613⁄32"<br />
LIMITED TEN-YEAR WARRANTY<br />
Proficient Audio Systems warrants to the original purchaser only<br />
that this product will be free from defects in materials and workmanship<br />
for a period of ten years, provided the speaker was purchased<br />
from a Proficient Audio Systems Authorized Dealer.<br />
Features and specifications are subject to change without notice.<br />
Defective products must be shipped, prepaid and insured,<br />
together with proof of purchase, to the Proficient Audio Systems<br />
Authorized Dealer from whom they were purchased, or to<br />
Proficient Audio Systems at the address listed on this installation<br />
instruction manual. Freight collect shipments will be refused. It is<br />
preferable to ship this product in the original shipping container<br />
to lessen the chance of transit damage. In any case, the risk of loss<br />
or damage in transit is to be borne by the purchaser.<br />
If, upon examination at the Factory or Proficient Audio Systems<br />
Authorized Dealer, it is determined that the unit was defective<br />
in materials or workmanship at any time during this warranty<br />
period, Proficient Audio Systems or the Proficient Audio Systems<br />
Authorized Dealer will, at its option, repair or replace this product<br />
at no additional charge, except as set forth below. If this model is<br />
no longer available and can not be repaired effectively, Proficient<br />
Audio Systems, at its sole option, may replace the unit with a current<br />
model of equal or greater value. In some cases where a new<br />
model is substituted, a modification to the mounting surface may<br />
be required. If mounting surface modification is required, Proficient<br />
Audio Systems assumes no responsibility or liability for such modification.<br />
All replaced parts and product become the property of<br />
Proficient Audio Systems. Products replaced or repaired under this<br />
Warranty will be returned to the original retail purchaser, within a<br />
reasonable time, freight prepaid.<br />
This Warranty does not include service or parts to repair damage<br />
caused by accident, disaster, misuse, abuse, negligence, inadequate<br />
packing or shipping procedures, commercial use, voltage<br />
inputs in excess of the rated maximum of the unit, or service,<br />
repair or modification of the product which has not been authorized<br />
or approved by Proficient Audio Systems. This Warranty also<br />
excludes normal cosmetic deterioration caused by environmental<br />
conditions. This warranty will be void if the Serial Number on the<br />
product has been removed, tampered with or defaced.<br />
This Warranty is in lieu of all other expressed warranties. If the<br />
product is defective in materials or workmanship as warranted<br />
above, the purchaser’s sole remedy shall be repair or replacement<br />
as provided above. In no event will Proficient Audio Systems be<br />
liable for any incidental or consequential damages arising out of<br />
the use or inability to use the product, even if Proficient Audio<br />
Systems. or a Proficient Audio Systems Authorized Dealer has<br />
been advised of the possibility of such damages, or for any claim<br />
by any other party. Some states do not allow the exclusion or<br />
limitation of consequential damages, so the above limitation and<br />
exclusion may not apply.<br />
All implied warranties on the product are limited to the duration of<br />
this expressed Warranty. Some states do not allow limitation on the<br />
length of an implied warranty. If the original retail purchaser resides<br />
in such a state, this limitation does not apply.<br />
Should you have any questions regarding this, or any other Proficient Audio Systems product, please call our service hotline at<br />
800.448.0976 or e-mail us at techsupport@proficientaudio.com. We are available to assist you every weekday, except holidays,<br />
between the hours of 7:00 a.m. and 5:00 p.m. PST.<br />
Audio Systems<br />
940 Columbia Avenue, Riverside, CA 92507<br />
800.448.0976 • Fax 951.787.8747 • proficientaudio.com<br />
1300-71000