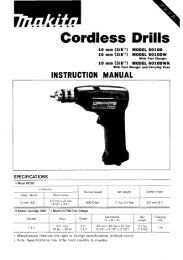
Cordless Driver Drill - Makita
Cordless Driver Drill - Makita
Cordless Driver Drill - Makita

Create successful ePaper yourself
Turn your PDF publications into a flip-book with our unique Google optimized e-Paper software.
6oo<br />
7<br />
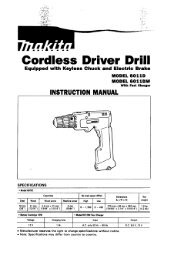
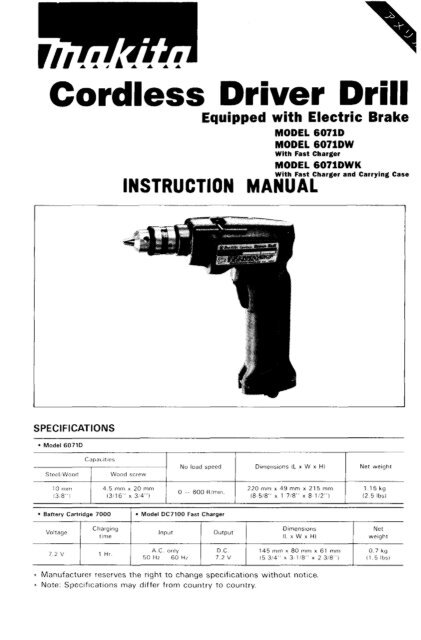
<strong>Cordless</strong> <strong>Driver</strong> <strong>Drill</strong><br />
Equipped with Electric Brake<br />
MODEL 6071D<br />
MODEL 6071DW<br />
With Fast Charger<br />
INSTRUCTION MANUAL<br />
MODEL 607lDWK<br />
With Fast Charger and Carrying Case<br />
SPEC IF I CAT IONS<br />
Stcel Wood<br />
Cdpacitics<br />
Wood screw<br />
10 11111, 4 5 m m x 20 mini 1<br />
13 a"! 1 13'16" x 3 4"1 (8~518"<br />
Battery Cartridge 7000 1 - Model<br />
1<br />
Hr 1<br />
50<br />
-<br />
~~<br />
No load speed Dimensions IL x W x HI Net weight<br />
R,m,n I 220 mm x 49 mm x 215 mm 115kg<br />
x 1 7'8" x 8 1!2"1 1 12 5 Ibs!<br />
DC7100 Fast Charger<br />
A C orily<br />
Hr 60 HI ~<br />
OC<br />
2 V 1<br />
I5<br />
Dimensions<br />
IL x W x HI<br />
145 mm x 80 mm x 61 mni<br />
314'' x 3~1{8" x 2 3/8"!<br />
* Manufacturer reserves the right to change specifications without notice.<br />
* Note: Specifications may differ from country to country.<br />
1 weight<br />
Net<br />
0 7 kg
IMPORTANT<br />
SAFETY INSTRUCTIONS<br />
(For All Tools)<br />
WARNING: WHEN USING ELECTRIC TOOLS, BASIC SAFE-<br />
TY PRECAUTIONS SHOULD ALWAYS BE FOLLOWED TO<br />
REDUCE THE RISK OF FIRE, ELECTRIC SHOCK, AND PER-<br />
SONAL INJURY, INCLUDING THE FOLLOWING:<br />
2<br />
READ ALL INSTRUCTIONS.<br />
1.<br />
2.<br />
3.<br />
4.<br />
5.<br />
6.<br />
7.<br />
8.<br />
9.<br />
IO.<br />
11.<br />
12.<br />
KEEP WORK AREA CLEAN. Cluttered areas and benches invite injuries.<br />
CONSIDER WORK AREA ENVIRONMENT. Don't use power tools in damp<br />
or wet locations. Keep work area well lit. Don't expose power tools to rain.<br />
Don't use tool in presence of flammable liquids or gases.<br />
KEEP CHILDREN AWAY. All visitors should be kept away from work area.<br />
Don't let visitors contact tool or extension cord.<br />
STORE IDLE TOOLS. When not in use, tools should be stored in dry, and high<br />
or locked-up place - out of reach of children.<br />
DON'T FORCE TOOL. It will do the job better and safer at the rate for which<br />
it was intended.<br />
USE RIGHT TOOL. Don't force small tool or attachment to do the job of a<br />
heavy-duty tool. Don't use tool for purpose not intended.<br />
DRESS PROPERLY. Don't wear loose clothing or jewelry. They can be caught<br />
in moving parts. Rubber gloves and non-skid footwear are recommended<br />
when working outdoors. Wear protective hair covering to contain long hair.<br />
USE SAFETY GLASSES. Also use face or dust mask if cutting operation is<br />
dusty.<br />
DON'T ABUSE CORD. Never carry tool by cord or yank it to disconnect from<br />
receptacle. Keep cord from heat, oil, and sharp edges.<br />
SECURE WORK. Use clamps or a vise to hold work. It's safer than using<br />
your hand and it frees both hands to operate tool.<br />
DON'T OVERREACH. Keep proper footing and balance at all times.<br />
MAINTAIN TOOLS WITH CARE. Keep tools sharp and clean for better and<br />
safer performance. Follow instructions for lubricating and changing accessories.<br />
Inspect tool cords periodically and if damaged, have repaired by authorized<br />
service facility. Inspect extension cords periodically and replace if<br />
damaged. Keep handles dry, clean, and free from oil and grease.<br />
. DISCONNECT TOOLS. When not in use, before servicing, and when chang-<br />
13,<br />
ing accessories, such as blades, bits, cutters.
14. REMOVE ADJUSTING KEYS AND WRENCHES. Form habit of checking to<br />
see that keys and adjusting wrenches are removed from tool before turning<br />
it on.<br />
15. AVOID UNINTENTIONAL STARTING. Don't carry plugged-in tool with finger<br />
on switch. Be sure switch is OFF when plugging in.<br />
16. OUTDOOR USE EXTENSION CORDS. When tool is used outdoors, use only<br />
extension cords intended for use outdoors and so marked.<br />
17. STAY ALERT. Watch what you are doing, use common sense. Don't operate<br />
tool when you are tired.<br />
18. CHECK DAMAGED PARTS. Before further use of the tool, a guard or other<br />
part that is damaged should be carefully checked to determine that it will<br />
operate properly and perform its intended function. Check for alignment of<br />
moving parts, binding of moving parts, breakage of parts, mounting, and any<br />
other conditions that may affect its operation. A guard or other part that<br />
is damaged should be properly repaired or replaced by an authorized service<br />
center unless otherwise indicated elsewhere in this instruction manual.<br />
Have defective switches replaced by authorized service center. Don't use<br />
tool if switch does not turn it on and off.<br />
19. GUARD AGAINST ELECTRIC SHOCK. Prevent body contact with grounded<br />
surfaces. For example; pipes, radiators, ranges, refrigerator enclosures.<br />
20. REPLACEMENT PARTS. When servicing, use only identical replacement parts.<br />
VOLTAGE WARNING: Before connecting the tool to a power source (receptacle,<br />
outlet, etc.) be sure the voltage supplied is the same as that specified on the<br />
nameplate of the tool. A power source with voltage greater than that specified<br />
for the tool can result in SERIOUS INJURY to the user - as well as damage to<br />
the tool. If in doubt, DO NOT PLUG IN THE TOOL. Using a power source with<br />
voltage less than the nameplate rating is harmful to the motor.<br />
3
IMPORTANT SAFETY INSTRUCTIONS<br />
1. SAVE THESE INSTRUCTIONS - This manual<br />
Length of Cord (Feet) 25 50 100<br />
AWG Size of Cord 18 18 18<br />
150<br />
16<br />
9. Do not operate charger with damaged cord or plug - replace them immediately.<br />
IO. Do not operate charger if it has received a sharp blow, been dropped, or otherwise<br />
damaged in any way; take it to a qualified serviceman.<br />
11. Do not disassemble charger or battery cartridge; take it to a qualified<br />
serviceman when service or repair is required. Incorrect reassembly may<br />
result in a risk of electric shock or fire.<br />
12. To reduce risk of electric shock, unplug charger from outlet before attempting<br />
any maintenance or cleaning. Turning off controls will not reduce this risk.<br />
4
ADDITIONAL SAFETY RULES<br />
FOR CHARGER & BATTERY CARTRIDGE<br />
1. Do not charge Battery Cartridge when temperature is BELOW 10°C (5OOF)<br />
or ABOVE 4OoC (104OF).<br />
2. Do not attempt to use a step-up transformer, an engine generator or DC power<br />
receptacle.<br />
3. Do not allow anything to cover or clog the charger vents.<br />
4. Always cover the battery terminals with the battery cover when the battery<br />
cartridge is not used.<br />
5. Do not short the battery cartridge:<br />
(1) Do not touch the terminals with any conductive material.<br />
(2) Avoid storing battery cartridge in a container with other metal objects such<br />
as nails, coins, etc.<br />
(3) Do not expose battery cartridge to water or rain.<br />
A battery short can cause a large current flow, overheating, possible burns<br />
and even a breakdown.<br />
6. Do not store the tool and Battery Cartridge in locations where the temperature<br />
may reach or exceed 5OoC (122OF).<br />
7. Do not incinerate the Battery Cartridge even if it is severely damaged or is<br />
completely worn out. The battery cartridge can explode in a fire.<br />
ADDITIONAL SAFETY RULES<br />
1. Be aware that this tool is always in an operating condition, because it does<br />
not have to be plugged into an electrical outlet.<br />
2. Always be sure you have a firm footing.<br />
Be sure no one is below when using the tool in high locations.<br />
3. Hold the tool firmly.<br />
4. Keep hands away from rotating parts.<br />
5. When drilling into walls, floors or wherever "live" electrical wires may be<br />
encountered, DO NOT TOUCH ANY METAL PARTS OF THE TOOL!<br />
Hold the tool only by the insulated grasping surfaces to prevent electric shock<br />
if you drill into a "live" wire.<br />
6. Do not leave the tool running. Operate the tool only when hand-held.<br />
7. Do not touch the drill bit or the workpiece immediately after operation: they<br />
may be extremely hot and could burn your skin.<br />
SAVE THESE INSTRUCTIONS.<br />
5
Installing or removing battery cartridge<br />
0Always switch off the tool before insertion<br />
or removal of the battery cartridge.<br />
.To remove the battery cartridqe, pull out<br />
the set plate on the bottom if the tool<br />
and grasp both sides of the cartridge<br />
while withdrawing it from the barrel.<br />
.To insert the battery cartridge, align the<br />
tongue on the battery cartridge with the<br />
groove in the housing and slip it into<br />
place. Snap the set plate back into place.<br />
Be sure to close the set plate fully before<br />
using the tool.<br />
j<br />
0 Do not use force when inserting the battery cartridge.<br />
If the cartridge does not slide in easily, it is not being inserted correctly<br />
Charging<br />
Plug the fast charger into your power<br />
source. Insert the battery cartridge so that<br />
Charmno lioht<br />
the plus and minus terminals on the battery<br />
cartridge are on the same sides as their<br />
respective markings on the fast charger. Insert<br />
the cartridge fully into the port so that<br />
it rests on the charger port floor.<br />
The charging light will come on and charging<br />
will begin. If the charging light does not<br />
come on, . press . the reset button. If the<br />
charging light goes out within 10 seconds even after pressing the reset button a couple of<br />
times, the battery cartridge is dead. (CAUTION: Wait for more than 5 seconds after the<br />
charging light goes out to press the reset button again.) Replace it with a new one. When<br />
the charging light goes out after about one hour, you may remove the fully charged<br />
battery cartridge. After charging, unplug the charger from the power source.<br />
CAUTION :<br />
0 Your new battery cartridge is not charged. You will need to charge it before use.<br />
0 If you try to charge a cartridge from a just-operated tool, sometimes the charging light<br />
will not come on. If this occurs, let the cartridge cool off for a while. Then re-insert<br />
it and try to charge it once more.<br />
0 When you charge a new battery cartridge or a battery cartridge which has not been used<br />
for a long period, it may not accept a full charge. This is a normal condition and does<br />
not indicate a problem. You can recharge the battery cartridge fully after discharging<br />
it almost completely a couple of times.<br />
0 If you wish to charge two battery cartridges, allow 15 minutes between chargings on the<br />
fast charger.<br />
6
Selecting correct Phillips bit<br />
Use the chart to determine the best size<br />
driver bit for the size of screw that you<br />
wish to use.<br />
Nominal diameter (mm)<br />
Bit No.<br />
Wood screw<br />
2.1 - 2.7 (3/32"- 1/8")<br />
No. 2 3.1 - 4.5 (118"- 3/16")<br />
Selecting slotted bit<br />
Use a slotted bit that properly fits the screw slot. Use of a bit that is too small will<br />
damage the screw and/or bit.<br />
Installing or removing driver bit<br />
CAUTION :<br />
Always be sure that the tool is switched off and the battery cartridge is removed before<br />
installing or removing the bit.<br />
To install the bit, place it in the chuck as<br />
far as it will go. Tighten the chuck by<br />
hand. Place the chuck key in each of the<br />
three holes and tighten clockwise.<br />
Be sure to tighten all three chuck holes<br />
even I y .<br />
To remove the bit, turn the chuck key<br />
counterclockwise in just one hole, then<br />
loosen the chuck by hand.<br />
I<br />
Chuck key<br />
Tighten ,-<br />
I<br />
I<br />
Chuck key<br />
7
to stop.<br />
CAUTION :<br />
Before inserting t..e battery cartridge into the tool, always check to see that the trigger<br />
switch actuates properly and returns to the "OFF" position when released.<br />
Reversing switch action<br />
This tool has a reversing switch to change<br />
the direction of rotation. Slide the reversing<br />
switch to the right for clockwise rotation<br />
or to the left for counterclockwise.<br />
Reversing switcd<br />
CAUTION :<br />
0 Always check the direction of rotation before operation.<br />
.Use the reversing switch only when the tool comes to a complete stop. Changing the<br />
direction of rotation before the tool stops may ruin the tool.<br />
Overload protector<br />
The overload protector automatically cuts out to break the circuit whenever heavy work<br />
is prolonged. Wait 20-30 seconds before resuming operation.<br />
8
Bubble level<br />
This tool is equipeed with a bubble level to<br />
aid in holding the tool horizontally. Simply<br />
center the bubble in the sight window.<br />
Bubble level<br />
7<br />
Screwdriving operation<br />
Place the point of the driver bit in the<br />
screw head and apply pressure to the tool.<br />
Start the tool slowly and then increase the<br />
speed gradually. Release the trigger just as<br />
the screw bottoms out. The electric brake<br />
will then stop the tool immediately, preventing<br />
the screw and/or bit from being<br />
damaged.<br />
NOTE :<br />
0 Make sure that the driver bit is inserted straight in the screw head, or the screw and/or<br />
bit may be damaged.<br />
owhen driving wood screws, predrill Pilot<br />
holes to make driving easier and to prevent<br />
splitting of the workpiece. See the<br />
chart.<br />
3.1 (1/8")<br />
3.5 (9/64") (3/32- 3/32")<br />
I<br />
2.5 - 2.8<br />
3.8 (5/32")<br />
(3132- 7/64")<br />
4.5 (11/64")<br />
2.9 - 3.2<br />
(7/64 - 1 /8")<br />
9
<strong>Drill</strong>ing operation<br />
0 <strong>Drill</strong>ing in wood<br />
When drilling in wood, best results are obtained with wood drills equipped with a guide<br />
screw. The guide screw makes drilling easier by pulling the bit into the workpiece.<br />
0 <strong>Drill</strong>ing in metal<br />
To prevent the bit from slipping when<br />
starting a hole, make an indentation with<br />
a centerpunch and hammer at the point<br />
to be drilled. Place the point of the bit in<br />
the indentation and start drilling.<br />
Use a cutting lubricant when drilling<br />
metals. The exceptions are iron and brass<br />
which should be drilled dry.<br />
CAUTION :<br />
*Pressing excessively on the tool will not speed up the drilling. In fact, this excessive<br />
pressure will only serve to damage the tip of your bit, decrease the tool performance<br />
and shorten the service life of the tool.<br />
*There is a tremendous force exerted on the tool/bit at the time of hole breakthrough.<br />
Hold the tool firmly and exert care when the bit begins to break through the workpiece.<br />
0 A stuck bit can be removed simply by setting the reversing switch to reverse rotation in<br />
order to back out. However, the tool may back out abruptly if you do not hold it firmly.<br />
Always secure small workpieces in a vise or similar hold-down device.<br />
10
MAINTENANCE<br />
CAUTION :<br />
Always be sure that the tool is switched off and the battery cartridge is removed before<br />
attempting to perform inspection or maintenance.<br />
To maintain product SAFETY and RELIABILITY, repairs, maintenance or adjustment<br />
should be performed by <strong>Makita</strong> Authorized or Factory Service Centers, always using<br />
<strong>Makita</strong> replacement parts.<br />
11
ACCESSORIES<br />
CAUTION :<br />
These accessories or attachments are recommended for use with your <strong>Makita</strong> tool specified in this<br />
manual. The use of any other accessories or attachments might present a risk of injury to persons,<br />
The accessories or attachments should be used only in the proper and intended manner.<br />
Bits<br />
Fast charger<br />
Model DC7100<br />
Part No. 113109-0<br />
0 Rubber pad assembly<br />
Part No. 123001 -2<br />
0 Battery cartridge 7000<br />
Part No. 632002-4<br />
0 Wool bonnet<br />
Part No. 743401-6<br />
0 Battery cover<br />
Part No. 414938-7<br />
0 Foam polishing pad<br />
Part No. 743023-2<br />
0 Chuck key S10<br />
Part No. 763419-1<br />
0 Keyless drill chuck<br />
Part No. 763083-8<br />
12
0 Battery holster<br />
Holster holds extra battery<br />
Part No. 823033-3C<br />
0 Tool holster<br />
has some bits storage space<br />
Use holster to carry drill only after<br />
removing bit.<br />
Part No. 823033-3A<br />
Part No. 823033-3E (Genuine holster)<br />
0 Steel carrying case<br />
Part No. 823087-3 (Steel case)<br />
Part No. 181372-3 (Plastic Case)<br />
13
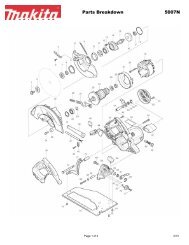
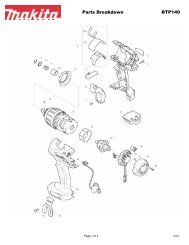
10 mm (3/8")<br />
CORDLESS DRIVER DRILL<br />
Model 6071D<br />
Note: The switch and other part configurations<br />
may differ from country to country.<br />
MODEL 6071D 1<br />
14
~<br />
MOUEL 6071U Apr 21 86 EN<br />
'EM A&, DESCRIPTION<br />
I:,',"<br />
,!& DESCRIPTION<br />
I<br />
<strong>Drill</strong> Chuck S10<br />
Pan Head Screw M5x18<br />
Gear<br />
Plane Bearing 5<br />
Motor<br />
Holder 6<br />
Swmh<br />
Housing R<br />
Bubble Level<br />
la<br />
11<br />
12<br />
13<br />
14<br />
15<br />
16<br />
17<br />
18<br />
Note The switch and other part speclflcalions m,iy differ fronl country to country<br />
I<br />
7<br />
1<br />
1<br />
1<br />
1<br />
1<br />
1<br />
1<br />
Tube<br />
Pan Head Screw M4x22 IWilh Wdhherl<br />
set Plat0<br />
Houstng L<br />
Swrtch<br />
Plane Bearing 3<br />
Gear Couplele 13 58<br />
Plane Bearing 3<br />
Name Plate<br />
15
f’<br />
MAKITA LIMITED ONE YEAR WARRANTY<br />
Warranty Policy<br />
Every hlakita tool is thoroughly inspected and tested before leaving the factory. It IS warranted to<br />
he free of defects from workmanship and materials for the period of ONE YEAR from the date of<br />
original purchase. Should any troubkdevelop during this one-year period, return the COMPLETE<br />
tool, freight prepaid, to one of <strong>Makita</strong>’s Factory or Authorized Service Centers. If inspection shows<br />
the trouble is caused by defective workmanship or material, <strong>Makita</strong> will repair (or at our option,<br />
replace) without charge.<br />
This Warranty does not apply where:<br />
repairs have been made or attempted by others:<br />
repairs are required because of normal wear and tear:<br />
The tool has been abused, misused or improperly maintained,<br />
alterations have been made to the tool.<br />
IN NO EVENT SHALL MAKITA BE LIABLE FOR ANY INDIRECT, INCIDENTAL OR CON-<br />
SEQUENTIAL DAMAGES FROM THE SALE OR USE OF THE PRODUCT. THIS DISCLAIMER<br />
APPLIES BOTH DURING AND AFTER THE TERM OF THIS WARRANTY.<br />
MAKITA DISCLAIMS LIABILITY FOR ANY IMPLIED WARRANTIES INCLUDING IMPLIED<br />
WARRANTIES OF “MERCHANTABILITY” AND “FITNESS FOR A’ SPECIFIC PURPOSE,”<br />
AFTER THE ONE-YEAR TERM OF THIS WARRANTY.<br />
This Warranty gives you specific legal rights, and you may also have other rights which vary from<br />
state to state. Some states do not allow the exclusion or limitation of incidental or consequential<br />
damages, so the above limitation or exclusion may not apply to you. Some states do not allow<br />
limitation onahow long an implied warranty lasts, so the above limitation may not apply to you.<br />
<strong>Makita</strong> Corporation<br />
3-11 -8, Sumiyoshi-cho,<br />
Anjo, Aichi 446 Japan<br />
883546F061<br />
PRINTED IN JAPAN<br />
1992 - 3 - N