PROFESSIONAL WINDSHIELD REPAIR KIT - Wurth USA
PROFESSIONAL WINDSHIELD REPAIR KIT - Wurth USA
PROFESSIONAL WINDSHIELD REPAIR KIT - Wurth USA

You also want an ePaper? Increase the reach of your titles
YUMPU automatically turns print PDFs into web optimized ePapers that Google loves.
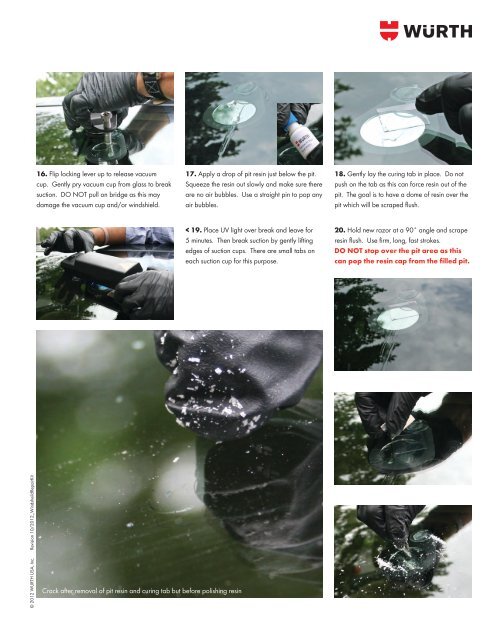
16. Flip locking lever up to release vacuum<br />
cup. Gently pry vacuum cup from glass to break<br />
suction. DO NOT pull on bridge as this may<br />
damage the vacuum cup and/or windshield.<br />
17. Apply a drop of pit resin just below the pit.<br />
Squeeze the resin out slowly and make sure there<br />
are no air bubbles. Use a straight pin to pop any<br />
air bubbles.<br />
18. Gently lay the curing tab in place. Do not<br />
push on the tab as this can force resin out of the<br />
pit. The goal is to have a dome of resin over the<br />
pit which will be scraped flush.<br />
< 19. Place UV light over break and leave for<br />
5 minutes. Then break suction by gently lifting<br />
edges of suction cups. There are small tabs on<br />
each suction cup for this purpose.<br />
20. Hold new razor at a 90˚ angle and scrape<br />
resin flush. Use firm, long, fast strokes.<br />
DO NOT stop over the pit area as this<br />
can pop the resin cap from the filled pit.<br />
© 2012 WURTH <strong>USA</strong>, Inc. Revision 10/2012_WindsheildRepairKit<br />
Crack after removal of pit resin and curing tab but before polishing resin