REVTEX 4 Author's Guide - Local Sector 7 web page
REVTEX 4 Author's Guide - Local Sector 7 web page
REVTEX 4 Author's Guide - Local Sector 7 web page

You also want an ePaper? Increase the reach of your titles
YUMPU automatically turns print PDFs into web optimized ePapers that Google loves.
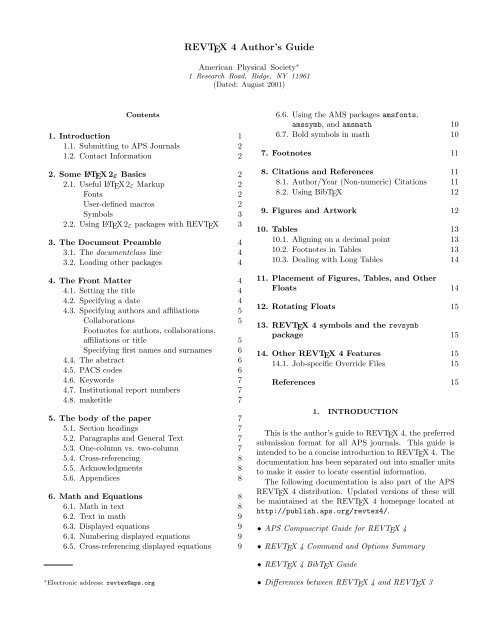
<strong>REVTEX</strong> 4 Author’s <strong>Guide</strong><br />
American Physical Society ∗<br />
1 Research Road, Ridge, NY 11961<br />
(Dated: August 2001)<br />
Contents<br />
1. Introduction 1<br />
1.1. Submitting to APS Journals 2<br />
1.2. Contact Information 2<br />
2. Some L A TEX 2ε Basics 2<br />
2.1. Useful L A TEX 2ε Markup 2<br />
Fonts 2<br />
User-defined macros 2<br />
Symbols 3<br />
2.2. Using L A TEX 2ε packages with <strong>REVTEX</strong> 3<br />
3. The Document Preamble 4<br />
3.1. The documentclass line 4<br />
3.2. Loading other packages 4<br />
4. The Front Matter 4<br />
4.1. Setting the title 4<br />
4.2. Specifying a date 4<br />
4.3. Specifying authors and affiliations 5<br />
Collaborations 5<br />
Footnotes for authors, collaborations,<br />
affiliations or title 5<br />
Specifying first names and surnames 6<br />
4.4. The abstract 6<br />
4.5. PACS codes 6<br />
4.6. Keywords 7<br />
4.7. Institutional report numbers 7<br />
4.8. maketitle 7<br />
5. The body of the paper 7<br />
5.1. Section headings 7<br />
5.2. Paragraphs and General Text 7<br />
5.3. One-column vs. two-column 7<br />
5.4. Cross-referencing 8<br />
5.5. Acknowledgments 8<br />
5.6. Appendices 8<br />
6. Math and Equations 8<br />
6.1. Math in text 8<br />
6.2. Text in math 9<br />
6.3. Displayed equations 9<br />
6.4. Numbering displayed equations 9<br />
6.5. Cross-referencing displayed equations 9<br />
6.6. Using the AMS packages amsfonts,<br />
amssymb, and amsmath 10<br />
6.7. Bold symbols in math 10<br />
7. Footnotes 11<br />
8. Citations and References 11<br />
8.1. Author/Year (Non-numeric) Citations 11<br />
8.2. Using BibTEX 12<br />
9. Figures and Artwork 12<br />
10. Tables 13<br />
10.1. Aligning on a decimal point 13<br />
10.2. Footnotes in Tables 13<br />
10.3. Dealing with Long Tables 14<br />
11. Placement of Figures, Tables, and Other<br />
Floats 14<br />
12. Rotating Floats 15<br />
13. <strong>REVTEX</strong> 4 symbols and the revsymb<br />
package 15<br />
14. Other <strong>REVTEX</strong> 4 Features 15<br />
14.1. Job-specific Override Files 15<br />
References 15<br />
1. INTRODUCTION<br />
This is the author’s guide to <strong>REVTEX</strong> 4, the preferred<br />
submission format for all APS journals. This guide is<br />
intended to be a concise introduction to <strong>REVTEX</strong> 4. The<br />
documentation has been separated out into smaller units<br />
to make it easier to locate essential information.<br />
The following documentation is also part of the APS<br />
<strong>REVTEX</strong> 4 distribution. Updated versions of these will<br />
be maintained at the <strong>REVTEX</strong> 4 home<strong>page</strong> located at<br />
http://publish.aps.org/revtex4/.<br />
• APS Compuscript <strong>Guide</strong> for <strong>REVTEX</strong> 4<br />
• <strong>REVTEX</strong> 4 Command and Options Summary<br />
• <strong>REVTEX</strong> 4 BibTEX <strong>Guide</strong><br />
∗ Electronic address: revtex@aps.org<br />
• Differences between <strong>REVTEX</strong> 4 and <strong>REVTEX</strong> 3
2<br />
This guide assumes a working <strong>REVTEX</strong> 4 installation.<br />
Please see the installation guide included with the distribution.<br />
The <strong>REVTEX</strong> system for L A TEX began its development<br />
in 1986 and has gone through three major revisions since<br />
then. All versions prior to <strong>REVTEX</strong> 4 were based on<br />
L A TEX2.09 and, until now, <strong>REVTEX</strong> did not keep pace<br />
with the advances of the L A TEX community and thus<br />
became inconvenient to work with. <strong>REVTEX</strong> 4 is designed<br />
to remedy this by incorporating the following design<br />
goals:<br />
• Make <strong>REVTEX</strong> fully compatible with L A TEX 2ε; it is<br />
now a L A TEX 2ε document class, similar in function to<br />
the standard article class.<br />
• Rely on standard L A TEX 2ε packages for common tasks,<br />
e.g, graphicx, color, and hyperref.<br />
• Add or improve macros to support translation to<br />
tagged formats such as XML and SGML. This added<br />
markup will be key to enhancing the peer-review process<br />
and lowering production costs.<br />
• Provide a closer approximation to the typesetting style<br />
used in Physical Review.<br />
• Incorporate new features, such as hypertext, to make<br />
<strong>REVTEX</strong> a convenient and desirable e-print format.<br />
• Relax the restrictions in <strong>REVTEX</strong> that had only been<br />
necessary for typesetting journal camera-ready copy.<br />
To meet these goals, <strong>REVTEX</strong> 4 is a complete rewrite<br />
with an emphasis on maintainability so that it will be<br />
easier to provide enhancements.<br />
The <strong>REVTEX</strong> 4 distribution includes both a template<br />
(template.aps) and a sample document (apssamp.tex).<br />
The template is a good starting point for a manuscript.<br />
In the following sections are instructions that should be<br />
sufficient for creating a paper using <strong>REVTEX</strong> 4.<br />
1.1. Submitting to APS Journals<br />
Authors using <strong>REVTEX</strong> 4 to prepare a manuscript<br />
for submission to Physical Review or Reviews of Modern<br />
Physics must also read the companion document<br />
APS Compuscript <strong>Guide</strong> for <strong>REVTEX</strong> 4 distributed with<br />
<strong>REVTEX</strong> and follow the guidelines detailed there.<br />
Further information about the compuscript program<br />
of the American Physical Society may be found at http:<br />
//publish.aps.org/ESUB/.<br />
1.2. Contact Information<br />
Any bugs, problems, or inconsistencies should reported<br />
to <strong>REVTEX</strong> support at revtex@aps.org. Reports should<br />
include information on the error and a small sample<br />
document that manifests the problem if possible (please<br />
don’t send large files!).<br />
2. SOME L A TEX 2ε BASICS<br />
A primary design goal of <strong>REVTEX</strong> 4 was to make it<br />
as compatible with standard L A TEX 2ε as possible so that<br />
authors may take advantage of all that L A TEX 2ε offers.<br />
In keeping with this goal, much of the special formatting<br />
that was built in to earlier versions of <strong>REVTEX</strong> is now<br />
accomplished through standard L A TEX 2ε macros or packages.<br />
The books in the bibliography provide extensive<br />
coverage of all topics pertaining to preparing documents<br />
under L A TEX 2ε. They are highly recommended.<br />
To accomplish its goals, <strong>REVTEX</strong> 4 must sometimes<br />
patch the underlying L A TEX kernel. This means that<br />
<strong>REVTEX</strong> 4 requires a fairly recent version of L A TEX 2ε.<br />
Versions prior to 1996/12/01 may not work correctly.<br />
<strong>REVTEX</strong> 4 will be maintained to be compatible with<br />
future versions of L A TEX 2ε.<br />
2.1. Useful L A TEX 2ε Markup<br />
L A TEX 2ε markup is the preferred way to accomplish<br />
many basic tasks.<br />
Fonts<br />
Because <strong>REVTEX</strong> 4 is based upon L A TEX 2ε, it inherits<br />
all of the macros used for controlling fonts. Of particular<br />
importance are the L A TEX 2ε macros \textit, \textbf,<br />
\texttt for changing to an italic, bold, or typewriter font<br />
respectively. One should always use these macros rather<br />
than the lower-level TEX macros \it, \bf, and \tt. The<br />
L A TEX 2ε macros offer improvements such as better italic<br />
correction and scaling in super- and subscripts for example.<br />
Table I summarizes the font selection commands in<br />
L A TEX 2ε.<br />
User-defined macros<br />
L A TEX 2ε provides several macros that enable users to<br />
easily create new macros for use in their manuscripts:<br />
• \newcommand{〈command〉}[〈narg〉][〈opt〉]{〈def 〉}<br />
• \newcommand*{〈command〉}[〈narg〉][〈opt〉]{〈def 〉}<br />
• \renewcommand{〈command〉}[〈narg〉][〈opt〉]{〈def 〉}<br />
• \renewcommand*{〈command〉}[〈narg〉][〈opt〉]{〈def 〉}<br />
• \providecommand{〈command〉}[〈narg〉][〈opt〉]{〈def 〉}<br />
• \providecommand*{〈command〉}[〈narg〉][〈opt〉]{〈def 〉}
3<br />
Font command<br />
\textit{〈text〉}<br />
\textbf{〈text〉}<br />
\texttt{〈text〉}<br />
\textrm{〈text〉}<br />
\textsl{〈text〉}<br />
\textsf{〈text〉}<br />
\textsc{〈text〉}<br />
\textmd{〈text〉}<br />
\textnormal{〈text〉}<br />
\textup{〈text〉}<br />
\mathit{〈text〉}<br />
\mathbf{〈text〉}<br />
\mathtt{〈text〉}<br />
\mathsf{〈text〉}<br />
\mathcal{〈text〉}<br />
\mathnormal{〈text〉}<br />
\bm{〈text〉}<br />
\mathfrak{〈text〉} a<br />
\mathbb{〈text〉} a<br />
TABLE I: L A TEX 2ε font commands<br />
Text Fonts<br />
Explanation<br />
Italics<br />
Boldface<br />
Typewriter<br />
Roman<br />
Slanted<br />
Sans Serif<br />
Small Caps<br />
Medium Series<br />
Normal Series<br />
Upright Series<br />
a Requires amsfonts or amssymb class option<br />
Math Fonts<br />
Math Italics<br />
Math Boldface<br />
Math Typewriter<br />
Math Sans Serif<br />
Calligraphic<br />
Math Normal<br />
Bold math for Greek letters<br />
and other symbols<br />
Fraktur<br />
Blackboard Bold<br />
Here 〈command〉 is the name of the macro being defined,<br />
〈narg〉 is the number of arguments the macro takes, 〈opt〉<br />
are optional default values for the arguments, and 〈def 〉<br />
is the actually macro definiton. \newcommand creates a<br />
new macro, \renewcommand redefines a previously defined<br />
macro, and \providecommand will define a macro<br />
only if it hasn’t been defined previously. The *-ed versions<br />
are an optimization that indicates that the macro<br />
arguments will always be “short” arguments. This is almost<br />
always the case, so the *-ed versions should be used<br />
whenver possible.<br />
The use of these macros is preferred over using plain<br />
TEX’s low-level macros such as \def,\edef, and \gdef.<br />
APS authors must follow the APS Compuscript <strong>Guide</strong><br />
for <strong>REVTEX</strong> 4 when defining macros.<br />
Symbols<br />
L A TEX 2ε has added some convenient commands for<br />
some special symbols and effects. These are summarized<br />
in Table II. See [3] for details.<br />
L A TEX 2ε also removed some symbols that were previously<br />
automatically available in L A TEX2.09. These symbols<br />
are now contained in a separate package latexsym.<br />
TABLE II: L A TEX 2ε commands for special symbols and effects<br />
Command<br />
Symbol/Effect<br />
\textemdash —<br />
\textendash –<br />
\textexclamdown ¡<br />
\textquestiondown ¿<br />
\textquotedblleft “<br />
\textquotedblright ”<br />
\textquoteleft ‘<br />
\textquoteright ’<br />
\textbullet<br />
•<br />
\textperiodcentered ·<br />
\textvisiblespace<br />
\textcompworkmark<br />
Break a ligature<br />
\textcircled{〈char〉}<br />
Circle a character<br />
To use these symbols, include the package using:<br />
\usepackage{latexsym}<br />
2.2. Using L A TEX 2ε packages with <strong>REVTEX</strong><br />
Many L A TEX 2ε packages are available, for instance,<br />
on CTAN at ftp://ctan.tug.org/tex-archive/<br />
macros/latex/required/ and at ftp://ctan.tug.<br />
org/tex-archive/macros/latex/contrib/ or may<br />
be available on other distribution media, such as the<br />
TEX Live CD-ROM http://www.tug.org/texlive/.<br />
Some of these packages are automatically loaded by<br />
<strong>REVTEX</strong> 4 when certain class options are invoked and<br />
are, thus, “required”. They will either be distributed<br />
with <strong>REVTEX</strong> or are already included with a standard<br />
L A TEX 2ε distribution.<br />
Required packages are automatically loaded by<br />
<strong>REVTEX</strong> on an as-needed basis. Other packages should<br />
be loaded using the \usepackage command. To load the<br />
hyperref package, the document preamble might look<br />
like:<br />
\documentclass{revtex}<br />
\usepackage{hyperref}<br />
Some common (and very useful) L A TEX 2ε packages are<br />
a priori important enough that <strong>REVTEX</strong> 4 has been designed<br />
to be specifically compatible with them. A bug<br />
stemming from the use of one of these packages in conjunction<br />
with any of the APS journals may be reported<br />
by contacting <strong>REVTEX</strong> support.<br />
AMS packages <strong>REVTEX</strong> 4 is compatible with and depends<br />
upon the AMS packages amsfonts, amssymb,<br />
and amsmath. In fact, <strong>REVTEX</strong> 4 requires use of these<br />
packages to accomplish some common tasks. See Sec-
4<br />
tion 6 for more. <strong>REVTEX</strong> 4 requires version 2.0 or<br />
higher of the AMS-L A TEX package.<br />
array and dcolumn The array and dcolumn packages<br />
are part of L A TEX’s required suite of packages. dcolumn<br />
is required to align table columns on decimal points<br />
(and it in turn depends upon the array package).<br />
longtable longtable.sty may be used for large tables<br />
that will span more than one <strong>page</strong>. <strong>REVTEX</strong> 4 dynamically<br />
applies patches to longtable.sty so that it<br />
will work in two-column mode.<br />
hyperref hyperref.sty is a package by Sebastian<br />
Rahtz that is used for putting hypertext links into<br />
L A TEX 2ε documents. <strong>REVTEX</strong> 4 has hooks to allow<br />
e-mail addresses and URL’s to become hyperlinks if<br />
hyperref is loaded.<br />
Other packages will conflict with <strong>REVTEX</strong> 4 and<br />
should be avoided. Usually such a conflict arises because<br />
the package adds enhancements that <strong>REVTEX</strong> 4 already<br />
includes. Here are some common packages that clash<br />
with <strong>REVTEX</strong> 4:<br />
multicol multicol.sty is a package by Frank Mittelbach<br />
that adds support for multiple columns. In<br />
fact, early versions of <strong>REVTEX</strong> 4 used multicol.sty<br />
for precisely this. However, to improve the handling<br />
of floats, <strong>REVTEX</strong> 4 now has its own macros for<br />
two-column layout. Thus, it is not necessary to use<br />
multicol.sty.<br />
cite Donald Arseneau’s cite.sty is often used to provide<br />
support for sorting a \cite command’s arguments<br />
into numerical order and to collapse consecutive runs<br />
of reference numbers. <strong>REVTEX</strong> 4 has this functionality<br />
built-in already via the natbib package.<br />
endfloat The same functionality can be accomplished<br />
using the endfloats class option.<br />
float <strong>REVTEX</strong> 4 already contains a lot of this functionality.<br />
3. THE DOCUMENT PREAMBLE<br />
The preamble of a L A TEX document is the set of commands<br />
that precede the \begin{document} line. It contains<br />
a \documentclass line to load the <strong>REVTEX</strong> 4<br />
class (i. e., all of the <strong>REVTEX</strong> 4 macro definitions),<br />
\usepackage macros to load other macro packages, and<br />
other macro definitions.<br />
3.1. The documentclass line<br />
The basic formatting of the manuscript<br />
is controlled by setting class options using<br />
\documentclass[〈options〉]{revtex4}. The macro<br />
\documentclass replaces the \documentstyle macro<br />
of L A TEX2.09. The optional arguments that appear in<br />
the square brackets control the layout of the document.<br />
At this point, one only needs to choose a journal style<br />
(pra, prb, prc, prd, pre, prl, prstab, and rmp) and<br />
either preprint or twocolumn. Usually, one would want<br />
to use preprint for draft papers. twocolumn gives the<br />
Physical Review look and feel. Paper size options are<br />
also available as well. In particular, a4paper is available<br />
as well as the rest of the standard L A TEX paper sizes.<br />
A full list of class options is given in the <strong>REVTEX</strong> 4<br />
Command and Options Summary.<br />
3.2. Loading other packages<br />
Other packages may be loaded into a <strong>REVTEX</strong> 4 document<br />
by using the standard L A TEX 2ε \usepackage command.<br />
For instance, to load the graphics package, one<br />
would use \usepackage{graphics}.<br />
4. THE FRONT MATTER<br />
After choosing the basic look and feel of the document<br />
by selecting the appropriate class options and loading<br />
in whatever other macros are needed, one is ready to<br />
move on to creating a new manuscript. After the preamble,<br />
be sure to put in a \begin{document} line (and put<br />
in an \end{document} as well). This section describes<br />
the macros <strong>REVTEX</strong> 4 provides for formatting the front<br />
matter of the article. The behavior and usage of these<br />
macros can be quite different from those provided in either<br />
<strong>REVTEX</strong> 3 or L A TEX 2ε. See the included document<br />
Differences between <strong>REVTEX</strong> 4 and <strong>REVTEX</strong> 3 for an<br />
overview of these differences.<br />
4.1. Setting the title<br />
The title of the manuscript is simply specified by using<br />
the \title{title} macro. A \\ may be used to put a line<br />
break in a long title.<br />
4.2. Specifying a date<br />
The \date{〈date〉} command outputs the date on the<br />
manuscript. Using \today will cause L A TEX to insert the<br />
current date whenever the file is run:<br />
\date{\today}
5<br />
4.3. Specifying authors and affiliations<br />
The macros for specifying authors and their affiliations<br />
have changed significantly for <strong>REVTEX</strong> 4. They have<br />
been improved to save labor for authors and in production.<br />
Authors and affiliations are arranged into groupings<br />
called, appropriately enough, author groups. Each author<br />
group is a set of authors who share the same set of affiliations.<br />
Author names are specified with the \author<br />
macro while affiliations (or addresses) are specified with<br />
the \affiliation macro. Author groups are specified by<br />
sequences of \author macros followed by \affiliation<br />
macros. An \affiliation macro applies to all previously<br />
specified \author macros which don’t already have<br />
an affiliation supplied.<br />
For example, if Bugs Bunny and Roger Rabbit are both<br />
at Looney Tune Studios, while Mickey Mouse is at Disney<br />
World, the markup would be:<br />
\author{Bugs Bunny}<br />
\author{Roger Rabbit}<br />
\affiliation{Looney Tune Studios}<br />
\author{Mickey Mouse}<br />
\affiliation{Disney World}<br />
The default is to display this as<br />
Bugs Bunny and Roger Rabbit<br />
Looney Tune Studios<br />
Mickey Mouse<br />
Disney World<br />
This layout style for displaying authors and their<br />
affiliations is chosen by selecting the class option<br />
groupedaddress. This option is the default for all APS<br />
journal styles, so it does not need to be specified explicitly.<br />
The other major way of displaying this information<br />
is to use superscripts on the authors and affiliations.<br />
This can be accomplished by selecting the class option<br />
superscriptaddress. To achieve the display<br />
Bugs Bunny, 1 Roger Rabbit, 1,2 and Mickey Mouse 2<br />
1 Looney Tune Studios<br />
2 Disney World<br />
one would use the markup<br />
\author{Bugs Bunny}<br />
\affiliation{Looney Tune Studios}<br />
\author{Roger Rabbit}<br />
\affiliation{Looney Tune Studios}<br />
\affiliation{Disney World}<br />
\author{Mickey Mouse}<br />
\affiliation{Disney World}<br />
Note that <strong>REVTEX</strong> 4 takes care of any commas and<br />
and’s that join the author names together and font selection,<br />
as well as any superscript numbering. Only the<br />
author names and affiliations should be given within their<br />
respective macros.<br />
There is a third class option, unsortedaddress,<br />
for controlling author/affiliation display. The default<br />
groupedaddress will actually sort authors into the approriate<br />
author groups if one chooses to specify an affiliation<br />
for each author. The markup:<br />
\author{Bugs Bunny}<br />
\affiliation{Looney Tune Studios}<br />
\author{Mickey Mouse}<br />
\affiliation{Disney World}<br />
\author{Roger Rabbit}<br />
\affiliation{Looney Tune Studios}<br />
will result in the same display as for the first case<br />
given above even though Roger Rabbit is specified after<br />
Mickey Mouse. To avoid Roger Rabbit being moved<br />
into the same author group as Bugs Bunny, use the<br />
unsortedaddress option instead. In general, it is safest<br />
to list authors in the order they should appear and specify<br />
affiliations for multiple authors rather than one at a<br />
time. This will afford the most independence for choosing<br />
the display option. Finally, it should be mentioned<br />
that the affiliations for the superscriptaddress are presented<br />
and numbered in the order that they are encountered.<br />
These means that the order will usually follow<br />
the order of the authors. An alternative ordering can<br />
be forced by including a list of \affiliation commands<br />
before the first \author in the desired order. Then use<br />
the exact same text for each affilation when specifying<br />
them for each author.<br />
If an author doesn’t have an affiliation, the<br />
\noaffiliation macro may be used in the place of an<br />
\affiliation macro.<br />
Collaborations<br />
A collaboration name can be specified with the<br />
\collaboration macro. This is very similar to the<br />
\author macro, but it can only be used with the class option<br />
superscriptaddress. The \collaboration macro<br />
should appear at the end of the list of authors. The<br />
collaboration name will be appear centered in parentheses<br />
between the list of authors and the list of affiliations.<br />
Because collaborations don’t normally have affiliations,<br />
one needs to follow the \collaboration with<br />
\noaffiliation.<br />
Footnotes for authors, collaborations, affiliations or title<br />
Often one wants to specify additional information associated<br />
with an author, collaboration, or affiliation such an<br />
e-mail address, an alternate affiliation, or some other anicillary<br />
information. <strong>REVTEX</strong> 4 introduces several new<br />
macros just for this purpose. They are:<br />
• \email[〈optional text〉]{e-mail address}
6<br />
• \home<strong>page</strong>[〈optional text〉]{URL}<br />
• \altaffiliation[〈optional text〉]{affiliation}<br />
• \thanks{miscellaneous text}<br />
In the first three, the optional text will be prepended<br />
before the actual information specified in the required<br />
argument. \email and \home<strong>page</strong> each have a default<br />
text for their optional arguments (‘Electronic address:’<br />
and ‘URL:’ respectively). The \thanks macro should<br />
only be used if one of the other three do not apply. Any<br />
author name can have multiple occurences of these four<br />
macros. Note that unlike the \affiliation macro, these<br />
macros only apply to the \author that directly precedes<br />
it. Any \affiliation must follow the other authorspecific<br />
macros. A typical usage might be as follows:<br />
\author{Bugs Bunny}<br />
\email[E-mail me at: ]{bugs@looney.com}<br />
\home<strong>page</strong>[Visit: ]{http://looney.com/}<br />
\altaffiliation[Permanent address: ]<br />
{Warner Brothers}<br />
\affiliation{Looney Tunes}<br />
This would result in the footnote “E-mail me at:<br />
bugs@looney.com, Visit: http://looney.com/, Permanent<br />
address: Warner Brothers” being attached to Bugs<br />
Bunny. Note that:<br />
• Only an e-mail address, URL, or affiliation should go<br />
in the required argument in the curly braces.<br />
• The font is automatically taken care of.<br />
• An explicit space is needed at the end of the optional<br />
text if one is desired in the output.<br />
• Use the optional arguments to provide customized text<br />
only if there is a good reason to.<br />
The \collaboration , \affiliation , or even \title<br />
can also have footnotes attached via these commands.<br />
If any ancillary data (\thanks, \email, \home<strong>page</strong>,<br />
or \altaffiliation) are given in the wrong context<br />
(e.g., before any \title, \author, \collaboration, or<br />
\affiliation command has been given), then a warning<br />
is given in the TEX log, and the command is ignored.<br />
Duplicate sets of ancillary data are merged, giving rise<br />
to a single shared footnote. However, this only applies<br />
if the ancillary data are identical: even the order of the<br />
commands specifying the data must be identical. Thus,<br />
for example, two authors can share a single footnote indicating<br />
a group e-mail address.<br />
Duplicate \affiliation commands may be given in<br />
the course of the front matter, without the danger of producing<br />
extraneous affiliations on the title <strong>page</strong>. However,<br />
ancillary data should be specified for only the first instance<br />
of any particular institution’s \affiliation command;<br />
a later instance with different ancillary data will<br />
result in a warning in the TEX log.<br />
It is preferable to arrange authors into sets. Within<br />
each set all the authors share the same group of affiliations.<br />
For each author, give the \author (and appropriate<br />
ancillary data), then follow this author group with<br />
the needed group of \affiliation commands.<br />
If affiliations have been listed before the first \author<br />
macro to ensure a particular ordering, be sure that any<br />
later \affiliation command for the given institution<br />
is an exact copy of the first, and also ensure that no<br />
ancillary data is given in these later instances.<br />
Each APS journal has a default behavior for the placement<br />
of these ancillary information footnotes. The prb<br />
option puts all such footnotes at the start of the bibliography<br />
while the other journal styles display them on the<br />
first <strong>page</strong>. One can override a journal style’s default behavior<br />
by specifying explicitly the class option bibnotes<br />
(puts the footnotes at the start of the bibliography) or<br />
nobibnotes (puts them on the first <strong>page</strong>).<br />
Specifying first names and surnames<br />
Many APS authors have names in which either the<br />
surname appears first or in which the surname is made<br />
up of more than one name. To ensure that such names<br />
are accurately captured for indexing and other purposes,<br />
the \surname macro should be used to indicate which<br />
portion of a name is the surname. Similarly, there is a<br />
\firstname macro as well, although usage of \surname<br />
should be sufficient. If an author’s surname is a single<br />
name and written last, it is not necessary to use these<br />
macros. These macros do nothing but indicate how a<br />
name should be indexed. Here are some examples;<br />
\author{Andrew \surname{Lloyd Weber}}<br />
\author{\surname{Mao} Tse-Tung}<br />
4.4. The abstract<br />
An abstract for a paper is specified by using the<br />
abstract environment:<br />
\begin{abstract}<br />
Text of abstract<br />
\end{abstract}<br />
Note that in <strong>REVTEX</strong> 4 the abstract must be specified<br />
before the \maketitle command and there is no need to<br />
embed it in an explicit mini<strong>page</strong> environment.<br />
4.5. PACS codes<br />
APS authors are asked to supply suggested PACS<br />
codes with their submissions. The \pacs macro is provided<br />
as a way to do this:
7<br />
\pacs{23.23.+x, 56.65.Dy}<br />
The actual display of the PACS numbers below the abstract<br />
is controlled by two class options: showpacs and<br />
noshowpacs. In particular, this is now independent of the<br />
preprint option. showpacs must be explicitly included<br />
in the class options to display the PACS codes.<br />
4.6. Keywords<br />
A \keywords macro may also be used to indicate keywords<br />
for the article.<br />
\keywords{nuclear form; yrast level}<br />
This will be displayed below the abstract and PACS (if<br />
supplied). Like PACS codes, the actual display of the the<br />
keywords is controlled by two classoptions: showkeys and<br />
noshowkeys. An explicit showkeys must be included in<br />
the \documentclass line to display the keywords.<br />
4.7. Institutional report numbers<br />
Institutional report numbers can be specified using the<br />
\preprint macro. These will be displayed in the upper<br />
lefthand corner of the first <strong>page</strong>. Multiple \preprint<br />
macros maybe supplied (space is limited though, so only<br />
three or less may actually fit).<br />
5.1. Section headings<br />
Section headings are input as in L A TEX. The output is<br />
similar, with a few extra features.<br />
Four levels of headings are available in <strong>REVTEX</strong>:<br />
\section{〈title text〉}<br />
\subsection{〈title text〉}<br />
\subsubsection{〈title text〉}<br />
\paragraph{〈title text〉}<br />
Use the starred form of the command to suppress the<br />
automatic numbering; e.g.,<br />
\section*{Introduction}<br />
To label a section heading for cross referencing, best<br />
practice is to place the \label{〈key〉} within the argument<br />
specifying the heading:<br />
\section{\label{sec:intro}Introduction}<br />
In the some journal substyles, such as those of the<br />
APS, all text in the \section command is automatically<br />
set uppercase. If a lowercase letter is needed, use<br />
\lowercase{x}. For example, to use “He” for helium in a<br />
\section{〈title text〉} command, type H\lowercase{e}<br />
in {〈title text〉}.<br />
Use \protect\\ to force a line break in a section heading.<br />
(Fragile commands must be protected in section<br />
headings, captions, and footnotes and \\ is a fragile command.)<br />
4.8. maketitle<br />
After specifying the title, authors, affiliations, abstract,<br />
PACS codes, and report numbers, the final step<br />
for formatting the front matter of the manuscript is to<br />
execute the \maketitle macro by simply including it:<br />
\maketitle<br />
The \maketitle macro must follow all of the macros<br />
listed above. The macro will format the front matter<br />
in accordance with the various class options that were<br />
specified in the \documentclass line (either implicitly<br />
through defaults or explicitly).<br />
5.2. Paragraphs and General Text<br />
Paragraphs always end with a blank input line. Because<br />
TEX automatically calculates linebreaks and word<br />
hyphenation in a paragraph, it is not necessary to<br />
force linebreaks or hyphenation. Of course, compound<br />
words should still be explicitly hyphenated, e.g., “authorprepared<br />
copy.”<br />
Use directional quotes for quotation marks around<br />
quoted text (‘‘xxx’’), not straight double quotes<br />
("xxx"). For opening quotes, use one or two backquotes;<br />
for closing quotes, use one or two forward quotes (apostrophes).<br />
5. THE BODY OF THE PAPER<br />
For typesetting the body of a paper, <strong>REVTEX</strong> 4 relies<br />
heavily on standard L A TEX 2ε and other packages (particulary<br />
those that are part of AMS-L A TEX). Users unfamiliar<br />
with these packages should read the following sections<br />
carefully.<br />
5.3. One-column vs. two-column<br />
One of the hallmarks of Physical Review is its twocolumn<br />
formatting and so one of the <strong>REVTEX</strong> 4 design<br />
goals is to make it easier to acheive the Physical Review<br />
look and feel. In particular, the twocolumn option will<br />
take care of formatting the front matter (including the<br />
abstract) as a single column. <strong>REVTEX</strong> 4 has its own
8<br />
built-in two-column formatting macros to provide wellbalanced<br />
columns as well as reasonable control over the<br />
placement of floats in either one- or two-column modes.<br />
Occasionally it is necessary to change the formatting<br />
from two-column to one-column to better accomodate<br />
very long equations that are more easily read when typeset<br />
to the full width of the <strong>page</strong>. This is accomplished<br />
using the widetext environment:<br />
\begin{widetext}<br />
long equation goes here<br />
\end{widetext}<br />
In two-column mode, this will temporarily return to onecolumn<br />
mode, balancing the text before the environment<br />
into two short columns, and returning to two-column<br />
mode after the environment has finished. <strong>REVTEX</strong> 4<br />
will also add horizontal rules to guide the reader’s eye<br />
through what may otherwise be a confusing break in the<br />
flow of text. The widetext environment has no effect on<br />
the output under the preprint class option because this<br />
already uses one-column formatting.<br />
Use of the widetext environment should be restricted<br />
to the bare minimum of text that needs to be typeset<br />
this way. However short pieces of paragraph text and/or<br />
math between nearly contiguous wide equations should<br />
be incorporated into the surrounding wide sections.<br />
Low-level control over the column grid can be accomplished<br />
with the \onecolumngrid and \twocolumngrid<br />
commands. Using these, one can avoid the horizontal<br />
rules added by widetext. These commands should only<br />
be used if absolutely necessary. Wide figures and tables<br />
should be accomodated using the proper * environments.<br />
5.4. Cross-referencing<br />
<strong>REVTEX</strong> inherits the L A TEX 2ε features for labeling<br />
and cross-referencing section headings, equations, tables,<br />
and figures. This section contains a simplified explanation<br />
of these cross-referencing features. The proper usage<br />
in the context of section headings, equations, tables, and<br />
figures is discussed in the appropriate sections.<br />
Cross-referencing depends upon the use of “tags,”<br />
which are defined by the user. The \label{〈key〉} command<br />
is used to identify tags for <strong>REVTEX</strong>. Tags are<br />
strings of characters that serve to label section headings,<br />
equations, tables, and figures that replace explicit, byhand<br />
numbering.<br />
Files that use cross-referencing (and almost all<br />
manuscripts do) need to be processed through <strong>REVTEX</strong><br />
at least twice to ensure that the tags have been properly<br />
linked to appropriate numbers. If any tags are<br />
added in subsequent editing sessions, L A TEX will display<br />
a warning message in the log file that ends with ...<br />
Rerun to get cross-references right. Running the<br />
file through <strong>REVTEX</strong> again (possibly more than once)<br />
will resolve the cross-references. If the error message persists,<br />
check the labels; the same {〈key〉} may have been<br />
used to label more than one object.<br />
Another L A TEX warning is There were undefined<br />
references, which indicates the use of a key in a \ref<br />
without ever using it in a \label statement.<br />
<strong>REVTEX</strong> performs autonumbering exactly as in standard<br />
L A TEX. When the file is processed for the first time,<br />
L A TEX creates an auxiliary file (with the .aux extension)<br />
that records the value of each 〈key〉. Each subsequent run<br />
retrieves the proper number from the auxiliary file and<br />
updates the auxiliary file. At the end of each run, any<br />
change in the value of a 〈key〉 produces a L A TEX warning<br />
message.<br />
Note that with footnotes appearing in the bibliography,<br />
extra passes of L A TEX may be needed to resolve all<br />
cross-references. For instance, putting a \cite inside a<br />
\footnote will require at least three passes.<br />
Using the hyperref package to create hyperlinked<br />
PDF files will cause reference ranges to be expanded to<br />
list every reference in the range. This behavior can be<br />
avoided by using the hypernat package available from<br />
www.ctan.org.<br />
5.5. Acknowledgments<br />
Use the acknowledgments environment for an acknowledgments<br />
section. Depending on the journal substyle,<br />
this element may be formatted as an unnumbered<br />
section title Acknowledgments or simply as a paragraph.<br />
Please note the spelling of “acknowledgments”.<br />
\begin{acknowlegments}<br />
The authors would like to thank...<br />
\end{acknowlegments}<br />
5.6. Appendices<br />
The \appendix command signals that all following<br />
sections are appendices, so \section{〈title text〉} after<br />
\appendix will set {〈title text〉} as an appendix<br />
heading (an empty {〈title text〉} is permitted). For<br />
a single appendix, use a \appendix* followed by<br />
\section{〈title text〉} command to suppress the appendix<br />
letter in the section heading.<br />
6. MATH AND EQUATIONS<br />
6.1. Math in text<br />
Not surprisingly, <strong>REVTEX</strong> uses the TEX math $ delimiters<br />
for math embedded in text. For example, $a^{z}$
9<br />
give a z . Within math mode, use ^{〈math〉} for superscripts<br />
and _{〈math〉} for subscripts. If the braces after<br />
the ^ are omitted, TEX will superscript the next token<br />
(generally a single character or command). Thus it is<br />
safest to use explicit braces {}.<br />
As with text, math should not require extensive explicit<br />
vertical or horzontal motion commands, because<br />
TEX calculates math spacing itself automatically. In<br />
particular, explicit spacing around relations (e.g., =)<br />
or operators (e.g., +) should be unnecessary. These<br />
suggestions notwithstanding, some fine-tuning of math<br />
is required in specific cases, see Chapter 18 in the<br />
TEXbook[1].<br />
6.2. Text in math<br />
There are times when normal, non-italic text needs to<br />
be inserted into a math expression. The \text{〈text〉}<br />
command is the preferred method of accomplishing<br />
this. It produces regular text and scales correctly<br />
in superscripts: $y=x \text{ for } x_{\text{e-p}}$<br />
gives “y = x for x e-p ”. To use the \text command,<br />
the amsmath package must be loaded: include<br />
a \usepackage{amsmath} command in the document<br />
preamble or use the class option amsmath. Please note<br />
that <strong>REVTEX</strong> 4 requires version 2.0 or higher of amsmath.<br />
Other common alternatives may be less desirable. Using<br />
the standard L A TEX 2ε \mbox{〈text〉} will give normal<br />
text, including a hyphen, but will not scale correctly<br />
in superscripts: $x_{\mbox{e-p}}$ gives “xe-p”. The<br />
\rm command only switches to Roman font for math letters.<br />
It does not, for example, handle hyphens correctly:<br />
$$x_{\rm{e-p}}$ gives “x e−p ”. But note that \textrm,<br />
it does work: $x_{\textrm{e-p}}$ gives “x e-p ”.<br />
6.3. Displayed equations<br />
Equations are set centered in the column width or flush<br />
left depending on the selected journal substyle.<br />
For the simplest type of displayed equation, a numbered,<br />
one-line equation, use the equation environment.<br />
<strong>REVTEX</strong> takes care of the equation number—the number<br />
will be set below the equation if necessary. Use \[. . . \]<br />
for a single, one-line unnumbered display equation.<br />
Use the eqnarray environment when more than one<br />
consecutive equation occurs, putting each equation in a<br />
separate row of the environment, and using \nonumber<br />
before the row end (\\) to suppress the equation number<br />
where necessary. If the equations are related to each<br />
other, align each on the respective relation operator (such<br />
as =).<br />
When an equation is broken over lines or is continued<br />
over multiple relation operators, it is called a multi-line<br />
or continued equation, respectively; here, too, use the<br />
eqnarray environment.<br />
For a continued equation, align each row on the relation<br />
operator just as with multiple equations, and use<br />
the \nonumber command to suppress auto-numbering on<br />
broken lines. Also, use the starred form of the row end<br />
(\\*) to prevent a <strong>page</strong>break at that juncture.<br />
Short displayed equations that can appear together on<br />
a single line separated by \qquad space may be placed in<br />
a single equation environment.<br />
As explained in Section 5.3, occasionally in two-column<br />
mode a long equation, in order to fit it in the narrow<br />
column width, would need to be broken into so many<br />
lines that it would affect readibility. Set it in a wide<br />
column using the widetext environment. Then return<br />
to the normal text width as soon as possible.<br />
The sample file apssamp.tex illustrates how to obtain<br />
each of the above effects.<br />
6.4. Numbering displayed equations<br />
<strong>REVTEX</strong> 4 automatically numbers equations. For<br />
single-line and multi-line equations, use the equation<br />
and eqnarray environments as described above. For<br />
unnumbered single-line equations, use the \[. . . \] construction.<br />
The command \nonumber will suppress the<br />
numbering on a single line of an eqnarray. For a multiline<br />
equation with no equation numbers at all, use the<br />
eqnarray* environment.<br />
A series of equations can be a labeled with a lettered<br />
sequence, e.g., (3a), (3b), and (3c), by putting the respective<br />
equation or eqnarray environment within a<br />
subequations environment. The amsmath package (can<br />
be loaded with the amsmath class option) is required for<br />
this.<br />
Use the command \tag{〈number〉} to produce an idiosyncratic<br />
equation number: (1 ′ ), for example. Numbers<br />
assigned by \tag are completely independent of<br />
<strong>REVTEX</strong>’s automatic numbering. The package amsmath<br />
is required for using the \tag command.<br />
To have <strong>REVTEX</strong> reset the equation numbers at the<br />
start of each section, use the eqsecnum class option in<br />
the document preamble.<br />
See the sample file apssamp.tex for some examples.<br />
6.5. Cross-referencing displayed equations<br />
To refer to a numbered equation, use the<br />
\label{〈key〉} and \ref{〈key〉} commands. The<br />
\label{〈key〉} command is used within the referenced<br />
equation (on the desired line of the eqnarray, if a<br />
multi-line equation):<br />
\begin{equation}
10<br />
A=B \label{pauli}<br />
\end{equation}<br />
... It follows from Eq.~(\ref{pauli})<br />
that this is the case ...<br />
\begin{eqnarray}<br />
A & = &B,\label{pauli2}\\<br />
A’& = &B’<br />
\end{eqnarray}<br />
gives<br />
A = B (1)<br />
... It follows from Eq. (1) that this is the case ...<br />
A = B, (2)<br />
A ′ = B ′ (3)<br />
Please note the parentheses surrounding the \ref command.<br />
These are not provided automatically and, thus,<br />
must be explicitly incorporated.<br />
Numbers produced with \tag can also be crossreferenced<br />
by adding a \label command after the \tag<br />
command.<br />
Using a \label after \begin{subequations} to reference<br />
the general number of the equations in the<br />
subequations environment. For example, if<br />
\begin{subequations}<br />
\label{allequations} % notice location<br />
\begin{eqnarray}<br />
E&=&mc^2,\label{equationa}<br />
\\<br />
E&=&mc^2,\label{equationb}<br />
\\<br />
E&=&mc^2,\label{equationc}<br />
\end{eqnarray}<br />
\end{subequations}<br />
gives the output<br />
E = mc 2 ,<br />
E = mc 2 ,<br />
E = mc 2 ,<br />
(4a)<br />
(4b)<br />
(4c)<br />
then Eq.~(\ref{allequations}) gives “Eq. (4)”.<br />
Note: incorrect cross-referencing will result if \label<br />
is used in an unnumbered single-line equation (i.e., within<br />
the \[ and \] commands), or if \label is used on a line<br />
of an eqnarray that is not being numbered (i.e., a line<br />
that has a \nonumber).<br />
6.6. Using the AMS packages amsfonts, amssymb,<br />
and amsmath<br />
The American Mathematical Society’s AMS-L A TEX<br />
packages provided extra fonts, symbols, and math<br />
markup that are quite convenient. <strong>REVTEX</strong> 4 supports<br />
the use of these packages directly. To use the amsfonts,<br />
amssymb, and amsmath class options, AMS-L A TEX (and<br />
perhaps the additional AMS fonts) will need to be installed.<br />
Please note the <strong>REVTEX</strong> 4 requires version 2.0<br />
or higher of AMS-L A TEX. These packages can be downloaded<br />
from http://www.ams.org/tex/.<br />
There are two class options for accessing the AMS<br />
fonts: amsfonts and amssymb. The amsfonts option defines<br />
the \mathfrak and \mathbb commands to switch<br />
to the Fraktur and Blackboard Bold fonts, respectively.<br />
These fonts are selected with the \mathfrak and \mathbb<br />
font-switching commands: ${\mathfrak{G}}$ gives a<br />
Fraktur “G” and ${\mathbb{Z}}$ gives a Blackboard<br />
Bold “Z”. <strong>REVTEX</strong> does not currently support the use<br />
of the extra Euler fonts (the AMS fonts starting with eur<br />
or eus) or the Cyrillic fonts (the AMS fonts starting with<br />
w).<br />
The amssymb class option gives all the font capabilities<br />
of the amsfonts class option and further defines<br />
the commands for many commonly used math symbols.<br />
These symbols will scale correctly in superscripts and<br />
other places. See the AMS-L A TEX documentation for the<br />
complete list of symbols available.<br />
6.7. Bold symbols in math<br />
<strong>REVTEX</strong> 4 uses the standard L A TEX 2ε Bold Math<br />
(bm) package as the basis for creating bold symbols<br />
in math mode. As usual, this requires an explicit<br />
\usepackage{bm} in the document preamble. The command<br />
\bm{〈symbol〉} makes {〈symbol〉} bold in math<br />
mode, ensuring that it is the correct size, even in superscripts.<br />
If the correct font in the correct size is not available<br />
then result is the {〈symbol〉} set at the correct size in<br />
lightface and a L A TEX 2ε warning that says “No boldmath<br />
typeface in this size. . . ”. Most bold special characters<br />
will require that the AMS fonts be installed and the<br />
amsfonts class option be invoked.<br />
\bm is the proper means to get bold Greek characters—<br />
upper- and lowercase—and other symbols. The following<br />
will come out bold with \bm: normal math italic letters,<br />
numbers, Greek letters (uppercase and lowercase),<br />
small bracketing and operators, and \mathcal. Fraktur<br />
characters will come out bold in a \bm; however,<br />
Blackboard Bold requires using the \mathbbcommand<br />
rather than \bm. The amsfonts option adds support for<br />
bold math letters and symbols in smaller sizes and in<br />
superscripts when a \bm{〈symbol〉} is used. For example,<br />
$\pi^{\bm{\pi}}$ gives a bold lowercase pi in the<br />
superscript position: ππ .<br />
Note that \bm{〈math〉} is a fragile command and, thus,<br />
should be preceded by \protect in commands with moving<br />
arguments.
11<br />
7. FOOTNOTES<br />
L A TEX’s standard \footnote command is available in<br />
<strong>REVTEX</strong> 4. The footnote text can either appear at<br />
the bottom of a <strong>page</strong> or as part of the bibliography<br />
(in order, after the rest of the references). This choice<br />
can be controlled by two class options: footinbib and<br />
nofootinbib. <strong>REVTEX</strong> 4 defaults to the former. Specific<br />
journal options may select a different value than the<br />
default. Note that in the latter case, the argument of<br />
the \footnote command is a moving argument in the<br />
sense of the L A TEX User’s <strong>Guide</strong> & Reference Manual,<br />
Appendix C.1.3: any fragile command within that argument<br />
must be preceded by a \protect command.<br />
The \footnote macro should not be used in the front<br />
matter for indicating author/affiliation relationships or<br />
to provide additional information about authors (such as<br />
an e-mail address). See Section 4.3 for the proper way to<br />
do this.<br />
Finally, footnotes that appear in tables behave differently.<br />
They will be typeset as part of the table itself. See<br />
Section 10.2 for details.<br />
8. CITATIONS AND REFERENCES<br />
In keeping with the <strong>REVTEX</strong> 4 design goal of making it<br />
easier to extract tagged information from a manuscript,<br />
new macros and BibTEX style files have been added to<br />
provide better markup. Furthermore, these have been<br />
built upon some widely-used L A TEX packages in line with<br />
the design goal of making use of the existing packages<br />
where possible. The two main external packages that<br />
are of concern here are Patrick Daly’s natbib citation<br />
package and his custom-bib tool kit for building new<br />
BibTEX style files.<br />
From an author’s point of view, all this means is that<br />
a proper <strong>REVTEX</strong> 4 installation requires having natbib<br />
(version 7 or higher) installed. It also means that the<br />
full set of natbib functionality is available from within<br />
<strong>REVTEX</strong> 4 (but see the APS Compuscript <strong>Guide</strong> for<br />
<strong>REVTEX</strong> 4 for restrictions). The natbib documentation<br />
contains many exmaples; see in particular the included<br />
natnotes.tex file for a convenient summary.<br />
As in standard L A TEX, references are cited in text using<br />
the \cite{〈key〉} command and are listed in the bibliography<br />
using the \bibitem{〈key〉} command. The \cite<br />
macro enables <strong>REVTEX</strong> 4 to automatically number the<br />
references in the manuscript.<br />
A typical example might be:<br />
String theory\cite{GSW} attempts to<br />
provide a theory of everything.<br />
The corresponding \bibitem would be:<br />
\bibitem{GSW} M.~Greene, J.~Schwarz, and<br />
E.~Witten, \textit{Superstring Theory:<br />
Introduction}, (Cambridge University<br />
Press, London, 1985).<br />
Journals differ in how the \cite will be displayed.<br />
Most APS journals display the citation in-line, as a number,<br />
enclosed in square brackets, e. g., “String theory[1]<br />
attempts. . . .” Other journals (most notably Physical Review<br />
B) instead use a number in a superscript: “String<br />
theory 1 attempts. . . .” Selecting the journal substyle using<br />
a class option (such as prb) will invoke the appropriate<br />
style. In journal substyles using superscripts, the<br />
macro the \onlinecite{〈key〉} is necessary to get the<br />
number to appear on the baseline. For example, “String<br />
theory (see, for example, Ref.~\onlinecite{GSW})” will<br />
give the output “String theory (see, for example, Ref. 1).”<br />
The \onlinecite command has the same semantics<br />
as natbib’s \citealp command.<br />
A \cite command with multiple keys is formatted<br />
with consecutive reference numbers collapsed; e.g.,<br />
[1,2,3,5] will be output as [1–3,5]. To split the list over<br />
more than one line, use a % character immediately following<br />
a comma:<br />
. . . \cite{a,b,c,d,e,f,%<br />
g,h,i,j,k,l,m,n,o,p,q,r,s,t,u,v,w,x,y,z}<br />
The % avoids unwanted spaces.<br />
8.1. Author/Year (Non-numeric) Citations<br />
Reviews of Modern Physics uses a citation style based<br />
on the first author’s last name and the year of the reference<br />
rather than a simple number. Support for this style<br />
of citing references is the primary reason <strong>REVTEX</strong> 4 uses<br />
the natbib package. natbib uses an optional argument<br />
to the \bibitem macro to specify what text to use for<br />
the \cite text:<br />
\bibitem[〈short-name〉(〈year〉)〈long-name〉]<br />
where 〈short-name〉 is the author name used in a parenthetical<br />
citation, 〈long-name〉 that used in a textual<br />
citation, and 〈year〉 is the year. More concretely, the<br />
\bibitem example above would appear as<br />
\bibitem[Greene et al.(1985)Green,<br />
Schwarz, and Witten]{GSW}<br />
M.~Greene, J.~Schwarz, and E.~Witten,<br />
\textit{Superstring Theory},<br />
(Cambridge Press, London, 1985).<br />
When the citation constitutes part of the grammar<br />
of the sentence, the \textcite{〈key〉} command<br />
may be used (analogous to the \onlinecite command<br />
above). Both \textcite and \onlinecite are<br />
built upon natbib’s rich repertoire of macros (\citep,<br />
\citet, etc.). These macros are available in <strong>REVTEX</strong> 4;
12<br />
however, APS authors must follow the APS Compuscript<br />
<strong>Guide</strong> for <strong>REVTEX</strong> 4 guidelines regarding natbib’s<br />
macros.<br />
8.2. Using BibTEX<br />
The \bibitem entries can be coded by hand as above,<br />
of course, but the use of BibTEX with the new style files<br />
provided with <strong>REVTEX</strong> 4 makes it particularly simple<br />
to generate marked-up references that can, for instance,<br />
take advantage of packages like hyperref for linking.<br />
They also save the trouble of having to specify formatting<br />
like the italics for the book title in the above example.<br />
And, for those wishing to use author/year citations,<br />
BibTEX will automatically generate the appropriate optional<br />
arguments for the \bibitem commands.<br />
BibTEX is an adjunct to L A TEX that aids in the preparation<br />
of bibliographies. BibTEX allows authors to build<br />
up a database or collection of bibliography entries that<br />
may be used for many manuscripts. A BibTEX style file<br />
then specifies how to transform the entries into a proper<br />
\bibitem for a particular journal. Here we give a brief<br />
summary of how to get started with BibTEX. More details<br />
can be found in the <strong>REVTEX</strong> 4 BibTEX <strong>Guide</strong> included<br />
in the distribution or in the LaTeX books listed<br />
in the references.<br />
Selecting a journal style by using an appropriate class<br />
option will automatically select the correct BibTEX style<br />
file. For all of the Physical Review journals, this is<br />
apsrev.bst, while for Reviews of Modern Physics this<br />
is apsrmp.bst. The selection can be overridden by<br />
specifying an alternative .bst file using the standard<br />
L A TEX 2ε\bibliographystyle macro. This must appear<br />
in the preamble before the \begin{document} line in<br />
<strong>REVTEX</strong> 4 (this differs from standard L A TEX).<br />
The BibTEX database files will contain entries such as:<br />
@Book{GSW,<br />
author=‘‘M. Greene, J. Schwarz,<br />
E. Witten’’,<br />
title=‘‘Superstring theory:<br />
Introduction’’,<br />
publisher=‘‘Cambridge University<br />
Press’’,<br />
address=‘‘London’’,<br />
year=‘‘1985’’<br />
}<br />
There are entry formats for articles, technical reports, e-<br />
prints, theses, books, proceedings, and articles that appear<br />
in books or proceedings. The apsrev and apsrmp<br />
styles provided with <strong>REVTEX</strong> 4 also allows URL’s and<br />
e-print identifiers to be specified for any of the different<br />
entry types. There is also an additional “collaboration”<br />
field that can be used in addition to “author”.<br />
To actually create the bibliography in the manuscript,<br />
the \bibliography{〈bib files〉} macro is used. Here<br />
〈bib files〉 is a comma-separated list of BibTEX bibliography<br />
database files, each with the .bib extension. The<br />
\bibliography macro should be placed at the location<br />
where the references are to appear (usually after the main<br />
body of the paper). When the manuscript is processed<br />
with L A TEX for the first time, the keys corresponding for<br />
the \cite macros used in the manuscript are written out<br />
to the .aux file. Then BibTEX should be run (if the<br />
manuscript is called paper.tex, the command would be<br />
bibtex paper. This will produce a .bbl file containing<br />
all of the \bibitem’s for the manuscript. Subsequent<br />
runs of L A TEX 2ε will call this file in to resolve the references.<br />
L A TEX 2ε should be run repeatedly until all references<br />
are resolved.<br />
The BibTEX-produced \bibitem’s created using the<br />
apsrev and apsrmp appear considerably more complex<br />
than the example given above. This is because the style<br />
files add in \bibinfo, \bibnamefont, \eprint, and \url<br />
macros for specifying additional formatting and tagging.<br />
The \bibinfo macro is mostly a do-nothing macro that<br />
serves merely to tag the information with the field information<br />
from the original entry in the BibTEX database.<br />
The \eprint and \url macros can be used to create the<br />
appropriate hyperlinks in target formats such as PDF.<br />
For more information on using BibTEX with L A TEX, see<br />
Sections 4.3.1 and C.11.3 of the L A TEX User’s <strong>Guide</strong> &<br />
Reference Manual[2], Section 13.2 of [4], or the online<br />
BibTEX manual http://ctan.tug.org/tex-archive/<br />
biblio/bibtex/distribs/doc/btxdoc.tex.<br />
9. FIGURES AND ARTWORK<br />
Figures may be included into a <strong>REVTEX</strong> 4 manuscript<br />
by using the standard L A TEX 2ε macros. It should be<br />
noted that L A TEX 2ε includes several powerful packages<br />
for including the files in various formats. The two<br />
main packages are graphics and graphicx. Both offer<br />
a macro called \includegraphics[〈args〉]{〈filename〉};<br />
they mainly differ in how arguments for controlling figure<br />
scaling, translation, and orientation are specified.<br />
Old L A TEX2.09 interfaces such as epsfig have been reimplemented<br />
on top of these packages. For more information<br />
on the enhancements of the graphicx package,<br />
see [5] or ftp://ctan.tug.org/tex-archive/macros/<br />
latex/required/graphics/grfguide.ps. <strong>REVTEX</strong> 4<br />
no longer has the epsf class option, though the epsfig<br />
package provides a similar interface.<br />
The figure environment should be used to add a caption<br />
to the figure and to allow L A TEX to number and place<br />
the figures where they fit best. L A TEX will label and automatically<br />
number the captions FIG. 1, FIG. 2, etc. For<br />
example:<br />
\begin{figure}
13<br />
\includegraphics{fig1.eps}<br />
\caption{\label{fig1}Text of first caption.}<br />
\end{figure}<br />
Note how the \label{〈key〉} command is used to crossreference<br />
figures in text. The \label{〈key〉} command<br />
should be inserted inside the figure caption. As usual,<br />
the \ref{〈key〉} macro can then by used to refer to the<br />
label: “As depicted in FIG.~\ref{fig1}. . . ”.<br />
Figures are normally set to the width of the column in<br />
which they are placed. This means that in two-column<br />
mode, the figure will be placed in a single, narrow column.<br />
For wide figures, the \figure* environment should<br />
be used instead. This will place the figure across both<br />
columns (the figure usually will appear either at the top<br />
or the bottom of the following <strong>page</strong>).<br />
Captions less than one line long are centered under the<br />
figure, otherwise they span the width of the figure.<br />
Note that is unnecessary (and undesirable) to use explicit<br />
centering commands inside the float environments.<br />
\begin{tabular}<br />
...<br />
\end{tabular}<br />
\end{ruledtabular}<br />
\end{table}<br />
A basic table looks as follows:<br />
\begin{table}<br />
\caption{\label{tab:example}Text of table caption.}<br />
\begin{ruledtabular}<br />
\begin{tabular}{ll}<br />
Heading 1 & Heading 2\\<br />
Cell 1 & Cell 2\\<br />
\end{tabular}<br />
\end{ruledtabular}<br />
\end{table}<br />
The quasitable environment is no longer in<br />
<strong>REVTEX</strong> 4. The standard tabular environment can be<br />
used instead because it no longer puts in the double rules.<br />
10. TABLES<br />
Tables are very similar to figures. They should be input<br />
using the table environment as detailed below, and<br />
L A TEX will label and number the captions TABLE 1, TA-<br />
BLE 2, etc. (or in whatever format required by the chosen<br />
journal substyle). Tables without captions won’t be<br />
numbered.<br />
Each table must begin with \begin{table}, end with<br />
\end{table}. A caption can be specified using the<br />
\caption{〈text〉} command. Captions less than one line<br />
long are centered under the figure, otherwise they span<br />
the width of the figure. To refer to the table via crossreferencing,<br />
a \label{〈key〉} command should appear<br />
within the \caption. Use the \ref{〈key〉} command to<br />
cite tables in text. The table environment will set the<br />
table to the width of the column. Thus, in two-column<br />
mode, the table will confined to a single column. To set<br />
a table to the full width of the <strong>page</strong>, rather than the<br />
column, use the table* environment.<br />
The heart of the table is the tabular environment.<br />
This will behave for the most part as in standard L A TEX 2ε<br />
(please refer to Section 3.6.3 and Appendix C.10.2 of<br />
the L A TEX User’s <strong>Guide</strong> & Reference Manual for more<br />
details about the tabular environment). Note that<br />
<strong>REVTEX</strong> 4 no longer automatically adds double (Scotch)<br />
rules around tables. Nor does the tabular environment<br />
set various table parameters for column spacing as before.<br />
Instead, a new environment ruledtabular provides<br />
this functionality. This environment should surround the<br />
tabular environment:<br />
\begin{table}<br />
\caption{\label{}....}<br />
\begin{ruledtabular}<br />
10.1. Aligning on a decimal point<br />
Numerical columns should align on the decimal point<br />
(or decimal points if more than one is is present). This is<br />
accomplished by again using a standard L A TEX 2ε package,<br />
dcolumn which must be loaded in the manuscript’s<br />
preamble:<br />
\usepackage{dcolumn}<br />
Once this package is loaded, the column specifier ‘d’ can<br />
be used in the table’s tabular{〈preamble〉} enviroment<br />
preamble. The ‘d’ should be used for simple numeric<br />
data with a single decimal point. The entry of a d column<br />
is typeset in math mode; do not insert any $ math<br />
delimiters into a ‘d’ column. Items without a decimal<br />
point are simply set in math mode, centered. If text is<br />
required in the column, use \text or \mbox as appropriate.<br />
If multiple decimal points are present then the last<br />
is used for alignment. To escape from the ‘d’ column use<br />
\multicolumn as usual. See the sample file apssamp.tex<br />
for examples.<br />
10.2. Footnotes in Tables<br />
Footnotes in a table are labeled a, b, c, etc. They can<br />
be specified by using the L A TEX \footnote command.<br />
Furthermore, \footnotemark and \footnotetext can<br />
be used so that multiple entries can to refer to the same<br />
footnote. The footnotes for a table are typeset at the<br />
bottom of the table, rather than at the bottom of the<br />
<strong>page</strong> or at the end of the references. The arguments for<br />
\footnotemark and \footnotetext should be numbers<br />
1, 2, . . . . The journal style will convert these to letters.
14<br />
See sample file apssamp.tex for examples and explanations<br />
of use.<br />
10.3. Dealing with Long Tables<br />
By default, tables are set in a smaller size than the text<br />
body (\small). The \squeezetable declaration makes<br />
the table font smaller still (\scriptsize). Thus, putting<br />
the \squeezetable command before the \begin{table}<br />
line in a table will reduce the font size. If this isn’t sufficient<br />
to fit the table on a <strong>page</strong>, the standard L A TEX 2ε<br />
longtable package may be used. The scope of the<br />
\squeezetable command must be limited by enclosing<br />
it with a group:<br />
\begingroup<br />
\squeezetable<br />
\begin{table}<br />
[...]<br />
\end{table}<br />
\endgroup<br />
Tables are normally set to the width of the column in<br />
which they are placed. This means that in two-column<br />
mode, the table will be placed in a single, narrow column.<br />
For wide tables, the \table* environment should be used<br />
instead. This will place the table across both columns<br />
(the table usually will appear either at the top or the<br />
bottom of the following <strong>page</strong>).<br />
Under <strong>REVTEX</strong> 3, tables automatically break across<br />
<strong>page</strong>s; <strong>REVTEX</strong> 4 provides some of this functionality.<br />
However, this requires adding to the table a float placement<br />
option of [H] (meaning put the table “here” and<br />
effectively “unfloating” the table) to the \begin{table}<br />
command. The commands \\* and \same<strong>page</strong> can be<br />
used to control where the <strong>page</strong> breaks occur (these are<br />
the same as for the eqnarray environment).<br />
Long tables are more robustly handled by using the<br />
longtable.sty package included with the standard<br />
L A TEX 2ε distribution (put \usepackage{longtable} in<br />
the preamble). This package gives precise control over<br />
the layout of the table. The <strong>REVTEX</strong> 4 package contains<br />
patches that enable the longtable package to<br />
work in two-column mode. Of course, a table set<br />
in two-column mode needs to be narrow enough to<br />
fit within the column. Otherwise, the columns may<br />
overlap. <strong>REVTEX</strong> 4 provides an additional environment<br />
longtable* which allows a longtable to span the<br />
whole <strong>page</strong> width. Currently, the longtable* and<br />
ruledtabular environments are incompatible. In order<br />
to get the double (Scotch) rule, it is necessary to add<br />
the \hline\hline manually (or define \endfirsthead<br />
and \endlastfoot appropriately). For more documentation<br />
on the longtable environment and on the package<br />
options of the longtable package, please see the documentation<br />
available at ftp://ctan.tug.org/macros/<br />
latex/required/tools/longtable.dtx or refer to [4].<br />
11. PLACEMENT OF FIGURES, TABLES, AND<br />
OTHER FLOATS<br />
By default, figures and tables (and any other “floating”<br />
environments defined by other packages) float to the top<br />
or bottom of the <strong>page</strong> using the standard L A TEX float<br />
placement mechanism. Initially, each figure or table<br />
environment should be put immediately following its first<br />
reference in the text; this will usually result in satisfactory<br />
placement on the <strong>page</strong>. An optional argument for<br />
either environment adjusts the float placement. For example:<br />
\begin{figure}[〈placement〉]<br />
. . .<br />
\end{figure}<br />
where 〈placement〉 can be any combination of htbp!, signifying<br />
“here”, “top”, “bottom”, “<strong>page</strong>”, and “as soon as<br />
possible”, respectively. The same placement argument<br />
may be added to a \begin{table}. For more details<br />
about float placement, see the instructions in the L A TEX<br />
User’s <strong>Guide</strong> & Reference Manual, Appendix C.9.1.<br />
In two-column mode, a <strong>page</strong> may contain both a<br />
widetext environment and a float. <strong>REVTEX</strong> 4 may not<br />
always be able to automatically put the float in the optimal<br />
place. For instance, a float may be placed at the<br />
bottom of a column just before the widetext begins. To<br />
workaround this, try moving the float environment below<br />
the widetext environment. Alternative 〈placements〉<br />
may also alleviate the problem.<br />
figure and table environments should not be enclosed<br />
in a widetext environment to make them span<br />
the <strong>page</strong> to accomodate wide figures or tables. Rather,<br />
the figure* or table* environments should be used instead.<br />
Sometimes in L A TEX the float placement mechanism<br />
breaks down and a float can’t be placed. Such a “stuck”<br />
float may mean that it and all floats that follow are moved<br />
to the end of the job (and if there are too many of floats,<br />
the fatal error Too many unprocessed floats will occur).<br />
<strong>REVTEX</strong> 4 provides the class option floatfix<br />
which attempts to invoke emergency float processing to<br />
avoid creating a “stuck” float. <strong>REVTEX</strong> 4 will provide<br />
a message suggesting the use of floatfix. If floatfix<br />
doesn’t work or if the resulting positioning of the float is<br />
poor, the float should be repositioned by hand.<br />
<strong>REVTEX</strong> 4 offers an additional possibility for placing<br />
the floats. By using the either the endfloats or<br />
the endfloats* class option all floats may be held back<br />
(using an external file) and then set elsewhere in the<br />
document using the the commands \printtables and<br />
\printfigures, placed where the tables and figures are<br />
to be printed (usually at the end of the document). (This
15<br />
is similar to the standard \printindex command). Using<br />
a *-form of the commands (\printfigures* and<br />
\printtables*) will begin the figures or tables on a new<br />
<strong>page</strong>. Alternatively, the option endfloats* may be used<br />
to change the behavior of the non-*-forms so that every<br />
float will appear on a separate <strong>page</strong> at the end.<br />
Without one of the endfloats class options, these float<br />
placement commands are silently ignored, so it is always<br />
safe to use them. If one of the endfloats class options is<br />
given, but the \printtables command is missing, the tables<br />
will be printed at the end of the document. Likewise,<br />
if \printfigures is missing, the figures will be printed at<br />
the end of the document. Therefore it is also safe to omit<br />
these commands as long as <strong>REVTEX</strong>’s default choices for<br />
ordering figures and tables are satisfactory.<br />
The endfloats option (or perhaps some journal substyle<br />
that invokes it), requires explicit \begin{figure},<br />
\end{figure}, \begin{table}, and \end{table} lines.<br />
In particular, do not define typing shortcuts for table and<br />
figure environments, such as<br />
\def\bt{\begin{table}}% Incompatible!<br />
\def\et{\end{table}}%<br />
Please note that it is generally undesirable to have all<br />
floats moved to the end of the manuscript. APS no longer<br />
requires this for submissions. In fact, the editors and<br />
referees will have an easier time reading the paper if the<br />
floats are set in their normal positions.<br />
12. ROTATING FLOATS<br />
Often a figure or table is too wide to be typeset in<br />
the standard orientation and it is necessary to rotate<br />
the float 90 degrees. <strong>REVTEX</strong> 4 provides a new environment<br />
turn<strong>page</strong> as an easy means to accomplish<br />
this. The turn<strong>page</strong> environment depends on one of the<br />
packages graphics or graphicx being loaded. To use<br />
the turn<strong>page</strong> environment, simply enclose the figure or<br />
table environment with the turn<strong>page</strong> environment:<br />
\documentclass[...]{revtex4}<br />
\usepackage{graphicx}<br />
[...]<br />
\begin{turn<strong>page</strong>}<br />
\begin{figure} or \begin{table}<br />
[...]<br />
\end{figure} or \end{table}<br />
\end{turn<strong>page</strong>}<br />
A turn<strong>page</strong> float will be typeset on a <strong>page</strong> by itself. Currently,<br />
there is no mechanism for breaking such a float<br />
across multiple <strong>page</strong>s.<br />
TABLE III: Special <strong>REVTEX</strong> 4 symbols, accents, and boldfaced<br />
parentheses defined in revsymb.sty<br />
\lambdabar λ \openone 11<br />
\altsuccsim ≻ ∼ \altprecsim ≺ ∼<br />
\alt \agt <br />
\tensor x ↔ x \overstar x<br />
\loarrow x ← x \roarrow x → x<br />
ąć<br />
şť<br />
\biglb ( \bigrb)<br />
\Biglb ( \Bigrb)<br />
\bigglb ( \biggrb)<br />
ţű<br />
\Bigglb ( \Biggrb )<br />
13. <strong>REVTEX</strong> 4 SYMBOLS AND THE REVSYMB<br />
PACKAGE<br />
∗<br />
x<br />
Ã!<br />
Symbols made available in earlier versions of <strong>REVTEX</strong><br />
are defined in a separate package, revsymb, so that they<br />
may be used with other classes. This might be useful if,<br />
say, copying text from a <strong>REVTEX</strong> document to a non-<br />
<strong>REVTEX</strong> document. <strong>REVTEX</strong> 4 automatically includes<br />
these symbols so it is not necessary to explicitly call them<br />
in with a \usepackage statement.<br />
Table III summarizes the symbols defined in this<br />
package. Note that \overcirc, \overdots, and<br />
\corresponds are no longer in <strong>REVTEX</strong> 4. Use<br />
\mathring (standard in L A TEX 2ε), \dddot (with the<br />
amsmath package loaded), and \triangleq (with the<br />
amssymb class option) respectively. \succsim, \precsim,<br />
\lesssim, and \gtrsim are also defined either in<br />
amsmath or amssymb. The AMS versions of these commands<br />
will be used if the appropriate AMS package is<br />
loaded.<br />
14. OTHER <strong>REVTEX</strong> 4 FEATURES<br />
14.1. Job-specific Override Files<br />
<strong>REVTEX</strong> 4 allows manuscript-specific macro definitions<br />
to be put in a file separate from the main TEX file.<br />
One merely creates a file with the same basename as the<br />
TEX file, but with the extension ‘.rty’. Thus, if the TEX<br />
file is names man.tex, the macro definitions would go in<br />
man.rty. Note that the .rty file should be in the same<br />
directory as the TEX file. APS authors should follow the<br />
guidelines in the APS Compuscript <strong>Guide</strong> for <strong>REVTEX</strong> 4<br />
when submitting.<br />
[1] D.E. Knuth, The TEXbook, (Addison-Wesley, Reading,<br />
MA, 1986).
16<br />
[2] L. Lamport, L A TEX, a Document Preparation System,<br />
(Addison-Wesley, Reading, MA, 1996).<br />
[3] H. Kopka and P. Daly, A <strong>Guide</strong> to L A TEX 2ε, (Addison-<br />
Wesley, Reading, MA, 1995).<br />
[4] M. Goosens, F. Mittelbach, and A. Samarin, The L A TEX<br />
Companion, (Addison-Wesley, Reading, MA, 1994).<br />
[5] M. Goossens, S. Rahtz, and F. Mittelbach, The L A TEX<br />
Graphics Companion, (Addison-Wesley, Reading, MA,<br />
1997).<br />
[6] S. Rahtz, M. Goossens, et al.,The L A TEX Web Companion,<br />
(Addison-Wesley, Reading, MA, 1999).