Clinical steps - FGM-Dental: Startseite
Clinical steps - FGM-Dental: Startseite
Clinical steps - FGM-Dental: Startseite

Create successful ePaper yourself
Turn your PDF publications into a flip-book with our unique Google optimized e-Paper software.
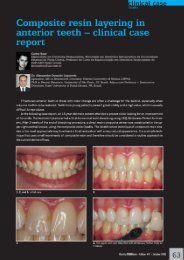
clinical case<br />
White Post<br />
Direct composite veneers with<br />
Opallis: <strong>Clinical</strong> <strong>steps</strong><br />
Dr. Sanzio Marques<br />
MS in Restorative Dentistry (FO-UFMG); Specialist in <strong>Dental</strong> Prothesis (FORP-USP);<br />
Author of the book intitled “Estética com resinas compostas em dentes anteriores:<br />
percepção, arte e naturalidade”; Coordinator of the Course of Excellence in Esthetic<br />
Dentistry of IEO - Belo Horizonte, Brazil; Coordinator of the Course Mastering the Art<br />
with Composite Resins of IEO – Belo Horizonte, Brazil.<br />
www.sorrisobelo.com.br<br />
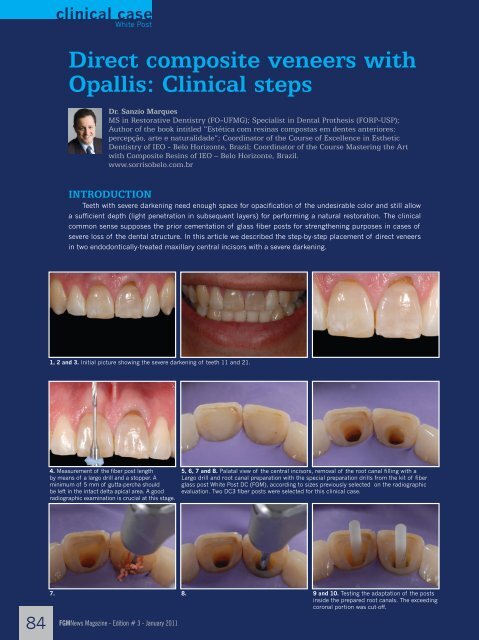
INTRODUCTION<br />
Teeth with severe darkening need enough space for opacification of the undesirable color and still allow<br />
a sufficient depth (light penetration in subsequent layers) for performing a natural restoration. The clinical<br />
common sense supposes the prior cementation of glass fiber posts for strengthening purposes in cases of<br />
severe loss of the dental structure. In this article we described the step-by-step placement of direct veneers<br />
in two endodontically-treated maxillary central incisors with a severe darkening.<br />
1, 2 and 3. Initial picture showing the severe darkening of teeth 11 and 21.<br />
4. Measurement of the fiber post length<br />
by means of a largo drill and a stopper. A<br />
minimum of 5 mm of gutta-percha should<br />
be left in the intact delta apical area. A good<br />
radiographic examination is crucial at this stage.<br />
5, 6, 7 and 8. Palatal view of the central incisors, removal of the root canal filling with a<br />
Largo drill and root canal preparation with the special preparation drills from the kit of fiber<br />
glass post White Post DC (<strong>FGM</strong>), according to sizes previously selected on the radiographic<br />
evaluation. Two DC3 fiber posts were selected for this clinical case.<br />
84<br />
7. 8. 9 and 10. Testing the adaptation of the posts<br />
inside the prepared root canals. The exceeding<br />
coronal portion was cut-off.<br />
<strong>FGM</strong>News Magazine - Edition # 3 - January 2011
clinical case<br />
White Post<br />
10.<br />
11 and 12. Surface treatment of the fiber post. The fiber posts were cleaned with alcohol. With<br />
the aid of a Cavibrush (<strong>FGM</strong>) the silane Prosil was applied and left on the surface for 60 seconds.<br />
13, 14 and 15 . Treatment of the root canal and pulp chamber. Acid etching with 37% phosphoric acid for 15 seconds, acid removal and water<br />
rinsing with a hypodermic syringe with fine cannula. The root canals were dried with absorbing paper cones and the dentin was left moist before<br />
adhesive application.<br />
16, 17, 18, 19 and 20. Application of a dual-cured adhesive system. The primer was applied and the excess were removed with absorbing paper<br />
cones and a stream of air. Then, the primer was light-cured. The mix of base and catalyst of the adhesive was applied followed by removal of<br />
excess with absorbing paper cones and an air stream.<br />
19.<br />
20.<br />
21. A lentulo drill is used to transfer the<br />
AllCem resin cement (<strong>FGM</strong>) to the root canal<br />
after mixing the base and catalyst pastes.<br />
22 and 23. Placement of the fiber glass posts White Post DC (<strong>FGM</strong>) and resin cement light<br />
curing for 60 seconds.<br />
24 and 25. An increment of the composite<br />
resin Opallis (<strong>FGM</strong>) to seal out the pulp<br />
chamber is being light-cured.<br />
<strong>FGM</strong>News Magazine - Edition # 3 - January 2011<br />
85
clinical case<br />
White Post<br />
25.<br />
26 and 27. Stone model of the upper arch obtained from an alginate impression. The stone<br />
model was waxed-up in order to re-establish the cervical–incisal dimension of the worn incisal<br />
edges of teeth 11 and 21. A silicone guide was constructed with a using a putty addition<br />
silicone impression material to aid the restorative procedure.<br />
28. Placement of the retraction cord Pro<br />
Retract 00 (<strong>FGM</strong>) in the gingival sulcus to<br />
reduce the possibility of contamination<br />
of restoration by gingival fluid once the<br />
restoration was performed under a modified<br />
rubber dam isolation.<br />
29 and 30. Preparation of a marginal groove to guide the reduction of the enamel on the buccal<br />
surface.<br />
31, 32 and 33. Reduction of buccal and incisal enamel. The amount of structure reduction was checked witht the silicone guide (approximately<br />
2 mm). The preparation was finished with Diamond Pro disks (<strong>FGM</strong>).<br />
34. A layer of the most opaque resin from<br />
the Opallis kit (shade OW) was placed on<br />
the preparation and light-cured to test its<br />
ability to mask the tooth discoloration. We<br />
concluded that this layer would not mask well<br />
the discoloration unless we placed a thicker<br />
increment. However the latter approach would<br />
reduce the depth of the following composite<br />
layers producing a restoration with a dull<br />
aspect and without a natural appearance.<br />
35 and 36. Finished preparation with the operative field properly isolated. Observe that we<br />
controlled a small bleeding in the gingival margin with the <strong>FGM</strong> hemostatic agent.<br />
86<br />
<strong>FGM</strong>News Magazine - Edition # 3 - January 2011
clinical case<br />
White Post<br />
37, 38 and 39. Acid etching of the prepared suraces with Condac 37 (<strong>FGM</strong>) for 15 seconds, followed by the application of a two-step adhesive<br />
and light-curing.<br />
39. 40.<br />
40, 41 and 42. A small increment of translucent enamel (T-Blue shade, Opallis, <strong>FGM</strong>) was placed on the silicone guide for reproduction of the<br />
palatal and incisal enamel.<br />
43 and 44. Application of an opaque layer of the Creative Color Opaquer Pink to mask<br />
the dental structure discoloration. A thin layer of this opaque paste were able to mask the<br />
discoloration. This would only be possible with OW resin if a very thick layer were used. Then,<br />
we employed subsequent composite layers using more translucent resins, gaining in beauty and<br />
naturalness.<br />
45. Placement of a thin layer of the opaque<br />
composite Opallis OP (<strong>FGM</strong>) to reproduce the<br />
dentin structure.<br />
46 and 47. Opallis DA4 was used to increase the chroma of the cervical region. Opallis DA2 was<br />
used in the medium and incisal thirds, keeping the design of the incisal mamelons.<br />
48 and 49. A thin layer of Opallis T-Blue<br />
(<strong>FGM</strong>) was placed in the incisal edge around<br />
the dentin mamelons. Observe the subtle<br />
effect of translucency and opalescence after<br />
polymerization of this layer.<br />
<strong>FGM</strong>News Magazine - Edition # 3 - January 2011<br />
87
clinical case<br />
White Post<br />
49.<br />
50 and 51. Characterization of the composite restoration with colored tints. The white tint was<br />
painted to simulate enamel hypoplasia and the ochre color to reproduce counter-opalescence.<br />
52. Buccal enamel is being reproduced with<br />
a Opallis E Bleach and Opallis VM (medium<br />
value) (<strong>FGM</strong>).<br />
53. Final light-activation after placement<br />
of a thin layer of Oxiblock (<strong>FGM</strong>) to reduce<br />
the oxygen inhibition and allow a better<br />
polymerization of the superficial composite<br />
resin layer.<br />
54.<br />
54, 55 and 56. The cervical excess was removed with a sharp blade (#12). With the same blade,<br />
we performed a kind of interdental cut, followed by a twist with a spatula to separate the teeth.<br />
57.<br />
57, 58, 59 and 60. Determination of the basic format of the teeth with the coarse-grit Diamond Pro disk (<strong>FGM</strong>).<br />
61 - 69. The surface texture and the shiny of the enamel surfaces were reproduced using the Diamond Pro (<strong>FGM</strong>) disks along with diamond burs<br />
and aluminum oxide paste with Diamond Flex (<strong>FGM</strong>) felt disks. In the interproximal areas, the Epitex polishing strips were used.<br />
88<br />
<strong>FGM</strong>News Magazine - Edition # 3 - January 2011
clinical case<br />
White Post<br />
64. 65. 66.<br />
67. 68. 69.<br />
70 - 72. Excellent esthetic result obtained with the placement of direct composite veneers with Opallis composite. Observe the natural aspect<br />
and similarity with the other patient’s teeth.<br />
73 and 74. Natural fluorescence and opalescence of Opallis composite (<strong>FGM</strong>).<br />
75. Final clinical aspect. 76. Initial clinical aspect.<br />
<strong>FGM</strong>News Magazine - Edition # 3 - January 2011<br />
89