Montageanleitung Installation Instructions - Essmann.hu
Montageanleitung Installation Instructions - Essmann.hu
Montageanleitung Installation Instructions - Essmann.hu

Create successful ePaper yourself
Turn your PDF publications into a flip-book with our unique Google optimized e-Paper software.
<strong>Montageanleitung</strong><br />
für ESSMANN Motoröffner EM 230V / 970<br />
<strong>Installation</strong> <strong>Instructions</strong><br />
for ESSMANN servomotor opener EM 230V/970<br />
Ausgabe / Version: 26.08.2010 / tbe<br />
Technische Änderungen vorbehalten. / Subject to technical alterations. Seite / Page 1 von / of 10<br />
Art.Nr.: 25000026 Dok.Nr.:OFF-017047<br />
<strong>Montageanleitung</strong>:<br />
Für die fachgerechte Montage, <strong>Installation</strong> und angemessene<br />
Wartung durch den gesc<strong>hu</strong>lten, sachkundigen und sicherheitsbewussten<br />
Elektro-Installateur und / oder Fachpersonal mit<br />
Kenntnissen der elektrischen Geräteinstallation.<br />
Lesen und beachten Sie die Angaben in dieser <strong>Montageanleitung</strong><br />
und halten Sie die vorgegebene Reihenfolge ein.<br />
Die Bedienungsanleitung für späteren Gebrauch / Wartung<br />
aufbewahren. Ein zuverlässiger Betrieb und ein Vermeiden von<br />
Schäden und Gefahren sind nur bei sorgfältiger Montage und<br />
Einstellung nach dieser Anleitung gegeben. Bitte beachten Sie<br />
genau die Anschlussbelegung, die minimalen und maximalen<br />
Leistungsdaten (siehe technischen Daten) und die<br />
<strong>Installation</strong>shinweise.<br />
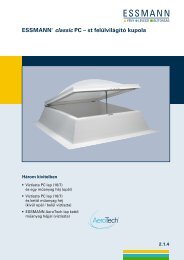
Anwendungsbereich:<br />
ESSMANN Motoröffner sind Lüftungsaggregate für die Montage in<br />
verschiedene Aufsetzkränze und Lichtbänder zum automatischen<br />
Öffnen und Schließen von Lichtkuppeln, bzw. Lichtbandklappen.<br />
Prüfen Sie immer, ob Ihre Anlage den gültigen Bestimmungen<br />
entspricht. Besondere Beachtung finden dabei: Nenngröße der<br />
Lichtkuppel, Öffnungszeit, Temperaturbeständigkeit von Kabel und<br />
Geräten.<br />
Der ESSMANN Motoröffner vom Typ EM 230V / 970 ist nicht für<br />
Tandemanwendungen in der ESSMANN Lichtkuppel comfort plus<br />
oder sonstiger Glasvarianten, ohne zusätzliche elektronische<br />
Steuerungen, geeignet.<br />
Beim Einsatz des ESSMANN Motoröffners in Verbindung mit<br />
Steuerzentralen anderer Hersteller ist die Kompatibilität zu prüfen.<br />
Besonderheiten:<br />
• Mit integrierter elektronischer Lastabschaltung. Diese garantiert<br />
ein dichtes Schließen der Lichtkuppel ohne Endschalterjustage.<br />
• Automatisches Abschalten beim Erreichen der Endposition.<br />
• Staubdicht und spritzwassergeschützt (Sc<strong>hu</strong>tzart IP 54).<br />
• Mantel- und Sc<strong>hu</strong>brohr aus Aluminiumlegierung, dadurch<br />
korrosionsfrei.<br />
• Potenzialfreier Kontakt für Meldung “Nicht Zu”.<br />
• Nach Rücksprache mit der ESSMANN Anwendungstechnik ist<br />
der ESSMANN Motoröffner auch für den Einsatz an<br />
Fremdfabrikaten geeignet.<br />
<strong>Installation</strong> instructions:<br />
For correct assembly, installation and appropriate maintenance by a<br />
trained, professional and safety-conscious electrician and/or<br />
specialist who has knowledge of electrical device installation.<br />
Please read and observe the information in these installation<br />
instructions and keep to the order specified by them.<br />
Retain the operating instructions for subsequent use/maintenance.<br />
Reliable operation and prevention of damage or risks can only be<br />
ensured if installation and setting up is carried out carefully and in<br />
accordance with these instructions. Please observe the connection<br />
assignments, minimum and maximum rated data (see the technical<br />
specifications section) and installation information precisely.<br />
Area of application:<br />
ESSMANN servomotor openers are ventilation units designed for<br />
installation in a variety of skylight bases and arcade rooflights, and<br />
are used for the automatic opening and closing of skylight domes or<br />
arcade rooflight flaps.<br />
Always make sure to check whether your system complies with the<br />
applicable regulations. In this respect, please pay particular attention<br />
to the nominal size of the skylight dome, the opening time and the<br />
temperature resistance of cables and devices.<br />
The ESSMANN servomotor opener type EM 230V/970 is not<br />
suitable for tandem applications in ESSMANN comfort plus skylight<br />
domes or other glass versions without the use of additional<br />
electronic controls.<br />
When using the ESSMANN servomotor opener in conjunction with<br />
control centres from other manufacturers, please check that the<br />
components are compatible.<br />
Special features:<br />
• Integrated electronic max load cut-off. This ensures the skylight<br />
dome is closed tightly without limit switch adjustment.<br />
• Automatic switching off when final position is reached.<br />
• Dust-proof and protected against spray water (IP 54 degree of<br />
protection).<br />
• Enclosing and extension tube made from aluminium alloy and<br />
therefore corrosion-resistant.<br />
• Potential-free contact for “Not closed”message.<br />
• The ESSMANN servomotor opener is also suitable for use with<br />
third-party products, following consultation with ESSMANN’s<br />
application engineers.<br />
ESSMANN GmbH • Im Weingarten 2 • D-32107 Bad Salzuflen • Telefon +49 (0) 5222.791-0 • Telefax +49 (0) 5222.791-236<br />
E-Mail: info@essmann.de • www.essmann.de<br />
A member of the ESSMANN GROUP.
Zeichenerklärung:<br />
Hinweise die unbedingt beachten werden müssen, sind durch<br />
besondere Zeichen hervorgehoben.<br />
Explanation of symbols:<br />
Information that absolutely must be observed is highlighted by<br />
means of particular symbols.<br />
Ausgabe / Version: 26.08.2010 / tbe<br />
Technische Änderungen vorbehalten. / Subject to technical alterations. Seite / Page 2 von / of 10<br />
Art.Nr.: 25000026 Dok.Nr.:OFF-017047<br />
Vorsicht: Gefahr für Personen durch elektrischen Strom.<br />
Achtung: Nichtbeachtung führt zur Zerstörung. Gefährdung für<br />
Mensch und Material durch falsche Handhabung.<br />
<strong>Montageanleitung</strong> ist zu beachten.<br />
Achtung: Warnung vor Absturzgefahr.<br />
Sicherheitsgurt benutzen.<br />
Warnung: Gefährdung für Personen durch Gefahren aus dem<br />
Gerätebetrieb. Quetsch- und Klemmgefahr.<br />
Hinweise:<br />
Sicherheits- und Montagehinweise:<br />
• Vor Beginn der Arbeiten ist sicherzustellen, dass die<br />
notwendigen Sicherheitsvorschriften eingehalten werden (z.B.<br />
Durchsturzsicherungen oder Personenabsturzsicherungskonsole<br />
(PAS) zur Absicherung der Dachöffnungen usw.).<br />
• Alle Arbeiten nur mit Sicherheitsausrüstung durchführen.<br />
Bereiche unterhalb der Dachöffnungen sind in geeigneter Form<br />
abzusichern und gegen Betreten abzusperren. (Herabfallende<br />
Bauteile oder Werkzeuge !).<br />
• Allgemeingültige, gesetzliche und sonstige verbindliche<br />
Regelungen zur Unfallverhütung sind zu beachten.<br />
Warnung:<br />
230 V AC; Gefährliche Spannung. Kann Tod, schwere Körperverletzungen<br />
oder erheblichen Sachschaden verursachen. Trennen<br />
Sie das Gerät allpolig von der Versorgungsspannung bevor Sie es<br />
montieren oder den Aufbau verändern.<br />
VDE 0100 für 230 V Netzanschluss beachten.<br />
Caution: Risk to persons due to electrical current.<br />
Attention: Failure to observe this information will lead to destruction.<br />
Risk to persons and material as a result of incorrect handling.<br />
Please observe the installation instructions.<br />
Attention: Danger of falling.<br />
Use a safety belt.<br />
Warning: Risk to persons due to dangerous situation created by<br />
device operation. Risk of crushing and becoming caught.<br />
Information:<br />
Safety and installation instructions:<br />
• The necessary safety regulations (e.g. fall-through protection or<br />
fall arrest safety consoles for the protection of roof openings,<br />
etc.) must be observed prior to commencing work.<br />
• Only carry out work when using safety equipment. Areas below<br />
roof openings are to be suitably secured and blocked off to<br />
prevent persons from entering them (falling components or<br />
tools!).<br />
• Generally applicable, legal and otherwise obligatory regulations<br />
relating to accident prevention must be observed.<br />
Warning:<br />
230 V AC; dangerous voltage. May cause death, serious bodily<br />
injuries or considerable damage. Disconnect all poles of the device<br />
from the supply voltage before you attempt to install it or change the<br />
setup.<br />
Observe VDE 0100 for 230 V line connections.<br />
ESSMANN GmbH • Im Weingarten 2 • D-32107 Bad Salzuflen • Telefon +49 (0) 5222.791-0 • Telefax +49 (0) 5222.791-236<br />
E-Mail: info@essmann.de • www.essmann.de<br />
A member of the ESSMANN GROUP.
Beachten Sie bei Montage und Bedienung:<br />
During installation and operation, please<br />
observe the following:<br />
Ausgabe / Version: 26.08.2010 / tbe<br />
Technische Änderungen vorbehalten. / Subject to technical alterations. Seite / Page 3 von / of 10<br />
Art.Nr.: 25000026 Dok.Nr.:OFF-017047<br />
Beim Schließen und Öffnen stoppt der Antrieb über die integrierte<br />
Lastabschaltung. Die entsprechende Druckkraft entnehmen Sie bitte<br />
den technischen Daten. Die Druckkraft in den Schnittstellen reicht<br />
aber auf jeden Fall aus bei Unachtsamkeit Finger zu zerquetschen.<br />
Bei der Montage und Bedienung nicht in den Dichtspalt und in den<br />
laufenden Antrieb greifen! Quetsch- und Klemmgefahr!<br />
Wartungsarbeiten:<br />
Werden die Geräte in Rauch- und Wärmeabzugsanlagen (kurz<br />
RWA) eingesetzt, müssen sie mindestens einmal jährlich geprüft,<br />
gewartet und ggf. instand gesetzt werden. Bei reinen<br />
Lüftungsanlagen ist dies auch zu empfehlen. (Informationen zur<br />
Wartung finden sie unter www.essmann.de). Die Geräte von<br />
Verunreinigungen befreien. Befestigungs- und Klemmschrauben auf<br />
festen Sitz prüfen. Die Geräte durch Probelauf testen.<br />
Defekte Geräte dürfen nur in unserem Werk instand gesetzt werden.<br />
Es sind nur Original-Ersatzteile einzusetzen. Die<br />
Betriebsbereitschaft ist regelmäßig zu prüfen. Ein Wartungsvertrag<br />
ist empfehlenswert.<br />
Leitungsverlegung:<br />
• Elektrischer Anschluss nur durch zugelassene Elektrofirma.<br />
• Netzzuleitungen 230 V AC separat bauseits absichern.<br />
• Netzzuleitungen bis an die Netzklemme ummantelt lassen.<br />
• Bei der <strong>Installation</strong> DIN- und VDE-Vorschriften beachten, VDE<br />
0100 Errichten von Starkstromanlagen bis 1000 V, VDE 0815<br />
<strong>Installation</strong>skabel und -leitungen, VDE 0833<br />
Gefahrenmeldeanlagen für Brand, Einbruch und Überfall.<br />
Kabeltypen ggf. mit den örtlichen Abnahmebehörden,<br />
Energieversorgungsunternehmen, Brandsc<strong>hu</strong>tzbehörden oder<br />
Berufsgenossenschaften festlegen.<br />
• Alle Niederspannungsleitungen (24 V DC) getrennt von<br />
Starkstromleitungen verlegen. Flexible Leitungen dürfen nicht<br />
eingeputzt werden.<br />
• Frei hängende Leitungen mit Zugentlastung versehen.<br />
• Die Leitungen müssen so verlegt sein, dass sie im Betrieb<br />
weder abgeschert, verdreht noch abgeknickt werden.<br />
• Abzweigdosen müssen für Wartungsarbeiten zugänglich sein.<br />
Die Kabelarten, -längen und -querschnitte gemäß den<br />
technischen Angaben ausführen.<br />
Vor jeder Wartungsarbeit oder Veränderung des Aufbaus sind<br />
die Netzspannung und Akkus allpolig abzuklemmen und gegen<br />
unbeabsichtigtes Wiedereinschalten abzusichern.<br />
Nach der <strong>Installation</strong>:<br />
Nach der <strong>Installation</strong> und jeder Veränderung der Anlage alle<br />
Funktionen durch Probelauf überprüfen .Es ist sicherzustellen,<br />
dass der ESSMANN Motoröffner im Ein- und Ausgefahrenen<br />
Zustand nicht die Unterkonstruktion berührt. (s. 7. Hinweise)<br />
Anwendungsbeispiel:<br />
ESSMANN Lichtkuppel / Aufsetzkranz<br />
During closing and opening, the drive stops via the integrated max<br />
load cut-off. Please refer to the technical specifications for<br />
information on the associated compressive force. The compressive<br />
force at the points where the components meet is always enough to<br />
crush fingers, so it is important to pay close attention to what is<br />
happening. During installation and operation, do not reach into the<br />
opening gap or into the drive while it is running. Risk of crushing and<br />
becoming caught!<br />
Maintenance work:<br />
If the devices are being used in smoke and heat extraction systems<br />
(SHE), they must be tested, serviced and - if necessary - repaired at<br />
least once a year. This is also recommended in the case of systems<br />
used for ventilation alone. (Please visit www.essmann.de for<br />
information on maintenance.) Remove any dirt or contaminants from<br />
the devices. Check that the fastening and clamping screws are<br />
seated firmly. Test the devices by means of a test run.<br />
Defective devices may only be repaired at our factory. Only original<br />
spare parts may be used. You must check that the devices are<br />
ready for operation on a regular basis. It is recommended that you<br />
arrange a maintenance contract.<br />
Laying cables:<br />
• Have electrical components connected by an approved<br />
electrician only.<br />
• Fuse 230 V AC feeder cables separately on site.<br />
• Have the feeder cables sheathed up to the supply terminal.<br />
• During installation, please observe the following DIN and VDE<br />
regulations: VDE 0100 (erection of power installations up to<br />
1000 V), VDE 0815 (installation cables and lines) and VDE<br />
0833 (hazard alert systems for fires, break-ins and attacks). If<br />
necessary, determine the appropriate cable types with the local<br />
acceptance body, power supply company, fire protection<br />
organisation or trade association.<br />
• Lay all low-voltage cables (24 V DC) so that they are separate<br />
from power lines. Flexible cables may not be embedded in<br />
plaster.<br />
• Secure freely suspended cables with a strain relief device.<br />
• The cables must be laid so that they cannot be shorn, twisted or<br />
kinked during operation.<br />
• Connection boxes must be accessible for maintenance work.<br />
The cable types, lengths and cross-sections must comply with<br />
the technical specifications..<br />
Before carrying out maintenance work or changing the setup, the<br />
mains voltage and accumulators must be disconnected at all poles<br />
and secured to prevent them being switched back on<br />
unintentionally.<br />
Following installation:<br />
After installation and any changes to the system, check all<br />
functions by means of a test run. You must ensure that the<br />
ESSMANN servomotor opener does not come into contact with the<br />
substructure in either an extended or retracted state (information on<br />
p. 7).<br />
Application example:<br />
ESSMANN skylight dome/skylight base<br />
ESSMANN GmbH • Im Weingarten 2 • D-32107 Bad Salzuflen • Telefon +49 (0) 5222.791-0 • Telefax +49 (0) 5222.791-236<br />
E-Mail: info@essmann.de • www.essmann.de<br />
A member of the ESSMANN GROUP.
Funktionsbeschreibung:<br />
Functional description:<br />
Ausgabe / Version: 26.08.2010 / tbe<br />
Technische Änderungen vorbehalten. / Subject to technical alterations. Seite / Page 4 von / of 10<br />
Art.Nr.: 25000026 Dok.Nr.:OFF-017047<br />
Dieser Antrieb wird mit der eingebauten elektronischen<br />
Lastabschaltung betrieben und benötigt keine Endschalter.<br />
Wenn diese Endanschläge erreicht werden, bzw. in AUF-Richtung<br />
ein Antrieb blockiert wird, schaltet die elektronische Lastabschaltung<br />
durch den erhöhten Motorstrom den Antrieb ab. Da der Motorstrom<br />
proportional ist zu den Sc<strong>hu</strong>b- und Zugkräften, erfolgt diese<br />
Abschaltung bei genau definierten Kräften.<br />
Achtung: eine Überbrückung der internen<br />
Lastabschaltung hat eine Zerstörung des Antriebs zur Folge.<br />
Komponenten:<br />
1. Aufsetzkranz<br />
2. Lichtkuppel<br />
3. Motoröffner<br />
4. Schieber Lichtkuppelschloss<br />
5. Spindelhalterung<br />
6. Motorkonsole<br />
7. Gewindestifte mit Mutter<br />
8. Bauseitge Unterkonstuktion<br />
Lieferumfang:<br />
Prüfen Sie den gelieferten ESSMANN Motoröffner auf<br />
Vollständigkeit. Im Lieferumfang enthalten sind:<br />
• 1St. ESSMANN Motoröffner<br />
• 1St. ESSMANN Spindelhalterung Art.Nr.: 0169101<br />
• 1St. ESSMANN Motorkonsole Art.Nr.: 0391220<br />
• 1St. ESSMANN Lichtkuppelschlüssel Art.Nr.: 0170281<br />
• 1St. Sechskantschraube M6 x 35mm<br />
• 2St. Gewindestift M8 x 25mm<br />
• 2St. Sechskantschraube M6 x 10mm<br />
• 3St. Scheibe 6,4<br />
• 2St. Sechskantmutter M8<br />
• 3St. Sechskantmutter M6<br />
Werkzeuge:<br />
Stellen Sie sicher, dass Sie folgendes Werkzeug zu Ihrer Verfügung<br />
steht:<br />
• Steckschlüssel 10<br />
• Schraubendreher (Schlitz 1,0 x 5,5)<br />
• Schraubenschlüssel SW13<br />
• Kombizange<br />
This drive is operated using the integrated electronic max load cutoff<br />
and does not require a limit switch.<br />
When the end stops are reached or a drive is blocked in the OPEN<br />
direction, the electronic max load cut-off switches off the drive as a<br />
result of the increased motor current. Since the motor current is<br />
proportional to the thrust and tensile forces, this switching-off<br />
process takes place at precisely defined forces.<br />
.<br />
Attention: Bridging the internal<br />
max load cut-off will cause the device to be destroyed.<br />
Components:<br />
1. Skylight base<br />
2. Skylight dome<br />
3. Servomotor opener<br />
4. Slide for skylight dome lock<br />
5. Spindle holder<br />
6. Motor console<br />
7. Grub screws with nut<br />
8. Substructure (on site)<br />
Scope of supply:<br />
Check that all the components of the ESSMANN servomotor opener<br />
have been included in the package. The scope of supply includes:<br />
• 1x ESSMANN servomotor opener<br />
• 1x ESSMANN spindle holder, art. no.: 0169101<br />
• 1x ESSMANN motor console, art. no.: 0391220<br />
• 1x ESSMANN skylight dome key, art. no.: 0170281<br />
• 1x hexagon-head screw, M6 x 35 mm<br />
• 2x grub screws, M8 x 25 mm<br />
• 2x hexagon-head screws, M6 x 10 mm<br />
• 3x washers, 6.4<br />
• 2x hexagon nuts, M8<br />
• 3x hexagon nuts, M6<br />
Tools:<br />
Ensure you have the following tools to hand:<br />
• Socket spanner 10<br />
• Screwdriver (for 1.0 x 5.5 slot)<br />
• Spanner 13 AF<br />
• Combination pliers<br />
ESSMANN GmbH • Im Weingarten 2 • D-32107 Bad Salzuflen • Telefon +49 (0) 5222.791-0 • Telefax +49 (0) 5222.791-236<br />
E-Mail: info@essmann.de • www.essmann.de<br />
A member of the ESSMANN GROUP.
Montage in<br />
Aufsetzkranz/Lichtkuppel:<br />
Assembly:<br />
Ausgabe / Version: 26.08.2010 / tbe<br />
Technische Änderungen vorbehalten. / Subject to technical alterations. Seite / Page 5 von / of 10<br />
Art.Nr.: 25000026 Dok.Nr.:OFF-017047<br />
• Sollte diese <strong>Montageanleitung</strong> nicht alle offen<br />
Fragen beantworten, wenden Sie sich an die<br />
ESSMANN Anwendungstechnik.<br />
If these installation instructions do not answer any of<br />
the questions you may still have, please contact<br />
ESSMANN’s application engineers.<br />
1. Vorbereitung 1. Preparation<br />
Die entriegelte Lichtkuppel nicht vollständig öffnen<br />
und auf dem Dach ablegen. (Verformungsgefahr bei<br />
hohen Außentemperaturen)<br />
1.1 Das Lichtkuppelschloss vom Dach aus<br />
entriegeln. Dazu die Lichtkuppel mit dem<br />
beliegenden Schlüssel entriegeln und den<br />
Schieber (4) herausziehen. Der Schieber wird<br />
nicht mehr benötigt.<br />
1.2 Die beiden Abdeckhüttchen (7.a) von den zwei<br />
Gewindestiften (7) des Aufsetzkranzes<br />
herunterdrehen. Die Abdeckhüttchen werden<br />
nicht mehr benötigt.<br />
Open the unlocked skylight dome (but not<br />
completely) and set it down on the roof. (Risk of<br />
deformation at high temperatures.))<br />
1.1 Unlock the skylight dome lock from the roof. To<br />
do this, unlock the skylight dome using the key<br />
supplied and pull out the slide (4). The slide is<br />
no longer needed.<br />
1.2 Unscrew both the cover caps (7.a) for the two<br />
grub screws (7) on the skylight base. The cover<br />
caps are no longer needed.<br />
2. Spindelhalterung montieren 2. Installing the spindle holder<br />
• Montage der Spindelhalterung entfällt bei der<br />
ESSMANN Lichtkuppel plus und comfort plus,<br />
da diese bereits werkseitig montiert.<br />
2.1 Die Spindelhalterung (5) mittig am<br />
Spindelflansch der Lichtkuppel mit zwei<br />
Sechskant Schrauben (M6 x 10) (5.a)<br />
befestigen. (Max. 5,5Nm)<br />
• There is no need to install the spindle holder in<br />
the case of the ESSMAN plus and comfort plus<br />
skylight domes, as this has already been done<br />
at the factory.<br />
2.1 Fasten the spindle holder (5) at the centre of the<br />
skylight dome's spindle flange using two<br />
hexagon-head screws (M6 x 10) (5.a). (Max. 5.5<br />
Nm.)<br />
3. Montage Motorkonsole 3. Installing the motor console<br />
3.1 Die Motorkonsole (6) auf die im Aufsetzkranz<br />
befindlichen Gewindestifte (7) setzen und mit<br />
den Sechskantmuttern (M6) (6.b) und<br />
Unterlegscheiben (6,4) (6.a) befestigen. (Max. 6<br />
Nm)<br />
3.1 Place the motor console (6) on the grub screws<br />
(7) located in the skylight base and fasten it in<br />
place using the hexagon nuts (M6) (6.b) and<br />
washers (6.4) (6.a). (Max. 6 Nm.)<br />
ESSMANN GmbH • Im Weingarten 2 • D-32107 Bad Salzuflen • Telefon +49 (0) 5222.791-0 • Telefax +49 (0) 5222.791-236<br />
E-Mail: info@essmann.de • www.essmann.de<br />
A member of the ESSMANN GROUP.
Ausgabe / Version: 26.08.2010 / tbe<br />
Technische Änderungen vorbehalten. / Subject to technical alterations. Seite / Page 6 von / of 10<br />
Art.Nr.: 25000026 Dok.Nr.:OFF-017047<br />
4. Montage des Motoröffner 4. Installing the servomotor opener<br />
4.1 Den ESSMANN Motoröffner (3) in Höhe des<br />
Schwenkpunktes (3.a) in die Motorkonsole<br />
setzen.<br />
4.2 Den Motoröffner (3) mit den beiden seitlichen<br />
Stiftschrauben (M8) (6.c) mit der Motorkonsole<br />
verbinden und diese mit den Sechskantmuttern<br />
(M8) (6.d) kontern. (Max. 6 Nm)<br />
4.3 Durch drehen an der Hubstange des<br />
Motoröffners (3.b) diese in der Höhe an die<br />
Position der seitlichen Bohrung in der<br />
Spindelhalterung anpassen. (Durch<br />
Rechtsdre<strong>hu</strong>ng wird die Hubstange verkürzt,<br />
durch Linksdre<strong>hu</strong>ng verlängert.) Die Hubstange<br />
und die Spindelhalterung (5) mit der<br />
Sechskantschraube (M6 x 35)<br />
(5.b),Unterlegscheibe (6,4 ) (5.c) und<br />
Sechskantmutter (M6) (5.d) verbinden (Max. 6<br />
Nm). Die Hubstange des Motoröffner muß mittig<br />
in der Spindelhalterung montiert werden.<br />
4.1 Place the ESSMANN servomotor opener (3) in<br />
the motor console, at the height of the pivoting<br />
point (3.a).<br />
4.2 Connect the servomotor opener (3) to the motor<br />
console using the two stud bolts (M8) (6.c) at<br />
the side and fix these in place using the<br />
hexagon nuts (M8) (6.d). (Max. 6 Nm.)<br />
4.3 By turning the lifting rod of the servomotor<br />
opener (3.b), adjust the height of the rod until it<br />
reaches the position of the bore hole at the side<br />
of the spindle holder. (Turning the lifting rod<br />
clockwise shortens it; turning it anticlockwise<br />
lengthens it.) Connect the lifting rod and spindle<br />
holder (5) using the hexagon-head screw (M6 x<br />
35) (5.b), washer (6.4) (5.c) and hexagon nut<br />
(M6) (5.d) (max. 6 Nm). The servomotor opener<br />
lifting rod must be in a central position in the<br />
spindle holder.<br />
4.4 Motoröffner nach erfolgter Montage. 4.4 How the servomotor opener looks after<br />
installation is complete.<br />
ESSMANN GmbH • Im Weingarten 2 • D-32107 Bad Salzuflen • Telefon +49 (0) 5222.791-0 • Telefax +49 (0) 5222.791-236<br />
E-Mail: info@essmann.de • www.essmann.de<br />
A member of the ESSMANN GROUP.
5. Beispiele zur Montage im<br />
Lichtband<br />
5. Examples: <strong>Installation</strong> in an<br />
arcade rooflight<br />
Ausgabe / Version: 26.08.2010 / tbe<br />
Technische Änderungen vorbehalten. / Subject to technical alterations. Seite / Page 7 von / of 10<br />
Art.Nr.: 25000026 Dok.Nr.:OFF-017047<br />
• Bei der Montage der ESSMANN Motorkonsole an<br />
einer bauseitigen Unterkonstruktion ist die<br />
Unterkonstruktion auf den Belastungsfall zu<br />
prüfen. (Soglasten) Die Schrauben (7.B) sind je<br />
nach vorhandener Unterkonstruktion zu wählen.<br />
• Aufgrund der vielfältigen Einsatzmöglichkeiten in<br />
Lichtbändern mit Lichtbandklappen ist es nicht<br />
möglich alle Einbausituationen darzustellen.<br />
Daher sind hier nur Lösungsbeispiele gezeigt.<br />
Für weitere Befestigungslösungen und eventuell<br />
benötigtes Befestigungsmaterial wenden sie sich<br />
an die ESSMANN GmbH.<br />
• Die Befestigung des Motors und der Hubstange<br />
erfolgt entsprechend der Montage im<br />
Aufsetzkranz bzw. an der Lichtkuppel.<br />
5.1 Die Motorkonsole (6) an der Vorhandenen<br />
Aufkantung oder Zarge befestigen.<br />
5.2 Die Kämpfermontagehalterung (A) mit sechs<br />
Schrauben (C) (4,8 x16) am Kämpfer befestigen.<br />
Die Motorkonsole (6) auf die an der Kämpfermontagehalterung<br />
(A) befindlichen Gewindestifte<br />
(B) setzen und mit den Sechskantmuttern (M6)<br />
(6.b) und Unterlegscheiben (6,4) (6.a)<br />
befestigen. (Max. 6 Nm)<br />
• When installing the ESSMANN motor console on<br />
a substructure on site, the substructure must be<br />
checked for loads (i.e. suction loads). The<br />
screws (7.B) must be selected according to the<br />
type of substructure that is present.<br />
• Since there is a wide range of options for<br />
applications in arcade rooflights with arcade<br />
rooflight flaps, it is not possible to show every<br />
single installation scenario. For this reason, only<br />
examples of possible solutions are shown here.<br />
For additional mounting solutions and any<br />
mounting material that may be required, please<br />
contact ESSMANN GmbH.<br />
• The motor and lifting rod are mounted in<br />
accordance with the installation method in the<br />
skylight base or on the skylight dome.<br />
5.1 Fasten the motor bracket (6) to the upstand or<br />
base provided<br />
5.2 Attach the frame installation bracket (A) to the<br />
frame using six screws (C) (4.8 x 16). Place the<br />
motor console (6) on the grub screws (B) located<br />
on the frame installation bracket (A) and fasten it<br />
in place using the hexagon nuts (M6) (6.b) and<br />
washers (6.4) (6.a). (Max. 6 Nm.)<br />
ESSMANN GmbH • Im Weingarten 2 • D-32107 Bad Salzuflen • Telefon +49 (0) 5222.791-0 • Telefax +49 (0) 5222.791-236<br />
E-Mail: info@essmann.de • www.essmann.de<br />
A member of the ESSMANN GROUP.
NYM - J 3 x 1,5 mm²<br />
Abzweigdose<br />
connection box<br />
6. Elektrischer Anschluß 6. Electrical connection<br />
Ausgabe / Version: 26.08.2010 / tbe<br />
Technische Änderungen vorbehalten. / Subject to technical alterations. Seite / Page 8 von / of 10<br />
Art.Nr.: 25000026 Dok.Nr.:OFF-017047<br />
NYM - J 5 x 1,5 mm²<br />
GR 1 GR 2<br />
M<br />
M<br />
Netz 230 V AC<br />
power system<br />
230 V AC<br />
NYM - J 5 x 1,5 mm²<br />
M<br />
M<br />
M<br />
max. 10 Antrieb<br />
max. 10 drives<br />
Antrieb...<br />
drive...<br />
Antrieb...<br />
drive...<br />
Antrieb 1<br />
drive.1<br />
Abzweigdose<br />
connection box<br />
230 V AC<br />
Lüftungstaster<br />
230 V AC<br />
vent switch<br />
max. 230 V AC /max 1A<br />
Schwarz / black<br />
braun / brown<br />
blau / blue<br />
weiß / white<br />
weiß / white<br />
L1 L1 N L1 N<br />
(AUF) (ZU)<br />
230 V 50Hz<br />
• Vor Inbetriebnahme der Motoren auf freien<br />
Hubweg achten.<br />
• ESSMANN Motoröffner EM 230V 970 nicht mit<br />
Motoren anderen Typs in einer Lüftungsgruppe<br />
betreiben.<br />
6.1 Leitungsverlegung und elektrischer Anschluss<br />
nur durch zugelassene Elektrofirma. Die<br />
Anschlussleitungen dürfen weder auf Zug,<br />
Verdre<strong>hu</strong>ng, Quetsc<strong>hu</strong>ng noch auf Abscherung<br />
belastet werden. Im Schwenkbereich ist die<br />
Leitungsverlegung untersagt. Gültige<br />
Bestimmungen (siehe Seite 2) beachten.<br />
N<br />
L1<br />
M<br />
Lüftungsgruppe 1 max. 10 Antriebe<br />
ventlation group 1max. 10 drives<br />
weiß / white<br />
weiß / white<br />
blau / blue<br />
braun / brown<br />
schwarz / black<br />
weiß / white<br />
weiß / white<br />
blau / blue<br />
braun / brown<br />
schwarz / black<br />
230 V AC<br />
Lüftungstaster<br />
230 V AC<br />
vent switch<br />
6.2 Potenzialfreier Kontakt eingebaut im ESSMANN<br />
Motoröffner. Hubstange komplett eingefahren =<br />
Kontakt geöffnet. Hubstange nicht komplett<br />
eingefahren = Kontakt geschlossen<br />
Abzweigdose<br />
connection box<br />
M<br />
M<br />
• Prior to starting up the motors, make sure that<br />
they can freely perform their lifting motion.<br />
• Do not operate ESSMANN servomotor opener<br />
EM 230V/970 with other types of motors in a<br />
ventilation group.<br />
6.1 Have cables laid and electrical components<br />
connected by an approved electrician only. The<br />
connection cables must not be subjected to<br />
strain by means of tensile forces, twisting,<br />
crushing or shearing. Cables must not be laid<br />
within the pivoting range. The applicable<br />
regulations must be observed (see page 2).<br />
Lüftungsgruppe 2 max. 10 Antriebe<br />
ventlation group 2 max. 10 drives<br />
weiß / white<br />
weiß / white<br />
blau / blue<br />
braun / brown<br />
schwarz / black<br />
weiß / white<br />
weiß / white<br />
blau / blue<br />
braun / brown<br />
schwarz / black<br />
230 V AC<br />
Lüftungstaster<br />
230 V AC<br />
vent switch<br />
(ZU) (AUF) (ZU) (A UF)<br />
Abzweigdose<br />
connection box<br />
Abzweigdose<br />
connection box<br />
6.2 Potential-free contact integrated in ESSMANN<br />
servomotor opener. Lifting rod completely<br />
retracted = contact open. Lifting rod not<br />
completely retracted = contact closed.<br />
ESSMANN GmbH • Im Weingarten 2 • D-32107 Bad Salzuflen • Telefon +49 (0) 5222.791-0 • Telefax +49 (0) 5222.791-236<br />
E-Mail: info@essmann.de • www.essmann.de<br />
A member of the ESSMANN GROUP.
7. Funktionstest / Hinweise 7. Function test/Information<br />
Ausgabe / Version: 26.08.2010 / tbe<br />
Technische Änderungen vorbehalten. / Subject to technical alterations. Seite / Page 9 von / of 10<br />
Art.Nr.: 25000026 Dok.Nr.:OFF-017047<br />
• Nach Abschluss der Montage und<br />
Elektroinstallation ist zu prüfen, dass der<br />
Motoröffner das ordnungsgemäße Öffnen und<br />
Schließen der Lichtkuppel gewährleistet. Tritt<br />
der seltene Fall ein, das aufgrund der<br />
bauseitigen Unterkonstruktion der ESSMANN<br />
Motoröffner mit dieser kollidiert, bietet<br />
ESSMANN folgende Lösungsvorschläge.<br />
• Bei Verwendung der ESSMANN Motorkonsole<br />
Lang sind die Klemmsteine der ESSMANN<br />
Motorkonsole Lang zu verwenden und nicht die<br />
Gewindestifte der bisherigen Motorkonsole.<br />
Montage Motorkonsole lang<br />
7.1 Lösungsvorschlag 1:<br />
Die ESSMANN beiliegende Motorkonsole wird<br />
durch die ESSMANN Motorkonsole Lang im<br />
Aufsetzkranz ausgetauscht und der Motoröffner<br />
in den äußeren Löchern befestigt.<br />
Artikelnummer Motorkonsole lang: 0391730.<br />
Bei der Montage der ESSMANN Motorkonsole<br />
an der bauseitigen Unterkonstruktion ist die<br />
Unterkonstruktion auf den Belastungsfall zu<br />
prüfen. (Soglasten)<br />
7.2 Lösungsvorschlag 2:<br />
Die ESSMANN beiliegende Motorkonsole wird<br />
durch die ESSMANN Motorkonsole Lang<br />
ausgetauscht und an der bauseitigen<br />
Unterkonstruktion befestigt. Der Motoröffner<br />
wird anschließend in den äußeren Löchern<br />
befestigt. Artikelnummer Motorkonsole Lang<br />
0391730.<br />
Befestigung Motoröffner:<br />
• Bis auf zwei Gewindegänge die beiden<br />
Senkopfschrauben (9.a) aus den Klemmsteinen<br />
herausschrauben.<br />
• Die Klemmsteine in die<br />
Schwalbenschwanzführungen (3.a) des<br />
Motoröffners einführen.<br />
• Die Klemmsteine im Uhrzeigersinn drehen,bis<br />
die Klemmsteine in der<br />
Schwalbenschwanzführung (3.a) einrasten. Die<br />
Markierungen (9.c) auf den Klemmschalen muß<br />
parallel zu den Schwalbenschwanzführungen<br />
des Motorsöffners (3) stehen.<br />
• Die Senkopfschrauben (9.a) mit dem<br />
beiliegendem Sechskantschüssel (4mm) fest<br />
anziehen . Darauf achten, dass die Markierung<br />
(9.c) auf den Klemmschalen (9.b ) weiterhin<br />
parallel zu den Schwalbenschwanzführungen<br />
steht.<br />
• Für unsachgemäße Montage sowie<br />
Bedienfehler wird seitens des Herstellers keine<br />
Haftung übernommen.<br />
• Once the installation and electrical connection<br />
procedures are complete, you must check that<br />
the servomotor opener can ensure the skylight<br />
dome is opened and closed correctly. In the<br />
unlikely event that the ESSMANN servomotor<br />
opener collides with the substructure due to the<br />
way the substructure is installed at the site,<br />
ESSMANN offers the following suggestions for<br />
solutions.<br />
• If you are using the ESSMANN motor console<br />
Long, you must also use the connector blocks for<br />
the ESSMANN motor console Long rather than<br />
the grub screws for the previous motor console.<br />
Installing the motor console Long<br />
7.1 Suggested solution 1:<br />
The ESSMANN motor console provided is<br />
replaced with the ESSMANN motor console<br />
Long in the skylight base and the servomotor<br />
opener is fixed in place in the outer holes.<br />
Article number for motor console Long:<br />
0391730.<br />
When installing the ESSMANN motor console<br />
on a substructure on site, the substructure must<br />
be checked for loads (i.e. suction loads).<br />
7.2 Suggested solution 2:<br />
The ESSMANN motor console supplied is<br />
replaced with the ESSMANN motor console<br />
Long and fastened to the substructure on site.<br />
The servomotor opener is then fixed in place in<br />
the outer holes. Article number for motor<br />
console Long: 0391730.<br />
Fixing the servomotor opener in place:<br />
• Unscrew the two countersunk head screws<br />
(9.a) from the connector blocks until two<br />
threads are left.<br />
• Insert the connector blocks in the dovetail<br />
guides (3.a) of the servomotor opener.<br />
• Turn the connector blocks clockwise until they<br />
latch into place in the dovetail guide (3.a). The<br />
markings (9.c) on the clamp collars must be<br />
parallel with the dovetail guides of the<br />
servomotor opener (3).<br />
• Tighten the countersunk head screws (9.a)<br />
using the spanner provided (4 mm). Make sure<br />
that the markings (9.c) on the clamp collars<br />
(9.b) are still parallel with the dovetail guides.<br />
• Für unsachgemäße Montage sowie<br />
Bedienfehler wird seitens des Herstellers keine<br />
Haftung übernommen.<br />
ESSMANN GmbH • Im Weingarten 2 • D-32107 Bad Salzuflen • Telefon +49 (0) 5222.791-0 • Telefax +49 (0) 5222.791-236<br />
E-Mail: info@essmann.de • www.essmann.de<br />
A member of the ESSMANN GROUP.
Technische Daten:<br />
Technical specifications :<br />
Ausgabe / Version: 26.08.2010 / tbe<br />
Technische Änderungen vorbehalten. / Subject to technical alterations. Seite / Page 10 von / of 10<br />
Art.Nr.: 25000026 Dok.Nr.:OFF-017047<br />
Spannung:<br />
230V/AC – 50 HZ<br />
(+10% / -15%)<br />
Stromaufnahme: ca. 0,2A<br />
Druckkraft:<br />
max.500N<br />
Zugkraft:<br />
max.250N<br />
Hublängen:<br />
300,500,750 und<br />
1000mm<br />
Anschlussleitung: 5 x 0,75mm², Länge<br />
1,60m grau<br />
Geschwindigkeit:<br />
ca. 10mm/s<br />
Einschaltdauer:<br />
3.Min.(ED/ON),7Min.<br />
(AD/OFF)<br />
Sc<strong>hu</strong>tzart: IP 54 nach DIN 40500<br />
Sc<strong>hu</strong>tzisoliert:<br />
Klasse II nach DIN<br />
40014<br />
Umgebungstemperatur: :-5°C bis +75°C<br />
Abmessungen:<br />
41 x 82,5 x Hub + ca.<br />
133mm (B x H X L)<br />
Gehäusematerial: Aluminium-<br />
Rechteckprofil<br />
Farbe / Standert: Silber,exoxiert EV 1<br />
Sonderfarbe:<br />
auf Anfrage nach RAL<br />
Farbbeschichtet<br />
Endkappen:<br />
Lebensdauer:<br />
Kunststoff,grau<br />
10.000Lüftungszyklen<br />
bei Nennlast<br />
Voltage: 230 V AC – 50 HZ (+10% /<br />
-15%)<br />
Current consumption: Approx. 0.2 A<br />
Compressive force: Max. 500 N<br />
Tensile force:<br />
Max. 250 N<br />
Stroke lengths: 300, 500, 750 and 1000<br />
mm<br />
Connecting cable: 5 x 0.75 mm², length 1.60<br />
m, grey<br />
Speed:<br />
Approx. 10 mm/s<br />
Duty cycle:<br />
3 min. (DC/ON), 7 min.<br />
(ID/OFF<br />
Degree of protection: IP 54 in acc. with DIN<br />
40500<br />
All-insulated:<br />
Class II in acc. with DIN<br />
40014<br />
Ambient temperature: -5°C to +75°C<br />
Dimensions: 41 x 82.5 x stroke +<br />
approx. 133 mm<br />
(W x H X L)<br />
Housing material:<br />
Aluminium, rectangular<br />
profile<br />
Colour/standard: Silver, anodised EV 1<br />
Special colour:<br />
On request, in acc. with<br />
RAL –colour-coated<br />
End caps:<br />
Service life:<br />
Plastic, grey<br />
> 10,000 ventilation cycles<br />
at nominal load<br />
ESSMANN GmbH • Im Weingarten 2 • D-32107 Bad Salzuflen • Telefon +49 (0) 5222.791-0 • Telefax +49 (0) 5222.791-236<br />
E-Mail: info@essmann.de • www.essmann.de<br />
A member of the ESSMANN GROUP.