

Building instructions for the Potter Winged Box kite - 2kiters.com
Building instructions for the Potter Winged Box kite - 2kiters.com
Building instructions for the Potter Winged Box kite - 2kiters.com

Create successful ePaper yourself
Turn your PDF publications into a flip-book with our unique Google optimized e-Paper software.
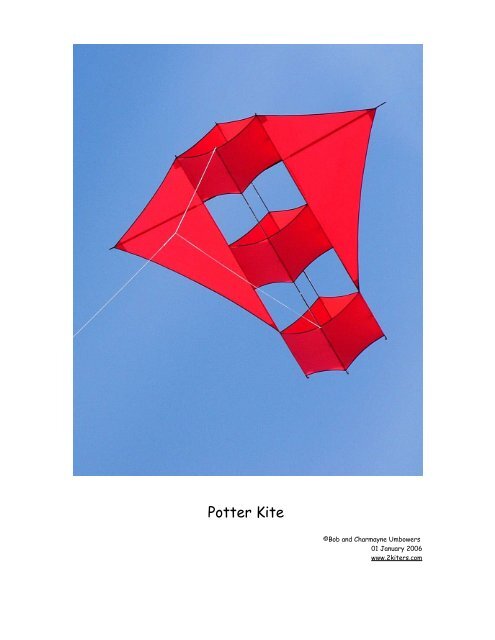
<strong>Potter</strong> Kite<br />
©Bob and Charmayne Umbowers<br />
01 January 2006<br />
www.2<strong>kite</strong>rs.<strong>com</strong>
The <strong>Potter</strong> is a historical <strong>kite</strong> designed by Mr. Samuel <strong>Potter</strong> in <strong>the</strong> late1800's. It was used<br />
<strong>for</strong> meteorological research. Some had 2 cells, this design has 3. The original <strong>kite</strong>s were<br />
made from cotton canvas and wood spars. Our replica uses ripstop nylon and carbon<br />
spars. Fly your <strong>kite</strong> in moderate wind with 80 - 100# test line. In high winds, remove <strong>the</strong><br />
wings and fly only <strong>the</strong> 3-celled box. Our dimensions are from Kites & Friends 06/2004.<br />
We have taught <strong>the</strong> <strong>Potter</strong> <strong>Box</strong> <strong>kite</strong> at 2 different <strong>kite</strong>making retreats. These are <strong>the</strong><br />
<strong>instructions</strong> along with a supply list and drawings.<br />
You will need:<br />
12 inches of 3.9 ounce Dacron <strong>for</strong> rein<strong>for</strong>cements<br />
11 yards of 1" wide 3/4 ounce black ripstop nylon tailing, split it in half lengthwise.<br />
62 feet of pre-stretched black 100# braided line<br />
8 RLG2300L rods<br />
3 RLG1880L rods<br />
5 ferrels cut from a C30 FG rod<br />
12 CLEFSD19 T-connectors, modified to attach to <strong>the</strong> cell spreader rods<br />
10 stubby nocks (NST2300)<br />
1 vinyl end cap, cut into 4 rings<br />
4 yards ¾ ounce ripstop nylon <strong>for</strong> sails, sleeves and bag<br />
24 sleeves (2.25” long x 1” wide cut from scraps of your ripstop nylon)<br />
8 pony beads, available from craft stores<br />
2 innertube bands about 1/2” wide cut from <strong>the</strong> intertube of a road bicycle tire such as a<br />
700 x 20/28C<br />
(Any part numbers listed are Kite Studio numbers.)<br />
O<strong>the</strong>r materials needed: matching thread and black thread. Helpful optional items: 1/4”<br />
wide double sided tape, a short, thin wood dowel, 2 or 3 chip bag clips or spring clo<strong>the</strong>s<br />
pins, beeswax, silver permanent pen, transparent tape.<br />
Sewing procedure:<br />
Wing rein<strong>for</strong>cements Sew <strong>the</strong> rein<strong>for</strong>cements onto <strong>the</strong> back of <strong>the</strong> skin. Make a right and<br />
a left wing. Sew only <strong>the</strong> inner edge. Use matching thread if available. Zig zag stitch.<br />
Cell panels Fold each of <strong>the</strong> 6 cell panels in half crosswise and make a hard crease along<br />
<strong>the</strong> fold. Sew two panels toge<strong>the</strong>r with a 1 cm seam allowance, making 3 long strips <strong>for</strong><br />
<strong>the</strong> 3 cells. Use matching thread if available. Straight stitch. Finger press <strong>the</strong> seam<br />
allowance to one side.<br />
Edge Binding Use black thread. Locate <strong>the</strong> edge-binding strips in your kit marked <strong>for</strong> <strong>the</strong><br />
wings. You have 2 long pieces, one <strong>for</strong> each wing. Fold a section of <strong>the</strong> strip in half and<br />
lay it around <strong>the</strong> wing edge. The edge of <strong>the</strong> wing must be on <strong>the</strong> fold line; fold <strong>the</strong> strip<br />
over and zig zag or straight stitch. Cut <strong>the</strong> strip off and continue binding <strong>the</strong> second edge.<br />
Cut and do <strong>the</strong> 3 rd side. Edge bind both wings.<br />
Locate <strong>the</strong> strips marked <strong>for</strong> <strong>the</strong> boxes. As with <strong>the</strong> wings, fold <strong>the</strong> binding and sew onto<br />
<strong>the</strong> long edges of <strong>the</strong> cell skins. You will sew one scallop, back tack and cut <strong>the</strong> binding<br />
off at <strong>the</strong> end of each scallop be<strong>for</strong>e sewing <strong>the</strong> next. Hint: use double-sided tape to
secure binding if you have problems. Optional: Be<strong>for</strong>e starting to sew cut <strong>the</strong> edge<br />
binding into pieces 48cm (19 inches) long. You need 24 strips. After sewing a strip, trim<br />
<strong>the</strong> end of <strong>the</strong> strip be<strong>for</strong>e sewing <strong>the</strong> next.<br />
Wing lines and loop Zig zag stitch and be sure to back tack all starts and stops.<br />
1. Sew a loop at <strong>the</strong> top of each wing. Use a 10 cm line. 3 cm of each end of <strong>the</strong><br />
line goes on <strong>the</strong> <strong>kite</strong> with <strong>the</strong> middle of <strong>the</strong> line at <strong>the</strong> tip, <strong>for</strong>ming a loop. Be<br />
careful not to make <strong>the</strong> loop too long.<br />
2. A 35cm line goes at <strong>the</strong> spreader tip of <strong>the</strong> each wing. Start <strong>the</strong> end of <strong>the</strong> line<br />
at <strong>the</strong> inner edge of <strong>the</strong> rein<strong>for</strong>cement. The remainder is off <strong>the</strong> tip of <strong>the</strong> wing<br />
and is used to tie <strong>the</strong> spreader in place.<br />
3. Use a 60cm line <strong>for</strong> <strong>the</strong> trailing edge tip of each wing. It is sewn in <strong>the</strong> same<br />
manner as <strong>the</strong> wing spreader tip.<br />
Second cell seam Stitch <strong>the</strong> short ends of each panel toge<strong>the</strong>r, <strong>com</strong>pleting 3 cells, with a<br />
1 cm seam allowance. Use matching thread if available. Straight stitch. Finger press <strong>the</strong><br />
seam allowance to one side.<br />
Cell loops and connecting lines Cut four 200 cm lengths of line. Use thread matching <strong>the</strong><br />
cell color if available. Zig zag stitch and be sure to back tack all starts and stops. Sew all<br />
lines on <strong>the</strong> inside of <strong>the</strong> cells. It is nice to line up <strong>the</strong> seams of <strong>the</strong> cells from one box to<br />
<strong>the</strong> next. Measure VERY accurately. This is vital! It is <strong>the</strong> most critical part of<br />
sewing this <strong>kite</strong>.<br />
1. Start with one cell and one line. Form and stitch securely a loop at <strong>the</strong> top of <strong>the</strong><br />
box, at one of <strong>the</strong> seams or one of <strong>the</strong> fold lines. Use 3 cm of line on <strong>the</strong> <strong>kite</strong>,<br />
make <strong>the</strong> loop (be careful not to make <strong>the</strong> loop too long; a 2cm loop is fine),<br />
dropping <strong>the</strong> line back down into <strong>the</strong> cell and continue sewing over <strong>the</strong> line to<br />
<strong>the</strong> o<strong>the</strong>r end of <strong>the</strong> cell. Stitch over <strong>the</strong> line, staying on <strong>the</strong> seam or fold line as<br />
closely as possible. Back stitch. Repeat this procedure with each of <strong>the</strong> o<strong>the</strong>r<br />
three 200 cm lines. Each loop needs to be <strong>the</strong> same length.***<br />
2. Mark with a straight pin or a silver pen <strong>the</strong> point on <strong>the</strong> line that is exactly 35<br />
cm from <strong>the</strong> end of <strong>the</strong> cell. Mark all 4 lines.<br />
3. Position this mark exactly at <strong>the</strong> start of <strong>the</strong> 2 nd cell with <strong>the</strong> line on <strong>the</strong> inside of<br />
<strong>the</strong> cell. Sew over it as in step 1. You will not be making <strong>the</strong> loop. Back stitch<br />
both ends. Repeat with <strong>the</strong> o<strong>the</strong>r 3 lines. ***<br />
4. When done with Step 3, you will have 2 cells attached to each o<strong>the</strong>r with 35 cm<br />
of line between <strong>the</strong>m. There is a loop at <strong>the</strong> top and a long length of line at <strong>the</strong><br />
trailing edge.<br />
5. Repeat step 2, marking <strong>the</strong> line exactly 35 cm from <strong>the</strong> edge of <strong>the</strong> second cell.<br />
6. Repeat step 3.<br />
7. You now have <strong>the</strong> cells permanently connected toge<strong>the</strong>r and spaced correctly.<br />
Sleeves The sleeves go inside <strong>the</strong> boxes and will control <strong>the</strong> longerons. They need to be<br />
stitched near <strong>the</strong> top and bottom edges of <strong>the</strong> four corners of each cell. (8 per cell.) Stitch<br />
on <strong>the</strong> long edge of <strong>the</strong> sleeve and push up <strong>the</strong> sleeve a little bit to make a slight tube<br />
ra<strong>the</strong>r than sewing <strong>the</strong> sleeve flat to <strong>the</strong> box. See sample. *** You may sew <strong>the</strong> sleeves<br />
into <strong>the</strong> first box right after you sew in <strong>the</strong> lines, be<strong>for</strong>e adding <strong>the</strong> second cell. Do <strong>the</strong><br />
second set of sleeves be<strong>for</strong>e adding <strong>the</strong> third cell.
Rods: To prepare <strong>the</strong> rods <strong>for</strong> assembly take <strong>the</strong> three RLG1880L rods and cut <strong>the</strong>m in<br />
half. Glue one of <strong>the</strong> T connectors onto one end of each cut rod.<br />
Take two of <strong>the</strong> RLG2300L rods from <strong>the</strong> kit and cut <strong>the</strong>m in half. Glue a nock onto one<br />
end of each RLG 2300L. (Total of 10).<br />
You must fit <strong>the</strong> box spreaders into <strong>the</strong> <strong>kite</strong> be<strong>for</strong>e gluing <strong>the</strong> second T connector to <strong>the</strong><br />
rod. Cut as necessary. When you glue <strong>the</strong> T connector in place, make sure it lines up with<br />
<strong>the</strong> o<strong>the</strong>r one. The box spreaders are approximately 60cm long. (RLG1880L rods)<br />
Longerons: Install ferrules to a depth that is half <strong>the</strong> length of your ferrel on four of <strong>the</strong><br />
full length (RLG2300L) rods. These will be positioned at <strong>the</strong> top of <strong>the</strong> <strong>kite</strong>. The four<br />
short longeron pieces are approximately 58cm overall. When assembled, each longeron<br />
has an arrow nock at both ends. When you put <strong>the</strong> rods into <strong>the</strong> cells, a circle of<br />
intertubing goes on 2 opposite longeron rods between <strong>the</strong> top and middle cell. They will<br />
be used to secure <strong>the</strong> wing spreaders in position. Cut <strong>the</strong> vinyl end cap into 4 rings. These<br />
will go over <strong>the</strong> arrow nocks and will hold <strong>the</strong> cell loops in place at <strong>the</strong> top of <strong>the</strong> <strong>kite</strong>.<br />
Once put into <strong>the</strong> cells, <strong>the</strong> longerons always remain in place.<br />
Cut each wing spreader (RLG2300L) to 104cm; install one rod into <strong>the</strong> ferrule to a depth<br />
that is half <strong>the</strong> length of your ferrel.<br />
Bridling Cut four 30cm pieces of line and one 50cm piece. Make loops of each. Set<br />
aside <strong>the</strong> long loop and attach 2 of <strong>the</strong> short ones to <strong>the</strong> boxes on a longeron without <strong>the</strong><br />
intertube loops. Position 1 at <strong>the</strong> top of <strong>the</strong> <strong>kite</strong> and <strong>the</strong> second above <strong>the</strong> bottom box. The<br />
remaining two short loops are attached, one each, to <strong>the</strong> lines extending from <strong>the</strong> wing<br />
bottom tips via a Prussic knot. Two turns is usually sufficient.<br />
Use <strong>the</strong> remaining line <strong>for</strong> your bridle. Tie a loop at each end. Attach it to <strong>the</strong> loops you<br />
put on <strong>the</strong> boxes with a lark's head. Lark's head <strong>the</strong> final loop to <strong>the</strong> bridle. This is your<br />
tow point.<br />
Done! Enjoy flying your replica <strong>Potter</strong> <strong>kite</strong>.
<strong>Potter</strong> Kite rein<strong>for</strong>cements
<strong>Potter</strong> Kite dimensions