User Manual (PDF, 2.7 MB) - BlueAnt Wireless
User Manual (PDF, 2.7 MB) - BlueAnt Wireless
User Manual (PDF, 2.7 MB) - BlueAnt Wireless

You also want an ePaper? Increase the reach of your titles
YUMPU automatically turns print PDFs into web optimized ePapers that Google loves.
<strong>BlueAnt</strong><br />
InterPhone Features<br />
Automatic Volume Adjusting<br />
High/Low Volume Modes<br />
Voice Dial and Voice Answer<br />
Bluetooth Helmet Handsfree<br />
Rider to Passenger Intercom<br />
Bike to Bike Intercom<br />
All Weather Water Resistant<br />
Index<br />
Package Contents ................................................................................................. 2<br />
Product Descriptions ............................................................................................ 2<br />
Charging the Headset ........................................................................................... 3<br />
Powering On and Off ............................................................................................ 3<br />
Pairing to your Bluetooth Mobile Phone ............................................................. 3<br />
Installing the Clip Mount ...................................................................................... 4<br />
Using the Headset Clip Mount with Fastening Clamp ......................................... 4<br />
Using the Headset Clip Mount with Adhesive ...................................................... 5<br />
Mounting the InterPhone ...................................................................................... 5<br />
Quick removal of the InterPhone ......................................................................... 6<br />
Basic Operations .................................................................................................. 7<br />
Make a Call: ........................................................................................................ 7<br />
Answer a Call: ..................................................................................................... 7<br />
End a Call: ........................................................................................................... 7<br />
Voice Dial: ........................................................................................................... 7<br />
Reject a Call (For Handsfree Profile Phones only): ............................................. 8<br />
Volume Settings: ................................................................................................. 8<br />
Reconnect the Interphone: .................................................................................. 8<br />
Special Features ................................................................................................... 9<br />
High Volume or Low Volume Mode ..................................................................... 9<br />
Voice Answer and Reject Mode ........................................................................ 10<br />
Advanced Functions ........................................................................................... 11<br />
Intercom Pairing Procedure: .............................................................................. 11<br />
Using as an Intercom: ....................................................................................... 11<br />
Multi-Pairing / Switching Connections between Phones .................................... 12<br />
Specifications ...................................................................................................... 13<br />
Help ...................................................................................................................... 14
Package Contents<br />
Product Descriptions<br />
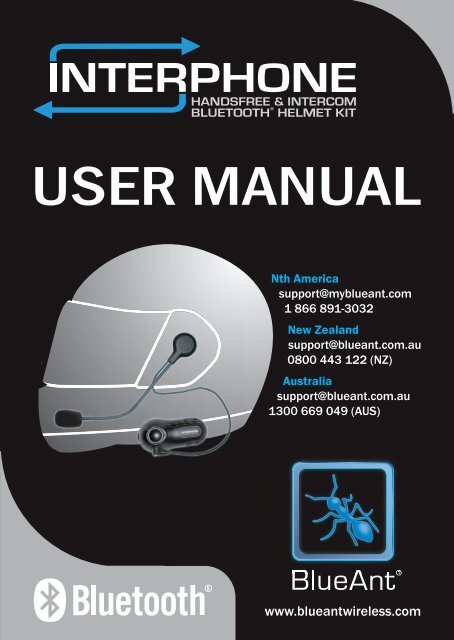
The <strong>BlueAnt</strong> InterPhone is a Bluetooth Headset designed for the motorcycle rider<br />
and passenger who wish to have clear and reliable wireless communications while<br />
riding. This headset is equipped with hi-tech features: Voice and Answer Reject,<br />
Auto-Volume Level Adjusting, Low/High Volume Modes and Rider to Passenger or<br />
Bike to Bike Intercom. Note: You must have two Interphone Headsets to use the<br />
Intercom feature. This headset is compatible with Bluetooth cellular phones and<br />
can be suited to any sort of helmet for motorcyclists.<br />
1. Multi-function Button (MFB) 5. Charger and Headset Socket<br />
2. LED Status Indicator 6. Hook<br />
3. Volume Up Button 7. Ear Speaker<br />
4. Volume Down Button 8. Microphone<br />
9. Headset Plug<br />
2
Charging the Headset<br />
Note: After opening the box please charge the InterPhone before using.<br />
1. Connect the provided AC charger’s plug to the Charger Socket(5).<br />
2. Plug the charger to 110-240v electricity socket and Turn On.<br />
3. The LED will blink Red to Green while charging.<br />
4. When the LED turns a Steady Green, charging<br />
is complete. Disconnect the charger<br />
5. When the LED turns to a blinking red,<br />
the battery is low. Charge the unit as above.<br />
Note: A normal charge from a low battery will take about 4 hours.<br />
Powering On and Off<br />
To Power On: Press and Hold the MFB(1) for approximately 1 second until the<br />
LED turns blue and begins to flash. Headset will beep once.<br />
To Power Off: Press and Hold the MFB for approximately 5 seconds.<br />
The Headset will beep 3 times and the LED will turn red.<br />
After a few seconds the headset will switch off.<br />
Pairing to your Bluetooth Mobile Phone<br />
Pairing will create a stored connection in the InterPhone and your Bluetooth cell<br />
phone. Pairing has to be done only once when first connecting to a phone.<br />
1. From OFF, Press and Hold the MFB on the InterPhone for about 5<br />
seconds until the LED turns to a blinking red/blue. InterPhone is now in<br />
pairing mode ready to be found in by your phone.<br />
2. While the headset is in pairing mode, access the Bluetooth menu of your<br />
phone. Turn Bluetooth ON.<br />
3. Go to the Devices list and execute a Bluetooth search (discover/add/pair)<br />
See your phone’s manual for exact search procedure if required.<br />
4. After several seconds your phone will display a list of Bluetooth devices<br />
found. Select InterPhone and Press Ok/Next.<br />
5. The phone will ask for a pin key/password, enter 0000 (4 zeros) and press<br />
Ok. (The devices will then use 128 bit encryption for security)<br />
6. If the Pairing is successful the LED will change to a blinking Blue.<br />
7. The phone and the InterPhone will then connect.<br />
Note: Some phones do not connect directly after entering 0000.<br />
You may need to connect manually after pairing by-<br />
1. Press MFB (1st beep) once to connect.<br />
2. Go to the phones Bluetooth Paired device list, select the InterPhone and<br />
Press Connect.<br />
The InterPhone is now ready to be installed.<br />
3
Installing the Clip Mount<br />
Important: There are 2 types of Headset Clips included<br />
in this package. Either can be used with full<br />
or open faced helmets, on either side of<br />
the helmet.<br />
- Headset Clip Mount with Fastening Clamp.<br />
(removable)<br />
- Headset Clip Mount with Adhesive. (fixed)<br />
Use the one which best suits your helmets design.<br />
Using the Headset Clip Mount with Fastening Clamp<br />
1. Using the provided<br />
screw driver, loosen<br />
the Clips’ screws<br />
enough to allow the<br />
Clip to slide onto<br />
either side of the<br />
Helmets’ shell.<br />
2. Make sure you put<br />
the clip under the helmets padding.<br />
3. Adjust the Clip until you find the best location for your helmet.<br />
4. Tighten the screws to hold the clip firmly in place.<br />
Note: If the helmet’s shell is too<br />
thick, the Spacer (provided) may<br />
be needed to put in between the 2<br />
parts of the Headset Clip, as<br />
shown in the picture on the right.<br />
Use the additional longer screws<br />
(provided) for this purpose.<br />
4
Using the Headset Clip Mount with Adhesive<br />
1. Before removing the protective strip from the double-sided adhesive, find<br />
the best location to place the Headset Clip Mount.<br />
2. Clean the part of the helmet that the Headset Clip Mount with Adhesive will<br />
be attached to. Remove any dirt or grease. Do not use cleaners that may<br />
damage the helmet or that will leave an oily residue. Make sure the surface<br />
is dry before continuing.<br />
3. Check again the positioning of the clip. Once it is mounted it will not be<br />
possible to move without making the<br />
adhesive unusable. So please take care<br />
when choosing its position.<br />
4. Note that the small section of the two<br />
holes/slots in the Clip must be faced<br />
towards the bottom of the helmet. As<br />
shown in the picture to the right.<br />
5. Remove the protective strip from the<br />
double-sided adhesive and carefully<br />
attach the Clip to the outside shell of the<br />
helmet.<br />
Mounting the InterPhone<br />
1. Take your InterPhone<br />
Headset and slide it down<br />
into the slots in the<br />
Headset Clip Mount.<br />
Make sure that it’s<br />
perfectly fitted and locked<br />
into place by trying to<br />
extract it, pulling upwards.<br />
2. Now you need to attach the<br />
speaker and microphone<br />
arm to the inside of the<br />
helmet. Take the Velcro<br />
pad which the speaker will<br />
attach to, and test for the<br />
best position to fix it. The<br />
Velcro Pad should be fixed<br />
at the height of your ear in the helmets ear pocket. You will need to put the<br />
helmet on a few times to find the optimum position to apply the pad. When the<br />
correct positioning is found, remove the protective strip and apply the Velcro<br />
Pad.<br />
5
3. Next, take the Ear Speaker(7) and attach it to the Velcro Pad. Run the<br />
Microphone Arm down along down to where your mouth will be. As the<br />
Microphone Arm is flexible, you can adjust it so it sits in the optimum position in<br />
front of your mouth. Some helmets have removable padding; if yours does, it is<br />
recommended to run the speaker and mic under the padding.<br />
4. Taking care to match the<br />
pins up, connect the<br />
Headset Plug(9) to the<br />
Headset Socket(5). The<br />
plug can only be inserted<br />
in one position.<br />
5. Secure the cord of the Headset<br />
Plug(9) inside the helmet. Tuck<br />
any extra wire into the helmet.<br />
Ensure that only few centimeters<br />
of the cord comes out.<br />
You have successfully mounted the InterPhone<br />
Quick removal of the InterPhone<br />
Remove the <strong>BlueAnt</strong> InterPhone by pushing down the lock<br />
as shown and then take out the InterPhone Module in an<br />
upward motion.<br />
6
Basic Operations<br />
IMPORTANT:<br />
The BLUEANT INTERPHONE needs to be ‘paired’ with your Bluetooth mobile<br />
phone before you can use the following functions. (See Pairing to your<br />
Bluetooth Mobile Phone on page 3.)<br />
Make a Call:<br />
Dial the number using your phone as normal. Audio will automatically be on the<br />
headset.<br />
Note: With some phones like Siemens S55 and Panasonic X70, audio is always<br />
on the phone during an outgoing call. You will need to press MFB(1) to transfer<br />
the audio to your headset.<br />
Answer a Call:<br />
To answer an incoming call just press the MFB(1) for 1 second (1 st beep).<br />
Or, Assuming the InterPhone Voice Answer and Reject is activated:<br />
Accept a call by loudly saying a word within 10 seconds. (Example: When you<br />
receive the ring tone, Say loudly ”Hello!”) The call will be answered. Audio will be<br />
on the headset.<br />
Note: See InterPhone Voice Dial and Reject Activation / Deactivation on page 10<br />
End a Call:<br />
Press the MFB (1) for 1 second to end the call (1 st beep).<br />
Voice Dial:<br />
Important: First, make sure to activate the voice dial function of your phone.<br />
Record at least one voice tag. (Kindly refer to the procedure in your phone’s<br />
manual.) Note: Voice dialing entries must be stored in the phone’s memory, not on<br />
the SIM card!<br />
1. Press MFB (1) for 1 second (1 st beep) to manually activate voice dialing. The<br />
Voice dial tone/ beep will be heard on the headset prompting the user to say<br />
the voice tag of the contact to call.<br />
2. Say the voice tag. The voice will be played back to you then the phone will<br />
dial the number automatically.<br />
7
Reject a Call (For Handsfree Profile Phones only):<br />
To reject an incoming call just press the MFB(1) for 2 seconds (2 nd beep).<br />
Or, Assuming the InterPhone Voice Answer and Reject is activated, be<br />
silent for 10 seconds. The call will automatically be rejected.<br />
Note: See InterPhone Voice Dial and Reject Activation / Deactivation on page 10<br />
Audio Transfer (For Handsfree Profile Phones only):<br />
During an ongoing call, audio transfer can be made.<br />
From BLUEANT INTERPHONE to Phone:<br />
Press the MFB(1) for 2 seconds (2 nd beep). The audio will be transferred to<br />
the phone.<br />
From Phone to BLUEANT INTERPHONE: Press the MFB(1) for 1 second (1 st<br />
beep). The audio will be transferred back to the headset.<br />
Volume Settings:<br />
Note: This is for basic volume adjustment once set up. Please see the section in<br />
Special Features on High or Low Volume Mode to set the correct volume range for<br />
your helmet.<br />
Press Volume Up(3) or down(4) button until desired level is reached.<br />
Automatic Volume Adjustment. When the bike is in motion (motorcycle<br />
running and there is driving and background noise): The BLUEANT INTERPHONE<br />
will automatically adjust the volume in response to the background noise. Thus,<br />
the user can continuously hear the audio clearly even when there is loud<br />
background noise.<br />
Reconnect the Interphone:<br />
To reconnect your cell phone to the Interphone after switching off or going out<br />
of range.<br />
1) Turn the Interphone ON and Press the MFB(1) once (first beep)<br />
2) Or, use your phones Bluetooth Menu to connect<br />
8
Special Features<br />
High Volume or Low Volume Mode<br />
Setting to high or low volume mode depends on user’s helmet design or<br />
structure. Some helmet types may require near or far positioning of the<br />
InterPhones Ear Speaker(7) from the user’s ear. Please try both modes to<br />
discover which mode is appropriate for your helmet.<br />
High Volume Mode Activation is advised if you position the Ear Speaker(7)<br />
far from your ear. This will enable you to still have a clear and audible audio.<br />
Procedure:<br />
1. From Off, press and hold the Volume Up(3).<br />
2. Keep the Volume Up(3) pressed and then press the MFB(1) for 5<br />
seconds.<br />
3. Power On beep followed by a HIGH TONE can be heard. The Status<br />
Indicator(2) will flash red-blue.<br />
4. Release both buttons.<br />
Note: Be careful. At full volume, the Ear Speaker(7) can be very loud. Do<br />
not position your Ear Speaker close to your ear.<br />
Low Volume Mode Activation is advised if the positioning of your Ear<br />
Speaker(7) is very near to your ear.<br />
Procedure:<br />
1. From Off, press and hold the Volume Down(4).<br />
2. Keep the Volume Down(4) pressed and then press the MFB(1) for 5<br />
seconds.<br />
3. Power On beep followed by a LOW TONE can be heard. The Status<br />
Indicator(2) will flash red-blue.<br />
4. Release both buttons.<br />
9
Voice Answer and Reject Mode<br />
• When activated, the user can accept a call by saying any word within 10<br />
seconds. The user can also reject a call by being silent for 10 seconds.<br />
• When deactivated, apply normal answer and normal rejection of call.<br />
Activation:<br />
1. From Off, press and hold simultaneously the Volume Up(3) & Volume<br />
down(4) buttons.<br />
2. Keep both buttons pressed and then press the MFB(1) for 5 seconds.<br />
3. Power On beep followed by a HIGH TONE can be heard. The Status<br />
Indicator(2) will flash red-blue.<br />
4. Release all 3 buttons.<br />
Deactivation:<br />
1. From Off, press and hold simultaneously the Volume Up(3) & Volume<br />
Down(4) buttons;<br />
2. Keep both buttons pressed and then press the MFB(1) for 5 seconds.<br />
3. Power On beep followed by a LOW TONE can be heard. The Status<br />
Indicator(2) will flash red-blue.<br />
4. Release all 3 buttons.<br />
10
Advanced Functions<br />
Driver to Passenger or Bike to Bike INTERCOM<br />
The BLUEANT INTERPHONE has motorcycle intercom system that allows driver<br />
to passenger conversations. This intercom features full-duplex communication so<br />
driver and passenger may enjoy simultaneous conversations just like on the<br />
telephone. To use this feature you must have two <strong>BlueAnt</strong> InterPhone Headsets<br />
Intercom Pairing Procedure:<br />
1. Prepare two BLUEANT INTERPHONES.<br />
Note: Make sure to switch off the phones paired to these two headsets.<br />
2. Set the two units to pairing mode (from off, press and hold the MFB(1) of the<br />
BLUEANT INTERPHONE for about 5 seconds or until you hear the 2 nd<br />
beep).<br />
3. When the two are set to pairing, press Volume Up(3) button of BLUEANT<br />
INTERPHONE N°1 for about 5 seconds (1 st beep followed by 5 successive<br />
beeps will be heard and then BLUEANT INTERPHONE N°1 turns off).<br />
4. Wait for 3 seconds and then switch on BLUEANT INTERPHONE N°1.<br />
5. Press Volume Down(4) button of BLUEANT INTERPHONE N°2 for about 5<br />
seconds (1 st beep followed by 5 successive beeps will be heard). BLUEANT<br />
INTERPHONE N°2 pairing blink will change to blinking blue while BLUEANT<br />
INTERPHONE N°1 will again turn off.<br />
6. Wait for 3 seconds and then switch on again BLUEANT INTERPHONE N°1.<br />
7. Press MFB(1) of BLUEANT INTERPHONE N°1 for about 3 seconds (2 nd<br />
beep) to connect to BLUEANT INTERPHONE N°2.<br />
The set-up has been successful. Both headsets are now connected. Fullduplex<br />
conversations can be made.<br />
Note: This has to be done only once every time you want to use 2 different<br />
BLUEANT INTERPHONE together.<br />
Using as an Intercom:<br />
To switch from phone to intercom, press MFB(1) for 3 seconds or until<br />
you hear the 2 nd beep.<br />
To switch from intercom to phone, press MFB(1) for 1 second or until<br />
you hear the 1 st beep.<br />
Important Notes:<br />
1. Both BLUEANT INTERPHONES’ must be in intercom mode to allow<br />
intercom.<br />
2. When the <strong>BlueAnt</strong> Interphones go out of range of each other they will<br />
drop out of intercom mode and will need to be manually reconnected<br />
when back in range. This is done by simply pressing and holding the MFB<br />
11
down on one of the Interphones until you hear the second beep, then<br />
both units will resume intercom mode.<br />
3. During intercom mode, the ring of the phone will not be transferred to the<br />
BLUEANT INTERPHONE automatically. (Tip: Switch on your phone’s<br />
vibrate option to notice an incoming call.)<br />
4. On an incoming call, Press the MFB(1) for 1 second to transfer the call to<br />
your headset. Some phones may require 2 times press on MFB(1) in<br />
order to answer an incoming phone call from intercom mode (1 st press to<br />
transfer the call to the headset, 2 nd press to answer the call).<br />
Multi-Pairing / Switching Connections between Phones<br />
The BLUEANT INTERPHONE can be paired to 5 different Bluetooth phones. An<br />
additional pairing will automatically delete the phone that has not been used for<br />
the longest time. Thus, maintaining 5 phones in its memory.<br />
You can easily switch to any of the paired phones by:<br />
1. Disconnecting the currently used phone using the “Active devices” in the<br />
Bluetooth menu of that phone.<br />
2. Connect to the wanted phone by using the “Paired devices” in the Bluetooth<br />
menu of that wanted phone.<br />
Note: Reconnection to a paired phone can also be done by pressing the<br />
MFB(1). But when you press the MFB(1), the BLUEANT INTERPHONE will<br />
attempt to connect to the last used phone only. So it is recommended to connect<br />
to another paired phone using the phone’s menu.<br />
12
Specifications<br />
Bluetooth Compliance:<br />
Bluetooth Version 1.2 Specifications<br />
Supported Bluetooth Profiles:<br />
Bluetooth Headset and Handsfree Profiles with Automatic Detection<br />
Operating Range:<br />
Up to 33ft (10m) for cell phones<br />
Up to 450ft (150m) for two Interphones<br />
Frequency:<br />
2.4GHz<br />
Talk Time:<br />
Up to 10 hours<br />
Standby Time:<br />
Up to 700 hours<br />
Charging Time:<br />
4 hours<br />
Battery type:<br />
Rechargeable Lithium Polymer 350mAh<br />
Special features:<br />
Full Duplex<br />
Full DSP Noise Cancellation / Echo Cancellation<br />
Automatic Volume Adjustment depending on ambient noise and speed level<br />
Intercom Mode<br />
Easy to find Volume / Multi-Function buttons<br />
Digital Volume Control<br />
Voice Recognition Dialing (If phone supports)<br />
Answer or reject incoming calls by voice control<br />
Water Resistant<br />
Aerodynamic and Compact Shape<br />
Easy to install, compatible with most common helmets available in the market<br />
Main unit detachable from helmet mounting clip<br />
Accessories:<br />
*High Power ultra slim speaker with integrated microphone boom<br />
*Two helmet mounting clips (clamp type and permanent type)<br />
*Wall Charger<br />
Dimensions (mm):<br />
87x 43x 23<br />
Weight:<br />
35g excluding accessories<br />
13
Help<br />
Phone/Device Software<br />
Please make sure you have the latest firmware upgrade for your Phone<br />
especially if you are using a PDA Phone. Go to the support section of the<br />
manufacturers’ website to check you have the latest version. Many new mobile<br />
phones, pda’s and computers phones require a Bluetooth patch to improve<br />
Bluetooth functionality from the original released version.<br />
Resetting Your Phone/Device<br />
Phones can become prone to software and memory issues which may cause<br />
Bluetooth reconnection problems. This can be fixed simply by turning the phone<br />
off and back on again.<br />
The phone will be reset and the working memory cleared.<br />
Trouble Shooting and Support Documents<br />
See the support section of www.blueantwireless.com for troubleshooting and<br />
Frequently Asked Questions (FAQ) as well as info on using with computers for<br />
VOIP application\s.<br />
<strong>BlueAnt</strong> Warranty Process<br />
1. Should you be having difficulties in operation please refer to the online FAQ<br />
and support documents, or call us. Our number is on the back page.<br />
2. Check our website for more information, updated manuals and<br />
troubleshooting. www.blueantwireless.com<br />
3. Call us and speak to one of the <strong>BlueAnt</strong> <strong>Wireless</strong> Customer Service Team<br />
We will clarify whether you have a hardware or connection issue.<br />
4. Return the unit directly to <strong>BlueAnt</strong> for testing and replacement of faulty items<br />
– Please call to arrange a Return Merchandise Authorization (RMA) number.<br />
Warranty Terms and Conditions<br />
1. <strong>BlueAnt</strong> Warrant the original purchaser of this product only.<br />
2. <strong>BlueAnt</strong> will replace or repair any faulty product provided it has not been<br />
misused or abused in any way.<br />
3. There are no user serviceable parts inside this product. Using a nonauthorized<br />
repairer will void the warranty.<br />
4. The Warranty is valid for 2 years (24 months) from the date of purchase.<br />
• Proof of purchase must be supplied to obtain warranty.<br />
• Headset must be in original packaging with serial number<br />
for warranty to be valid.<br />
5. Warranties are effective from the proof of purchase date<br />
and not from the date of any subsequent repair or<br />
replacement.<br />
14
Disclaimers:<br />
This manual is published by <strong>BlueAnt</strong>. The information contained in this document is subject to<br />
change without notice. All rights reserved. The Bluetooth word, mark and logos are owned by<br />
the Bluetooth SIG, Inc. and any use of such marks by <strong>BlueAnt</strong> is under license. Other<br />
trademarks and trade names are those of their respective owners.<br />
Warning: Prolonged use of a headset at high volumes may affect your hearing capacity. Using<br />
for extensive time periods may result in noise induced hearing loss (NIHL). Be careful about<br />
using in noisy environments as the tendency is to turn the headset up to compensate. Hearing<br />
loss may occur if the headset is used at maximum volumes for more than 5 minutes per day.<br />
Hearing loss may occur if the headset is used at medium volumes if used for more than 1 hour<br />
per day. Exposure to sound at such a close range for more than eight hours a day may result in<br />
hearing loss, even at low levels.<br />
Correct Disposal of This Product<br />
(Waste Electrical & Electronic Equipment)<br />
(Applicable in the European Union and other European countries with separate collection<br />
systems)<br />
This marking shown on the product or its literature, indicates that it should not be disposed with<br />
other household wastes at the end of its working life. To prevent possible harm to the<br />
environment or human health from uncontrolled waste disposal, please separate this from other<br />
types of wastes and recycle it responsibly to promote the sustainable reuse of material resources.<br />
Household users should contact either the retailer where they purchased this product, or their local<br />
government office, for details of where and how they can take this item for environmentally safe<br />
recycling.<br />
Business users should contact their supplier and check the terms and conditions of the purchase<br />
contract. This product should not be mixed with other commercial wastes for disposal.<br />
English<br />
This equipment is in compliance with the essential requirements and other relevant provisions of<br />
Directive 1999/5/EC<br />
FCC Notices<br />
This device complies with part 15 of the FCC rules. Operation is subject to the following two<br />
conditions: (1) This device may not cause harmful interference, and (2) This device must<br />
accept any interference received, including interference that may cause undesired operation.<br />
You are cautioned that changes or modifications not expressly approved by the part<br />
responsible for compliance could void the user’s authority to operate the equipment.<br />
FCC RF Exposure requirements:<br />
“This device and its antenna(s) must not be co-located or operating in conjunction with any<br />
other antenna or transmitter.”<br />
15