duallie Weather Shield instructions - BOB Trailers and Strollers
duallie Weather Shield instructions - BOB Trailers and Strollers
duallie Weather Shield instructions - BOB Trailers and Strollers

Create successful ePaper yourself
Turn your PDF publications into a flip-book with our unique Google optimized e-Paper software.
<strong>duallie</strong> <strong>Weather</strong> <strong>Shield</strong> <strong>instructions</strong><br />
(800) 893-2447 www.bobgear.com email- info@bobgear.com Ph: (208) 375-5171<br />
Fax: (208) 375-5172, <strong>BOB</strong> <strong>Trailers</strong>, Inc. 5475 Gage St. Boise, ID 83706<br />
Congratulations on your<br />
purchase of the <strong>BOB</strong><br />
<strong>Weather</strong> <strong>Shield</strong>. It is<br />
designed to provide your<br />
child with protection from<br />
inclement weather. Proper<br />
installation <strong>and</strong> care will<br />
provide years of reliable<br />
service.<br />
Before attempting to use<br />
or attach your new<br />
<strong>Weather</strong> <strong>Shield</strong>, read <strong>and</strong><br />
underst<strong>and</strong> these<br />
<strong>instructions</strong> completely<br />
to insure proper<br />
assembly <strong>and</strong> operation.<br />
If you are unclear on any<br />
point, contact your dealer<br />
or <strong>BOB</strong> before use.<br />
Warnings<br />
. This product is designed<br />
exclusively for use with<br />
<strong>BOB</strong> Duallie <strong>and</strong><br />
Ironman Duallie<br />
strollers. It is not<br />
intended for use with<br />
other strollers or<br />
products.<br />
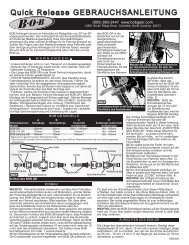
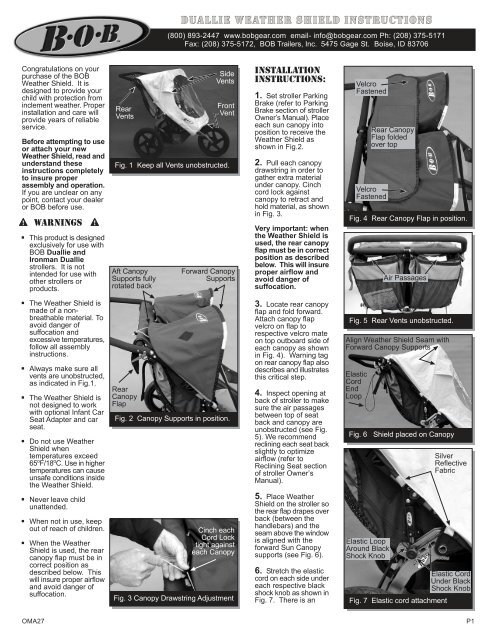
Rear<br />
Vents<br />
Aft Canopy<br />
Supports fully<br />
rotated back<br />
Side<br />
Vents<br />
Front<br />
Vent<br />
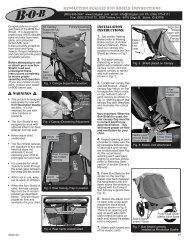
Fig. 1 Keep all Vents unobstructed.<br />
Forward Canopy<br />
Supports<br />
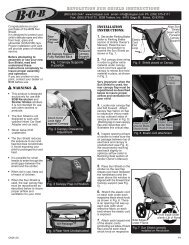
INSTALLATION<br />
INSTRUCTIONS:<br />
1. Set stroller Parking<br />
Brake (refer to Parking<br />
Brake section of stroller<br />
Owner’s Manual). Place<br />
each sun canopy into<br />
position to receive the<br />
<strong>Weather</strong> <strong>Shield</strong> as<br />
shown in Fig.2.<br />
2. Pull each canopy<br />
drawstring in order to<br />
gather extra material<br />
under canopy. Cinch<br />
cord lock against<br />
canopy to retract <strong>and</strong><br />
hold material, as shown<br />
in Fig. 3.<br />
Very important: when<br />
the <strong>Weather</strong> <strong>Shield</strong> is<br />
used, the rear canopy<br />
flap must be in correct<br />
position as described<br />
below. This will insure<br />
proper airflow <strong>and</strong><br />
avoid danger of<br />
suffocation.<br />
Velcro<br />
Fastened<br />
Rear Canopy<br />
Flap folded<br />
over top<br />
Velcro<br />
Fastened<br />
Fig. 4 Rear Canopy Flap in position.<br />
Air Passages<br />
. The <strong>Weather</strong> <strong>Shield</strong> is<br />
made of a nonbreathable<br />
material. To<br />
avoid danger of<br />
suffocation <strong>and</strong><br />
excessive temperatures,<br />
follow all assembly<br />
<strong>instructions</strong>.<br />
. Always make sure all<br />
vents are unobstructed,<br />
as indicated in Fig.1.<br />
. The <strong>Weather</strong> <strong>Shield</strong> is<br />
not designed to work<br />
with optional Infant Car<br />
Seat Adapter <strong>and</strong> car<br />
seat.<br />
. Do not use <strong>Weather</strong><br />
<strong>Shield</strong> when<br />
temperatures exceed<br />
65 o F/18 o C. Use in higher<br />
temperatures can cause<br />
unsafe conditions inside<br />
the <strong>Weather</strong> <strong>Shield</strong>.<br />
. Never leave child<br />
unattended.<br />
. When not in use, keep<br />
out of reach of children.<br />
. When the <strong>Weather</strong><br />
<strong>Shield</strong> is used, the rear<br />
canopy flap must be in<br />
correct position as<br />
described below. This<br />
will insure proper airflow<br />
<strong>and</strong> avoid danger of<br />
suffocation.<br />
Rear<br />
Canopy<br />
Flap<br />
Fig. 2 Canopy Supports in position.<br />
Cinch each<br />
Cord Lock<br />
tight against<br />
each Canopy<br />
Fig. 3 Canopy Drawstring Adjustment<br />
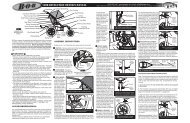
3. Locate rear canopy<br />
flap <strong>and</strong> fold forward.<br />
Attach canopy flap<br />
velcro on flap to<br />
respective velcro mate<br />
on top outboard side of<br />
each canopy as shown<br />
in Fig. 4). Warning tag<br />
on rear canopy flap also<br />
describes <strong>and</strong> illustrates<br />
this critical step.<br />
4. Inspect opening at<br />
back of stroller to make<br />
sure the air passages<br />
between top of seat<br />
back <strong>and</strong> canopy are<br />
unobstructed (see Fig.<br />
5). We recommend<br />
reclining each seat back<br />
slightly to optimize<br />
airflow (refer to<br />
Reclining Seat section<br />
of stroller Owner’s<br />
Manual).<br />
5. Place <strong>Weather</strong><br />
<strong>Shield</strong> on the stroller so<br />
the rear flap drapes over<br />
back (between the<br />
h<strong>and</strong>lebars) <strong>and</strong> the<br />
seam above the window<br />
is aligned with the<br />
forward Sun Canopy<br />
supports (see Fig. 6).<br />
6. Stretch the elastic<br />
cord on each side under<br />
each respective black<br />
shock knob as shown in<br />
Fig. 7. There is an<br />
Fig. 5 Rear Vents unobstructed.<br />
Align <strong>Weather</strong> <strong>Shield</strong> Seam with<br />
Forward Canopy Supports<br />
Elastic<br />
Cord<br />
End<br />
Loop<br />
Fig. 6 <strong>Shield</strong> placed on Canopy<br />
Elastic Loop<br />
Around Black<br />
Shock Knob<br />
Fig. 7 Elastic cord attachment<br />
Silver<br />
Reflective<br />
Fabric<br />
Elastic Cord<br />
Under Black<br />
Shock Knob<br />
OMA27<br />
P1
opening mid way up<br />
each side (with silver<br />
reflective fabric on each<br />
end) where the elastic<br />
cord is exposed.<br />
7. Attach each looped<br />
end of the elastic cords<br />
(protruding out sides of<br />
back flap) around each<br />
black shock knob on<br />
respective side of<br />
stroller, as shown in Fig.<br />
7 (right side shown).<br />
The cord locks allow the<br />
loop to be enlarged or<br />
reduced, thereby<br />
adjusting the tension.<br />
8. Locate black plastic<br />
end plugs at outboard<br />
ends of stroller. Note<br />
hole on top of each<br />
plug. Locate metal wire<br />
stay at front of <strong>Weather</strong><br />
<strong>Shield</strong> (see Fig. 8). Pull<br />
<strong>Weather</strong> <strong>Shield</strong> forward<br />
<strong>and</strong> insert ends of metal<br />
stay into holes on the<br />
black plastic plugs.<br />
9. Stretch the elastic<br />
edges of the <strong>Weather</strong><br />
<strong>Shield</strong> <strong>and</strong> route under<br />
sides of stroller frame<br />
as shown in Fig. 9.<br />
10. Align vents on rear<br />
flap of <strong>Weather</strong> <strong>Shield</strong><br />
with air passages<br />
between top of seat<br />
back <strong>and</strong> canopy flap.<br />
Make sure air opening<br />
is not obstructed (Fig.<br />
5).<br />
11. To place child in<br />
the stroller, pull the front<br />
of the <strong>Weather</strong> <strong>Shield</strong><br />
off the front of stroller,<br />
then lift up, stretch <strong>and</strong><br />
roll over the forward<br />
edge of stroller canopy<br />
as shown in Fig. 10.<br />
This will temporarily<br />
hold the <strong>Weather</strong> <strong>Shield</strong><br />
out of your way while<br />
you place the child into<br />
the seat.<br />
12. Once your child is<br />
secured in the safety<br />
harness (refer to your<br />
stroller’s Owner’s<br />
Manual, Seat Safety<br />
Harness section),<br />
release the <strong>Weather</strong><br />
<strong>Shield</strong> from canopy <strong>and</strong><br />
re-secure wire stay into<br />
holes on end plugs <strong>and</strong><br />
elastic under frame<br />
sides. Fig. 11 shows a<br />
<strong>Weather</strong> <strong>Shield</strong><br />
correctly installed.<br />
Ends of<br />
metal Stay<br />
plastic<br />
Plugs<br />
with<br />
holes<br />
Fig. 8 Front attachment:<br />
Insert Stay ends into holes.<br />
Fig. 9 Elastic properly routed<br />
under frame sides <strong>and</strong> ends.<br />
Fig. 10 <strong>Weather</strong> <strong>Shield</strong> shown<br />
placed over Forward Canopy<br />
Supports for loading & unloading<br />
CARE INSTRUCTIONS:<br />
H<strong>and</strong> wash cold <strong>and</strong> hang dry. Do not dry clean, iron, or place in<br />
dryer.<br />
LIMITED WARRANTY:<br />
<strong>BOB</strong> <strong>Trailers</strong> Inc. takes pride in its workmanship <strong>and</strong> strives to<br />
manufacture the best products possible. Therefore, we warranty the<br />
Duallie <strong>Weather</strong> <strong>Shield</strong> against defects in material <strong>and</strong> workmanship<br />
subject to the conditions listed below. Since no product is indestructible,<br />
it does not cover defects attributable to or resulting from normal wear,<br />
abuse or alteration.<br />
. The Duallie <strong>Weather</strong> <strong>Shield</strong> is warranted for one year from the date<br />
of original purchase.<br />
. Warranty is only valid for the original purchaser.<br />
. Proof of purchase is required to exercise this warranty.<br />
. Labor <strong>and</strong> freight charges are not included.<br />
. Normal wear, neglect, abuse, accidents, improper use are not<br />
covered by this warranty.<br />
. Warranty claims must be made through an authorized dealer.<br />
. This warranty is limited to the repair or replacement of the defective<br />
part. <strong>BOB</strong> shall in no event be responsible for consequential or<br />
special damages.<br />
. This limited warranty is the only express or implied warranty<br />
applicable to <strong>BOB</strong>. Any implied warranties, including warranties of<br />
merchantability <strong>and</strong> fitness shall be limited in scope <strong>and</strong> duration<br />
in accordance with this limited warranty.<br />
Fig. 11 <strong>Weather</strong> <strong>Shield</strong> correctly<br />
installed on Duallie<br />
OMA27<br />
<strong>BOB</strong> <strong>Trailers</strong>, Inc. 2006<br />
P2