
Create successful ePaper yourself
Turn your PDF publications into a flip-book with our unique Google optimized e-Paper software.
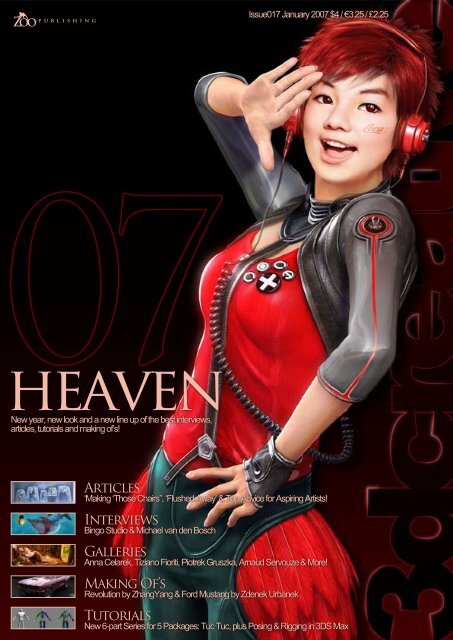
Issue017 <strong>Jan</strong>uary 20<strong>07</strong> $4 / €3.25 / £2.25<br />
New year, new look and a new line up of the best interviews,<br />
articles, tutorials and making of’s!<br />
Articles<br />
‘Making ‘Those Chairs’’, ‘Flushed Away’ & Top Advice for Aspiring Artists!<br />
Interviews<br />
Bingo Studio & Michael van den Bosch<br />
Galleries<br />
Anna Celarek, Tiziano Fioriti, Piotrek Gruszka, Arnaud Servouze & More!<br />
Making Of’s<br />
Revolution by ZhangYang & Ford Mustang by Zdenek Urbánek<br />
Tutorials<br />
New 6-part Series for 5 Packages: Tuc Tuc, plus Posing & Rigging in 3DS Max
Contents<br />
New year, new look and a new line up of the best interviews,<br />
articles, tutorials and making of’s!<br />
Issue017 <strong>Jan</strong>uary 20<strong>07</strong> $4 / €3.25 / £2.25<br />
Articles<br />
Making ‘Those chairs’, Flushed Away & Top Advice for Aspiring Artists!<br />
Interviews<br />
Bingo Studio & Michael van den Bosch<br />
Galleries<br />
Anna Celarek, Tiziano Fioriti, Piotrek Gruszka , Arnaud Servouze & More!<br />
Making Of’s<br />
Revolution by ZhangYang & Ford Mustang by Zdenek Urbánek<br />
Tutorials<br />
New 6 part Series for 5 packages : Tuc Tuc & Posing & Rigging with a 3D Max Biped<br />
Editorial<br />
Hello once again<br />
to <strong>3DCreative</strong><br />
Magazine. After over<br />
a year in business<br />
we have decided to<br />
push the bar a little<br />
further... We have<br />
an enourmous list<br />
of great interviews,<br />
articles, making of’s<br />
and tutorials ready for<br />
you this year, and we<br />
guarantee that every<br />
magazine will be as<br />
good as, if not better<br />
than, this month’s monster issue! We hope you all had a good New Year,<br />
plus any other celebrations over the December period. Early <strong>Jan</strong>uary for<br />
us is usually a case of “back to work blues”, but im rather (sadly) excited<br />
about getting back to the desk and putting together the new issues of<br />
both <strong>3DCreative</strong> and 2DArtist mags, checking out all of the new gallery<br />
submissions and reading through all those interview answers, learning a<br />
thing or two from one of the many great tutorials we have on offer, and<br />
also (ashamedly) looking forward to ploughing through my 500+ email<br />
inbox from the festive period, to see what you guys have said about the<br />
mags and what suggestions you have all made. Hopefully I’ll have the<br />
inbox cleared by late February, but keep the mails coming in anyway<br />
as we do reply to every single one of you! A big thanks to all of you for<br />
keeping us going, and also to all of our contributors, some of whom give<br />
up their time (usually around very busy schedules) to bring quality content<br />
to the masses! All the best for the New Year, Ed & the <strong>3DCreative</strong> Team.<br />
Contents<br />
What’s in this Month<br />
Bingo Studio<br />
Shanghai’s Offering to the Future of CG Art<br />
Michael van den Bosch<br />
Freelance Illustrator<br />
Those chairs<br />
Making the Short Movie<br />
Flushed away<br />
Dreamworks & Aardman Combine!<br />
Inspiring Advice<br />
Industry Expert Advice for all!<br />
Galleries<br />
10 of the Best 3D Artworks<br />
Tuc Tuc<br />
for 3DSMax, Maya, C4D, LW & XSi<br />
Posing & Rigging<br />
with 3DStudio Max Bipeds by Wayne A. Robson<br />
Revolution<br />
Project Overview by ZhangYang<br />
Ford Mustang<br />
Project Overview by Zdenek Urbánek<br />
Recruitment<br />
Job Vacancies<br />
About us<br />
Zoo Publishing Information & Contacts<br />
005<br />
014<br />
020<br />
024<br />
057<br />
065<br />
<strong>07</strong>5<br />
<strong>07</strong>7<br />
085<br />
095<br />
103<br />
106<br />
Editor<br />
Ben Barnes<br />
Assistant Editor<br />
Warin Pismoke<br />
Layout<br />
Ben Barnes<br />
Alex Price<br />
Bobby Brown<br />
Marketing<br />
Lynette Clee<br />
Additional<br />
Content<br />
Tom Greenway<br />
Lynette Clee<br />
Warin Pismoke<br />
Richard Tilbury<br />
Chris Perrins<br />
Free Stuff!<br />
Keep an eye out for<br />
similar symbols to this<br />
throughout the mag.<br />
Wherever you see<br />
this symbol, click it to<br />
download resources,<br />
extras and even movies!<br />
www.3dcreativemag.com page <br />
Issue 017 <strong>Jan</strong>uary 20<strong>07</strong>
Contributors<br />
Luciano<br />
Iurino<br />
I started back in<br />
1994, with 3DStudio<br />
on MS-Dos, as a<br />
Modeller/Texture<br />
Artist. In 2001, I cofounded<br />
PM Studios<br />
& still work for it as Lead 3D Artist. Recently we<br />
have developed the videogame “ETROM – The<br />
Astral Essence”. I also work as a freelancer<br />
for different magazines, web-portals, GFX &<br />
videogame companies. Recently I left the 3DS<br />
Max environment to move on to XSI.<br />
iuri@pmstudios.it<br />
Niki<br />
Bartucci<br />
Freelance 3D<br />
Modeller, Italy. I started<br />
working in Computer<br />
Graphics in 2000 as<br />
an Illustrator & Web<br />
Designer. In 2003, I<br />
started using 3D software, such as C4D and,<br />
later, 3DS Max. In 2000, I worked on “ETROM<br />
- The Astral Essence”, RPG video-game for<br />
PC, developed by PM Studios. I’m currently<br />
a freelancer & specialise in commercials. I<br />
especially like RPG & RTS video-games.<br />
niki@pikoandniki.com<br />
Vojislav<br />
Milanovic<br />
3D Modeller, Animator,<br />
VFX Compositor,<br />
Anigraph Studio,<br />
self-taught, all-round<br />
3D-guy. I started to<br />
“doodle” around in<br />
3D about 8 years ago. In the last 5 years I have<br />
done a lot of various things from print & TV<br />
ads to gaming & movie graphics. I’m currently<br />
involved in multimedia study & character<br />
developing for an animated feature movie. One<br />
of my goals is to make my own animated movie.<br />
vojo@teol.net<br />
http://users.teol.net<br />
www.pikoandniki.com<br />
Contributing<br />
artists<br />
Every month, many creatives and artists from around the world contribute<br />
to <strong>3DCreative</strong> Magazine. Here you can read all about them. If you would<br />
like to be a part of either <strong>3DCreative</strong> or 2DArtist Magazines, please<br />
contact ben@zoopublishing.com.<br />
Tuc-Tuc Tutorial Artists: these wonderful people<br />
are responsible for translatiing our 3DSMax<br />
content for Cinema 4D, Maya, Lightwave &<br />
Softimage XSi. Most of them have been with us<br />
since the Joan of Arc series and have all worked<br />
on the highly popular Swordmaster Series...<br />
Bogdan<br />
Horduna<br />
3D VFX Artist in Iasi,<br />
Romania. I started<br />
back in 1999 with<br />
3DStudio Max, but in<br />
2000 trained in Maya.<br />
I’ve been a Modeller<br />
and Texturer for few 3D animated movies &<br />
two games. I’m also a ‘Modeller, Dynamics &<br />
Particles, Lights & Render Supervisor’ for many<br />
commercials, musical video-clips and industrial<br />
presentations.<br />
ionuts@catv.embit.ro<br />
suiobo@yahoo.com<br />
Giuseppe<br />
Guglielmucci<br />
Freelance 3D<br />
Modeller/Animator.<br />
I began using<br />
computers with the<br />
epoch of the Vic 20<br />
& Cinema4D was my<br />
1st 3D software. I started working in the field<br />
of CG in 1999 in commercial design. In 2003 I<br />
worked on “ETROM - The Astral Essence”, RPG<br />
video-game for PC, developed by PM Studios.<br />
Currently I’m hoping to work in the video-games<br />
industry & to develop my own game.<br />
piko@pikoandniki.com www.pikoandniki.com<br />
www.3dcreativemag.com page <br />
Issue 017 <strong>Jan</strong>uary 20<strong>07</strong>
Contributors<br />
Zdenek<br />
Urbánek<br />
Liberec, Czech<br />
Republic.<br />
My first experience<br />
with 3D Graphics was<br />
in 2001. It was a Bryce<br />
3D where I created my<br />
first image, after I started learning in 3DStudio<br />
Max. I would like work in game development,<br />
or film. Now it is mostly my hobby and now I’m<br />
working on my own game with my friend.<br />
URBIS.URBIS@seznam.cz<br />
Frankino<br />
Lupo<br />
Frankino has recently<br />
joined our team<br />
creating the Lightwave<br />
version of ‘Tuc Tuc’.<br />
Frankino works as<br />
a web designer and<br />
pixel artists amongst other things.<br />
www.frankinolupo.it<br />
frankino@frankinolupo.it<br />
Michael<br />
van den<br />
Bosch<br />
Freelance Illustrator/<br />
Character Designer,<br />
Netherlands. I love<br />
to sketch characters<br />
with a pencil and bring<br />
them to life with my computer. The thing I focus<br />
on are the eyes and the personality. My main<br />
goal is creating artwork with a message. I hope<br />
to see myself doing this for many more years,<br />
because there’s nothing like being self-employed.<br />
michael@motionchannel.com<br />
http://www.motionchannel.com<br />
Zhang<br />
Yang<br />
3D Modeller/Texture<br />
Artist/VFX Compositor,<br />
China, self-taught, allround.<br />
3DS Max was<br />
my first 3D software<br />
and then I switched<br />
over to Maya through 2002. Now I also use C4D,<br />
Z-Brush, Mudbox and like traditional painting. I’ve<br />
worked for a video-game company, animation<br />
studio and TV station. At present, I’m a freelancer.<br />
My goal is to work for the movie industry.<br />
zhangyangshaoyu99520@hotmail.com<br />
http://zhangyang84.cgsociety.org/gallery/<br />
Would you like to Contribute to <strong>3DCreative</strong> or 2DArtist Magazine?<br />
We are always looking for tutorial artists, gallery submissions, potential interviewees, making of writers and more. For more information, send a link to<br />
your work here: warin@zoopublishing.com<br />
www.3dcreativemag.com page <br />
Issue 017 <strong>Jan</strong>uary 20<strong>07</strong>
Shanghai Bingo Digital-Media<br />
Technology Co. Ltd. is a group<br />
composed of young artists devoted<br />
to developing CG arts. All members<br />
of the team have a wide range of<br />
experience in processing CG movies<br />
and cartoons. Within a year Bingo<br />
had prestige in the industry and<br />
quickly collected briefs from<br />
‘Fudan Shangke’ & ‘Coca<br />
Cola’. Subsequently,<br />
they now work for<br />
worldwide well-known<br />
companies such as<br />
‘News QQ’, ‘Maiken<br />
Light’ and more...
Interview Bingo Digital<br />
Thanks for taking the time out to talk with us.<br />
Can we begin by finding out a little about how<br />
everything started for Bingo Digital? Who were<br />
the founders? What was their vision? And how<br />
far have you come to achieving this today?<br />
We are a group of youths who are addicted to<br />
three-dimensional computer art. Individually we<br />
witnessed China’s three-dimensional animation<br />
emerge and grow. Finally we gathered into one<br />
group, named “Bingo”, to pursue our dream.<br />
Most of the Bingo members are from a largescale,<br />
demonic CG production company. We<br />
are all qualified and have received systematic<br />
training. We participated in project management<br />
and productions, such as a full CG movie, cut<br />
scenes of games and animation teleplay, etc.<br />
Our goal is to grow into an international topnotch<br />
visual special-effects product producer,<br />
such as ‘Blur’.<br />
We hope to<br />
achieve this<br />
with our high efficiency<br />
and prime service.<br />
It sounds like you are very<br />
passionate about your work<br />
and goals. Are your 3D skills<br />
mostly self-taught?<br />
Yes, we are very passionate about our work,<br />
because we find the work very interesting<br />
www.3dcreativemag.com page <br />
Issue 017 <strong>Jan</strong>uary 20<strong>07</strong>
Bingo Digital Interview<br />
everyday. Mostly we studied our 3D skills by ourselves. Sometimes our company<br />
also provides courses for newcomers and trains them in the knowledge of our<br />
working production pipeline.<br />
Let’s talk Coca Cola! What a great client, you must have been very happy to get<br />
them on board. We have seen some of your amazing characters posted on<br />
the Net, so can you tell us a bit about the brief Coca Cola set you and<br />
what the future holds?<br />
Thanks for your kind words; when<br />
Coca Cola (China) contacted<br />
us, Bingo was just a studio<br />
in an apartment. We were<br />
astonished at their invitation as<br />
we had been mainly focusing on<br />
technological testing, instead<br />
of doing public promotions at<br />
that time. Coca Cola said their cooperative<br />
providers, and other large CG<br />
companies in China, could not<br />
undertake this project because<br />
of the time limit and high quality that was<br />
www.3dcreativemag.com page <br />
Issue 017 <strong>Jan</strong>uary 20<strong>07</strong>
Interview Bingo Digital<br />
required. They heard from these companies that<br />
Bingo had the abilities to execute this project.<br />
Although Bingo had just become established,<br />
the team members are the best of the best in<br />
this field, so we were given this project and<br />
delivered it successfully, on time. Finally we<br />
received the accreditation from Coca Cola. In<br />
April 2006, Bingo formally became the visual<br />
products provider for Coca Cola, China. We<br />
keep supplying their prime visual products and<br />
www.3dcreativemag.com page <br />
Issue 017 <strong>Jan</strong>uary 20<strong>07</strong>
Bingo Digital Interview<br />
provide for their advertisement requirements.<br />
Later we will release the Coca Cola TV advert<br />
for the traditional Chinese Spring Festival.<br />
Your images have been appearing on the<br />
front pages of big CG sites, as well as in many<br />
forums. Have you noticed that this additional<br />
exposure has helped your business and brought<br />
in new work?<br />
Keeping at the top position in CG websites is<br />
quite helpful to our public promotion. It makes<br />
Bingo well known across the globe. The most<br />
important effect of Bingo is that lots of young<br />
CG-ers in China now are dreaming of joining<br />
Bingo. In this respect, we also hope to achieve<br />
cooperation with other companies to open up<br />
new business opportunities.<br />
What advice do you have for young “CG-ers”?<br />
Keep passionate, if the chances are a hundred<br />
to one against you, you just need to try harder<br />
until you succeed!<br />
What is the CG industry like in China, and what<br />
direction is it heading?<br />
CG currently has wide prospects in China.<br />
Recently, the central government of China<br />
www.3dcreativemag.com page <br />
Issue 017 <strong>Jan</strong>uary 20<strong>07</strong>
Interview Bingo Digital<br />
issued coherent policies to support the domestic<br />
game, animation and multi-media industry. We<br />
have also gained support from the Shanghai<br />
municipal government. With the coming of<br />
a new era in the game industry, numerous<br />
large-scale game production companies have<br />
established their studios in Shanghai, such as<br />
EA, UBI, Epic and 2K. China will soon be full<br />
www.3dcreativemag.com page 10<br />
Issue 017 <strong>Jan</strong>uary 20<strong>07</strong>
Bingo Digital Interview<br />
of opportunities in employment and business<br />
cooperation in this industry. On the other<br />
hand, China is boosting its cultural industry<br />
giving potential to many markets. Shanghai,<br />
for example, has greatly strengthened its<br />
cooperation with the world and issued some<br />
preferential policies for its development in<br />
financial and business commerce.<br />
www.3dcreativemag.com page 11<br />
Issue 017 <strong>Jan</strong>uary 20<strong>07</strong>
Interview Bingo Digital<br />
That’s great to hear, it sounds like the industry<br />
is really taking off. What about the educational<br />
side of things, are universities and colleges<br />
doing their part with suitable new courses?<br />
Lately we are keeping in touch with universities<br />
and colleges, trying to find out where their<br />
strengths and weaknesses are. We have done a<br />
lot of things already for education and maybe in<br />
the future, universities and colleges will add our<br />
courses too.<br />
Can you tell us about any new projects you are<br />
working on now, and what you are aiming to<br />
achieve for in Bingo’s future?<br />
At the present stage we are producing game<br />
tests and cut scene animations for the next<br />
generation platforms. These animations mainly<br />
focus on the mainstream game engine, such<br />
as XBOX 360 and PS3. At the same time<br />
we are undertaking an advertising project for<br />
Volkswagen and this project will also be finished<br />
soon. We have already set-up a CG education<br />
centre, in conjunction with Shanghai Multi-Media<br />
Industrial Park, with the hope of sharing our<br />
experiences with those who want to engage in<br />
this industry. Each of the training periods is up<br />
to 7 months and the first-stage of the training<br />
period has already begun.<br />
Bingo Digital<br />
For more work by this<br />
group please visit:<br />
www.bingo-digital.com<br />
Or contact them at:<br />
bingo@bingo-digital.com<br />
Interviewed by: Tom<br />
Greenway<br />
www.3dcreativemag.com page 12<br />
Issue 017 <strong>Jan</strong>uary 20<strong>07</strong>
“First of all, the rabbit<br />
does deserve it.”<br />
Currently working as a Freelance Illustrator,<br />
Michael is skilled in both 2D and 3D disciplines.<br />
He talks exclusively to <strong>3DCreative</strong>...
Michael van den Bosch Interview<br />
Hi Michael, thanks for talking to us. Please<br />
introduce us to your beginnings in CG art…<br />
Hi, my name is Michael van den Bosch. I<br />
studied for about two and a half years at the<br />
‘Grafisch Lyceum’, in Rotterdam. During my<br />
traineeship, I was stationed at Hallmark Cards,<br />
where I saw all these freelance illustrators<br />
bring in their traditionally painted artwork and I<br />
realised that this was what I wanted to do. In this<br />
traineeship, in 1995, I decided to “drop out”, got<br />
myself registered and became self-employed,<br />
working as a Freelance Illustrator.<br />
A lot of your work has been for commercial<br />
purposes. Do you think that your style lends<br />
itself well to commercial projects?<br />
Well, I’ve always been trying to create artwork<br />
with a message. I mainly draw art that has a<br />
cute and adorable kind of look. Being in the field<br />
of greetings cards, I’ve been told that 80% of<br />
the people who buy cards are women. So, to<br />
answer your question, I don’t know.<br />
You are both 2D and 3D artist, have you<br />
found getting work easier having skills in both<br />
disciplines?<br />
Yes, 2D will always be the traditional art clients’<br />
need, but 3D is all around us nowadays. All<br />
the latest animations in theatres, the computer<br />
games industry and movies are all 3D. So, when<br />
clients see that you do 3D, they will probably<br />
contact you sooner.<br />
What are your influences?<br />
Almost every artist out there. I sometimes spend<br />
hours searching the Internet, looking for artists<br />
that move me with their work. I’m always looking<br />
www.3dcreativemag.com page 15<br />
Issue 017 <strong>Jan</strong>uary 20<strong>07</strong>
Interview Michael van den Bosch<br />
for inspiration, which doesn’t come only from the<br />
big names in the industry.<br />
How much research goes into an average piece<br />
of artwork for you?<br />
Hard to say, really. The idea usually comes in a<br />
split second, but after that the brain never stops<br />
storming. OK, there’s a period you ‘Google’ or<br />
search for certain things you need to know, for<br />
instance how something is constructed, but<br />
during the process of sketching, colouring or<br />
modelling, the mind always comes up with new<br />
ideas to improve the work in progress.<br />
You have a style which I would describe as<br />
‘maniac fun’ in some of your pieces, such as<br />
the ‘rabbit strikes back’. Is this a release for you<br />
or do you really think that the rabbits deserve<br />
revenge?<br />
Good point. First of all, the rabbit does deserve<br />
it. Ever seen any compliments or credits given<br />
to the magician’s rabbit after a performance on<br />
www.3dcreativemag.com page 16<br />
Issue 017 <strong>Jan</strong>uary 20<strong>07</strong>
Michael van den Bosch Interview<br />
stage, other than some carrots? It’s really a<br />
release for me, actually. I recently got an e-mail<br />
from another artist, who said: “Nice work in your<br />
portfolio, especially that new piece called: ‘The<br />
rabbit strikes back!’. Nothing like your other<br />
work. It’s like a dark side has come out of you.”<br />
He was right on the money.<br />
What projects do you have lined up for the<br />
future?<br />
I’m busy with my first short animation. The only<br />
problem with www.3dcreativemag.com this is that it’s a lot of work to do<br />
page 17<br />
Issue 017 <strong>Jan</strong>uary 20<strong>07</strong>
Interview Michael van den Bosch<br />
on your own.<br />
So, this could<br />
be a long term<br />
project but hey, you<br />
were talking about the<br />
future, right?<br />
What one piece of advice would<br />
you give to an aspiring artist?<br />
I’m not a wise man, but the advice I’d<br />
like to give, is to do what you do best.<br />
Thanks very much for talking to us, and best of<br />
luck for the future.<br />
Michael van<br />
den Bosch<br />
For more work by this artist<br />
please visit:<br />
www.motionchannel.com<br />
Or contact them at:<br />
It’s my pleasure and thank you for this<br />
michael@motionchannel.com<br />
interview. www.3dcreativemag.com page 18<br />
Issue 017 Interviewed <strong>Jan</strong>uary 20<strong>07</strong> by: Ben Barnes
C O L O R<br />
R E F L E C T I O N S<br />
D E P T H<br />
S H A D O W S<br />
T H E P O W E R O F L A Y E R S<br />
STRATA 3D CX 5.0<br />
D E S I G N A T A H I G H E R P O W E R<br />
Digit Magazine (July 2006) says,<br />
“Strata 3D TM CX feels like an Adobe ®<br />
application - graphic designers will feel<br />
right at home... The traditional look (of<br />
Strata 3D CX) makes the program<br />
friendly to new users.” Version 5.0 of<br />
CX... “makes the program even more<br />
like Photoshop’s ® 3D cousin.”<br />
Digit named Strata 3D CX the number<br />
one 3D app for designers, and awarded<br />
it “Best Buy” in its 3D Design Software<br />
Shootout.<br />
SEE FOR YOURSELF!<br />
The 30-Day unlimited tryout<br />
of Strata 3D CX 5.0 is now<br />
available. Visit our website<br />
to find out what users and<br />
industry publications have<br />
been raving about.<br />
Visit our website to learn about our entire<br />
line of products for designers: Strata 3D CX,<br />
Strata Live 3D, and Strata Foto 3D.<br />
Strata, Strata 3D CX, Strata Foto 3D, Strata Live 3D, and The Power Of 3D are trademarks of and/or licensed by Corastar Inc.<br />
All other trademarks are the property of their respective holders. Image by Thorbjørn Haarup Laursen.
“These Chairs - Dom Där Stolarna” by Daniel<br />
Westlund? The 3D animated dance film, which<br />
sets six chairs into motion accompanied by a<br />
drum solo, was made using 3ds Max. It was aired<br />
last month on SVT in Sweden and has been<br />
shown at film festivals in Germany, Sweden,<br />
Norway and Australia. It won the Leo award at<br />
the Braunschweig International Film Festival in<br />
Germany this month.
Making ‘Those chairs’<br />
Tell us a bit about yourself. How did you get into<br />
3D? How long have you been doing it? What<br />
sort of work have you done in the past and what<br />
sort of work do you do now?<br />
I was born in Sweden in 1969. I started studying<br />
art in 1987 when I attended The Nordic Art<br />
School in Kokkola, Finland. In 1989 I went to<br />
The Royal Academy of Fine Arts in Stockholm<br />
to study Fine Art; painting in particular. But<br />
when I graduated in 1994, I was more into big<br />
installations. Once I left school, I couldn’t keep<br />
doing big things because of the lack of space,<br />
so I started to make scale models of exhibitions<br />
and photography, and at some point I thought<br />
I had more opportunity by going over to 3D.<br />
My girlfriend was into 3ds Max at the time, so it<br />
wasn’t long before I made the move. This was<br />
at the time when plug-in renderers started to<br />
show up as beta products: Brazil, Finalrender<br />
and V-Ray. Without these, I wouldn’t have<br />
moved into 3D because I was very concerned<br />
with the quality and realism of the images and I<br />
thought the tools at hand (e.g. Lightscape) were<br />
too messy to work with. I’ve been using 3ds<br />
Max since 1999. I like its graphical interface.<br />
This has really helped me to learn the more<br />
advanced functions of the software. I’m from<br />
a strictly artistic background with very little<br />
knowledge of advanced maths, so it’s really<br />
helpful to have things like the reaction controller.<br />
It’s a way for me to do expressions without any<br />
deeper knowledge of arithmetics. I also like<br />
the variety of plug-ins, as we now have lots<br />
of renderers to hand, for example. My main<br />
work has been in looped animations for art<br />
galleries. I’ve also done visualisation work for<br />
architects and animations for commercials, but<br />
my main income is as a lecturer at “Konstfack<br />
University College of Arts, Crafts and Design”<br />
in Stockholm, where I teach 3D modelling and<br />
animation.<br />
How did the idea for this project come about?<br />
The idea came to me when I was involved<br />
in a joint project with a designer and a<br />
choreographer. It didn’t lead to anything at the<br />
time but I kept the idea for some years and I<br />
made a short loop of three chairs moving around<br />
more randomly two years ago. That piece was<br />
shown at some exhibitions and galleries in<br />
Sweden. I was asked about showing it on TV<br />
but I didn’t think it fitted, so I started to think<br />
about making a version for TV with more of a<br />
start and ending. I also went to dance shows to<br />
learn more and found that I really liked it!<br />
How would you describe the completed<br />
animation? Does it have a name?<br />
The animation is called “Those Chairs - Dom<br />
Där Stolarna”. It’s not that exiting, but me and<br />
my friends referred to it as “those chairs”. The<br />
title also alludes to resignation, something out of<br />
your control, which I think fits the film. My main<br />
question when I first had the idea was: how do<br />
I make a rigid object come alive? I think the<br />
outcome is six very confident chairs showing<br />
good teamwork.<br />
How did you create the chairs?<br />
I modelled the chairs using ‘Silo Witch’, a<br />
dedicated sub-division modelling tool. It might<br />
have been easier to do them in 3ds Max but I’d<br />
just got the software and thought I’d try it out to<br />
get to know the tools. After importing the chair<br />
into 3ds Max, I set the UV using UV-unwrap<br />
and created textures for it in Photoshop. The<br />
material consists of several blended V-ray<br />
materials with different textures: diffuse, gloss,<br />
shiny, etc.<br />
How did you animate them?<br />
I wanted the animation to look “real”, or as<br />
if there was actually some invisible person<br />
tossing them around, so nothing but automated<br />
secondary motions would do. I did several<br />
tests to animate it using bones and spring<br />
controllers but ended up doing it with ‘reactor’.<br />
Reactor is the tool that I used the most. I love<br />
its predictability and stability. All the movement<br />
of the chairs is 100% reactor. The animation<br />
was done in two steps. Each chair is guided<br />
by a single angular dashpot. I started out by<br />
animating one chair using x-form. That was the<br />
hardest part! I had to key frame every step, but<br />
it didn’t have to be perfect and there was no<br />
second-hand motion. The animation I got from it<br />
wasn’t that good but I could see the timing and<br />
where the chairs were heading. The second<br />
step was to take a second chair and bind it<br />
to an angular dashpot with the first chair as a<br />
guide. Now I got all the secondary animation<br />
movements and also some surprises which are<br />
inevitable when working on a one-man project<br />
like this. I spent a lot of time tweaking the<br />
dashpot’s strength and dampening so that the<br />
final animation was more or less in line with the<br />
pre-animated chair’s position, as the dashpot<br />
was only directing its rotation, not its position.<br />
www.3dcreativemag.com page 21<br />
Issue 017 <strong>Jan</strong>uary 20<strong>07</strong>
How did you do the lighting, texturing and<br />
shading?<br />
I rendered it all in V-ray, so for the lighting and<br />
shading I used V-ray area lights and V-ray<br />
materials.<br />
What were the biggest challenges you had to<br />
face?<br />
I had to do this project in different periods as<br />
other work came in between. Every time I got<br />
back to it, I saw something new that I didn’t<br />
like and needed to change. That was good in<br />
many ways, but with the work flow I had with<br />
reactor driving all the animation, it was quite a<br />
challenge. The ‘ease curve’ became my best<br />
friend. It can’t solve everything, but it helped me<br />
adjust a lot of timing glitches and it’s a great fine<br />
tuning tool.<br />
How long did it take to render?<br />
The render time was about 60 minutes a frame,<br />
and with a total of 5,000 frames, I realised I<br />
couldn’t do it without a render farm. I ended up<br />
using Respower’s flat rate system. I was very<br />
happy with it, although it was a lot of money<br />
considering this was a totally self-financed<br />
project.<br />
What are you most proud of and why?<br />
I’m very pleased with the animation work on<br />
the chairs. I wasn’t too concerned with the<br />
rendering, shaders and lighting. I was quite<br />
confident about those parts as I’ve been doing<br />
them a lot. But the animation had to live up to<br />
the photo-real quality in the imagery and I had<br />
to find a way for it to act naturally, even though it<br />
was totally unnatural for them to jump around.<br />
How long did you spend on the project?<br />
It probably took about 40 days in total, but this<br />
was over a period of six months.<br />
Looking back, what would you have done<br />
differently?<br />
For the next film I do, I will definitely work more<br />
on the naming structure. It’s easy to think that<br />
it’s only six chairs for a short, but in the end you<br />
have to do even more work just cleaning your<br />
folder tree where you find all sorts of names like<br />
“final”, “final-final” and “final03”. Maybe that’s<br />
OK if you work on it everyday, but if you go<br />
away for a week, it’s like hell to start working<br />
on the project again! So for the next project, I‘ll<br />
work out a clear structure for naming objects,<br />
files, etc. I’ll also keep them on printed paper so<br />
I don’t have to sit in front of the computer all the<br />
time when planning, etc.<br />
Where has the film been shown?<br />
I sent it someone at SVT who called me back<br />
a few weeks later and said he wanted to buy<br />
it. It was shown after a culture show that had a<br />
dance theme. It’s also been shown at festivals:<br />
The Uppsala short film festival in Uppsala,<br />
Sweden; The 8th Annual WT OS International<br />
Film festival in Norway; The Filmflicks dance<br />
Making ‘Those chairs’<br />
film festival in North Carlton, Australia; The<br />
Internationales filmfest Braunschweig - where<br />
it won first prize in the “LEO” competition. I<br />
hope to show it at more festivals next year, but<br />
it’s a job in itself to apply to all the festivals by<br />
yourself.<br />
What has been the feedback on the finished<br />
work?<br />
I’ve had lots of great feedback from friends and<br />
colleagues which means a lot to me. But one<br />
thing that struck me once it was aired, was the<br />
total silence afterwards. I’m not used to this as<br />
most of my work has been for exhibition halls<br />
and galleries where you have an opening and<br />
get to meet people and see their reactions<br />
straight away. So it’s really great if I can go to<br />
the festivals and be in the audience as they<br />
screen the film. The best feedback I got was at<br />
the LEO award at the Internationales filmfest<br />
Braunschweig this November. To go there and<br />
receive the award for something that started<br />
with just my own thoughts was very heartening<br />
and fills you with great self-confidence.<br />
Making<br />
‘Those<br />
Chairs’<br />
For more<br />
information<br />
please contact<br />
Kim Willsher<br />
kimw@rlyl.co.uk<br />
Red Lorry Yellow Lorry<br />
www.3dcreativemag.com page 22<br />
Issue 017 <strong>Jan</strong>uary 20<strong>07</strong>
From DreamWorks Animation and Aardman<br />
Features, the teams behind the Oscar®-winning<br />
hits “Shrek” and “Wallace & Gromit: The Curse<br />
of the Were-Rabbit,” comes the computeranimated<br />
comedy “Flushed Away.”<br />
Blending Aardman’s trademark style and<br />
characterizations with DreamWorks’<br />
state-of-the-art computer<br />
animation, the film marks a<br />
unique new look for the<br />
artform.
Flushed away Dreamworks & Aardman Animation<br />
In this new comedy set on and beneath the<br />
streets of London, Roddy St. James (Hugh<br />
Jackman) is a pampered pet mouse who<br />
thinks he’s got it made. But when a sewer rat<br />
named Sid (Shane Richie) – the definition of “low life” – comes spewing<br />
out of the sink and decides it’s his turn to enjoy the lap of luxury, Roddy<br />
schemes to rid himself of the pest by luring him into the loo for a dip in the<br />
“whirlpool.” Roddy’s plan backfires when he inadvertently winds up being<br />
the one flushed away into the bustling world down below. Underground,<br />
Roddy discovers a vast metropolis, where he meets Rita (Kate Winslet),<br />
a street-wise rat who is on a mission of her own. If Roddy is going to get<br />
home, he and Rita will need to escape the clutches of the villainous Toad<br />
(Ian McKellen), who royally despises all rodents and has dispatched two<br />
hapless henchrats, Spike (Andy Serkis) and Whitey (Bill Nighy), as well as<br />
his cousin – that dreaded mercenary, Le Frog (Jean Reno) – to see that<br />
Roddy and Rita are iced… literally. The film is directed by David Bowers<br />
and Sam Fell with story by Sam Fell and Peter Lord and Dick Clement<br />
& Ian La Frenais and screenplay by Dick Clement & Ian La Frenais and<br />
Chris Lloyd & Joe Keenan and Will Davies. Produced by Cecil Kramer,<br />
Peter Lord and David Sproxton and co-produced by Maryann Garger.<br />
“Flushed Away” stars the voices of Tony Award winner Hugh Jackman<br />
(Broadway’s “The Boy From Oz,” the “X-Men” film franchise) as Roddy;<br />
four-time Oscar® nominee Kate Winslet (“Eternal Sunshine of the<br />
Spotless Mind,” “Iris,” “Titanic,” “Sense and Sensibility”) as Rita; two-time<br />
Oscar® nominee Ian McKellen (“The Lord of the Rings: The Fellowship of<br />
the Ring,” “Gods and Monsters”) as The Toad; Jean Reno (“The Da Vinci<br />
Code,” “The Tiger and the Snow”) as Le Frog; Bill Nighy (“Pirates of the<br />
Caribbean: Dead Man’s Chest,” “Love Actually”) and Andy Serkis (“King<br />
Kong,” “The Lord of the Rings: The Return of the King”) as Spike and<br />
Whitey; and Shane Richie (“Shoreditch”) as Sid.DreamWorks Animation<br />
S.K.G. and Aardman Features present “Flushed Away,” which is being<br />
distributed by Paramount Pictures.<br />
www.3dcreativemag.com page 25<br />
Issue 017 <strong>Jan</strong>uary 20<strong>07</strong>
Plumbing Together<br />
After achieving success with the critically<br />
acclaimed box-office hit “Chicken Run” and the<br />
Academy Award®-winning “Wallace & Gromit:<br />
The Curse of the Were-Rabbit,” DreamWorks<br />
Animation and Aardman Features team up for<br />
the third time with “Flushed Away.” For this film,<br />
the two studios took their collaboration to a new<br />
level: after being conceived at Aardman’s UK<br />
studio, “Flushed Away” became the company’s<br />
first computer-animated film and was produced<br />
entirely at DreamWorks’ animation studio in<br />
Glendale, California. According to director<br />
David Bowers, the movie reflects the best<br />
of what each studio has to offer. “We have<br />
Aardman’s charm and rich sensibilities, and
Dreamworks & Aardman Animation Flushed away<br />
all the imagination<br />
and technological<br />
capabilities of<br />
DreamWorks,”<br />
Bowers attests. “I<br />
don’t think the movie<br />
could have happened<br />
without either studio.”<br />
As “Flushed Away”<br />
was in its early stages<br />
of development, the<br />
filmmakers realized<br />
their third collaboration would need to be<br />
entirely computer-animated for several reasons.<br />
Water is notoriously difficult to recreate in<br />
stop-motion, and the sets would have to be<br />
enormous to be in proportion with Roddy, Rita,<br />
and the rest of the “Flushed Away” characters.<br />
According to director Sam Fell, Aardman had<br />
been looking to make a CG animated film for<br />
some time, and “Flushed Away” seemed to be<br />
the right project to make the jump. “We wanted<br />
to create a whole city, a whole world, and<br />
populate it with thousands of little rats walking<br />
around along canals instead of streets,” says<br />
Fell. “With water, crowds, big scope, many sets<br />
– it seemed like CGI could really help us make<br />
that happen.” Bowers agrees. “The Kensington<br />
apartment, where the movie begins, would have<br />
had to have been full size,” he says. “There just<br />
wouldn’t have been room in the studio to do it.<br />
And there wouldn’t have been enough plasticine<br />
or clay in the world to do it.” “At first, we thought<br />
we would do a stopframe<br />
film with a lot of<br />
CG enhancements,”<br />
says Aardman cofounder<br />
and producer<br />
David Sproxton. “But<br />
when we looked<br />
at how much we<br />
would be doing on<br />
the computer – the<br />
extensive tunnels,<br />
the large sets, the<br />
water – we thought,<br />
‘Why not make the<br />
www.3dcreativemag.com page 28<br />
Issue 017 <strong>Jan</strong>uary 20<strong>07</strong>
Flushed away Dreamworks & Aardman Animation<br />
whole thing in CG?’” In addition to the scaling<br />
challenges, the myriad water effects – critical<br />
components to a story set largely within a sewer<br />
world – provided an even more convincing<br />
case for CG. From Roddy’s titular tumble into<br />
the toilet’s whirlpool to the frenetic boat chase<br />
leading up to the film’s climax, water would need<br />
to be as versatile as the characters themselves.<br />
Aardman co-founder and producer Peter Lord<br />
explains, “Water is practically a character in<br />
this film, and it’s just the hardest thing to do in<br />
stop-frame animation,” he says. “When we do<br />
water, it’s normally little bits of cling film making<br />
a splash, or animating drips of glycerin trickling<br />
down the damp character. To have a boat<br />
bobbing about on a stream or tearing along at a<br />
super speed, through a river, chased by villains<br />
on egg whisks – it would have been impossible.”<br />
Head of effects Yancy Lindquist comments,<br />
“We have flushing water. We have water<br />
running down pipes. We have frozen masses<br />
of water. Each of those requires a slightly<br />
different technique.” Like the directors, Lord<br />
says that “Flushed Away” remains a film that<br />
could only have been made by a collaboration<br />
between Aardman and DreamWorks. “I think<br />
‘Flushed Away’ brings a stillness to the CG art<br />
form,” Lord says. “We believe in performance<br />
above all; the audience needs to believe in the<br />
characters. That often means watching what<br />
happens on the face when the character is<br />
almost still. That subtlety is what we do best.<br />
On the other hand, computer animation is great<br />
for big action. By putting the two together,<br />
we’ve got strong, believable characters and<br />
some truly spectacular action sequences.”Visual<br />
effects supervisor Wendy Rogers expands on<br />
the idea of stillness: “We really have treated the<br />
characters as though they were puppets, and<br />
they’re animated to move that way,” she says.<br />
“We don’t have any dynamic simulation on the<br />
hair. Their clothing doesn’t flow when they walk.<br />
They’re hitting that pose and holding it rather<br />
than sort of easing through a motion.” While the<br />
film is set primarily in a fanciful underground<br />
world, the real life lessons are unmistakable.<br />
Thrust together in their efforts – first to escape<br />
www.3dcreativemag.com page 29<br />
Issue 017 <strong>Jan</strong>uary 20<strong>07</strong>
Dreamworks & Aardman Animation Flushed away<br />
The Toad, then to put a stop to his dastardly<br />
plan – Roddy and Rita learn to rely on each<br />
other. “More than anything else, Rita wants to<br />
help her family,” producer Cecil Kramer says.<br />
“But she needs to learn that she can’t do that<br />
alone. When she opens herself up to accepting<br />
Roddy’s help, anything is possible. And<br />
Roddy’s journey is universal. You can have all<br />
the toys in the world, but they’re not worth much<br />
if you have no one to share them with. At the<br />
end of the day, we all need friends and families<br />
to connect, even the finest possessions pale in<br />
comparison to our relationships with others.”<br />
Dual Diligence<br />
From the characters themselves to the sets and<br />
backgrounds, Aardman films have a distinct<br />
look and feel – a style the filmmakers wanted to<br />
continue in “Flushed Away.” Because stopmotion<br />
technique itself is so integral to that<br />
style, bringing the Aardman look to CG required<br />
unique character design, careful attention to<br />
detail, and ultimately, a little restraint. The<br />
filmmakers knew they wanted to retain the<br />
patent Aardman characterizations in CG, but<br />
they were also determined to avoid direct<br />
replication of the clay figures into computer<br />
models. In combining the advantages of<br />
computer animation with the corporeal quality<br />
of stop-motion, they created something new<br />
– an evolution of the Aardman style. “There’s<br />
definitely a look to the design of an Aardman<br />
stop-motion film,” asserts Sproxton. “There’s<br />
a texture that’s inherent in model work – the<br />
fingerprints on the clay, the wood grain, the<br />
plaster, the paint. You get a lot of texture<br />
simply because the sets and characters are<br />
constructed from real materials. That look<br />
is distinctly Aardman. I would say it’s our<br />
trademark.” “We worked hard to translate the<br />
stop-frame style into the computer animated<br />
technique,” Fell states. “We wanted to use<br />
the CG technique to capture the signature<br />
Aardman warmth, charm, and tactile feel. It’s<br />
the best of both worlds, really.” In a stop-motion<br />
film, Aardman artists create plasticine models<br />
with metal armatures. Stop-motion animators<br />
www.3dcreativemag.com page 30<br />
Issue 017 <strong>Jan</strong>uary 20<strong>07</strong>
Flushed away Dreamworks & Aardman Animation<br />
pose the characters’ bodies and sculpt their<br />
faces frame by frame. As a result of this<br />
painstaking process, the characters hit poses<br />
very quickly and communicate largely through<br />
facial expressions. As Jeff Newitt, head of<br />
character animation, explains, the creators of<br />
“Flushed Away” found themselves freed by the<br />
new boundaries of CG, but constantly kept in<br />
mind the goal of matching the Aardman style.<br />
“The stop-motion armatures are restricted by<br />
gravity, and the weight of the clay or rubber<br />
or foam used in building the puppets,” Newitt<br />
says. “So when you animate them, you’re<br />
actually trying to achieve a kind of innovation<br />
through limitation most of the time, and a<br />
natural style has evolved. Since you don’t<br />
have those impediments in CG, animators<br />
actually have to use a lot of restraint to preserve<br />
it.” Melding the two animation styles was a<br />
trial-and-error exercise in the character rigging<br />
stage of production. During this phase, fully<br />
modeled and rigged characters are created in<br />
the computer based on the art department’s<br />
designs and specifications, as well as the<br />
needs of the animation team. Some of the<br />
benefits of working in CG were immediately<br />
apparent. “Consider The Toad,” offers Newitt.<br />
“You have a massive bell-shaped body with<br />
very spindly legs. There’s so much weight<br />
to support and almost nothing to carry it. A<br />
character like that is an absolute nightmare to<br />
produce in stop-motion, but in CG, you don’t<br />
have to worry about gravity.” Of course, there<br />
were also challenges during this translation<br />
process. “When we started doing the rigs,<br />
they matched the Aardman puppets almost<br />
exactly,” says lead character technical director<br />
Martin Costello. “But we found that some of the<br />
movements really didn’t work well in computer<br />
animation. So they evolved into something<br />
new, though there are still many similarities<br />
with traditional Aardman puppets, particularly<br />
the mouths and the brows.” In traditional<br />
stop-motion, animators use a variety of mouth<br />
pieces for each character. These pieces are<br />
removed and replaced with different shapes in<br />
nearly every frame which allow the animators to<br />
www.3dcreativemag.com page 31<br />
Issue 017 <strong>Jan</strong>uary 20<strong>07</strong>
not only make their characters speak but also<br />
create different expressions. To recreate this<br />
look in CG, the rigging department generated<br />
those replacement shapes within the computer.<br />
“In stop-motion, they physically remove one<br />
mouth shape and put in another in nearly every<br />
frame,” Costello notes. “So we made sure we<br />
could do the same thing on the computer.”<br />
One of the most difficult components of the<br />
CG facial rig was the trademark Aardman<br />
monobrow. On a clay figure, the monobrow is<br />
a piece of plasticine that hangs above the eyes,<br />
small plastic spheres which are pushed into the<br />
brows to form sockets. The brow is then raised<br />
slightly to form two furrows above the eyeballs.<br />
Costello cites Gromit – the silent canine partner<br />
of Aardman’s Wallace and Gromit franchise<br />
– as the best example of the brow’s importance.<br />
“Gromit doesn’t speak; he basically does all his<br />
acting with his brow. It’s very subtle and it’s a<br />
real mark of Aardman animation. So we had to<br />
mimic that in ‘Flushed Away.’” It took months to<br />
develop a CG rig that captured the right level<br />
of expressiveness. The monobrow rig had<br />
to reflect the clay-like feel of the character’s<br />
brow. Controls were added to the eye sockets<br />
to form a ridge, a sort of “false-brow” upon<br />
which the protruding brow would rest. Other<br />
controls were added to flatten and fatten the<br />
brow. Frown lines were added as scalable<br />
displacement maps to imitate the scoring of clay<br />
by modelling tools. “Aardman animators move<br />
the characters’ faces by hand,” Costello says.<br />
“Their fingers can make the smallest changes to<br />
reflect a character’s emotions or thoughts. The<br />
computer controls had to give our animators<br />
that same ability, because obviously we can’t<br />
just give the computer a giant thumb.” Thumb<br />
or no thumb, the Aardman thumbprints are all
over the characters of Flushed Away – literally<br />
and figuratively. When Spike receives an<br />
electric shock, the skeleton that shows through<br />
is actually a stop-frame armature. And if you<br />
look closely enough, Bowers shares, “you’ll see<br />
in some rare spots, some of the characters even<br />
have a few thumbprints on them.”<br />
Team Players<br />
No man – or mouse – is an island. Behind each<br />
of the memorable personalities gracing the<br />
screen in “Flushed Away,” there was a team of<br />
talented artists, animators, and actors working<br />
together to bring that character to life. “‘Flushed<br />
Away’ has some great comic characters,” Lord<br />
continues. “I think the villains in particular tend<br />
to steal the show a bit. We’ve taken great pains<br />
to try and get real performances and a story<br />
that people really care about. And it is a strong,<br />
exciting story, with lots of very big laughs.”<br />
“Our hero, Roddy St. James, is a privileged<br />
society mouse living a spoiled but solitary life in<br />
Kensington, an upscale London neighborhood,”<br />
Bowers reveals. “He thinks he has a wonderful<br />
life that involves a lot of play and very little<br />
responsibility. But he doesn’t have any family or<br />
real friends, so he has to make do with the toys<br />
and bits and pieces around the apartment.”<br />
“He doesn’t really know much about the world,”<br />
Fell adds. “He lives in this bubble – albeit, a<br />
very beautiful and luxurious bubble – but he’s<br />
quite naïve.” When he takes an unanticipated<br />
tumble into London’s sewer city, Roddy is faced<br />
with a world completely different from his own.<br />
It is immediately clear that this inadvertent<br />
adventure will be an eye-opening one.<br />
Hugh Jackman, who gives voice to Roddy,<br />
explains his character’s shock at his sudden<br />
change in circumstance. “When Roddy is
Dreamworks & Aardman Animation Flushed away<br />
flushed down the loo, it’s not just like being a<br />
fish out of water – it’s like being on Mars. He<br />
has never been outside his house before; he’s<br />
always well-dressed, always clean, and always<br />
alone. All of a sudden, he’s not only in a new<br />
world, he has to fend for himself among hordes<br />
of strangers.” “Hugh made Roddy even more<br />
charming than we thought he could be,” Bowers<br />
says. “Hugh is obviously a very talented<br />
dramatic actor, but he’s also got a lovely light<br />
comedy touch. Roddy became much more fun,<br />
really a nicer guy, when Hugh got involved. And<br />
he could sing! We didn’t expect that, but once<br />
we heard him, we knew we had to find a way<br />
for Roddy to sing in the movie.” Jackman, who<br />
won the Tony Award for Best Actor in a Musical<br />
in 2004 for his portrayal of singer-songwriter<br />
Peter Allen in “The Boy from Oz,” admits, “I’ve<br />
done a little bit of singing. When we first started<br />
working, Sam and David said, ‘We have an idea<br />
for a scene where Rita kicks you off out of the<br />
boat. You’re on a raft made from a rubber duck,<br />
and she throws you a guitar to use as a paddle.<br />
But instead, you use it to charm her by singing a<br />
song.’ We made it up on the spot.”<br />
Rita – played by Kate Winslet – is everything<br />
that Roddy isn’t. She’s an independent, streetsmart<br />
skipper who lives in the moment and<br />
takes risks, but is also determined to support<br />
her enormous family. Roddy and Rita find<br />
themselves thrown together for the adventure<br />
of a lifetime. “Roddy’s given a tip that Rita is<br />
the only one brave enough to take him on the<br />
dangerous journey back to his home,” Winslet<br />
explains. “And the two of them develop an<br />
www.3dcreativemag.com page 34<br />
Issue 017 <strong>Jan</strong>uary 20<strong>07</strong>
Flushed away Dreamworks & Aardman Animation<br />
unlikely friendship that sort of turns into an<br />
even more unlikely romance. It’s certainly a<br />
case of opposites attracting.” Fell adds, “Rita<br />
and her dad make a living as scrap dealers<br />
on this boat called the Jammy Dodger. She’s<br />
a bit wild, a little bit chaotic, a little vulgar<br />
– she’s got some rough edges. But she’s also<br />
brave and adventurous. So she might get into<br />
some trouble, but she always manages to get<br />
herself out of it.” “We thought of her as a sort<br />
of ‘Indiana Joanna,’” says Kramer. “Rita is<br />
really the quintessential street girl,” says Simon<br />
Otto, the supervising animator who developed<br />
Rita’s look. “At first, we created a character<br />
that was attractive, but extremely tomboyish.<br />
Red-haired, scrappy, a bit disheveled. Kate<br />
added a feminine nuance in her voice work,<br />
and I think Rita really ends up as something<br />
of a cross between a beautiful siren and a<br />
construction worker.” Winslet identifies with<br />
her character. “I think I am something like Rita<br />
– every girl should be. Tough, exciting, and<br />
interesting. I try to be as strong as I can be. I<br />
think that’s a very important quality for us girls<br />
to have.” If Rita is unrefined, Sid – Roddy and<br />
Rita’s unknowing matchmaker – is downright<br />
uncouth. After a burst sewer main rockets him<br />
up the pristine kitchen sink, Sid, a crass but<br />
jovial sewer rat, sets up residence in Roddy’s<br />
Kensington flat. Rather than be evicted from<br />
his plush new surroundings, Sid flushes<br />
away his displaced host. Adorned in a T-shirt<br />
made from underpants and trousers that can’t<br />
contain his sizeable belly, Sid punctuates his<br />
first scene in the movie with the longest belch<br />
in the history of animation. “Sid is filthy and<br />
unrestrained, and though he’s really not an<br />
evil guy at all, he’s a threat to Roddy’s way of<br />
life,” Fell states. “Sid has led a fairly tough life<br />
in the sewer, and has no desire to leave this<br />
luxurious place. He’s a dirty, energetic character<br />
who has invaded Roddy’s clean little bubble.<br />
Sid is chaos, and Roddy doesn’t like chaos.”<br />
British star Shane Richie provided Sid’s voice<br />
– and more. “Sid’s flamboyant and a bit odd,<br />
so Sam and David let me ad lib quite a bit,”<br />
Richie says. “So people who know me will<br />
www.3dcreativemag.com page 35<br />
Issue 017 <strong>Jan</strong>uary 20<strong>07</strong>
likely say, ‘Oh well, Shane’s added that bit.’ I certainly<br />
threw a bit of my personality in there.” Lionel Gallat, the<br />
supervising animator responsible for bringing Sid to life,<br />
noted that Sid’s girth was a challenge for the crew. “Sid<br />
is fat,” Gallat asserts. “It’s difficult for our riggers to give<br />
a portly character good definition. And sometimes their<br />
size restricts movement, which means that they have<br />
to create a lot of controls to shape different kinds of<br />
physical actions. Sid’s belly could have gotten in the<br />
way when he’s looking down into the toilet bowl, for<br />
example. But the riggers did such a good job<br />
with him.” While Sid happily adjusts to his<br />
lavish accommodations, trouble is brewing<br />
for the rodents down below; the comically<br />
sinister Toad is plotting their widespread<br />
demise. “The Toad is a big, bombastic,<br />
overbearing, huge, green monster,”<br />
says Bowers. “He used to be Prince<br />
Charles’ pet, but he was replaced by<br />
a mouse and flushed down the royal<br />
toilet into the London sewers. So he<br />
harbors a deep-seated resentment<br />
towards all rodents, and it’s his plan<br />
to wipe them all out.” The Toad is<br />
voiced by Ian McKellen. Bowers<br />
adds, “We asked him to bring all of<br />
his Shakespearean pomp to the role,<br />
because The Toad sees himself as sort of<br />
a sophisticated, suave, Noel Coward-type…<br />
even though everyone else sees him as Jabba<br />
the Hut.” “I never think of the characters I play<br />
as unpleasant, even if they’re Richard III,” says<br />
McKellen, sympathetically. “Toad’s had a hard<br />
life. He got flushed down the loo when Prince<br />
Charles handed over his favors to a new pet.<br />
Of course, Toad was disappointed, to put it<br />
mildly, but down below, he came into his<br />
own. He’s sentimental about his past,<br />
but he was turned by fate and he has<br />
a very strong nasty side as well.”<br />
“Toad is very baroque and broad in<br />
his gestures, and very fun to work<br />
with,” says supervising animator<br />
Jason Spencer-Galsworthy,<br />
who led the team that animated<br />
The Toad. “He’s the villain of<br />
the film, and the villain is often<br />
the character that has the<br />
most interesting nuances.<br />
There’s a perception that<br />
if you’re big, you’re also<br />
slow and lumbering, and we didn’t
want Toad to be like that. To get an idea of how<br />
he should move, we looked at videos of larger<br />
icons – Noel Coward, Alfred Hitchcock, to name<br />
two – who are also quick and powerful, who have<br />
incredible energy. You feel like he can be a real<br />
physical threat at any moment, even though he<br />
usually relies on his henchrats to do his dirty<br />
work.” Spike and Whitey are the Toad’s chief<br />
henchrats, tasked with retrieving the Toad’s<br />
secret weapon from Roddy and Rita. Much<br />
to their ruthless employer’s chagrin, this<br />
twosome is low on talent, brains, and killer<br />
instinct. They are, according to Fell, “really<br />
just a couple of idiots. They really want to<br />
be bad guys, but they’re just not any good<br />
at being bad.” Andy Serkis, who voices<br />
Spike, adds, “Spike and Whitey are a<br />
double act. Spike is lethal, absolutely<br />
lethal… in his own mind. He’s actually<br />
soft as anything, and kind of a nervous,<br />
twitchy rat who still lives with his mum.<br />
And he compensates by bossing around<br />
Whitey, who is three times his size.”<br />
“Whitey is an albino ex-laboratory<br />
rat,” explains Bill Nighy, who provides<br />
Whitey’s voice. “He was involved in<br />
some quite sophisticated shampoo<br />
experiments involving overexposure<br />
to hallucinogenics, which may well<br />
have contributed to his lacking<br />
intellect. He’s a big lumping<br />
character who is really a perfectly<br />
nice chap with a difficult job.”<br />
Producer Cecil Kramer adds,<br />
“I have a soft spot in my heart<br />
for Whitey. He’s rough and<br />
tough on the outside, but on<br />
the inside, he’s a complete<br />
mush.” Serkis found the<br />
process rewarding. “You<br />
inhabit the character and<br />
you play the situation,” he<br />
says. “I was fortunate<br />
in that the first section I<br />
did, Bill and I got to work<br />
together. That was such<br />
a relief, because if you’re<br />
doing a double act, you<br />
have to be able to play<br />
off the other person.”<br />
Nighy concurs, “The<br />
phenomenon of
Dreamworks & Aardman Animation Flushed away<br />
hearing your voice coming from this animated<br />
creature is thrilling.” When it becomes obvious<br />
that neither Spike nor Whitey can keep up with<br />
Rita and Roddy, The Toad calls up his ruthless<br />
and rubbery French cousin, Le Frog. A rather<br />
snooty mercenary, Le Frog is more passionate<br />
about having time for a leisurely dinner than<br />
he is about his cousin’s maniacal plan. French<br />
actor Jean Reno provides the voice of Le Frog.<br />
“He is the archetype of a bad guy more than<br />
a French archetype,” Reno describes. “He’s<br />
got some stereotypical French traits – his<br />
relationship with food, with girls – but there’s<br />
also the very smooth villain. He’s colorful, and<br />
I like that.” Bowers admires Reno’s sense of<br />
humor as much as his talent. “Jean was a real<br />
trooper,” he chuckles. “You know, the Brits and<br />
the French have poked fun at each other over<br />
the last, oh, five million years. We make fun of<br />
the Brits too, of course, but even so, there were<br />
certainly a few little gags that we sort of worried<br />
about handing over to such a respected French<br />
actor. But Jean didn’t mind in the least.”<br />
Le Frog’s distinct form dictated his range of<br />
motion. “He’s shaped a bit like an M&M, which<br />
can be tricky to animate,” says Mark A. Williams,<br />
the supervising animator who oversaw many<br />
of the key Le Frog scenes. “You can’t really<br />
rotate the spine and neck joints. So basically,<br />
you rotate him from the hips and give him very<br />
stretchy arms and legs. The way he moves<br />
actually adds to his humor.” Cecil Kramer<br />
reflects on the ensemble. “We never had all<br />
of our actors in the room at the same time,”<br />
she offers. “In fact, we recorded across ten<br />
cities, six countries, and three continents. But<br />
because we had just the right combination of<br />
talent – the right people in the right roles – the<br />
characters came together perfectly.”<br />
From “Up Top” To<br />
Bottom<br />
To emphasize the contrast between Roddy’s<br />
life of lonely luxury and the vibrant chaos<br />
he discovers when he’s flushed from it, the<br />
filmmakers were determined to design two<br />
dramatically different worlds. Their efforts<br />
www.3dcreativemag.com page 38<br />
Issue 017 <strong>Jan</strong>uary 20<strong>07</strong>
Flushed away Dreamworks & Aardman Animation<br />
resulted in the wild subterranean setting of<br />
Roddy’s tremendous adventure – the polar<br />
opposite of his polished, impersonal “Up Top”<br />
flat. Everything is in perfect order in Roddy’s<br />
extravagant home, and when his owners are<br />
away on holiday, Roddy has the run of the<br />
place. Fell explains, “Roddy is the pet mouse of<br />
a rather wealthy family living in Kensington. He<br />
lives in this gorgeous, gilded cage, is dressed in<br />
the finest doll clothes available, goes skiing on<br />
little mountains of ice cream. He plays volleyball<br />
with his toy pals and drives them around in<br />
his toy sports car. And he’s really quite happy<br />
there – or rather, just assumes he is because he<br />
doesn’t know anything different.”<br />
Since the film is set in and underneath London,<br />
one of the first steps in the production design<br />
process was a trip to the Square Mile itself. “We<br />
took so many photos,” remarks co-art director<br />
Pierre-Olivier Vincent. “We captured every<br />
little detail – the windows, the doors, the stairs,<br />
the signage – because things like these are<br />
very unique to a city. We really tried to absorb<br />
the mood of the city.” While the idea of the city<br />
often evokes images of rain and gloom, Vincent<br />
noted that London was practically awash in<br />
bright hues. “We think of London as a very<br />
dark city because the weather is often overcast,<br />
but it’s actually very colorful. There are a lot of<br />
reds, a lot of whites. Most of the windows have<br />
that white framing. The doors are often bright<br />
blue or green or red. Even the bricks are a<br />
very distinct color.” In the film, matte paintings<br />
provide the backdrop for above-ground London.<br />
“We started out with the photographs of the<br />
real place,” says Ronn Brown, matte painting<br />
supervisor. “Once we have those photographs,<br />
it’s kind of like making a collage. When we’re<br />
painting, we’re essentially putting all those<br />
photographs together, adding in the light, the<br />
values, and the shape. The goal is to be realistic<br />
within the style of the film – sort of ‘realistic<br />
with a twist,’ always adhering to that Aardman<br />
style. With Big Ben, for example, we’ve kind of<br />
exaggerated the shape of the building to give it<br />
more of that sculptural Aardman look.”<br />
Underneath Kensington, the vibe and pace<br />
www.3dcreativemag.com page 39<br />
Issue 017 <strong>Jan</strong>uary 20<strong>07</strong>
are quite different. It’s a bustling, unruly<br />
place, and for a pampered pet accustomed to<br />
order and predictability, it is simultaneously<br />
terrifying and exciting. Roddy’s home is clean,<br />
comfortable, and safe – but it is also somewhat<br />
cold and uninspiring. The underground world,<br />
conversely, needed to be almost magical.<br />
“There had to be a little bit of coldness in<br />
Roddy’s world because we needed him to<br />
eventually become attached to the world down<br />
below,” explains co-art director Scott Wills.<br />
“So he goes from a world that is really white<br />
and pristine into something darker and more<br />
complex. But it’s a balancing act – Roddy has<br />
to find the world overwhelming and intimidating<br />
at first, but it can’t be too scary and off-putting<br />
either, because he has to fall in love with it.”<br />
To draw inspiration for this world, the filmmakers<br />
visited an area of London that can hardly be<br />
considered a typical tourist attraction. “We took<br />
a field trip down into London’s sewers,” Bowers<br />
shares. “We got all kitted out in Hazmat suits<br />
and protective masks and had to climb down<br />
a 50-foot ladder.” The excursion revealed a<br />
less-than-picturesque environment. “There was<br />
nothing down there,” Bowers laughs. “We were<br />
expecting to be very inspired by what we saw,<br />
and while it really was impressively expansive,<br />
it was quite empty. We asked one of the men<br />
who worked down there where the rats were.<br />
He said, ‘Oh, it’s too deep for rats. No rats<br />
down here.’ So that was a bit of a surprise.”<br />
But the trip did reveal surprisingly beautiful<br />
Victorian architecture and brickwork, which<br />
production designer David A.S. James was sure<br />
to capture on camera. “I took a lot of digital<br />
stills down there,” he recalls, “even though there<br />
was a guy behind us warning us not to use too<br />
much flash because it could possibly trigger a<br />
methane explosion. Not exactly your typical<br />
workday in CG animation.” Once they were<br />
back in a less incendiary environment, the team<br />
began designing an alternate vision of London<br />
itself for the sewer world. While the mood and<br />
pace differ considerably from “Up Top,” the<br />
city’s influences are obvious in this underground<br />
metropolis; the designers reconstructed<br />
London’s notable landmarks with discarded<br />
items from the world above. In the alternate<br />
Piccadilly Circus, an old jukebox serves as a<br />
record store and a discarded arcade machine<br />
functions as an arcade. The subterranean<br />
Big Ben is comprised of a washing machine,<br />
a picture frame, a wall clock, and cups. The
London taxi is a converted boot, and the<br />
newsstand is a repurposed motorcycle helmet.<br />
Visual effects supervisor Wendy Rogers notes<br />
that to build the complicated and visually<br />
stunning world beneath the streets of London,<br />
the artists referenced an early were assisted<br />
physical set built by the team at Aardman and<br />
attempted to replicate that look in the computer.<br />
“It really was a design challenge, and I think<br />
that’s where Aardman really lent a hand. They<br />
gave one of their set builders a pile of garbage<br />
and said, ‘Go build an underworld.’ It’s really<br />
fun – every time you look at the movie, you’re<br />
going to find something different in the set.”<br />
The Jammy Dodger – Rita’s boat – is one of the<br />
team’s most inventive creations. “The boat has<br />
quite a bit of screen time,” James continues.<br />
“So we knew it had to be very interesting to<br />
look at. There are tennis balls for the bumpers.<br />
The back of the boat is a tire. The cabin is<br />
made from a gas can. The helm is a water tap,<br />
the throttle is from an old slot car racing set,<br />
the secret devices are triggered by typewriter<br />
keys… the list just keeps going.” Rogers notes<br />
that had the film been a traditional Aardman<br />
stop-motion film, the Jammy Dodger and the<br />
world it inhabits would have approached life<br />
size. “If our Roddy and Rita puppets were ten<br />
inches tall, the he entire underground city would<br />
have been 140 feet across to be proportionate<br />
and the Jammy Dodger would have to be five<br />
feet long,” she says. “With so many scenes<br />
taking place on that boat, with all its moving<br />
parts – the swinging Vegas dice, the mirrors<br />
– it was just too big a job.” Thousands of 3D<br />
models were needed to create Kensington<br />
and the dizzying world below. Modeling is the<br />
creation of all of the characters, props, and<br />
environments in geometric form. “It’s kind of<br />
like digital sculpting,” modeling supervisor Matt<br />
Paulson explains. “It’s taking the concepts<br />
and images and actually recreating them on<br />
the computer.” “Flushed Away” was incredibly<br />
challenging from a modeling perspective.<br />
Paulson says, “Typically, DreamWorks<br />
Animation films require anywhere from 1500 to<br />
1700 individual models. Flushed Away had well<br />
over 3000. There’s a lot of complexity, a lot of<br />
unique models that we put together to create<br />
a sophisticated, elegant world Up Top, and<br />
the sewer, where everything’s scattered and<br />
trashed a bit. Making those two worlds separate<br />
but equally appealing was one of our biggest<br />
challenges.”
Dreamworks & Aardman Animation Flushed away<br />
Rollin’ on a river<br />
Since CG animated movies are constructed<br />
within a virtual environment, it’s easy to<br />
underestimate the importance of one of<br />
the most fundamental pieces of filmmaking<br />
equipment – the camera. Cinematography<br />
is just as critical in CG as it is in live action or<br />
stop-motion. On physical movie sets, camera<br />
work is restricted by space and gravity. To film<br />
a scene from above, cameras typically run on<br />
tracks. Depending on the complexity of the shot<br />
desired, these structures can require intricate<br />
scaffolding and considerable manpower. And<br />
even with this effort, there will still be some<br />
limitations to the camera’s range of motion.<br />
Of course, gravity doesn’t exist in CG. A scene<br />
can be filmed from any angle in any motion the<br />
cinematographer desires, and an aerial shot is<br />
as straightforward as one on the ground. “We<br />
were able to fly the camera around,” Kramer<br />
says, “and that paid off beautifully in the boat<br />
chase, which is one of the most important<br />
sequences in the movie.” In “Flushed Away,”<br />
this freedom of movement is needed to be<br />
restrained in order to preserve the Aardman<br />
www.3dcreativemag.com page 42<br />
Issue 017 <strong>Jan</strong>uary 20<strong>07</strong>
Flushed away Dreamworks & Aardman Animation<br />
style. Co-head of layout Frank Passingham<br />
notes, “In terms of the camera movement, we<br />
wanted to keep the perspective very grounded,<br />
for the most part. I think we’ve emulated the<br />
Aardman look in the camera and lighting work<br />
as well as the animation.” Co-head of layout<br />
Brad Blackbourn was mindful of this objective in<br />
overseeing the transition between storyboards<br />
and full animation. Layout involves blocking a<br />
rough version of the characters through their<br />
intended movements on the computer. In<br />
addition to character movement, layout artists<br />
must also recreate the camera perspectives<br />
implied in the storyboards. During this stage,<br />
the preliminary camera movement, lenses,<br />
and angles are selected. It’s at this point,<br />
Blackbourn comments, that the crew is really<br />
“getting a feel for the geography of the set.”<br />
“Everything breaks down into frames,”<br />
Passingham adds. “You need to think about<br />
not just the camera move that you’re working<br />
on, but the camera move that you just cut<br />
from, or are about to cut to. There are always<br />
accelerations and decelerations in movies,<br />
and you’ve got to be very careful about those.<br />
Those decisions dictate the speed of the<br />
camera you use, and the width of the lens.”<br />
Blackbourn recalls the early stages of camera<br />
work on the scene that introduces the audience<br />
to The Toad’s ice room. “We wanted to try to<br />
play up the power of this scene,” he explains.<br />
“Roddy and Rita come face to face with all of<br />
the rats Toad has frozen. We wanted to give it<br />
sort of a ‘death chamber’ feel, when it’s basically<br />
a refrigerator. We used around 100 shots for<br />
this sequence, to cover every possible angle.<br />
And we used some really wide angle lenses<br />
and low perspective.” The majority of scenes<br />
in “Flushed Away” were filmed with 35-, 24-,<br />
and 18-millimeter lenses. “The characters’<br />
noses required us to be especially careful with<br />
the lenses,” Passingham explains. “Roddy,<br />
Rita, Sid – they’re rodents with long noses.<br />
When you’re using a wide-angle lens, those<br />
noses can almost project right off the screen,<br />
so you have to stay on top of that.” Camera<br />
movement was just as tricky as lens selection.<br />
For the sequence where Roddy is flushed from<br />
www.3dcreativemag.com page 43<br />
Issue 017 <strong>Jan</strong>uary 20<strong>07</strong>
his home, the camera’s motion was carefully<br />
designed to capture his disorientation. “We<br />
wanted Roddy to be spiraling, descending<br />
quickly, and very shaken,” Passingham says.<br />
‘So while we’re tracking forward, we’re actually<br />
sort of spiraling in the camera at the same time.<br />
And putting a bit of shake in the shot, some<br />
rough camera movement to show that he’s<br />
really being buffeted as he’s propelled along<br />
the popes. The camera motion really conveys<br />
that he’s taking a rather tough and extensive<br />
trip to the sewer world.” The climactic boat<br />
chase on the Jammy Dodger was one of the<br />
most challenging sequences to shoot. Bowers<br />
summarizes the scene: “Roddy and Rita are<br />
being chased by Spike, Whitey, and the rest of<br />
The Toad’s bunch. Rita hits the turbo boost,<br />
the fire extinguisher goes off, and the Jammy<br />
Dodger just shoots down the tunnel.” “The first<br />
thing we had to work out was the speed of the<br />
boat,” Passingham recalls. “At the beginning,<br />
the boat only uses one steady speed, then<br />
there’s a different speed when the chase begins,<br />
and then a final speed once Rita switches on<br />
the booster. And those speeds actually dictated<br />
the length of the tunnel.” The backgrounds were<br />
blurred to convey a sense of motion and speed.<br />
But to really make the sequence spectacular,<br />
the team turned to perhaps the most celebrated<br />
chase scene in motion picture history. “We<br />
realized that our chase was actually similar to<br />
a car chase, so we actually used the car chase<br />
sequence in ‘The French Connection’ as a<br />
reference. In that film, a lot of the cameras were<br />
actually mounted on the bumper of the cars.<br />
So we used a similar approach, and mounted<br />
a camera close to the water. It really captures<br />
that sense of speed and makes the shot look<br />
even more thrilling.”
The Wet Look<br />
While water is considerably more problematic<br />
in stop-motion, it’s not exactly easy in CG.<br />
Lighting artistic supervisor Mark Edwards<br />
notes, “Water is particularly difficult because,<br />
obviously, people already know what it looks<br />
like. They know how it moves and behaves,<br />
and they’re going to be watching with a<br />
critical eye. So we needed to capture just<br />
enough realism in the water’s appearance and<br />
movement without disrupting the movie’s visual<br />
style.” To design the varying water patterns,<br />
the effects team combined technology with<br />
basics: fluid-simulating software inspired by<br />
the real physical properties of water. These<br />
physical experiments are used as references,<br />
and then it’s up to the effects team to translate<br />
the real-life visuals into CG. “There’s a scene<br />
right after Roddy is jettisoned out of a pipe and<br />
up against a sewer grate and is doused with<br />
water,” Lindquist recalls. “We weren’t sure<br />
exactly how that should look, how the water<br />
would appear on impact, how it would drip off<br />
Roddy’s body. So we got some buckets, some<br />
hoses, some volunteers, and went outside.”<br />
The reference for the toilet flush scene was a<br />
little more challenging to obtain. “Toilets that<br />
aren’t low-flow are practically nonexistent in<br />
Los Angeles,” Kramer explains. “We went<br />
outside the country to find the right flush. The<br />
whirlpool that sucks Roddy underground was<br />
actually inspired by footage of a toilet in a British<br />
pub, courtesy of one of our Bristol colleagues.”<br />
Lindquist adds, “The flush scene is actually a<br />
sequence of three shots, using two different<br />
techniques to achieve the look. The first two<br />
shots were created by taking a flat surface and<br />
deforming it into a shape that closely resembled<br />
the flushing water from the pub footage, and
Dreamworks & Aardman Animation Flushed away<br />
Gregson-Williams embraced the process of<br />
composing for “Flushed Away.” He states, “It’s<br />
a particularly collaborative experience, scoring<br />
an animated movie. It’s quite a substantial<br />
commitment, compared with live action. It’s<br />
never really finished until it’s finished. Cues<br />
change, scenes expand. I’ll start developing<br />
the music when the film is in the storyboard<br />
stage, then adjust it as I go along.” When he first<br />
started composing the “Flushed Away” score,<br />
Gregson-Williams focused at first not on the<br />
beginning of the film or any of the fast-paced<br />
action sequences, but a poignant moment in<br />
the middle of the movie. “There’s a scene in<br />
the middle of the film where Roddy and Rita are<br />
having dinner, and she’s asking him to tell her<br />
about himself,” he says. “And Roddy claims to<br />
have a wonderful life, surrounded by friends and<br />
relatives. But it’s not true, and he’s beginning<br />
to realize that he’s actually sad about that. It’s<br />
a subtly emotional scene, and a momentary<br />
break from the frenzied pace of the film. It might<br />
sound a bit odd that I would start in the middle,<br />
but I saw it as the point where it all ties together.<br />
Having started there, I then doubled back to the<br />
beginning of the movie and thematically built<br />
towards that crucial scene.” The song selection<br />
was equally deliberate, and ultimately parallels<br />
the somewhat haphazard quality of the sewer<br />
world. “We have a fairly eclectic selection of<br />
songs and artists,” Bowers notes. “We wanted it<br />
to be fun, but we also wanted to capture a wide<br />
variety of different feelings, because it’s a city,<br />
complete with that urban city feel. So we have<br />
several artists, including the Jets, the Dandy<br />
Warhols, even Tina Turner.” But the filmmakers<br />
didn’t limit themselves to established musicians;<br />
“Flushed Away” also marks the musical debut<br />
of the scene-stealing slugs. These slippery<br />
singers started off as extras, just another kind<br />
of unfamiliar creature for Roddy to encounter<br />
with trepidation. But Fell and Bowers soon<br />
realized that the slugs had some serious comic<br />
potential. “We started off with just a few slugs<br />
that let out these hilarious high-pitched screams<br />
when Roddy first meets them,” Fell recalls. “But<br />
they were so funny and cute, we started to look<br />
www.3dcreativemag.com page 46<br />
Issue 017 <strong>Jan</strong>uary 20<strong>07</strong>
Flushed away Dreamworks & Aardman Animation<br />
for other spots in the film for them to show up.”<br />
Since the slugs had become a crew favorite,<br />
the bid to increase their screen time was wellreceived.<br />
“Before long,” notes Kramer, “we<br />
were thinking, ‘Wouldn’t it be great to have them<br />
singing?’ So they became something of a comic<br />
Greek chorus, which contributed to the kind of<br />
silly, whimsical, humorous style of our movie.”<br />
While the slugs do provide the background<br />
vocals for a scene where Roddy serenades<br />
Rita from the underground river, Bowers admits<br />
that there was some lip-synching involved in<br />
the finale, a spirited rendition of “Proud Mary.”<br />
“We really wanted to hear Tina Turner’s voice<br />
coming out of those slugs. We just thought it<br />
would be very funny. And it is.”<br />
www.3dcreativemag.com page 47<br />
Issue 017 <strong>Jan</strong>uary 20<strong>07</strong>
Dreamworks & Aardman Animation Flushed away<br />
Roddy a.k.a. Roderick St. James (voiced<br />
by HUGH JACKMAN), is a pampered pet mouse<br />
who lives in an elegant penthouse apartment in<br />
upscale Kensington, London. When the family<br />
goes away on vacation, it’s Roddy’s turn to have<br />
the run of the house. He’s never really ventured<br />
outside the safe walls of his luxurious home, or<br />
never really needed to. Or so he thought. When<br />
he gets flushed down the toilet he is surprised<br />
by the amazingly beautiful and vibrant world of<br />
rats he meets down in the drains of London.<br />
He learns to become more adventurous and<br />
learns about family and friendship from a gutsy<br />
rat named Rita. He learns that truly, no rat is an<br />
island.<br />
www.3dcreativemag.com page 48<br />
Issue 017 <strong>Jan</strong>uary 20<strong>07</strong>
Flushed away Dreamworks & Aardman Animation<br />
Rita (voiced by KATE WINSLET) is the<br />
complete opposite of Roddy. She’s a confident<br />
and adventurous risk-taker. Rita lives for the<br />
moment and believes that taking chances is an<br />
essential part of life. She comes from a large<br />
family. Her mom had 37 kids by the time she<br />
was 10 months old. Rita has spent most of her<br />
life working with her Dad as a scavenger on<br />
the family boat, the Jammy Dodger. When her<br />
Dad has to take a break from the action due to<br />
an accident working in a dangerous part of the<br />
drain, Rita takes on the job of providing for her<br />
mad but lovable family.<br />
www.3dcreativemag.com page 49<br />
Issue 017 <strong>Jan</strong>uary 20<strong>07</strong>
Dreamworks & Aardman Animation Flushed away<br />
The Toad (voiced by Sir IAN<br />
MCKELLEN) is a pompous, well-dressed,<br />
aristocratic amphibian who lives deep within the<br />
drains of London. His claim to fame is that<br />
he was once Prince Charles’ favorite pet.<br />
Sadly one day, he was replaced by a<br />
pet mouse, and when the prince wasn’t<br />
looking the Toad was flushed down<br />
the toilet by a palace flunky. Now the<br />
Toad hates all rodents. This hatred<br />
motivates his diabolical plan for the<br />
sewer – to wash away all of the rats<br />
in a Great Flood and repopulate the sewer with<br />
an army of tadpoles.<br />
www.3dcreativemag.com page 50<br />
Issue 017 <strong>Jan</strong>uary 20<strong>07</strong>
Flushed away Dreamworks & Aardman Animation<br />
Sid (voiced by SHANE RICHIE) is a big,<br />
enthusiastic, vulgar sewer rat who arrives in<br />
Roddy’s apartment when he is blown up through<br />
the pipes by a burst sewer main. Roddy’s place<br />
is like heaven to Sid - all the food you can eat<br />
and a big telly to watch the World Cup final on.<br />
With Roddy gone, Sid takes over Roddy’s life<br />
taking the phrase “all money and no taste” to<br />
new extremes.<br />
Le Frog (voiced by JEAN RENO) is The<br />
Toad’s mercenary French cousin. He and his<br />
gang of vicious henchfrogs will kill for a price,<br />
but not before they’ve had a proper threecourse<br />
lunch. Le Frog approaches his uptight<br />
English relative with a mixture of insouciance<br />
and disdain. He thinks his cousin’s rodent hating<br />
obsession is very unhealthy. Despite Le Frog<br />
and his gang’s vicious demeanor they are more<br />
comic than deadly (being funny little rubbery<br />
fellows after all).<br />
www.3dcreativemag.com page 51<br />
Issue 017 <strong>Jan</strong>uary 20<strong>07</strong>
Dreamworks & Aardman Animation Flushed away<br />
Whitey (voiced by BILL NIGHY) is an<br />
albino ex-laboratory rat. He had one too many<br />
“shampoos” up in the laboratory which left him<br />
completely unfocussed on doing bad<br />
deeds. He adds to Spike’s<br />
misery by undermining<br />
him and not acting like<br />
a proper hitman.<br />
Spike (voiced by ANDY SERKIS) has<br />
elected himself as the Toad’s chief henchrat.<br />
This is his first job as a bad guy. He tries really,<br />
really hard to act like a ruthless cold blooded<br />
killer but in reality he still lives with his mum<br />
and his middle name is Lesley. He desperately<br />
overcompensates for these shortcomings but<br />
his over-zealous approach to his work always<br />
insures a sticky end for him.<br />
www.3dcreativemag.com page 52<br />
Issue 017 <strong>Jan</strong>uary 20<strong>07</strong>
Flushed away Dreamworks & Aardman Animation<br />
Flushed FACTS When Roddy is<br />
“flushed away” from his posh Kensington flat<br />
into the mysterious world beneath London,<br />
the first being he encounters is a slug voiced<br />
by none other than Hugh Jackman. Sound<br />
engineers took Hugh’s scream as Roddy and<br />
reworked it electronically so that the slug would<br />
scream exactly the same as Roddy (albeit at<br />
a considerably higher pitch). There are 658<br />
characters populating the underground world.<br />
(By way of comparison, England’s smallest<br />
city, St. David’s, has over 1,600 people.) All<br />
of these characters can be seen in a single<br />
scene at the end of the film: they turn out to<br />
watch the World Cup Final on a giant screen in<br />
Piccadilly. Because non-”low flow” toilets are so<br />
hard to find in the Los Angeles area, Aardman<br />
colleagues in England videotaped footage<br />
of a toilet flushing in a local pub and sent it<br />
to DreamWorks’s Glendale studio for effects<br />
reference. (There is no word on whether they<br />
were ever allowed back inside the pub.) If all the<br />
tunnels in “Flushed Away” were laid end-to-end,<br />
they would cover 6.5 miles. Compare that to the<br />
30,000 miles of sewers underneath London in<br />
real life! The sewers in the film are held together<br />
by over 38,380 individual bolts and houses<br />
www.3dcreativemag.com page 53<br />
Issue 017 <strong>Jan</strong>uary 20<strong>07</strong>
220 buildings spanning 10 adjacent sets. In the scene<br />
when Spike gets electrocuted, an armature (rather than<br />
a skeleton) is visible inside his body, similar to what he<br />
would have had as a stop-motion puppet. As part of the<br />
reference trip to London, several members of the crew –<br />
the visual effects supervisor, the directors and production<br />
designer – toured the city’s sewers. In Tabitha’s room,<br />
there are a variety of dolls from previous DreamWorks<br />
Animation films, including a Gromit and several bunnies<br />
from “Wallace & Gromit: The Curse of the Were-Rabbit,”<br />
an Alex the Lion from “Madagascar,” and a Dragon from<br />
“Shrek.” Liquid Nitrogen takes less than 30 seconds to<br />
freeze, but about 259,200 seconds to animate.
Flushed Away<br />
For more information please visit<br />
www.flushedaway.com<br />
Article Courtesy : Imago Edizioni,<br />
Italy http://www.imagonet.it<br />
Published by agreement.
Flushed Away<br />
For more information please visit<br />
www.flushedaway.com<br />
Article Courtesy : Imago Edizioni,<br />
Italy http://www.imagonet.it<br />
Published by agreement.
Over the last Year, <strong>3DCreative</strong> has been<br />
asking industry professionals one<br />
important question:<br />
“What one piece<br />
of advice would<br />
you give to<br />
an Aspiring<br />
Artist?”<br />
With a new year<br />
and a fresh start,<br />
here are the<br />
answers...
Advice for Aspiring Artists<br />
“What one piece of<br />
advice would you give<br />
to an Aspiring Artist?”<br />
Wei Wei Hua<br />
Fantasy Artist and creator of ‘Green Valley’<br />
“It is very important that you love your job. It<br />
can make you happy and you can produce<br />
satisfying work. You also have to treat your<br />
designs seriously. If you want to make people<br />
feel touched by your work, you have to feel<br />
passionate about it first.”<br />
Krishnamurti M. Costa<br />
Character Artist, Cafe FX<br />
“People have no more reason to complain about<br />
the lack of information. The Internet is your<br />
friend. Google can help you a lot and CG online<br />
resource sites are full of great tutorials. Great art<br />
and animation schools are all around the world.<br />
If you are not interested to research things or<br />
work hard I feel sorry to tell you that maybe you<br />
will have no future doing 3D, and even worse<br />
if you are planning to get into the industry.<br />
People working in the industry are curious by<br />
nature and responsible for new techniques that<br />
a lot of the time come from a mixture of ideas<br />
from different sources. Working hard and being<br />
curious, you can have much more of a chance<br />
to get into 3D. One thing you can’t forget:<br />
technique is the smaller part! To learn a new<br />
technique is the simplest thing. What you really<br />
need is a good art background to succeed doing<br />
CG in general. The best CG artists I know are<br />
great traditional sculptors, painters etc. More<br />
art fundamentals can make your transition very<br />
easy sometimes. The mantra is “curiosity and<br />
hard work...”.”<br />
Michel Roger<br />
Artist, Attitude Studio, Luxembourg<br />
“Get seriously into it, which means a lot of<br />
hard work but not only in learning 3D tools and<br />
techniques. If possible, try yourself at different<br />
art forms such as drawing, traditional modelling<br />
or photography, and develop a strong artistic<br />
knowledge base. And the most important is:<br />
never think « that’s it, I’m good ». Always reevaluate<br />
yourself and be humble, as there are<br />
so many things to learn, it takes a lifetime.”<br />
Pär Tingström<br />
Starbreeze Studios, Sweden<br />
“Don’t let your employer take advantage of the<br />
fact that you love your work, don’t burn your self<br />
out because the project you work on is badly<br />
planned or suffers from poor leadership.”<br />
www.3dcreativemag.com page 58<br />
Issue 017 <strong>Jan</strong>uary 20<strong>07</strong>
Advice for Aspiring Artists<br />
James Ku<br />
Next Gen Developer, Whatif Productions, USA<br />
“The CG industry is definitely not an easy one<br />
to break into. This industry, whether it’s film, TV<br />
or games, seems very sexy, so it attracts a lot<br />
of people. The competition is very fierce and I<br />
would say my best advice is to not give up. It<br />
sounds quaint for me to say that, but this world<br />
is filled with people who would love nothing<br />
more than to tell you that you’ll never achieve<br />
your dreams. If you love doing CG then I think<br />
it will show, sooner or later it will show, and<br />
good things will happen. The one other thing I’d<br />
like to give as advice is to keep the long view.<br />
Make sure you see the far view of things, the big<br />
picture. What I mean is, CG is like any other art,<br />
it’s a life long pursuit. Don’t perceive graduation<br />
from art school or getting your first job as the<br />
end of your artistic development, it’s just the<br />
beginning. Don’t stop doing your personal art<br />
and practising in your spare time. I see so many<br />
artists who get their break in the industry and<br />
then from that point on, only do CG at work and<br />
then go home and spend the rest of their time in<br />
front of a TV or playing games. The longer you<br />
can stay hungry, the more you can treat every<br />
project like the first and the last project you’ll<br />
ever do, the more you’ll develop as an artist<br />
and the more your work will shine. My father<br />
once told me, the way to be a good man is to be<br />
forgiving with others and unforgiving to yourself,<br />
I think that’s applicable to all things in life. Stay<br />
humble, stay working and best of luck to all of<br />
you...”<br />
Jorge Baldeon<br />
Freelance Artist, Ecuador<br />
“In many interviews artists recommend to<br />
practice a lot and don’t give up, and they are<br />
right. What I have to say is to think outside<br />
the box, when you have an idea then twist it<br />
upside down and you will see a new world of<br />
possibilities. Try to learn other cultural views<br />
in the same matter and it will surprise you how<br />
others see the most common things in new,<br />
interesting ways. The technical side of 3D is<br />
actually getting easier and more reachable to<br />
artists, so we have to focus in our ideas and<br />
how they will look. One important factor for<br />
any aspiring 3D artist is to learn photography.<br />
At least the basics in composition, depth and<br />
contrast. It helped me get a better grip on 3D<br />
knowledge and flow...”<br />
Julien J. Mortimer<br />
Creature Artist, UK<br />
“For anyone just starting out it can seem quite<br />
daunting at first and it’s getting more and more<br />
competitive. You have to be prepared to work<br />
hard, for a creative artist, try and focus on<br />
getting your own style and look to your work so<br />
that you stand out from the crowd.”<br />
Jaques DeFontaine<br />
Freelance Artist, Belgium<br />
“I’m not too good at advice, but there are a<br />
couple of things which I find important. Always<br />
try to set up some kind of a pre-production<br />
period. I find this part very important… it’s not<br />
always possible though. For human or animal<br />
modelling buy/study anatomy books, they<br />
are almost essential. Realism is a very good<br />
exercise/challenge… style can come afterwards.<br />
Besides, if you watch movies such as ‘Finding<br />
Nemo’ or ‘Shrek’, they’re always using reality<br />
as reference, and sometimes, even if the movie<br />
is basically more cartoon, it’s mainly in the<br />
animation part. It’s just that, they stop where<br />
they find it might be too realistic for the overall<br />
style of the movie. Learn to observe… it’s<br />
definitely essential and unavoidable if you go<br />
www.3dcreativemag.com page 59<br />
Issue 017 <strong>Jan</strong>uary 20<strong>07</strong>
Advice for Aspiring Artists<br />
for realism. Last one… keep in mind that you<br />
were not born talented, you might have a gift but<br />
talent doesn’t exist without continuous work and<br />
passion… this is just my opinion though!”<br />
Raphael Lacoste<br />
Art Director, Canada<br />
“Firstly, what is a good 3D artist? In my opinion,<br />
3D is just a tool, it is like a pencil, and if you<br />
have a good basis in traditional art, you’ll be a<br />
better 3D artist. It’s like a good keyboard player,<br />
if he has a strong background in piano, jazz and<br />
classic, he will be a better keyboard player, even<br />
if he plays dance music… I think that to have a<br />
good sense of composition and lighting, a 3D<br />
artist should spend more time taking pictures<br />
with his camera, looking around and drawing…”<br />
Heber Alvarado<br />
Next-Gen Creature Modeller, Propaganda<br />
Games, Canada<br />
“Don’t compare the level of your work to your<br />
classmates, compare yourself to the industry<br />
and strive to achieve or surpass that, because<br />
that’s what you will be judge upon.”<br />
André Kutscherauer<br />
3D Visualisation Artist, Germany<br />
“With Dreamweaver and Photoshop you can<br />
get a very nicely designed online portfolio with<br />
less time being spent on learning. I think it’s not<br />
important to get a big flash site. I think a simple<br />
but nicely designed html page is enough. Just<br />
make it so it hits the right spot!”<br />
Richard Rosenman<br />
Head of 3D, Redrover Animation Studios,<br />
Toronto, CanadaA,<br />
“Make sure you have a strong trust in the people<br />
you work with as you will have to rely on them<br />
and they will have to rely on you. Know how<br />
to resolve conflicts and issues in a mature<br />
manner as these will always inevitably come<br />
up, especially in a creative environment. Plan<br />
ahead so that you’re prepared and capable<br />
of taking on the workload that may potentially<br />
come your way. And of course, the most<br />
important advice of all I could give to anyone in<br />
this line of work is that hardware and software<br />
are completely irrelevant in this field, unless you<br />
are a programmer. It doesn’t matter how well<br />
you know these tools or how many of them you<br />
know. What matters is how much creativity you<br />
posses and what you do with it. The computer<br />
is simply another artistic medium, but a<br />
fundamental knowledge of art concepts such as<br />
colour theory, design, composition, and anatomy<br />
are crucial in developing a successful career as<br />
a digital artist.”<br />
Vitaly Bulgarov<br />
Freelance Artist, Russis<br />
“Aspiring man has only his will and his patience<br />
to achieve anything he wants. Work... work<br />
hard... work as hard as you can!”<br />
www.3dcreativemag.com page 60<br />
Issue 017 <strong>Jan</strong>uary 20<strong>07</strong>
Advice for Aspiring Artists<br />
Adel Adili<br />
Founder, Leda Studios, Iran<br />
“Good forums are a suitable place for sharing our<br />
ideas, and if somebody is in trouble they can get<br />
hints from other artists’ comments. If I want to say<br />
something as a freelancer, I would say: be patient<br />
and keep your clients satisfied. But some advice<br />
for those who want to be a good artist is to have a<br />
strong imagination. When working, try to provide<br />
the same condition as the theme of the project for<br />
yourself to feel the mood of it, because you have<br />
to work with all your heart. A good work needs all<br />
your feelings and emotions.”<br />
Rich Diamant<br />
Lead Character Artist, Naughty Dog Studio<br />
“Don’t stop learning! The most successful<br />
people I’ve met are the ones who are always<br />
on top of their game. They know the latest and<br />
greatest methods of working and are constantly<br />
trying new ways to enhance themselves as<br />
artists. A vast knowledge of tools and pipelines<br />
will easily give you an edge over someone else<br />
whose knowledge is very limited. This industry<br />
is not easy. To be the best, you have to work<br />
for it.”<br />
essential for me to attain my work visa. This<br />
is what makes it difficult to get a contract. The<br />
optimum way is through the universities. The<br />
majority of our beginner employees come from<br />
universities and many of them are foreign. With<br />
many different skill requirements, being able<br />
to pick specialists in each field makes it much<br />
easier for them to obtain a specialist work visa.<br />
Dave Davidson<br />
Freelance Visualisation Artists, UK<br />
“Keep at it, expect knock backs, down times and<br />
always try to be positive about your work and<br />
the projects you work on.”<br />
Carlos Saldhana<br />
Director Ice Age 2, Blue Sky Studios<br />
“Talent comes in first place, but for a foreign<br />
worker to America, for me, my diploma was<br />
www.3dcreativemag.com page 61<br />
Issue 017 <strong>Jan</strong>uary 20<strong>07</strong>
Advice for Aspiring Artists<br />
Grzesiek Jonkajtys<br />
Artist, Cafe FX<br />
“Be patient: draw; paint; make photos and<br />
observe; always find good references.”<br />
Ryan Honey<br />
Co-Founder, BUCK Studio, LA, USA<br />
“Hmmm. My advice would be to spend your<br />
entire student career doing one amazing<br />
showpiece that not only incorporates everything<br />
you have learned but defines what you are<br />
passionate about. One piece of amazing work<br />
is much more effective in getting work than a<br />
bunch of mediocre projects.”<br />
Liam Kemp<br />
Freelance Artist, UK<br />
“I would say that if you really are passionate<br />
about making a movie, then you must just do it.<br />
There is nothing worse than living with regrets<br />
about not taking your chances when you had<br />
them, and if you feel you don’t have sufficient<br />
spare time, if you care about CG art enough,<br />
you will make the time. Lastly, get it into your<br />
mind that once you start a project, there is no<br />
going back - you no longer have the option to<br />
quit.”<br />
Rodrigue Pralier<br />
Concept Artist, EA, Montreal, Canada<br />
“My advice would be to be really motivated,<br />
always look for improvement, be aware of what<br />
is happening in the other industries (games,<br />
illustrations, comics etc.) and to not be afraid of<br />
re-doing the same thing many times.”<br />
Patrick Beaulieu<br />
Character Artist, Ubisoft, Quebec, Canada<br />
“I have been involved in different areas in 3D<br />
- each one has helped me get to where I am<br />
today. I don’t regret any choices that I have<br />
made or any decisions I have taken. There<br />
was always a good reason for these choices.<br />
Over the last 6 years in this field, I have met<br />
many nice people, have made good friends,<br />
and have learnt a great deal. I am happy to<br />
see how I have evolved in 3D and I hope to<br />
continue improving. I hope to have more good<br />
opportunities in this field and I will keep working<br />
hard to reach my goals!”<br />
Manuel Macha<br />
Lucasfilm Animation Company, Singapore B.V.<br />
“Especially for people who are trying to break<br />
into the industry, my advice to them would<br />
www.3dcreativemag.com page 62<br />
Issue 017 <strong>Jan</strong>uary 20<strong>07</strong>
Advice for Aspiring Artists<br />
be not to give up too easily! Right now, more<br />
people than ever before are trying to get a job in<br />
CG and it’s really competitive out there. I think a<br />
good way to get your foot in the door is through<br />
an internship because, besides good artistic and<br />
technical skills, knowing the right people really<br />
helps. Also, having a big network of people<br />
is essential in order to always be up-to-date<br />
regarding new projects and opportunities. Of<br />
course, all the things I have mentioned will only<br />
make sense if you have the artistic and technical<br />
skills. Most other artists I know all have this<br />
natural curiosity in common - always trying to<br />
improve & learn new things!”<br />
Jose Gomez<br />
Co-Founder, Shilo Design<br />
“Anyone aspiring to be in a creative field - any<br />
creative field - should never be afraid to fail or<br />
to take chances. It’s when you free yourself of<br />
these constraints that the best and most creative<br />
ideas are born and a project can take on a<br />
whole new dimension. Concept is “King”, so the<br />
more creative you can be initially, the better your<br />
work will turn out in the end.”<br />
www.3dcreativemag.com page 63<br />
Issue 017 <strong>Jan</strong>uary 20<strong>07</strong>
This months Gallery includes:<br />
Anna Celarek<br />
Tiziano Fioriti<br />
Zdenek Urbánek<br />
Arnaud Servouze<br />
JoonMin Park<br />
Zhang Yang<br />
Piotrek Gruszka<br />
Mauro Baldissera<br />
Raymond Yang
10 of the Best The Galleries<br />
Siren<br />
Anna Celarek<br />
anna_celarek@gmx.at<br />
www.ania.xibo.at<br />
Piazza Grande<br />
Tiziano Fioriti<br />
designtiziano@hotmail.com<br />
http://www.tizianofioriti.com<br />
www.3dcreativemag.com page 66<br />
Issue 017 <strong>Jan</strong>uary 20<strong>07</strong>
The Galleries 10 of the Best<br />
Ferrari F1-2000 Michael Schumacher<br />
Raymond Yang<br />
bignanfer@hotmail.com<br />
Ford Mustang<br />
Zdenek Urbánek<br />
URBIS.URBIS@seznam.cz<br />
You can follow the ‘Making Of’ this image later on in this issue of<br />
<strong>3DCreative</strong> Magazine...<br />
www.3dcreativemag.com page 67<br />
Issue 017 <strong>Jan</strong>uary 20<strong>07</strong>
10 of the Best The Galleries<br />
Sphinx<br />
Mauro Baldissera<br />
maurobaldissera@gmail.com<br />
Watermark – Bedroom<br />
Serge Vasiliew<br />
caesar@cat-a-pult.com<br />
http://cat-a-pult.com<br />
www.3dcreativemag.com page 68<br />
Issue 017 <strong>Jan</strong>uary 20<strong>07</strong>
The Galleries 10 of the Best<br />
Les lievres et la tortue<br />
Arnaud Servouze<br />
arnaud_servouze@hotmail.com<br />
http://arnaud.servouze.free.fr/<br />
Revolution<br />
Zhang Yang<br />
shaoyu99520@hotmail.com<br />
http://zhangyang84.cgsociety.org/gallery<br />
You can follow the ‘Making Of’ this image later on in this issue of <strong>3DCreative</strong> Magazine...<br />
www.3dcreativemag.com page 69<br />
Issue 017 <strong>Jan</strong>uary 20<strong>07</strong>
10 of the Best The Galleries<br />
Valkyrie VF-1S<br />
JoonMin Park<br />
fahrenheit<strong>07</strong>@hanmail.net<br />
http://studio.cgland.com/<br />
fahrenheit<strong>07</strong><br />
House<br />
Piotrek Gruszka<br />
dzejdzej11@wp.pl<br />
www.3dcreativemag.com page 70<br />
Issue 017 <strong>Jan</strong>uary 20<strong>07</strong>
<strong>3DCreative</strong> have teamed<br />
up with 3dtotal.com and<br />
design studio press to give<br />
you a preview of some<br />
fantastic books on offer.<br />
This Month; Quantum Dreams.<br />
“There’s something almost uncanny in seeing things you’ve<br />
imagined, and only described in words, depicted. It’s even<br />
more unsettling to see them depicted more clearly and<br />
vividly and accurately than you imagined them. Stephan<br />
Martiniere’s covers for my books have that effect on me.<br />
They look as if he has taken a camera and a sketchbook to<br />
these very worlds, and has seen more of them than I did.<br />
We should all be grateful for Martiniere’s mind’s eye.”<br />
– Ken MacLeod , author, The Cassini Division and the<br />
trilogy, The Engines of Light<br />
“Stephan isn’t just a stunning illustrator, he is truly a<br />
designer, with a great sense of harmony and style. He can<br />
create extremely organic objects or creatures as well as<br />
the most stylistic architecture of today and tomorrow.”<br />
– Patrick Tatopoulos production designer, I, Robot, Dark<br />
City, Independence Day<br />
“I find the uniqueness of his vision and confidence of his<br />
presentation endlessly fascinating and inspiring. We are<br />
fortunate that Stephan’s skills allow us to experience his<br />
fantastic imagination and all of his worlds.”<br />
– Ryan Church, concept design supervisor, Star Wars III<br />
QUANTUM DREAMS: The Art of Stephan Martiniere,<br />
is a collection of his sci-fi book cover paintings, video<br />
game designs and personal art. Stephan takes others’<br />
descriptions of faraway, imaginary realms...and makes<br />
them real. Stephan’s career has taken him from France to<br />
Japan to California, where he has worked in the fields of<br />
animation, concept art, theme park motion ride design,<br />
video games and book cover art. He helped design the<br />
worlds of I, Robot and Star Wars Episodes II and III , and<br />
with his book covers makes fantasy worlds come to life<br />
with a single image. QUANTUM DREAMS contains 130<br />
illustrations, including supporting sketches and early<br />
versions of finished pieces, with descriptions that give you<br />
an inside look into Stephan’s creativity and process.<br />
Product Details<br />
You can purchase this book<br />
and others...<br />
From 3DTotal.com/books now and receive great discounts<br />
for purchasing 2 books or more!<br />
Paperback: 80 pages<br />
Dimensions: 9 x 12 inches<br />
Illustrated: 130 illustrations<br />
Publisher: Design Studio Press<br />
ISBN: 0-9726676-7-9
Preview Pages : Quantum Dreams : The Art of Stephan Martiniere
Preview Pages : Quantum Dreams : The Art of Stephan Martiniere
SUBSCRIBE<br />
NOW&SAVE UP<br />
TO 25%<br />
on this already amazing value publication!<br />
12 ISSUES FOR<br />
THE PRICE OF 9<br />
Subscription $36 save $12 (25%)<br />
6 ISSUES FOR<br />
THE PRICE OF 5<br />
Subscription $20 save $4 (16%)<br />
Have your <strong>3DCreative</strong> Magazine Download link delivered<br />
automatically to your inbox every month...<br />
...and have it before anyone else!<br />
www.3dcreativemag.com<br />
image : Laurent Menabe
Tuc Tuc Is our new precise, step-by-step<br />
tutorial which will begin with a vehicle model<br />
and cover the principals of applying shaders,<br />
placing it in a simple scene & following with a<br />
two part section on both lighting and rendering.<br />
The tutorial will begin by creating and applying<br />
materials for the various parts of the car such as<br />
glass, chrome & tyres as well as texturing some<br />
simple geometry that will make up a scene. It<br />
will then move onto lighting where the focus will<br />
be on setting up a lighting rig and the various<br />
parameters connected to this. Finally the series<br />
will culminate with a section on rendering where<br />
the aim will be to finish with a polished image.<br />
3DSMax Version<br />
Page 1<strong>07</strong><br />
Cinema4D Version<br />
Page 118<br />
Lightwave Version<br />
Please see notice on pg 144<br />
Maya Version<br />
Page 127<br />
Softimage XSi Version<br />
Page 134<br />
This Month :<br />
Applying Materials &<br />
Shaders Part 1
Wayne A. Robson takes us through the basics<br />
of using the 3DSMax Biped, when and where<br />
not to use it, and why it is still one of the leading<br />
animation systems available today...
Using the 3D Max Biped Posing and Rigging<br />
Created In:<br />
3DS Max<br />
First of all, let me explain what biped is and isn’t,<br />
what it does well and what it does not do so<br />
well (or does badly at). Sometimes confusion of<br />
when it’s a good idea to use biped, and when<br />
it isn’t, can cause a whole world of problems<br />
(Fig.01).<br />
Biped is good for:<br />
• Posing a low-resolution mesh you’ll be using in<br />
Zbrush, Mudbox, or Silo 2;<br />
• Posing and animating game models;<br />
• Simple animation where total realism isn’t<br />
required;<br />
• Passing animations from one biped to another.<br />
Biped is not so good for:<br />
• A realistic life like rig (plug-ins that add<br />
muscles etc. are available but aren’t to the same<br />
standard as a custom-made rig);<br />
• Reacting like a custom FK/IK rig (although it is<br />
possible to add this to biped, it then ceases to<br />
be a default biped in my opinion).<br />
So basically, if you want to pose a lowresolution<br />
cage (either before or after you’ve<br />
done your sculpting), or simply make a few test<br />
animations, it’ll handle that job very well. What<br />
I’ll be covering in this article with biped is how to<br />
use it to pose a low-resolution mesh to import<br />
into Zbrush. My workflow is usually to work on<br />
my character in a default pose that I model the<br />
base mesh in. I then sculpt in Zbrush until I am<br />
happy with it, and at this point rig it using biped,<br />
before re-importing and solving any problems<br />
that may have occurred. These problems could<br />
be stretching or interpenetration issues from<br />
the pose or any number of things. When I use<br />
biped to pose a mesh I don’t get too detailed<br />
in skinning a mesh really well. The reason is<br />
that unless I’m animating the mesh there is no<br />
real reason in spending hours skinning a model<br />
perfectly if no-one is ever going to see it move.<br />
Especially if it is a problem that could really be<br />
fixed a lot faster in Zbrush. But obviously, if<br />
you’re going to animate it at some point, you’ll<br />
want to spend a good deal of more time on it.<br />
When it comes to giving it some sort of skin<br />
to allow it to react along with the biped rig in<br />
a good enough way for posing, you have two<br />
choices. You’re really going to want to use the<br />
Skin modifiers if you’re re-importing back into<br />
Zbrush, rather than the physique modifier. The<br />
reason for this is that the physique modifier<br />
re-numbers the vertexes so you’ll end up with<br />
a weird exploded mesh on import back into<br />
Zbrush. Obviously if you’re posing before you<br />
start the Zbrush detailing and sculpting, then<br />
feel free to use the quick and dirty method with<br />
physique.<br />
Now with the Skin modifier things are more like<br />
a standard rig you may make (Fig.02 & 03). This<br />
allows you to set the weights and envelopes of<br />
each bone on any vertex in the mesh, allowing<br />
for much more realistic deformation. (Of course,<br />
although this sometimes takes longer, it means<br />
less correctional work in Zbrush as a result.) I’ll<br />
be showing you how to use the skin modifiers,<br />
as well as some tips to help make life a bit<br />
www.3dcreativemag.com page 78<br />
Issue 017 <strong>Jan</strong>uary 20<strong>07</strong>
Posing and Rigging Using the 3D Max Biped<br />
easier when getting the biped to conform to<br />
your mesh better. Bare in mind that the more<br />
complex your base mesh, the more difficult it<br />
can be to a skin modifier. So I would advise<br />
starting with a fairly simple mesh so you can<br />
both get used to using the modifiers and biped,<br />
and also to build your confidence using them.<br />
Now is probably a good point to remind you that<br />
with biped, as with any rig, even if you’re only<br />
posing, your topology (or edge loops) are very<br />
important to how the deformation will take place<br />
and the quality (as well as ease of setup) of the<br />
final pose or animation.<br />
Fitting the Biped to<br />
your Low-Resolution<br />
Mesh<br />
My main tip when fitting your biped to your<br />
mesh is to make sure that each bone is about<br />
¾ of the size of that part of the mesh (Fig.04).<br />
If that sounds confusing don’t worry, as I’ll<br />
be including some images that will make this<br />
clearer. The first thing you want to make sure,<br />
when you import your low-resolution mesh into<br />
3DS Max, is that it’s facing in the correct way.<br />
Also, if you’re going to be importing an animated<br />
character with normal, diffuse etc. maps on it,<br />
ensure that your scale is set correctly for the<br />
game. With your low-resolution mesh set and<br />
positioned correctly in the very centre of your<br />
grid, I personally find it useful to make sure the<br />
soles of the feet of a character are set on the<br />
grid itself, but that’s a personal preference. With<br />
nothing selected, you’re going to have to draw<br />
your Biped on to the scene (Fig.05). Remember<br />
that when you draw your biped you will be<br />
drawing it with the soles of the feet fixed at the<br />
point you started to drag it from. Make sure the<br />
height is correct for your character and don’t<br />
worry too much about limbs being in the wrong<br />
place etc. We’ll be sorting that out in a minute,<br />
www.3dcreativemag.com page 79<br />
Issue 017 <strong>Jan</strong>uary 20<strong>07</strong>
Using the 3D Max Biped Posing and Rigging<br />
so for now just get used to dragging your biped<br />
the correct size. Now would probably be a good<br />
time to discuss the options, within biped itself,<br />
that affect the look of the biped etc. Let us look<br />
at how to change the ‘look’ of the biped. I find<br />
some of the included ‘versions’ are easier to<br />
work with than others. Although the biped is still<br />
exactly the same and it’s only the ‘look’ that’s<br />
changing, you may want to try some of them out<br />
(Fig.06). There are 4 different ‘Body Types’ of<br />
biped available from the biped creation section<br />
in a drop-down box. The four types shown from<br />
left to right above, are; Skeleton, Male, Female<br />
and Classic. Normally I use either the skeleton<br />
or classic biped, but it really is up to you which<br />
one you find the best layout for your model, and<br />
the purposes you’re going to use it for. Like a<br />
lot of things, when learning to use ‘biped’ it’s a<br />
matter of spending time getting used to it - the<br />
more you use it, the more you’ll find it becoming<br />
easier and easier.<br />
Fitting Biped to your<br />
mesh<br />
There are a few things to bear in mind about<br />
your base mesh before proceeding. Firstly, your<br />
edge-loops (or lack of them) will vastly affect the<br />
final quality of your biped rig. If your loops are<br />
incorrect, the deformation (and setting up) will be<br />
a much more painful experience. Once you’ve<br />
drawn out your biped to the same size as your<br />
mesh, and have positioned it roughly in the right<br />
place so that the groin area lines up roughly, we<br />
can move onto fitting the biped to your mesh<br />
correctly. What we’re going to do, so that biped<br />
and skin work easier and better, is to make sure<br />
each bone is about ¾ of the size of the part of the<br />
mesh that it will be influencing. This means that<br />
you won’t have to do as much hard work to skin<br />
your model. The biped control panel that we’ll<br />
use to set up our model, so that it has the correct<br />
parts we’ll need, is shown further down. On my<br />
rig, as I don’t need a full hand setup for the pose<br />
I have in mind, I’ll not be adding all the fingers<br />
and thumbs (although your own requirements<br />
may be different). To get to the biped panel first,<br />
bring up your item list and select ‘BIP01’ and go<br />
to your motion panel. To enable us to scale the<br />
parts and rotate them into position, you will want<br />
to make sure the button with the little man on it<br />
is pressed. When we start to pose or animate,<br />
we’ll depress the ‘footsteps’ button instead. If you<br />
select your main mesh and press Alt + X, you will<br />
go into see-through mode that will enable us to<br />
work better. Normally, I also have it set to edged<br />
mode in the view pane as well. This enables me<br />
to be able to see the vertexes that I’ll need later.<br />
It is now a simple matter of working down one<br />
side of your skeleton, scaling and rotating each<br />
bone into place. I usually find that putting the<br />
transform tools into ‘local’ mode makes this a<br />
whole lot easier. Assuming that you are already,<br />
or at least vaguely, familiar with 3DS Max<br />
(otherwise you wouldn’t be reading this tutorial),<br />
for the sake of brevity I shall assume that you<br />
already know how to do this. Once you have<br />
the mesh lined up along one side, we can mirror<br />
each bone to the other side by selecting it and<br />
doing the following:<br />
1 - Select the bone you wish to mirror to the<br />
opposite side;<br />
2 - Open up the ‘Copy/Paste’ section of the<br />
biped/bone panel over in the motions section (it’s<br />
easier to look at the image below to see where<br />
I’m talking about as that last description is a little<br />
confusing);<br />
3 - For the 1st time, make sure ‘posture’ is<br />
selected and that you’ve hit the little yellow star<br />
once. Click the ‘copy posture’ icon and then<br />
the ‘paste posture’ button. This will copy that<br />
particular bone’s rotation, scale and transform<br />
data to its mirror opposite;<br />
4 - Repeat until every bone is done in the arms<br />
and legs (Fig.<strong>07</strong>). Once we have the skeleton<br />
fitted to our mesh, and looking correct, we’ll<br />
move onto skinning the mesh.<br />
www.3dcreativemag.com page 80<br />
Issue 017 <strong>Jan</strong>uary 20<strong>07</strong>
Posing and Rigging Using the 3D Max Biped<br />
Skinning the mesh<br />
I’d like to remind you that if you wish to use your rig for anything other<br />
that a ‘posing rig’, you’ll need to put in a considerably larger amount of<br />
time into the skinning phase. Adding ‘joint angle deformers’, ‘bulge angle<br />
deformers’ and even ‘morph angle deformers’ would all be really useful<br />
things to add. If you’re taking your rig very seriously, you can also add<br />
some sort of muscle plug-in, such as ‘SkinFX’. It is also possible to add<br />
IK to the biped in the same way, as if they were a standard rig, but that’s<br />
beyond the scope of this particular tutorial (although, if there’s enough<br />
interest in wanting to know how it’s done, I’ll write another tutorial on it).<br />
(Fig.08). So, to re-iterate, this is a simple posing rig that wouldn’t cut it<br />
for a serious animation without longer hours spent on the skinning part.<br />
This is for use as a ‘posing rig’ only. With your mesh selected, add a<br />
‘Skin’ modifier (if you wish to do a really ‘quick and dirty’ version of this<br />
rig you could use the physique modifier instead). There will be quite a lot<br />
of images in this section so that I can try and use them to show how I’ve<br />
weighted my rig. These are meant as a guide only as every mesh has<br />
different requirements, although the basics remain the same. You’ll notice<br />
that on my rig I have no weight attached at all to Spine02 or Spine03.<br />
This has been done because it is only a posing rig so I had no need to<br />
weight those as well in this instance. Although, obviously, if this was a<br />
fully detailed rig for animation purposes, then I would have weighted<br />
those as well. If you scroll down this section, until you get to the box in<br />
the ‘parameters’ section, you’ll see a button named ‘Add’ for adding your<br />
bones. Click this, open your list and select all your bones, except any<br />
ending in ‘nub’ as these usually aren’t needed and only make for very<br />
unpredictable results in the skinning. If you’re anything like me, the last<br />
thing you want are nasty surprises at this stage (Fig.09). So with our<br />
bones added, we can now start the main work. Depending on how much<br />
time you have to rig your character for your pose (or poses) you may want<br />
to set the envelopes on your character before the next part. On the rig I<br />
did for this tutorial, I didn’t bother and got the same result, so unless you<br />
have a particular need to, I’d move straight onto the next part (Fig.10).<br />
What we’re going to do is, starting from the feet, work up one side of the<br />
body telling each bone what vertexes will be affected and by what amount.<br />
www.3dcreativemag.com page 81<br />
Issue 017 <strong>Jan</strong>uary 20<strong>07</strong>
Using the 3D Max Biped Posing and Rigging<br />
We’ll need to make sure we have the lasso<br />
selection enabled as it’s preferable to the other<br />
selection types in 3DS max for this job (Fig.11).<br />
It is a simple matter of selecting the vertexes<br />
that are going to be totally influenced by the<br />
particular bone, and then setting the influence<br />
to ‘1’. Then, moving to the vertexes that will<br />
be influenced less, (usually at the ends of the<br />
bones), set those to ‘0.5’. Working through our<br />
mesh like this, down one side, we’ll get a rig that<br />
will have some problems but gives us a starting<br />
point for our vertex weighting in more fine detail<br />
(Fig.12). (Fig 13-16: Some images of the other<br />
weights.) Once I have worked my way up each<br />
bone, I then mirror by selecting each individual<br />
bone and going to the ‘Mirror Parameters’<br />
section and highlighting. Firstly, you’ll want to<br />
set the mirror plane to the correct way. You<br />
have a choice between ‘X’, ’Y’, or ‘Z’. In this<br />
section are buttons that enable you to copy<br />
both bones and/or vertexes, but as I’ve normally<br />
already mirrored the bones at this stage I only<br />
use the setting for the vertexes. Remember that<br />
the chances that your skin settings are correct<br />
the first time you set them are less than zero,<br />
unless you are very experienced at skinning. So<br />
don’t be disheartened if your mesh ‘explodes’<br />
in places during your test animation in a minute<br />
(Fig.17). You may need to go back and refine<br />
your vertex weights a few times until you get<br />
them to behave in the way you want them to.<br />
There’s no way to explain how this works to cut<br />
down this experience, it’s something you get<br />
better at with time I’m afraid. So you’ll need to<br />
revisit this section a few times, most probably<br />
the first few times you do it.<br />
Posing your mesh.<br />
There are two ways to pose your mesh; by<br />
hand, which will be a little “un-intuitive” as<br />
the rig doesn’t have IK at this stage, or the<br />
way that I sometimes use if I’m in a hurry<br />
(although, not for this tutorial) is to import a<br />
BIP mocap file and pick a pose from within<br />
that. This has the added attraction that the<br />
pose will look incredibly natural if your rig has<br />
been skinned well, and also it’s a great way<br />
to find any problems in your rig. Bare in mind<br />
what you actually need your pose to be and<br />
what part of the mesh is going to be seen.<br />
If for example you are doing a face on shot,<br />
where the back won’t be seen, you won’t need<br />
to worry too much about skinning in the back<br />
area. If however it’s something that you’ll want<br />
to put in a turntable on your demo reel, you’ll<br />
www.3dcreativemag.com page 82<br />
Issue 017 <strong>Jan</strong>uary 20<strong>07</strong>
Posing and Rigging Using the 3D Max Biped<br />
need to make sure it looks well in it’s pose all<br />
the way round. Select your ‘BIP01’ from your<br />
list again and go to the motions panel. Click<br />
on the footsteps button and you are now ready<br />
to either pose or import a BIP mocap file. To<br />
import a mocap file, go to the folder icon and<br />
use one of the many that come with 3DStudio<br />
Max (there are also a few free ones on the<br />
Internet as well if you wish to use something<br />
less generic for your model). Now play your<br />
animation and see how it looks (Fig.18).<br />
There will undoubtedly be a few things wrong<br />
at this stage that you’ll need to go back and<br />
fix. There will probably be vertexes that are<br />
weighted too much, whilst others are weighted<br />
not enough. So keep redoing your skinning<br />
until it looks right to you, for what you need it<br />
for. A word of caution: just because your rig<br />
may look perfect with one mocap file, does not<br />
mean that if you load a totally different one it<br />
will still look perfect! Another file with different<br />
movements may highlight a whole new set of<br />
problems (this is also a great way to test out<br />
your rig if you really do need it to be perfect,<br />
by the way). Once you’ve picked a pose you<br />
can import it into Zbrush as your level 1 model,<br />
over the existing one, providing that no vertex<br />
numbers have been changed, and simply remodel<br />
any parts that look odd due to the pose<br />
being different. This is usually a simple and<br />
rather quick process. If you’re using another<br />
application for your sculpting, you may wish to<br />
hold off your sculpting until after it’s posed, or<br />
even just apply displacement or normal maps<br />
to your posed model in 3DS Max and render.<br />
This should give you a good start on rigging,<br />
using biped for posing. Once you’ve done this,<br />
you may want to move onto more extensive<br />
rigs that give a more anatomically correct<br />
animation. Good luck!<br />
Wayne A. Robson<br />
For more from this artist visit:<br />
http://www.dashdotslash.net<br />
Or contact them:<br />
wayne@dashdotslash.net<br />
www.3dcreativemag.com page 83<br />
Issue 017 <strong>Jan</strong>uary 20<strong>07</strong>
In this Making Of you can see how Zhang<br />
created his half-man, half-machine masterpeice,<br />
‘Revolution’, using Maya and Photoshop...
By: Zhang Yang Making Of Revolution<br />
Created In:<br />
Maya<br />
This character was modelled in Maya, using<br />
the low polygon modelling process. Firstly, I<br />
modelled a standard human body, spending<br />
much time on his topology structure because I<br />
will need him to pose a highly difficult gesture<br />
at the end. The teeth, eyes and hair, all require<br />
great patience (Fig.01). The blue arrows indicate<br />
where you need to be careful when modelling<br />
(Fig.02a-g). Following all this, it’s time for the<br />
aircrafts and the details in the foreground. I must<br />
say something regarding the city; because I will<br />
use matte painting to do it, I don’t need to model<br />
it too seriously, just like a real city (Fig.03).<br />
www.3dcreativemag.com page 86<br />
Issue 017 <strong>Jan</strong>uary 20<strong>07</strong>
Making Of Revolution By: Zhang Yang<br />
UVs<br />
This character was made for an illustration, so I<br />
didn’t set UV according to the normal method. I<br />
simply let the parts which can be seen take up<br />
more UV space. The UV of the other things are<br />
nothing fancy (Fig.04).<br />
Skin shade<br />
Someone once asked me how to connect<br />
Mental Ray ‘Fast Skin Shade’. Everyone has his<br />
own way. On the whole, in my opinion, I think<br />
it’s best to control every parameter as best as<br />
you possibly can. Therefore, I used about 10<br />
maps to control the more important parameters<br />
(such as Diffuse Colour, Epidermal Scatter<br />
Colour, Subdermal Scatter Colour, Primary<br />
Weight, Secondary Weight, and so on). My<br />
own experience is that the ‘sss’ effect of some<br />
places, like ears, can’t be too high - that is, not<br />
being too reddish - because a real man wouldn’t<br />
be like that. We need the feeling of the skin to<br />
be between plastic and wax. Because I used the<br />
HDR to illuminate, I must click ‘Include Indirect<br />
Lighting’ in the light map node (Fig.05 & 06).<br />
www.3dcreativemag.com page 87<br />
Issue 017 <strong>Jan</strong>uary 20<strong>07</strong>
By: Zhang Yang Making Of Revolution<br />
Texturing<br />
For this image, painting the texture is a<br />
complicated process. Basically, most textures<br />
of this character are 4096x4096 in size. First of<br />
all, I did the colour map by hand-painting and<br />
using some photos, then desaturated the colour<br />
and made the bump map and specular map<br />
afterwards. I changed the tone and details of the<br />
colour map, as the Epidermal Scatter Colour,<br />
Subdermal Scatter Colour, then changed the<br />
specular map as the reflection map. I got a very<br />
detailed normal map in Mudbox, by a highresolution<br />
model which included about 5-million<br />
polygons. I wanted to let the scene look worn<br />
and real. Then I used body paint to remove<br />
texture seams and added more bloodstains and<br />
dirt - I like all the small details.<br />
Fig.<strong>07</strong>-09 show the colour, bump and specular<br />
maps. Fig.10 shows the normal map and<br />
trousers.<br />
Pose Layout<br />
In this step, I bound the character, posed him,<br />
put in all the aircrafts and objects - generally<br />
making them look like my own design.<br />
Remodelling<br />
After the layout, I began to model the highresolution<br />
poly (this step almost made me<br />
crazy). I adjusted the body feature in Mudbox.<br />
I then finished the high-resolution poly humanbody<br />
model, and imported it back into Maya.<br />
I then constructed many tubes, which are<br />
just NURBS. Attention must be paid to their<br />
disordered positions and where the blood<br />
vessels are also coming out, so it was just<br />
www.3dcreativemag.com page 88<br />
Issue 017 <strong>Jan</strong>uary 20<strong>07</strong>
Making Of Revolution By: Zhang Yang<br />
www.3dcreativemag.com page 89<br />
Issue 017 <strong>Jan</strong>uary 20<strong>07</strong>
By: Zhang Yang Making Of Revolution<br />
endless placing and modelling. Then I modelled<br />
the clothing, gloves and trousers (Fig.11-14).<br />
Lighting<br />
I used Mental Ray IBL with an HDR picture and<br />
several lights for a special purpose. There are<br />
two primary light sources; an aircraft spot light<br />
above the character and the huge area light<br />
source in the background.<br />
Hair & Body Fur<br />
I finished the body hair and “fur” using Paint<br />
Effects, of course using ‘fuzz’ (if you can see<br />
them).<br />
Rendering<br />
I rendered the image multipass, which allowed<br />
me to easily modify and control them. The final<br />
image size is 3500x2500. Fig.15 is the diffuse<br />
layer and body fur layer. Fig.16 & 17 are the<br />
occlusion layer and deep layer. Fig.18 & 19 are<br />
the reflection layer and specular layer.<br />
www.3dcreativemag.com page 90<br />
Issue 017 <strong>Jan</strong>uary 20<strong>07</strong>
Making Of Revolution By: Zhang Yang<br />
I exaggerated the effects for you to see.<br />
Matte painting<br />
Because this is not a tutorial for matte painting,<br />
I won’t say too much about this step. I simply<br />
constructed the city in Maya and rendered<br />
the deep map, ambient occlusion map, and<br />
atmosphere map. I then used the photo<br />
references, which came from the Internet and<br />
digital pictures taken by myself, to complete<br />
the city in Photoshop. This is the complete<br />
background. I’m not worried about the areas<br />
that are covered by the character, so I am quite<br />
satisfied (Fig.20).<br />
Composing<br />
I put all the passes into Photoshop and made<br />
use of my skills to get them work together better.<br />
www.3dcreativemag.com page 91<br />
Issue 017 <strong>Jan</strong>uary 20<strong>07</strong>
By: Zhang Yang Making Of Revolution<br />
Effect<br />
Add the effect in Photoshop, such as lens<br />
effects, light fog and noise effects, and adjust<br />
the layers.<br />
www.3dcreativemag.com page 92<br />
Issue 017 <strong>Jan</strong>uary 20<strong>07</strong>
Making Of Revolution By: Zhang Yang<br />
Refining<br />
At the end, I refined the image, concentrating on<br />
things such as the micro-blood vessels and the<br />
beard (Fig.21 & 22) and details of the aircrafts<br />
and the foreground (Fig.23 & 24).<br />
Finishing<br />
Fig.25 is finally finished. I hope you have<br />
enjoyed this tutorial. If you have any questions<br />
or comments, please email me. Finally, I would<br />
like to thank my parents, my girlfriend and<br />
my friends. I also want to thank <strong>3DCreative</strong><br />
Magazine. (If you want to see the highresolution<br />
image, visit CGTalk on the link<br />
below.)<br />
Zhang Yang<br />
For more from this artist visit:<br />
http://forums.cgsociety.org/showthread.<br />
php?t=432057<br />
Or contact them:<br />
zhangyangshaoyu99520@hotmail.com<br />
www.3dcreativemag.com page 93<br />
Issue 017 <strong>Jan</strong>uary 20<strong>07</strong>
Balance of Power<br />
Image courtesy of Olivier Derouetteau, http://olive2d.free.fr<br />
Streamline your DI pipeline<br />
with the 3DBOXX RTX Series.<br />
The ideal combination of processing power<br />
and storage bandwidth for the Digital<br />
Intermediate process.<br />
Sixteen cores.<br />
Work on HD, 2k and 4k frames with ease<br />
Up to 15 hard drives - 1GB/s storage bandwidth<br />
Next-Generation AMD Opteron processors with DDR2 memory<br />
extend the industry-leading performance trajectory established by<br />
Dual-Core AMD Opteron processors, while offering a seamless<br />
upgrade path to Quad-Core performance and leading-edge<br />
solutions to help run your business applications.<br />
Next-Generation AMD Opteron processors with Direct<br />
Connect Architecture and high-bandwidth DDR2 memory<br />
offer great performance for floating-point applications and<br />
enhance our performance-per-watt capabilities for even<br />
cooler, more silent operation.<br />
BOXX® Technologies, Inc.<br />
1.877.877.BOXX<br />
sales@boxxtech.com<br />
We know VFX. And it shows.<br />
www.boxtech.com
We take a brief look at the creation of Zdenek<br />
Urbánek’s 1965 Ford Mustang. One of the best<br />
car renders to grace the <strong>3DCreative</strong> Pages...
Making Of Mustang<br />
M U S T A N G<br />
Created In:<br />
3DS Max 7, Adobe Photoshop.<br />
I’m Zdenek Urbánek, I was born in 1987 in<br />
the Czech Republic where I live and study.<br />
In this Making Of, I will show you something<br />
of the process I used to create this scene.<br />
For this scene I used 3DS Max 7, and Adobe<br />
Photoshop for creating the textures. Firstly, I<br />
found many reference images and blue-prints<br />
of the Mustang 1965, and used a few elements<br />
from other models as reference material. For the<br />
blue-prints I made 4 planes for 4 views, and I<br />
right-set it with the aid of a box (Fig.01).<br />
Modelling<br />
I started by creating the wheel. On the tyre, I<br />
have done one part which I attach for the right<br />
duration (Fig.02). For the wheel rim, I did this<br />
in the same way (Box Modelling). I then made<br />
the wheelbrace and the Mustang logo which is<br />
in the middle wheel. Behind the wheel, I created<br />
a simple brake. I made a narrow cylinder in the<br />
correct proportion, and to the cylinder I added a<br />
lot of holes (Fig.03). This rim, for example, isn’t<br />
typical of a Ford Mustang, but I wanted it. Fig.04<br />
is the show render wheel only. This image<br />
www.3dcreativemag.com page 96<br />
Issue 017 <strong>Jan</strong>uary 20<strong>07</strong>
Mustang Making Of<br />
was done in a Final Render System, but the<br />
settings for V-ray were very similar. Regarding<br />
the material, I will talk about this later. Fig.05<br />
is the final car model in a wire render and all is<br />
ready for meshsmooth. The basic form of the<br />
vehicle body was made according to prepared<br />
blue-prints (which I discussed at the beginning).<br />
Afterwards I added more details, which are very<br />
important for the final render. I would like show<br />
you some details of the interior - steering wheel,<br />
seats, handles - but these parts are all almost<br />
invisible in the final render (Fig.06). The details<br />
will follow next...<br />
www.3dcreativemag.com page 97<br />
Issue 017 <strong>Jan</strong>uary 20<strong>07</strong>
Making Of Mustang<br />
Texturing and shading<br />
I found most of the textures on the Internet<br />
and used Photoshop for corrections. For the<br />
tarmac texture I used a few textures from a few<br />
packs, made in Photoshop. One texture had<br />
6000x4000, and from that I made a bump map<br />
and displacement map. For the car material<br />
I used a composite mat. The car shade has<br />
three parts: the first part is a basic shade which<br />
has two layers, both have VrayMtl where it has<br />
a reflect fall-off map; the second part is the<br />
dirt, which is just a bitmap as diffuses and an<br />
alpha map which controls opacity, all drawn<br />
in Photoshop and using a texture from the<br />
3DTotal Textures collection; the third part of the<br />
composite mat is the speed stripes which is like<br />
the basic material but is white in colour and less<br />
reflective. Wheels have VrayMtl where it is a<br />
spectral noise map, and a bump map for the text<br />
on the side of the wheel.<br />
Rendering and<br />
lighting<br />
The whole scene was rendered in V-ray .There<br />
is one target directional light and the same<br />
HDRI map. The final image was rendered with<br />
an “anti-aliasing” filter, set on Catumll-Rom.<br />
The render engine is an irradiance map set on<br />
the image. Because I don’t have a powerful<br />
computer, I had to reduce some of the set<br />
up. The scene was rendered on AMD Athlon<br />
1800+, 1024Mb Ram and Ati Radeon 9600. The<br />
render time was about 9 hours (Fig.<strong>07</strong>). Fig.08<br />
shows the environment. The puddles were<br />
created as a big plane, after we can see pools<br />
where there is tarmac (second plane) reduced<br />
by a displacement map. In the final image, I<br />
used Photoshop post-production only for the<br />
brightness (Fig.09). The final render of the<br />
scene can be seen in Fig.10.<br />
www.3dcreativemag.com page 98<br />
Issue 017 <strong>Jan</strong>uary 20<strong>07</strong>
Mustang Making Of<br />
Zdenek Urbánek<br />
For more from this artist contact them:<br />
URBIS.URBIS@seznam.cz<br />
www.3dcreativemag.com page 99<br />
Issue 017 <strong>Jan</strong>uary 20<strong>07</strong>
Zoo Publishing presents the new issue of 2dartist<br />
magazine a downloadable monthly magazine for<br />
concept art, digital & matte painting for only $4US<br />
visit www.2dartist.com<br />
to download the free ‘lite’ issue, the full issue, subscription<br />
offers and to purchase back issues.<br />
Artist<br />
Concept Art, Digital & Matte Painting Magazine<br />
Issue012 December 2006 $4 / €3.25 / £2.25<br />
Interviews<br />
Thierry “BARONTiERi” Doizon<br />
Tim Flattery<br />
Tom Arthur Opasinski<br />
Jean-Marie Vives<br />
Articles<br />
Creatively Self - Employed<br />
Conceptart.org & Massive Black Workshop<br />
Tutorials<br />
‘Cornelius’ : Colouring in a Cartoon style<br />
‘Tuc Tuc’ Concept Painting & Painting Armour<br />
Making Ofs<br />
‘Hex’, ‘The Devil’s Fountain’ & ‘Mea culpa ‘<br />
Galleries<br />
10 of the best 2D digital artworks<br />
UT NOW!<br />
Concept Art, Digital & Matt
Next Month<br />
Interviews<br />
Peter Sanitra<br />
Anders Lejczak<br />
d0rn<br />
Articles<br />
Ghost in the Shell 2<br />
Numberjacks<br />
Next Generation - Blitz<br />
Games<br />
Tutorials<br />
Tuc Tuc<br />
Shaders, Lighting and Rendering<br />
tutorial Part 2 of 6 for 3DSMax,<br />
Maya, Lightwave, Cinema4D &<br />
XSI!<br />
Photography Tutorial:<br />
Composition, Angles and<br />
Viewpoints by Spencer Murphy<br />
Introduction to Lighting by<br />
Cesar Alejandro Montero Orozco<br />
Galleries<br />
another 10 of the best Images<br />
from around the world.<br />
Making Of’s<br />
Madness by Marcin Solarz<br />
Say cheese by Eric Provan<br />
in3dcreative<br />
Image : Ghost in the Shell 2<br />
visit www.3dcreativemag.com for full information<br />
and to purchase current and previous<br />
issues for only $4 US each!
“You’ve read the articles, you’ve learnt from the<br />
tutorials, now get the Job you’ve always wanted!”<br />
Employers! If you have a position that could be potentially filled by one of <strong>3DCreative</strong> Magazine’s 20,000+ talented readers and<br />
would like to advertsie here then please contact lynette@zoopublishing.com
Recruitment<br />
Krome Studios is Australia’s largest<br />
game development studio. We now<br />
boast 4 project teams, over 200 talented<br />
people and an increasing presence in the<br />
worldwide game development industry.<br />
We are always looking for talented and<br />
experienced game developers to join<br />
our teams.<br />
If you share our passion for games<br />
and would like to work on high<br />
profile titles in conjunction with<br />
the top 5 publishers in the world.<br />
– We want to hear from you!<br />
For more information on available<br />
positions and how to apply<br />
please visit our website:<br />
www.kromestudios.com<br />
TY the Tasmanian Tiger and the Krome Studios logo are trademarks of Krome Studios Pty, Ltd. © 2006 Universal Interactive, Inc. Spyro and related<br />
characters are and © Universal Interactive, Inc. All other trademarks are the property of their respective owners. All Rights Reserved.<br />
www.3dcreativemag.com page 104<br />
Issue 000 Month 20<strong>07</strong>
Recruitment<br />
Artwork copyright of Lothar Zhou<br />
Jobs to get your<br />
teeth into...<br />
www.opmjobs.com<br />
General Enquiries: OPM Response Ltd, 15 Peartree Business Centre, Stanway, Colchester CO3 0JN<br />
Tel: 01206 544044 Fax: 01206 547198 Email: officemanager@opmjobs.com<br />
Would you like to advertise your jobs here for free? Contact : lynette@zoopublishing.com<br />
www.3dcreativemag.com page 105<br />
Issue 000 Month 20<strong>07</strong>
About us Zoo Publishing<br />
Is a Company publishing downloadable online<br />
magazines. It is based in the West Midlands<br />
in the UK. Zoo currently produces two online<br />
downloadable magazines, 3dcreative and<br />
2dartist. Zoo’s intention is to make each issue<br />
as full of great articles, images, interviews,<br />
images and tutorials as possible. If you would<br />
like more information on Zoo Publishing or It’s<br />
magazines, or you have a question for our staff,<br />
please use the links below.<br />
Contact Information<br />
www.zoopublishing.com<br />
www.3dcreativemag.com<br />
www.2dartistmag.com<br />
Editor > Ben Barnes<br />
ben@zoopublishing.com<br />
Assistant Editor > Warin Pismoke<br />
warin@zoopublishing.com<br />
Marketing > Lynette Clee<br />
lynette@zoopublishing.com<br />
Partners<br />
If you have a CG Community website, and<br />
would be interested in reselling <strong>3DCreative</strong> or<br />
2DArtist magazine please contact Lynette Clee<br />
on the eMail address above.<br />
The 123d<br />
3DResources<br />
CGEmpire<br />
Epic 3DStudios<br />
Subdivision<br />
2DValley<br />
3DStudio<br />
CGFocus<br />
Epilogue<br />
The 3DStudio<br />
3DExcellence<br />
3DTotal<br />
CGUnderground<br />
GFXArtist<br />
The Best 3D<br />
3DKingdom<br />
3DTutorials<br />
Childplay Studios<br />
Kurv Studios<br />
Threedy<br />
3DLinks<br />
3DValley<br />
Conceptart<br />
Max-Realms<br />
Treddi<br />
3DM3<br />
Ambiguous Arts<br />
Daz3d<br />
MediaWorks<br />
Tutorialman<br />
3DMonkeys<br />
CGArena<br />
Deathfall<br />
PixelBoxAcademy<br />
Vanishing Point<br />
3DNuts<br />
CGChannel<br />
Digital Tutors<br />
Rendez-vous3D<br />
Vocanson<br />
3DPalace<br />
CGDirectory<br />
Eje-Zeta<br />
Spinquad<br />
1DCafe<br />
www.3dcreativemag.com page 106<br />
Issue 017 <strong>Jan</strong>uary 20<strong>07</strong>
Tuc-Tuc Appying Shaders, Lighting & Rendering<br />
Tuc-Tuc<br />
Is our new precise, step-by-step tutorial which<br />
will begin with a vehicle model and cover the<br />
principals of applying shaders, placing it in<br />
a simple scene and following with a two-part<br />
section on both lighting and rendering. The<br />
tutorial will begin by creating and applying<br />
materials for the various parts of the car, such<br />
as glass, chrome and tyres, as well as texturing<br />
some simple geometry that will make up a<br />
scene. It will then move onto lighting where the<br />
focus will be on setting up a lighting rig and the<br />
various parameters connected to this. Finally the<br />
series will culminate with a section on rendering,<br />
where the aim will be to finish with a polished<br />
image. The schedule is as follows:<br />
Issue 017 <strong>Jan</strong>uary 20<strong>07</strong><br />
Applying Materials &<br />
Shaders Part 1<br />
Issue 018 February 20<strong>07</strong><br />
Applying Materials &<br />
Shaders Part 2<br />
Issue 019 March 20<strong>07</strong><br />
Lighting Setup & Rig<br />
(with hdri) Part 1<br />
Issue 020 April 20<strong>07</strong><br />
Lighting Setup & Rig<br />
(with hdri) Part 2<br />
Issue 021 May 20<strong>07</strong><br />
Rendering<br />
Part 1<br />
Issue 022 June 20<strong>07</strong><br />
Rendering<br />
Part 2<br />
Enjoy ...<br />
www.3dcreativemag.com page 1<strong>07</strong><br />
Issue 017 <strong>Jan</strong>uary 20<strong>07</strong>
Appying Shaders, Lighting & Rendering Tuc-Tuc<br />
Assigning Materials &<br />
Shaders - Part 1<br />
Fig 01<br />
1. Here is our TucTuc vehicle model, put into<br />
a simple scene made by geometric objects,<br />
modelled with insets and extrusions (Fig.01).<br />
2. Let’s have a closer look to how the scene<br />
is composed, viewing it from different angles<br />
(Fig.02).<br />
Fig 02<br />
3. We will use Mental Ray as renderer, so let’s<br />
Fig 03<br />
set 3DS Max to use it. Go to the rendering panel<br />
(F10 shortcut key), select the Common tab. Go<br />
to the Assign Renderer rollout and click on the<br />
three-dots button next to Production. Select<br />
Mental Ray renderer from the window that<br />
appears (Fig.03).<br />
www.3dcreativemag.com page 108<br />
Issue 017 <strong>Jan</strong>uary 20<strong>07</strong>
Tuc-Tuc Appying Shaders, Lighting & Rendering<br />
Fig 04<br />
4. Now we can start creating and assigning<br />
materials to the vehicle components. First of all,<br />
create a “CarPaint” material. Set its colour to<br />
red (or whatever colour you like) and assign this<br />
material to the main body of the vehicle (Fig.04).<br />
Don’t forget to assign meaningful names to the<br />
materials you create, for clarity’s sake.<br />
Fig 05<br />
5. Select all the other components that will show<br />
the CarPaint material and assign it to them<br />
(Fig.05).<br />
Fig 06<br />
6. Select a new material slot, name it “Glass”,<br />
change its colour to something blue-ish and<br />
assign it to the glass object (Fig.06).<br />
www.3dcreativemag.com page 109<br />
Issue 017 <strong>Jan</strong>uary 20<strong>07</strong>
Appying Shaders, Lighting & Rendering Tuc-Tuc<br />
7. Now create a “LightGlass” material with an<br />
orange diffuse colour and assign it to the objects<br />
marked with the white wireframe in Fig.<strong>07</strong>.<br />
Fig <strong>07</strong><br />
8. Don’t forget to assign the same LightGlass<br />
material to the back lights (Fig.08).<br />
Fig 08<br />
9. Select all the chromic parts of the vehicle and<br />
Fig 09<br />
assign a light greyish “Chrome” material, like<br />
shown in Fig.09.<br />
www.3dcreativemag.com page 110<br />
Issue 017 <strong>Jan</strong>uary 20<strong>07</strong>
Tuc-Tuc Appying Shaders, Lighting & Rendering<br />
Fig 10<br />
10. Once again, rotate the view around<br />
the model and check if there is any other<br />
component needing the Chrome material. If<br />
there is any, assign this material to it (Fig.10).<br />
Fig 11<br />
11. Hide the front light glass object and assign<br />
the Chrome material to the inner components of<br />
the front lights (Fig.11).<br />
Fig 12<br />
12. Create a new “BlackPlastic” material; give it<br />
a dark grey (almost black) colour and assign it<br />
to the objects shown in Fig.12.<br />
www.3dcreativemag.com page 111<br />
Issue 017 <strong>Jan</strong>uary 20<strong>07</strong>
Appying Shaders, Lighting & Rendering Tuc-Tuc<br />
13. Rotate the view and assign the BlackPlastic<br />
material to these objects, too (Fig.13).<br />
Fig 13<br />
14. Create a dark grey (almost black) “Tyre”<br />
material and assign it to the three tyres in the<br />
scene (Fig.14).<br />
Fig 14<br />
Fig 15<br />
15. Assign the LightGlass material to the topfront<br />
light glass (Fig.15).<br />
www.3dcreativemag.com page 112<br />
Issue 017 <strong>Jan</strong>uary 20<strong>07</strong>
Tuc-Tuc Appying Shaders, Lighting & Rendering<br />
Fig 16<br />
16. Assign the Chrome material to the objects<br />
marked with the white wireframe in Fig.16.<br />
Fig 17<br />
17. Create a “GenericGray” material, check the<br />
2-sided option, and assign it to scene elements<br />
(such as walls, ground, etc.). Make sure that<br />
no objects of the vehicle are currently selected.<br />
Also, create an Omni light and position it like<br />
shown in Fig.17 and 18.<br />
Fig 18<br />
18. Select the Omni light and change its<br />
shadows type to RayTraced Shadows. Of<br />
course, set them to “On”. Create a Camera<br />
and position it like shown in Fig.18. Select the<br />
Perspective View and use the “C” shortcut key<br />
to see through the camera.<br />
www.3dcreativemag.com page 113<br />
Issue 017 <strong>Jan</strong>uary 20<strong>07</strong>
Appying Shaders, Lighting & Rendering Tuc-Tuc<br />
19. Render the scene (F9 for Quick Render)<br />
and you should get something like the picture<br />
in Fig.19. Now we can start working on every<br />
material and detail it. Let’s start with the<br />
CarPaint, which is the most important shader in<br />
the scene.<br />
Fig 19<br />
20. Select the CarPaint slot in the Material<br />
Editor and click on the Standard button. Select<br />
the Shellac shader from the list that appears.<br />
This will change the shader type and its<br />
properties. The Shellac material is composed<br />
by two different layers; one Base layer, and one<br />
Shellac layer. This is the right choice for our<br />
CarPaint shader.<br />
Fig 20<br />
21. Click on the Base layer to select it. Check<br />
Fig 21<br />
the 2-sided option; change the Diffuse colour<br />
to red (or any colour you like). Set the Specular<br />
Level to 200 and Glossiness to 51.<br />
www.3dcreativemag.com page 114<br />
Issue 017 <strong>Jan</strong>uary 20<strong>07</strong>
Tuc-Tuc Appying Shaders, Lighting & Rendering<br />
Fig 22<br />
22. Click on the Diffuse slot and assign a Falloff<br />
map to it. Change the Falloff colours to reddish<br />
(top colour) and black (bottom colour). Also,<br />
change the Falloff mixing curve like shown in<br />
Fig.22. Make sure that Falloff Type is set to<br />
Perpendicular/Parallel.<br />
Fig 23<br />
23. Go back to the root of Base layer; click on<br />
the slot next to Glossiness and assign a Noise<br />
map to it. Change the Noise size to something<br />
right for your scene (it depends on your scene<br />
size, so use the values in Fig.23 just as a<br />
reference, since they may not suit your scene<br />
size). Change the Noise type to Fractal.<br />
Fig 24<br />
24. Go back to the root of Shellac material;<br />
click on the Shellac layer, click on the Standard<br />
button and select Raytrace. Check the 2-sided<br />
option. Set the Index of Refraction to 1,55. Set<br />
the Specular Level to 160 and the Glossiness<br />
value to 36.- Leave the other parameters as<br />
they are (Fig.24).<br />
www.3dcreativemag.com page 115<br />
Issue 017 <strong>Jan</strong>uary 20<strong>07</strong>
Appying Shaders, Lighting & Rendering Tuc-Tuc<br />
25. Click on the Diffuse slot and assign a Falloff<br />
map to it. Leave the default colours (black and<br />
white) and change the Mix curve to something<br />
similar to Fig.25.<br />
Fig 25<br />
26. Go back to the root of Raytrace material<br />
and assign a Noise map to the Glossiness slot.<br />
Once again, set its type to Fractal and lower<br />
the size value. You have to try and find the right<br />
noise size for your scene. Use Fig.26 just as a<br />
reference for the Noise values.<br />
Fig 26<br />
27. Go back to the Shellac material root and<br />
Fig 27<br />
set the Shellac Colour Blend to a value of 80<br />
(Fig.27).<br />
www.3dcreativemag.com page 116<br />
Issue 017 <strong>Jan</strong>uary 20<strong>07</strong>
Tuc-Tuc Appying Shaders, Lighting & Rendering<br />
28. Make another Render and you should have something<br />
similar to Fig.28. Don’t worry if the picture is still too dark, we<br />
will deal with lighting in the next parts of this tutorial. Here are<br />
some renders of the scene from different viewpoints:<br />
Tuc Tuc Designed & Modelled by:<br />
Richard Tilbury<br />
Tutorial By:<br />
Luciano Iurino<br />
For more from this artist visit:<br />
www.pmstudios.it<br />
Or contact them:<br />
iuri@pmstudios.it<br />
www.3dcreativemag.com page 117<br />
Issue 017 <strong>Jan</strong>uary 20<strong>07</strong>
Tuc-Tuc<br />
Is our new precise, step-by-step tutorial which<br />
will begin with a vehicle model and cover the<br />
principals of applying shaders, placing it in<br />
a simple scene and following with a two-part<br />
section on both lighting and rendering. The<br />
tutorial will begin by creating and applying<br />
materials for the various parts of the car, such<br />
as glass, chrome and tyres, as well as texturing<br />
some simple geometry that will make up a<br />
scene. It will then move onto lighting where the<br />
focus will be on setting up a lighting rig and the<br />
various parameters connected to this. Finally the<br />
series will culminate with a section on rendering,<br />
where the aim will be to finish with a polished<br />
image. The schedule is as follows:<br />
Issue 017 <strong>Jan</strong>uary 20<strong>07</strong><br />
Applying Materials &<br />
Shaders Part 1<br />
Issue 018 February 20<strong>07</strong><br />
Applying Materials &<br />
Shaders Part 2<br />
Issue 019 March 20<strong>07</strong><br />
Lighting Setup & Rig<br />
(with hdri) Part 1<br />
Issue 020 April 20<strong>07</strong><br />
Lighting Setup & Rig<br />
(with hdri) Part 2<br />
Issue 021 May 20<strong>07</strong><br />
Rendering<br />
Part 1<br />
Issue 022 June 20<strong>07</strong><br />
Rendering<br />
Part 2<br />
Enjoy ...
Tuc-Tuc Appying Shaders, Lighting & Rendering<br />
Applying Materials &<br />
Shaders - Part 1<br />
Fig 01<br />
1. In this first part of tutorial we will start seeing<br />
how to create and assign the procedural<br />
materials to our model. First of all we need to<br />
create a simple environment in which to put<br />
the vehicle. As you can see from Fig.01 I have<br />
created a wall, sidewalk and street.<br />
2. The next step is to divide the object according<br />
to the materials that we are going to create.<br />
In Fig.02 you will notice that I have grouped in<br />
a “Null Object” - the objects which make up the<br />
environment - and have called it “environment”.<br />
While in the second Null Object, called TUC-<br />
TUC, you can see all parts that make up the<br />
vehicle.<br />
Fig 02<br />
3. Now we are ready to create the materials.<br />
Fig 03<br />
First of all hide the environment, as shown in<br />
stage 1 of Fig.03. Then in the Material Browser<br />
go into the Function menu and create a “New<br />
Material Group”, as seen in stage 2 of figure. In<br />
this way we will have a library which will contain<br />
only the materials of the vehicle. Name this<br />
material group “TUC-TUC”. Select it and from<br />
the File menu choose “Create New Material”<br />
(Ctrl+N). We will start by creating the base of the<br />
main body material, so name the new material<br />
“main_body”, as shown in stage 3 of figure.<br />
www.3dcreativemag.com page 119<br />
Issue 017 <strong>Jan</strong>uary 20<strong>07</strong>
Appying Shaders, Lighting & Rendering Tuc-Tuc<br />
Fig 04<br />
4. Now assign the material to the main_body,<br />
: select the object and, into Material Browser,<br />
go into Function > Apply, or just drag it onto the<br />
main_body object. Change its grey colour to<br />
any colour you like, as seen in Fig.04. You may<br />
remove the Specular Channel (double-click on<br />
the main_body material > uncheck the box of<br />
specular channel) or you may leave it. This is<br />
not too important at the moment because we are<br />
creating the bases of the materials. Later we will<br />
modify them, making them more complex and<br />
more realistic.<br />
Fig 05<br />
5. Now create a new material, rename it<br />
“chrome” and assign it to the chrome object, as<br />
seen in Fig.05. You may change its colour or<br />
you may leave the default grey colour.<br />
Fig 06<br />
6. Add a new material, call it “black_plastic” and<br />
apply it to the corresponding object like shown<br />
in Fig06. Change its colour to darker gray as<br />
seen in figure.<br />
www.3dcreativemag.com page 120<br />
Issue 017 <strong>Jan</strong>uary 20<strong>07</strong>
Tuc-Tuc Appying Shaders, Lighting & Rendering<br />
7. Same operation for the glass: create a new<br />
material; rename it “glass”; assign it to the glass<br />
object; change the colour of the material to a<br />
lighter grey, as shown in Fig.<strong>07</strong>.<br />
Fig <strong>07</strong><br />
8. Add another material and call it “light_glass_<br />
1” and apply it to the corresponding object, as<br />
shown in Fig.08. For this material I changed its<br />
colour to red.<br />
Fig 08<br />
9. Now create an orange material and rename it<br />
Fig 09<br />
“light_glass_2”. Assign it to the object, as seen<br />
in Fig.09.<br />
www.3dcreativemag.com page 121<br />
Issue 017 <strong>Jan</strong>uary 20<strong>07</strong>
Appying Shaders, Lighting & Rendering Tuc-Tuc<br />
Fig 10<br />
10. This is the same operation for the light_<br />
glass_3 object, so create a blue material, as<br />
shown in Fig.10.<br />
Fig 11<br />
11. Add a new black material and assign it to<br />
the tyre_black object (Fig.11).<br />
Fig 12<br />
12. Add a new white material for the white part<br />
of the tyre (Fig.12).<br />
www.3dcreativemag.com page 122<br />
Issue 017 <strong>Jan</strong>uary 20<strong>07</strong>
Tuc-Tuc Appying Shaders, Lighting & Rendering<br />
13. Now you can see from Fig.13 that we<br />
now have all the basic materials grouped in<br />
a material library. It’s composed of 9 different<br />
materials; main_body, chrome, black_plastic,<br />
glass, light_glass_1, light_glass_2, light_glass_<br />
3, tyre_black and tyre_white.<br />
Fig 13<br />
14. Now insert a light into the scene just to see<br />
how it’s going. This will not be the final lighting<br />
but we just need a light to check how the<br />
materials work. From the main menu go into<br />
Objects > Scene > Omni Light and position the<br />
light as shown in Fig.14. In the right of figure,<br />
you can see the parameters of the light: Type =<br />
Omni; Colour = White; Intensity = 100%;<br />
Shadow = Enable; Shadow = Shadow<br />
Maps; Shadow Density = 60%. “Un-hide” the<br />
environment and then make a render in the<br />
Perspective view - the scene looks a bit dark but<br />
it’s not too bad!<br />
Fig 14<br />
15. It’s now time to start working on the most<br />
important shader of the scene: the car paint<br />
shader. First of all, hide the other parts of the<br />
car, so only leave visible the main_body object.<br />
Now you already know, Cinema 4D has its own<br />
library of advanced procedural materials; Banji,<br />
Banzi, Cheen, etc. We will start from one of<br />
these advanced materials and next we will<br />
modify it in order to obtain our car paint shader.<br />
For the main_body material, we will use<br />
a Procedural Shader called “Lumas”. Its<br />
characteristic is to have 3 specular highlights<br />
and this allows us to give the shader a high<br />
quality. Then load the Lumas shader in the<br />
Colour Channel by clicking on the little button<br />
near “Texture”. From the menu which will<br />
appear, choose Effect > Lumas, as seen in<br />
Fig.15.<br />
Fig 15<br />
www.3dcreativemag.com page 123<br />
Issue 017 <strong>Jan</strong>uary 20<strong>07</strong>
Appying Shaders, Lighting & Rendering Tuc-Tuc<br />
Fig 16<br />
16. Once the material is loaded, click on the<br />
tab, as shown in stage 1 of Fig.16. Change the<br />
standard red colour to any colour you like, as<br />
seen in stage 2 of the figure. In stage 3 you can<br />
see the parameters of the “Specular 1”, here just<br />
change the colour to white. Change the colour<br />
of the “Specular 2”, as shown in stage 4, this<br />
time choose a light grey. The same goes for the<br />
“Specular 3”, change the colour to a darker grey,<br />
as seen in stage 5 of the figure. Leave the other<br />
parameters as default, change just the colours<br />
of the shader and of the 3 specular highlights.<br />
Fig 17<br />
17. Make a render to see how it’s going (Fig.17).<br />
Fig 18<br />
18. The next step is to enable the Diffusion<br />
Channel. This channel is used to have a control<br />
of light and dark areas. Load the “Fresnel” effect<br />
as shown in stage 1 of Fig.18. The Fresnel is<br />
like a gradient but it effects your material, based<br />
on your geometry’s “normals”, in relation to the<br />
camera. It also helps your model stand out from<br />
the background by giving it a nice edge. Check<br />
the “Affect Luminance” box, as seen in stage<br />
2, and then click on the Fresnel tab to change<br />
the colours of the gradient. Use the colours as<br />
shown in stage 3 of the figure.<br />
www.3dcreativemag.com page 124<br />
Issue 017 <strong>Jan</strong>uary 20<strong>07</strong>
Tuc-Tuc Appying Shaders, Lighting & Rendering<br />
19. Now enable the Reflection Channel. Here, I<br />
also used the Fresnel Effect (Fig.19). If you want<br />
to blur the reflection you have to increase the<br />
percentage of dispersion, but this will increase<br />
the rendering times (the larger the value, the<br />
longer the render time), so for this reason I left<br />
it at 0%.<br />
Fig 19<br />
20. Let’s now take care of the Specularity, so<br />
enable the Specular Channel. Set the Mode<br />
to Metal and then change the parameters, as<br />
shown in Fig.20.<br />
Fig 20<br />
21. To make the shader more realistic, also<br />
Fig 21<br />
enable the Specular Colour Channel. Load the<br />
Noise effect, as seen in stage 1 of Fig.21. This<br />
effect will give the shader the typical grain of car<br />
paint. Click on the tab to change the properties<br />
of noise (Stage 2). In stage 3, you will notice<br />
that I changed the colours; the first colour is a<br />
dark blue and the second one is a light blue.<br />
Of course, if you are using a different colour for<br />
your car paint, choose the right tint for the noise<br />
effect. I also changed the Global Scale to 0.2%<br />
and the value of the Contrast. This concludes<br />
the main_body shader.<br />
www.3dcreativemag.com page 125<br />
Issue 017 <strong>Jan</strong>uary 20<strong>07</strong>
Appying Shaders, Lighting & Rendering Tuc-Tuc<br />
That’s all for this first part. Next month we will<br />
continue looking into creating the rest of the<br />
shaders.<br />
Tuc Tuc<br />
Designed & Modelled by:<br />
Richard Tilbury<br />
Tutorial by:<br />
Giuseppe Guglielmucci &<br />
Niki Bartucci<br />
For more from this artist visit:<br />
www.pikoandniki.com<br />
Or contact them:<br />
niki@pikoandniki.com<br />
www.3dcreativemag.com page 126<br />
Issue 017 <strong>Jan</strong>uary 20<strong>07</strong>
Tuc-Tuc<br />
Is our new precise, step-by-step tutorial which<br />
will begin with a vehicle model and cover the<br />
principals of applying shaders, placing it in<br />
a simple scene and following with a two-part<br />
section on both lighting and rendering. The<br />
tutorial will begin by creating and applying<br />
materials for the various parts of the car, such<br />
as glass, chrome and tyres, as well as texturing<br />
some simple geometry that will make up a<br />
scene. It will then move onto lighting where the<br />
focus will be on setting up a lighting rig and the<br />
various parameters connected to this. Finally the<br />
series will culminate with a section on rendering,<br />
where the aim will be to finish with a polished<br />
image. The schedule is as follows:<br />
Issue 017 <strong>Jan</strong>uary 20<strong>07</strong><br />
Applying Materials &<br />
Shaders Part 1<br />
Issue 018 February 20<strong>07</strong><br />
Applying Materials &<br />
Shaders Part 2<br />
Issue 019 March 20<strong>07</strong><br />
Lighting Setup & Rig<br />
(with hdri) Part 1<br />
Issue 020 April 20<strong>07</strong><br />
Lighting Setup & Rig<br />
(with hdri) Part 2<br />
Issue 021 May 20<strong>07</strong><br />
Rendering<br />
Part 1<br />
Issue 022 June 20<strong>07</strong><br />
Rendering<br />
Part 2<br />
Enjoy ...
Appying Shaders, Lighting & Rendering Tuc-Tuc<br />
Applying Materials &<br />
Shaders - Part 1<br />
Fig 01<br />
Welcome to our new tutorial. In this new set<br />
of lessons we’re going to apply shaders and<br />
materials on a 3D model, set up lighting and<br />
rig using HDRI (High Dynamic Range Images)<br />
and rendering. In the first two parts we are<br />
applying shaders and materials, so let’s begin.<br />
The first part will be mostly basic because I<br />
want everybody who’s following this tutorial to<br />
get used to the interface, tools and techniques,<br />
rather then focusing on shaders. The last part:<br />
Applying Materials & Shaders Part 2 will focus<br />
more on shaders then GUI.<br />
1. Since I have no concept art to follow I am<br />
pretty much free to choose any colours I want<br />
for my car. First of all I shall add the main<br />
colour, which will be the chassis of the vehicle.<br />
Open the Multilister window, then create a new<br />
material, “Blinn”, using Edit > Create (Fig.01).<br />
Fig 02<br />
2. In order to change the colour of the material,<br />
double-click on the newly created Blinn. It will<br />
open the attribute window of the Blinn. Here<br />
you can add or change all the attributes for this<br />
material. You can change the transparency, or<br />
add a map on transparency. You can change<br />
the reflection ratio, specular colour and so on.<br />
By changing the Diffuse, Opacity, Specular<br />
Colour and Specular Roll Off, you can transform<br />
this material into Glass, Steel, Wood, Rubber,<br />
etc. We need a glossy material to reflect the<br />
environment and the default settings are pretty<br />
good for the chassis. So, we’ll leave everything<br />
as it is and we’ll change only the colour. Click on<br />
the colour and the “Colour Chooser” window will<br />
open, as in Fig.02. Choose an orange colour, or<br />
another colour if you want something different,<br />
and hit ‘Accept’ when you finish. Then, with the<br />
middle mouse button, drag the Blinn from the<br />
Multilister Window onto the chassis and let it go.<br />
Fig 03<br />
3. I would like to have few more colour details<br />
on my chassis and for this I’m going to add 3<br />
www.3dcreativemag.com page 128<br />
Issue 017 <strong>Jan</strong>uary 20<strong>07</strong>
Tuc-Tuc Appying Shaders, Lighting & Rendering<br />
Fig 04<br />
blue lines. Two on the top of the chassis and<br />
one right above the wheel shields. To do this<br />
I have to create a selection with all the faces I<br />
want to change. Select 7 edges from the middle<br />
of each and hit “Convert Selection to Edge<br />
Loop”. This will create a ring of 7 edges going<br />
all around the top of the chassis. Now because I<br />
cannot add a colour to the edges, only to faces,<br />
I have to convert my selection to faces. Hit<br />
“Convert Selection to Faces”.<br />
4. With all the faces still selected we’re going to<br />
create a “Quick Select Set”. This new set is very<br />
useful, especially when we are using a single<br />
mesh and you want to add more materials on<br />
Fig 05<br />
the same mesh. Now you can select those faces<br />
whenever you need to, by going in Edit > Quick<br />
Select Sets > bodyBlueLines_set or any other<br />
set of edges, faces, etc. you’ll ever create, as in<br />
Fig.04. I’m sure you’ll find this tool very useful<br />
for texturing, modelling, etc.<br />
5. The next step is to create a new Blinn<br />
material and to change the colour into blue<br />
using the same steps as in section 2. Do not<br />
change any attributes from the blue line material<br />
since it will remain part of the chassis. The only<br />
thing that’s changing is the paint, from yellow to<br />
blue. It would also be good to change the name<br />
of every new material in order to find it easily<br />
when you want to change something. You can<br />
Fig 06<br />
do this by adding a new name into the “Blinn”<br />
and “ShadingEngine” sections, as highlighted<br />
in red in Fig.05. You’ll notice that the name<br />
will also be changed in the Multilister Window.<br />
If you see that Maya is adding a number after<br />
your new rename, e.g. “bodyBlueLines1” or<br />
“bodyBlueLines_SG1”, this means that you<br />
have another object, SG (shading group), etc.<br />
in the scene that is using the same name. This<br />
happens very often and there are standards of<br />
naming/renaming.<br />
6. Select the faces that you want to turn into<br />
blue, using Edit > Quick Selection Set. Assign<br />
the new material by clicking onto the material in<br />
the Multilister Window and then Edit > Assign.<br />
www.3dcreativemag.com page 129<br />
Issue 017 <strong>Jan</strong>uary 20<strong>07</strong>
Appying Shaders, Lighting & Rendering Tuc-Tuc<br />
Notice that I have used another method to<br />
assign a material, since dragging the material<br />
with the middle mouse button is not helping me<br />
too much in this situation. I have to assign one<br />
material to 3 different lines which are part of the<br />
same object (Fig.06).<br />
Fig <strong>07</strong><br />
7. Now let’s make the red lights at the side. For<br />
this you’ll have to select the faces first, then<br />
apply another new material. Here we can use<br />
a combination of methods to select the faces.<br />
First select the edges that are going all over the<br />
lights, then “Convert Selection to Edge Loop”.<br />
Then “Convert Selection to Faces”. Make sure<br />
you have selected all the faces. Apply the new<br />
red material and that’s it. You may find some<br />
faces that are not selected. Select those faces<br />
too and then apply the material. Once you’ve<br />
selected all the faces, don’t forget to create a<br />
new “Quick Selection Set” (Fig.<strong>07</strong>).<br />
Fig 08<br />
8. Using exactly the same technique, make the<br />
red lights at the back (Fig.08). Note: The red<br />
material has exactly the same attributes as the<br />
blue and orange material. Only the colour is<br />
changed to red.<br />
9. For the wheel shields we cannot use the<br />
conversion methods used above so this will<br />
be a little more painful. To assign the black<br />
material onto the wheel shields you’ll have to<br />
select the faces manually. It won’t take too long<br />
but you have to pay attention to all the other<br />
faces that you don’t want to select. This may<br />
give you a bit of headache if you’re not quite<br />
used to navigating in a wireframe mode. I hope<br />
you’ll finish quickly and don’t forget to save the<br />
selection as ‘Quick Selection Set’. This tool is<br />
made especially for these kinds of pains and<br />
it saves a lot of time. Please note that my face<br />
selection is going around the back red lights.<br />
They are already coloured in red and I want to<br />
keep them this way (Fig.09).<br />
Fig 09<br />
www.3dcreativemag.com page 130<br />
Issue 017 <strong>Jan</strong>uary 20<strong>07</strong>
Tuc-Tuc Appying Shaders, Lighting & Rendering<br />
Fig 10<br />
10. Now create a new blinn material and assign<br />
it to the selected faces from the wheel shields<br />
(Fig.10).<br />
Fig 11<br />
11. We’re now going to take care now of the<br />
steps. Select all the faces of the steps, create a<br />
new material and assign it to the steps.<br />
Fig 12<br />
12. The final part is to add a shiny thin chrome<br />
line on the front. For this part I have selected<br />
the edges and I’ve used “Convert Selection to<br />
Edge Loop” then “Convert Selection to Faces”. I<br />
also had to deselect some of the faces that were<br />
selected, so pay attention to what’s selected.<br />
For this shiny line I have used a new material,<br />
“Phong”, as in Fig.12. I usually use this for all<br />
kinds of particularly shiny materials, like glass,<br />
diamonds, steel, chrome materials, mirrors,<br />
etc. The “Cosine Power” attribute is very good<br />
for this type of glossiness because it’s not<br />
linear, like the “Specular Roll Off” attribute, from<br />
the Blinn-type material. Also notice that the<br />
material is black in colour. This way I’m having<br />
www.3dcreativemag.com page 131<br />
Issue 017 <strong>Jan</strong>uary 20<strong>07</strong>
Appying Shaders, Lighting & Rendering Tuc-Tuc<br />
a powerful contrast between the dark and shiny<br />
parts. The highlights are made by the “Specular<br />
Colour”. This is a powerful material and can be<br />
used as a base for many other materials.<br />
Fig 13<br />
13. Now that I’m done with the chassis I’ve<br />
made a quick render to check that everything is<br />
as I expected it to be. I have used HDRI (High<br />
Dynamic Range Image) for this render, provided<br />
free together with HDRShop (I want to thank<br />
them for this, because they’re doing a very good<br />
job there) and Final Gathering, without any other<br />
lights in the scene. I will not enter into the details<br />
of this right now since we’ll have two entire parts<br />
allocated to rendering and lighting (see following<br />
pages for renders).<br />
14. Now we’re going to make the cab sign for<br />
the top of the chassis. Firstly I want to make it<br />
completely yellow so I’ll add a yellow colour to<br />
the entire object, as in Fig.14.<br />
Fig 14<br />
15. Now I think a nice shiny line around this part<br />
will be good for the contrast between the entire<br />
chassis and this object. For this I’m going to<br />
select the edges, then using “Convert Selection<br />
to Edge Loop” and “Convert Selection to Faces”,<br />
I have selected the entire part I want to change.<br />
I’m going to create a similar Phong material, as<br />
the one used at the front part of the chassis,<br />
because I have to have exactly the same<br />
chrome material (Fig.15).<br />
Fig 15<br />
Now we’ve finished with the simple materials,<br />
next we’re going to create some light effects<br />
without using any lights in the scene. I’ll use<br />
another part of the material attributes, named<br />
Special Effects. I want to create the impression<br />
that my lights are on. For this, we’re going to<br />
use glow and optical FX attributes but this and<br />
many more new materials, like “Layer Shader”,<br />
“Glow Shader” and “Ramp Shader”, we’ll be<br />
covered on the next month tutorial. Until then,<br />
take a look at the very first renders on the next<br />
page.<br />
www.3dcreativemag.com page 132<br />
Issue 017 <strong>Jan</strong>uary 20<strong>07</strong>
Tuc-Tuc Appying Shaders, Lighting & Rendering<br />
Tuc Tuc Designed & Modelled by:<br />
Richard Tilbury<br />
Tutorial by: Bogdan Horduna<br />
For more from this artist, contact them:<br />
suiobo@yahoo.com<br />
www.3dcreativemag.com page 133<br />
Issue 017 <strong>Jan</strong>uary 20<strong>07</strong>
Tuc-Tuc<br />
Is our new precise, step-by-step tutorial which<br />
will begin with a vehicle model and cover the<br />
principals of applying shaders, placing it in<br />
a simple scene and following with a two-part<br />
section on both lighting and rendering. The<br />
tutorial will begin by creating and applying<br />
materials for the various parts of the car, such<br />
as glass, chrome and tyres, as well as texturing<br />
some simple geometry that will make up a<br />
scene. It will then move onto lighting where the<br />
focus will be on setting up a lighting rig and the<br />
various parameters connected to this. Finally the<br />
series will culminate with a section on rendering,<br />
where the aim will be to finish with a polished<br />
image. The schedule is as follows:<br />
Issue 017 <strong>Jan</strong>uary 20<strong>07</strong><br />
Applying Materials &<br />
Shaders Part 1<br />
Issue 018 February 20<strong>07</strong><br />
Applying Materials &<br />
Shaders Part 2<br />
Issue 019 March 20<strong>07</strong><br />
Lighting Setup & Rig<br />
(with hdri) Part 1<br />
Issue 020 April 20<strong>07</strong><br />
Lighting Setup & Rig<br />
(with hdri) Part 2<br />
Issue 021 May 20<strong>07</strong><br />
Rendering<br />
Part 1<br />
Issue 022 June 20<strong>07</strong><br />
Rendering<br />
Part 2<br />
Enjoy ...
Tuc-Tuc Appying Shaders, Lighting & Rendering<br />
Assigning Materials &<br />
Shaders - Part 1<br />
Fig 01<br />
1. Let’s start inspecting the scene and its<br />
elements. Fig.01 is captured from the Camera<br />
view (headlight and wireframe on shaded were<br />
enabled for visualisation’s sake). As you can<br />
see, a small environment was created to put<br />
the vehicle in. We will optimize this environment<br />
later on in other parts of the tutorial if needed;<br />
for the moment you just need to know that it<br />
is made of simple geometry (like boxes and<br />
cylinders) with some simple materials and<br />
photographic textures on it.<br />
2. Let’s have a look at Fig.02, which shows the<br />
scene from different points of view (top, front<br />
and side). The scene is a simple box without<br />
the top base (this is because we will make the<br />
light cast from above to create a nice lighting<br />
atmosphere). In the lower right part of Fig.02<br />
you can see the Explorer view (you can bring<br />
it up with the “8” short-cut key), with all the<br />
elements which make up the scene. The TucTuc<br />
element is shown in green with a small man<br />
icon because it is a Model (it’s like a mini-scene<br />
within the main scene). The TucTuc model<br />
contains all the objects which make up the<br />
vehicle. In the centre of Fig.02 there’s a capture<br />
of the Material Editor (RV); it shows a library<br />
called “ENV_Materials” which was created to<br />
contain all the materials and shaders of the<br />
environment.<br />
Fig 02<br />
Fig 03<br />
3. Let’s start creating the materials for the<br />
vehicle. First of all, hide everything but the<br />
vehicle meshes (click with the Middle Mouse<br />
Button on the TucTuc model in the Explorer<br />
view and use the Shift + Ctrl + H shortcut to hide<br />
all the rest). Once you have only the TucTuc<br />
model in the scene, open the Material Editor<br />
(View > Rendering/Texturing > Material Editor),<br />
right-click on the Materials (Sources) label<br />
and click on Create New Material Library, as<br />
shown in part 1 of Fig.03. Now right-click on the<br />
newly created library, and rename it “TucTuc_<br />
www.3dcreativemag.com page 135<br />
Issue 017 <strong>Jan</strong>uary 20<strong>07</strong>
Appying Shaders, Lighting & Rendering Tuc-Tuc<br />
Fig 04<br />
Materials”, as seen in part 2 of Fig.03. This new<br />
material library will contain all the materials and<br />
shaders of the vehicle.<br />
4. Select the main body of the vehicle (Fig.04).<br />
Click on the Create Material button in the<br />
Material Editor. This will create a new, standard<br />
material. Right-click on it in the material<br />
library and rename it “MainBody_Material”.<br />
In the Phong properties, enter the new name<br />
“MainBody_Phong” and change the grey Diffuse<br />
colour to any colour you like. The colour of<br />
the main body will update accordingly in the<br />
viewport, as shown in Fig.04.<br />
Fig 05<br />
5. Select the door and the wheel cover, as<br />
shown in Fig.05, and click on the Assign<br />
Material button in the Material Editor. This will<br />
start a “picking session” and the Material Editor<br />
will be closed; use the Ctrl + Tab shortcut to<br />
re-open it and click on MainBody_Material in the<br />
Material Library of the Material Editor. This will<br />
assign the same material of the main body to<br />
the selected elements.<br />
Fig 06<br />
6. Select all the other components that will<br />
have the MainBody_Material, and repeat the<br />
last step (click on Assign Material and pick the<br />
MainBody_Material in the Material Library).<br />
www.3dcreativemag.com page 136<br />
Issue 017 <strong>Jan</strong>uary 20<strong>07</strong>
Tuc-Tuc Appying Shaders, Lighting & Rendering<br />
7. Now select the parts that will be made of<br />
transparent glass (Fig.<strong>07</strong>), create a new material<br />
called LightGlass_Material and assign it to them.<br />
You can leave its colour as grey, or maybe<br />
choose a lighter grey.<br />
Fig <strong>07</strong><br />
8. Create a new material called “Glass_Material”<br />
and assign it to the main glass mesh (marked<br />
with the white wireframe in Fig.08). In this case<br />
the colour was changed to blue, but these are<br />
just symbolic colours, we will alter them later.<br />
Fig 08<br />
9. Select the tyres and assign them a material<br />
Fig 09<br />
called “Tyre_Material” and set its colour to a<br />
darker grey, as shown in Fig.09.<br />
www.3dcreativemag.com page 137<br />
Issue 017 <strong>Jan</strong>uary 20<strong>07</strong>
Appying Shaders, Lighting & Rendering Tuc-Tuc<br />
Fig 10<br />
10. Add another material, called “Chrome_<br />
Material”, select all the meshes that will be<br />
made of this kind of material and assign it to<br />
them (Fig.10).<br />
Fig 11<br />
11. Create a “BlackPlastic_Material” and<br />
assign it to the meshes marked with the white<br />
wireframe in Fig.11. Change its colour to a very<br />
dark grey, almost black.<br />
Fig 12<br />
12. Select and hide (with the H shortcut key) the<br />
lights’ glass mesh. Select the inner components<br />
of the lights and assign a new OrangePlastic_<br />
Material to them, as seen in Fig.12. Change its<br />
colour to a bright orange shade.<br />
www.3dcreativemag.com page 138<br />
Issue 017 <strong>Jan</strong>uary 20<strong>07</strong>
Tuc-Tuc Appying Shaders, Lighting & Rendering<br />
13. Assign the same OrangePlastic_Material to<br />
the back lights, as shown in Fig.13.<br />
Fig 13<br />
14. Let’s recap everything: you should have<br />
ended up with a Material Library similar to<br />
the one in Fig.14 (it’s composed of 7 different<br />
Materials; BlackPlastic, Chrome, Glass,<br />
LightGlass, MainBody, OrangePlastic and Tyre<br />
materials). Don’t forget to check every side<br />
of your model to see if you have forgotten to<br />
assign the right material to any other hidden part<br />
of the model.<br />
Fig 14<br />
15. Now it’s time to give the scene some light<br />
Fig 15<br />
and check how it is going. Create a SpotLight<br />
and position it as shown in Fig.15. You can<br />
use the “B” shortcut key to enable some<br />
advanced controls on the SpotLight (you can<br />
alter the radius interactively in the viewports<br />
just by clicking and dragging the cursor over<br />
the SpotLight). In the centre of Fig.15 you can<br />
see the basic parameters of the SpotLight; pure<br />
white colour, Intensity = 1, Shadows = Enabled,<br />
Umbra = 0,063. In the upper-right part of Fig.15<br />
there’s a Render Region of the scene - it should<br />
look like that. Pretty horrible at the moment, isn’t<br />
it?<br />
www.3dcreativemag.com page 139<br />
Issue 017 <strong>Jan</strong>uary 20<strong>07</strong>
Appying Shaders, Lighting & Rendering Tuc-Tuc<br />
Fig 16<br />
Fig 17<br />
Fig 18<br />
16. Let’s start working on the most important<br />
shader of this scene: the car paint shader.<br />
We could try to build a car paint shader from<br />
scratch, and that would be an interesting topic;<br />
but we would have to deal with a tedious and<br />
mostly unresolvable problem: the extremely<br />
time-consuming blurry reflections of Mental<br />
Ray. In fact, one of the key aspects of a car<br />
paint shader is a nice blurry reflection all over<br />
the vehicle body and its chromic components.<br />
Creating nice, blurry reflections with Mental<br />
Ray is a “few-clicks” task, but unfortunately the<br />
render time goes up as you increase the quality<br />
of the reflection itself. We need something much<br />
faster, and with the same (if not better) quality,<br />
since we need to make constant changes to<br />
the overall look of the vehicle. This is why, in<br />
this tutorial, we will rely on a pre-made, highquality<br />
car paint shader, which will be almost<br />
impossible to obtain by creating it from scratch<br />
(and in no way would we have the same fast<br />
render-times). You can download this shader<br />
(and a lot of other really nice shaders) for free at<br />
the Tek2Shoot website (http://www.tek2shoot.<br />
com/images/stories/articles_files/t2s_mentalray_<br />
1.1.zip - the guys at Tek2Shoot (www.<br />
tek2shoot.com) have created an XSI add-on<br />
which contains several unexposed Mental Ray<br />
shaders). We will use their Car Paint shader for<br />
our vehicle. Let’s see how to install it. Download<br />
the file from the previous link, save it to your<br />
hard drive and un-zip it. Open XSI and from the<br />
File menu choose Add-On > Install. Click on the<br />
three-dots button shown in Fig.16, and locate<br />
the file you just un-zipped on your hard drive.<br />
Make sure that the Root Location is set to User<br />
Add-Ons and click on the Install button. This<br />
will install the new T2S shaders. Close XSI and<br />
launch it again to automatically load these new<br />
shaders.<br />
17. Select the vehicle’s body and use the<br />
“7” shortcut key to open the Render Tree. It<br />
will show the MainBody_Material we created<br />
previously (if it doesn’t, hit the Refresh icon on<br />
the Render Tree to reload it). Click on the Nodes<br />
menu (part 1 of Fig.17); click on Illumination ><br />
www.3dcreativemag.com page 140<br />
Issue 017 <strong>Jan</strong>uary 20<strong>07</strong>
Tuc-Tuc Appying Shaders, Lighting & Rendering<br />
More (part 2 of Fig.17); click on the Paths button<br />
in the file browser and choose T2S_MentalRay<br />
from the pop-up list (part 3 of Fig.17); finally,<br />
choose the mi_car_paint_phen file from the<br />
browser, as shown in part 4 of Fig.17.<br />
Fig 19<br />
18. Go back to the Render Tree and plug the<br />
newly created mi_car_paint_phen node to the<br />
Surface node of the MainBody_Material. It is<br />
just as simple. You can see this for yourself<br />
by dragging a render Region in the Camera<br />
viewport (Fig.18).<br />
19. If you double-click on the mi_car_paint_phen<br />
node in the Render Tree, you can alter its<br />
parameters. Let’s see the most important ones,<br />
shown in Fig.19:<br />
2 - Base - the base colour of the material;<br />
3 - Edge - the colour shown on the edges of the<br />
model (where the material tends to go darker);<br />
4 - Lit Colour - the colour shown in the area of<br />
the model hit by the light source;<br />
5 - Falloff parameters - used to make the<br />
relative effect narrower or wider (for example,<br />
the effect on the edge colour).<br />
For a complete description of all the parameters,<br />
check out this website:<br />
http://www.lamrug.org/resources/doc/paint.html.<br />
Fig 20<br />
20. Now you can customise this wonderful car<br />
paint shader with the colours you like. In this<br />
case, the Base colour was set to a bluish colour<br />
(RGB = 0, 150, 204). The Lit colour was set with<br />
a brighter colour (RGB = 0, 248, 182). The Lit<br />
Falloff value was set to 4,632. You can see the<br />
result in Fig.20.<br />
Fig 21<br />
21. Now let’s take care of the specularity. If you<br />
click on the second tab of the mi_car-paint_<br />
phen shader, you will see the parameters that<br />
control the specularity of the shader (Fig.21).<br />
This aspect is split into two different channels;<br />
Primary Specular and Secondary Specular. The<br />
Colour parameters control the colour of the two<br />
channels of specularity, the Weight parameter is<br />
a global multiplier of the effect and the Exponent<br />
controls the Phong exponent for the specularity<br />
www.3dcreativemag.com page 141<br />
Issue 017 <strong>Jan</strong>uary 20<strong>07</strong>
Appying Shaders, Lighting & Rendering Tuc-Tuc<br />
Fig 22<br />
effect. Lastly, on the bottom of this tab, there’s<br />
an option called “Glazing”. When on, this helps<br />
in creating the shiny and polished car paint<br />
effect.<br />
22. Set the Primary and Secondary Specular<br />
Weight to 0,671. The Secondary Specular<br />
Colour was set to an RGB = 12, 255, 255<br />
colour. Of course, if you are using a different<br />
overall colour for your vehicle, choose the right<br />
tint for the Secondary Specular Colour.<br />
Fig 23<br />
23. In the Flake tab of the mi_car_paint_phen<br />
shader, you can find the controls for the flakes<br />
effect. In this case only the Weight parameter<br />
was changed (and set to 2,349). In case you<br />
experience problems with the size of the flakes<br />
(it may depend on your scene size), just change<br />
the Scale value, which by default is set to the<br />
minimum (0,001). If you need bigger flakes,<br />
increase this value. You can also alter the<br />
flakes’ colour (Colour parameter), and Density.<br />
Fig 24<br />
24. Open the Reflection tab of the mi_car_paint_<br />
phen and set the Glossy Spread value to 0,02<br />
and the Samples to 10 (the bigger this value,<br />
the longer the render time...). In this way we will<br />
blur the reflections a little.<br />
www.3dcreativemag.com page 142<br />
Issue 017 <strong>Jan</strong>uary 20<strong>07</strong>
Tuc-Tuc Appying Shaders, Lighting & Rendering<br />
Well, that is all for this month. We will slightly<br />
change the car paint shader values later on,<br />
when we will deal with the illumination task. Next<br />
month, we’ll see how to create the rest of the<br />
shaders for the vehicle.<br />
Tuc Tuc Designed & Modelled by:<br />
Richard Tilbury<br />
Tutorial by:<br />
Luciano Iurino<br />
For more from this artist visit:<br />
www.pmstudios.it<br />
Or contact them:<br />
iuri@pmstudios.it<br />
www.3dcreativemag.com page 143<br />
Issue 017 <strong>Jan</strong>uary 20<strong>07</strong>
Tuc-Tuc<br />
<strong>3DCreative</strong><br />
would like to apologise<br />
Due to a Technical<br />
Error, the Lightwave<br />
version of Tuc tuc will<br />
begin next month, with<br />
a double part 1 & 2 Issue.<br />
sorry for any<br />
inconvenience.<br />
Please email<br />
ben@zoopublishing<br />
if you would like<br />
to be sent a link to<br />
download part 1 when<br />
it is available, without<br />
needing to purchase<br />
next months issue.<br />
www.3dcreativemag.com page 144<br />
Issue 017 <strong>Jan</strong>uary 20<strong>07</strong>