Trracer Gun Manual - Wolfpack Paintball Team
Trracer Gun Manual - Wolfpack Paintball Team
Trracer Gun Manual - Wolfpack Paintball Team

You also want an ePaper? Increase the reach of your titles
YUMPU automatically turns print PDFs into web optimized ePapers that Google loves.
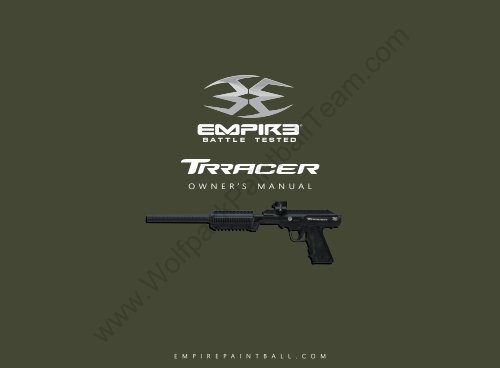
OWNER’S<br />
MANUAL<br />
www.<strong>Wolfpack</strong><strong>Paintball</strong><strong>Team</strong>.com<br />
E M P I R E P A I N T B A L L . C O M
CONTENTS<br />
Page<br />
1. SAFE MARKER HANDLING 1<br />
2. INTRODUCTION 1<br />
3. GETTING STARTED 1-3<br />
4. FIRING YOUR MARKER 3<br />
5. VELOCITY ADJUSTMENT 4<br />
6. UNLOADING YOUR MARKER 4<br />
7. MAINTENANCE AND LUBRICATION 4<br />
8. DISASSEMBLY 5<br />
9. STORAGE AND TRANSPORTATION 5<br />
10. PARTS LIST & DIAGRAMS 6<br />
www.<strong>Wolfpack</strong><strong>Paintball</strong><strong>Team</strong>.com<br />
E M P I R E P A I N T B A L L . C O M<br />
For manuals and warranty details, go to:<br />
paintballsolutions.com<br />
For manuals in other languages,<br />
(where applicable), go to:<br />
paintballsolutions.com<br />
©2010 Empire <strong>Paintball</strong>, Inc. The<br />
Empire logo, “Battle Tested” and<br />
“<strong>Trracer</strong>” are trademarks of Empire<br />
<strong>Paintball</strong>, Inc. All rights reserved.<br />
Empire <strong>Paintball</strong> is a brand of KEE<br />
Action Sports, LLC.
1. Safe Marker Handling<br />
IMPORTANT: Never carry your marker uncased when not on a<br />
playing field. The non-playing public and law enforcement personnel<br />
may not be able to distinguish between a paintball marker and<br />
firearm. For your own safety and to protect the image of the sport,<br />
always carry your marker in a suitable marker case or in the box in<br />
which it was shipped.<br />
• Treat every marker as if it were loaded.<br />
• Never look down the barrel of a paintball marker.<br />
• Keep the marker in “safe mode” until ready to shoot, safety on,<br />
and barrel-blocking device installed in/on the marker’s barrel.<br />
• Keep your finger off the trigger until ready to shoot.<br />
• Never point the marker at anything you don’t wish to shoot.<br />
• Keep the barrel-blocking device in/on the marker’s barrel when<br />
not shooting.<br />
• Always remove paintballs and the air source before disassembly.<br />
• After removing the air source, point marker in safe direction and<br />
discharge until marker is degassed.<br />
• Store the marker unloaded and degassed in a secure place.<br />
• Follow warnings listed on the air source for handling and storage.<br />
• Do not shoot at fragile objects such as windows.<br />
• Every person within range must wear eye, face, and ear protection<br />
designed specifically to stop paintballs and meeting ASTM<br />
standard F1776.<br />
• Always measure your marker’s velocity before playing paintball<br />
and never shoot at velocities in excess of 300 feet-per-second<br />
(91.44 meters-per-second).<br />
Read this entire manual before loading, or attaching a propellant<br />
source, or in any way attempting to operate the Empire <strong>Trracer</strong><br />
marker.<br />
2. Introduction<br />
Congratulations on your selection of the Empire <strong>Trracer</strong> paintball<br />
marker. The <strong>Trracer</strong> marker is made to provide you with many<br />
years of reliable performance. We are honored that you have chosen<br />
the <strong>Trracer</strong> as your marker of choice and hope you enjoy using<br />
this high-quality product.<br />
The <strong>Trracer</strong> is precision engineered from aircraft-grade aluminum<br />
and composite materials. We expect you to play hard and play frequently<br />
and the <strong>Trracer</strong> was built with this in mind.<br />
Empire <strong>Trracer</strong> markers come with a removable auto-cocker<br />
threaded barrel and accept any CO2 or high-pressure compressed<br />
air tanks with standard threads.<br />
Marker Specifications<br />
Model . . . . . . . . . . . . . . . . . . . . . . . . . . . . . . . . . . . . . . . . . . . . .<strong>Trracer</strong><br />
Caliber . . . . . . . . . . . . . . . . . . . . . . . . . . . . . . . . . . . . . . . . . . . . . . ..68<br />
Mechanical Action . . . . . . . . . . . . . . . . . . . .Pump with Auto Trigger<br />
Air Source . . . . . . . . .CO2 or High Pressure Compressed Air Tanks<br />
Main Body Material . . . . . . . . . . . . . . . . . . . . . . . . . . . . . .Aluminum<br />
Included Items<br />
• 14" Barrel (.688” bore)<br />
• 5/64", 3/32", 1/16", 1/8" Allen Wrenches<br />
• Velocity Adjustment Wrench<br />
• Spare Parts Kit<br />
• barrel-blocking Device<br />
• Clamping Feed Elbow<br />
• Instruction <strong>Manual</strong><br />
www.<strong>Wolfpack</strong><strong>Paintball</strong><strong>Team</strong>.com<br />
E M P I R E P A I N T B A L L . C O M 1
2<br />
3. Getting Started<br />
Safety and safe marker handling are the most important aspects<br />
of paintball sports. Please practice each of the following steps with<br />
an unloaded marker before attempting to operate your marker<br />
with an air source and paintballs.<br />
• Do not install an air source or load paintballs into your marker until<br />
you have completely read and understood this manual and feel<br />
completely confident with your ability to handle your marker safely.<br />
• Always use ASTM-approved paintball-specific eye protection.<br />
Always wear eye protection<br />
when handling a paintball<br />
marker and in any areas<br />
where paintball markers<br />
may be discharged.<br />
• Keep your finger out of the<br />
trigger guard and away<br />
from the trigger; point the<br />
muzzle of the marker in a<br />
safe direction at all times.<br />
Keep the marker in safe<br />
mode.<br />
• Always keep your marker<br />
pointed in a safe direction<br />
and use a barrel-blocking<br />
device.<br />
• Remember that the ultimate<br />
safety device is you,<br />
the operator.<br />
Fig. 3.1<br />
Fig. 3.2<br />
E M P I R E P A I N T B A L L . C O M<br />
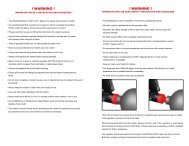
Safety and Safe Mode<br />
The safety is a small mechanical slide on the left side of the marker<br />
above the trigger. When the safety is “Off”, a red dot is visible<br />
on the marker (Fig. 3.1). When the Safety is “On”, no red dot will be<br />
visible and the marker will not fire (Fig. 3.2).<br />
In this manual, you will see the term “safe mode”. In “safe mode”,<br />
the safety should be set to “safe” (red marking on safety will not be<br />
visible) and a barrel-blocking device should be installed. Make sure<br />
your marker is in “safe mode” when the marker is not being fired<br />
or when indicated to do so.<br />
Feed Elbow Installation<br />
• Install the feed elbow before installing the barrel.<br />
• Press and hold the retention button located on the side of the<br />
feed elbow.<br />
• Slide the elbow onto the front of the Picatinny rail.<br />
• Line up the elbow with the feed hole on the right side of the<br />
body.<br />
• Check that the elbow is locked in place, properly aligned, and<br />
that the spring-loaded retention button is lined up with a gap<br />
on the Picatinny rail.<br />
Barrel Installation<br />
• Make sure marker is degassed, loader removed, no paintballs in<br />
the feed port or breech, and the marker is in “safe mode”.<br />
• While pointing marker in a safe direction, slide the barrel<br />
through the pump handle and thread into the front opening of<br />
the marker body.<br />
• Turn the barrel clockwise until it stops (do not over tighten).<br />
• Install a barrel-blocking device. This can be a barrel plug or<br />
other such device that prevents the accidental discharge of a<br />
paintball.<br />
www.<strong>Wolfpack</strong><strong>Paintball</strong><strong>Team</strong>.com
Loader Installation<br />
• To install a loader check the feed elbow and loader to make sure<br />
they are free from debris and obstructions.<br />
• Press the loader into the opening of the feed elbow until it stops.<br />
• Align the loader so that the lid is pointing to the rear and the<br />
loader is parallel with the marker.<br />
• Clamp the loader in place by tightening the clamp arm; it may<br />
be necessary to adjust the clamp. Do not over tighten the loader.<br />
Feed Elbow Clamp Adjustment<br />
The feed elbow clamp may need adjustment for different<br />
types/brands of loaders. Adjust the clamp using a 3/32" Allen<br />
wrench; turning the screw clockwise will increase the clamping<br />
force, while turning in counter-clockwise will decrease the clamping<br />
force.<br />
Before Pressurizing your Marker<br />
Consult the place where you purchased your Empire marker, or a<br />
recognized and competent air smith, for instruction in the safe<br />
handling of compressed-air cylinders before purchasing or connecting<br />
one to your Empire marker.<br />
• Check to make sure that you and anyone within range are wearing<br />
eye protection designed specifically for paintball.<br />
• Double check that all screws are tightened and no parts are<br />
loose before installing your tank.<br />
• Ensure you have a barrel plug, barrel sock, or other specifically<br />
designed barrel-blocking device in place.<br />
• Make sure there are no paintballs in the marker.<br />
• Set marker to “safe mode”.<br />
Pressurizing your Marker<br />
• While pointing the marker in a safe direction, locate the ASA (air<br />
source adapter). The <strong>Trracer</strong> ASA is located at the back of the body.<br />
• Insert the threaded<br />
end of the air cylinder<br />
into the ASA.<br />
• Without pushing the<br />
cylinder, twist the<br />
cylinder clockwise<br />
and allow the threads<br />
to draw the cylinder<br />
into the marker’s ASA<br />
until it stops. Your<br />
marker is now<br />
charged (Fig. 3.3).<br />
Warning:<br />
• Remember compressed air, nitrogen systems, and CO2 cylinders<br />
can be extremely dangerous if misused or improperly handled.<br />
Use only cylinders meeting D.O.T. or regionally defined<br />
specifications.<br />
• Never disassemble your tank or tank regulator. Only a qualified<br />
and trained technician should perform work on your tank and<br />
tank regulator.<br />
• Never add any lubricants or greases into the fill adapter on your<br />
tank regulator.<br />
Loading <strong>Paintball</strong>s<br />
Empire markers use .68 caliber, water-soluble paintballs, readily<br />
available at paintball pro-shops, commercial playing fields, and<br />
many sporting goods stores. The paintballs are fed through the<br />
feed elbow into the breech of the marker.<br />
• Make sure the marker is set to “safe mode”, safety on, and barrel-blocking<br />
device on.<br />
• Put on an eye protective device designed specifically for paintball<br />
and make sure that anyone within range of the marker does<br />
the same.<br />
www.<strong>Wolfpack</strong><strong>Paintball</strong><strong>Team</strong>.com<br />
Fig. 3.3<br />
E M P I R E P A I N T B A L L . C O M 3
4<br />
• Load quality .68 caliber paintballs (leave some room for paintballs<br />
to move about, inside loader).<br />
• Your marker is now loaded.<br />
4. Firing Your Marker<br />
Warning: Always keep your marker pointed in a safe direction!<br />
Everyone within firing range should always use paintball approved<br />
eye and face protection in the presence of live paintball markers.<br />
Make sure the marker is set to “safe mode”, before following the<br />
steps below.<br />
• Install the air cylinder, pressurizing the marker.<br />
• Put the paintballs into the loader.<br />
• Using the pump handle, load a paintball by sliding the pump<br />
back then forward.<br />
• Remove the barrel-blocking device.<br />
• Aim the marker in a safe direction.<br />
• Set the safety to the “fire” position, safety off.<br />
• Aim the marker at the target.<br />
• Place your finger on the trigger.<br />
• Pull the trigger with a smooth squeezing motion.<br />
Auto-Trigger<br />
The Empire <strong>Trracer</strong> paintball marker is equipped with an auto-trigger.<br />
To use the auto-trigger, simply hold the trigger in and pump<br />
the marker. Each time the handle is pumped a paintball will be<br />
fired from the marker.<br />
Auto-Trigger Adjustment<br />
The auto-trigger activation point is adjustable per the set screw<br />
in the trigger. It is factory set and should only be adjusted if<br />
necessary.<br />
E M P I R E P A I N T B A L L . C O M<br />
• Turning the set screw clockwise will activate the auto-trigger<br />
later in the forward pumping action. If set to activate too late in<br />
the forward pumping action, the marker will not firing at all or<br />
consistently.<br />
• Turning the set screw counter-clockwise will activate the autotrigger<br />
earlier in the forward pumping action. Setting it to activate<br />
to early will result in low velocity, as the bolt will not be<br />
sealed within the breech of the marker.<br />
• To set the auto-trigger correctly, turn the set screw in the trigger<br />
clockwise until the auto trigger does not activate, then turn the<br />
set screw counter-clockwise at least half-turn.<br />
Anti-Double Cocking Feature<br />
The Empire <strong>Trracer</strong> has an anti-double cocking feature which prevents<br />
the marker from being pumped twice before one paintball is<br />
fired. Once the marker is pumped back then forward, the pump<br />
handle will be locked into the forward position until it is fired. This<br />
feature prevents double feeding paintballs into the marker.<br />
5. Velocity Adjustment<br />
Always check the velocity of the marker prior to playing paintball.<br />
Different playing fields may have different maximum velocity<br />
limits. At no time should you shoot at velocities above 300 feet-persecond<br />
(91.44 meters-per-second).<br />
• Put on an eye protective device designed specifically for paintball<br />
and make sure that anyone within range of the Empire<br />
marker does the same.<br />
• While pointing the marker in a safe direction, remove the barrelblocking<br />
device.<br />
• Point the Empire marker over a chronograph that will measure<br />
the velocity of the paintballs discharged by the marker.<br />
• Set the marker to “fire” mode.<br />
www.<strong>Wolfpack</strong><strong>Paintball</strong><strong>Team</strong>.com
• Pull the trigger and check the reading on the chronograph.<br />
• Insert the velocity adjuster Allen wrench into the <strong>Trracer</strong>’s barrel<br />
and slide it in till it stops, being careful not to damage the barrel<br />
(Fig. 5.1).<br />
• Turn the wrench slightly until you feel it lock into the velocity<br />
adjuster.<br />
• Turn the wrench<br />
inward or clockwise<br />
to increase<br />
the velocity, and<br />
outward or<br />
counter-clockwise<br />
to lower the<br />
velocity of the<br />
paintballs discharged<br />
from<br />
Fig. 5.1<br />
the marker.<br />
6. Unloading Your Marker<br />
Put on an eye protective device designed specifically for paintball<br />
and make sure that anyone within range of your Empire marker<br />
does the same.<br />
• Make sure the barrel-blocking device is properly installed and<br />
the marker is set to “safe mode”.<br />
• Remove the loader and all paintballs.<br />
• While pointing the Empire marker in a safe direction, remove the<br />
barrel-blocking device and fire the marker several times to<br />
insure there are no balls remaining in the chamber or the barrel.<br />
• Properly re-install the barrel-blocking device and set the marker<br />
safety to “safe mode”.<br />
Removing Air Cylinder<br />
• Put on an eye protective device designed specifically for paintball<br />
and make sure that anyone within range of the Empire<br />
marker does the same.<br />
• Make sure the barrel-blocking device is properly installed on the<br />
marker.<br />
• While pointing the Empire marker in a safe direction, remove the<br />
air cylinder, by turning it counter-clockwise.<br />
• Air will vent before the air cylinder unthreads completely.<br />
• The marker is now ready to be cleaned and put away for future<br />
use.<br />
7. Maintenance and Lubrication<br />
Caution: Before attempting to perform any maintenance operations,<br />
make sure that all paintballs and propellant sources have<br />
been removed from the marker. Install a barrel-blocking device;<br />
marker must be unloaded and degassed before any disassembly<br />
or maintenance.<br />
Once your Empire marker is unloaded and the air cylinder is<br />
removed, you can use a damp cloth to wipe off paint, dirt, and<br />
debris from the outside of your marker. Once your marker is clean<br />
and dry you can re-oil using a light, premium marker oil. Do not<br />
use any petroleum-based or aerosol products on your marker.<br />
Petroleum-based and aerosol products can damage your markers<br />
O-rings.<br />
Cleaning Barrel /Breech Insert and Breech of Marker<br />
• Push a paintball swab, like the Empire Swab, through the barrel<br />
and breech area to clean them.<br />
• Clean the outside of your marker using a paper towel or rag,<br />
which can be dampened with warm water.<br />
Lubricating the Bolt/Hammer Assembly<br />
• See Section 8 for disassembly instructions.<br />
• Wipe the parts clean and inspect the O-rings for damage or<br />
www.<strong>Wolfpack</strong><strong>Paintball</strong><strong>Team</strong>.com<br />
E M P I R E P A I N T B A L L . C O M 5
6<br />
wear, replace if needed.<br />
• Apply one drop of premium marker oil to the O-ring on the bolt<br />
and apply a small amount to the outer surface of the hammer.<br />
8. DISASSEMBLY<br />
CAUTION: Before attempting to perform any maintenance operations,<br />
make sure that all paintballs and air sources have been<br />
removed from the marker. Install a barrel-blocking device; marker<br />
must be unloaded and degassed before any disassembly or<br />
maintenance.<br />
Disassembly Tips<br />
• Make sure you have a clean area to work on your marker.<br />
• When removing parts for the first time, do so carefully, so you do<br />
not lose any.<br />
• Visit <strong>Paintball</strong>Solutions.com for additional information.<br />
Barrel<br />
• The barrel is removed by turning it counter-clockwise and sliding<br />
it through the pump handle.<br />
Pump Handle<br />
• Remove the two pump handle screws with a flathead screwdriver<br />
or by hand and slide the pump handle forward.<br />
Clamping Feed Elbow<br />
• To remove the feed elbow, the barrel or pump handle must be<br />
removed first.<br />
• Push and hold in the latch button on the side of the elbow.<br />
• While holding the button in, slide the feed elbow off the front of<br />
the marker.<br />
E M P I R E P A I N T B A L L . C O M<br />
Rail<br />
• Using a 3/32" Allen wrench, remove the three rail screws and lift<br />
rail from body.<br />
Ball Detent<br />
• The ball detent can be removed once the trigger frame is removed.<br />
Trigger Frame Assembly<br />
• Using a 1/8" Allen wrench, remove the two frame screws.<br />
• Lower the trigger frame away from the marker body.<br />
Grips<br />
• The grips hold the safety ball and safety spring in place. It is recommended<br />
that you do not remove the grips from the trigger<br />
frame.<br />
Valve/Power-Tube Assembly<br />
• The valve/power-tube assembly can be removed once the grip<br />
frame has been removed, by sliding it out the back of the main<br />
body.<br />
Bolt /Hammer Assembly<br />
• Remove the grip frame and valve/power-tube assembly.<br />
• Slide the bolt /hammer assembly out the back of the marker.<br />
9. Storage and Transportation<br />
IMPORTANT: Never carry your Empire marker uncased when not<br />
on a playing field. The non-playing public and law enforcement<br />
personnel may not be able to distinguish between a paintball<br />
marker and firearm. For your own safety and to protect the image<br />
of the sport, always carry your Empire marker in a suitable marker<br />
case or in the box in which it was shipped.<br />
www.<strong>Wolfpack</strong><strong>Paintball</strong><strong>Team</strong>.com
When you are finished using your Empire marker it is important<br />
that you prepare it for storage. This will not only serve to increase<br />
the life of the marker, but will assure optimum performance on your<br />
next outing.<br />
• The Empire marker must be clear of all paint and air sources when<br />
not being used.<br />
• Be sure to have marker de-cocked and in “safe mode” when not<br />
in use.<br />
• Make sure a barrel-blocking device is in place.<br />
• Store your Empire marker and propellant in cool dry place.<br />
• Keep your Empire marker away from unsupervised children.<br />
• Your Empire marker must be free of all paint and not attached to<br />
a propellant source while being transported to and from the<br />
playing field.<br />
• Observe and obey all local, state, and federal laws concerning<br />
the transportation of paintball markers. For information concerning<br />
any of the laws in your area, contact your local law enforcement.<br />
• Always store the marker in a secure location when not in use so<br />
as to prevent access by unauthorized persons.<br />
Schematic # Description SKU#<br />
1 Safety Ball 10730<br />
2 Safety Spring 10750<br />
3 Trigger Pin 10766<br />
4 Grip Screws 10782<br />
5 Feed Elbow (complete) 17757<br />
6 Feed Elbow Screw 17759<br />
7 Feed Elbow Lever 17760<br />
8 Feed Elbow Collar 17761<br />
9 Feed Elbow Seat 17762<br />
Schematic # Description SKU#<br />
10 Feed Elbow Spacer 17763<br />
11 Trigger Frame 17956<br />
12 Trigger Frame Screw (10-32 x.5) 17957<br />
13 Grips 17959<br />
14 Barrel 19250<br />
15 Pump Handle 19251<br />
16 Pump Screw 19252<br />
17 Pump Screw O-ring 19253<br />
18 Body 19254<br />
19 Velocity Adjuster Wrench 19255<br />
20 Top Rail 19256<br />
21 Top Rail Screw 19257<br />
22 Trigger 19258<br />
23 Trigger Spring 19259<br />
24 Safety Slide 19260<br />
25 Bolt 19261<br />
26 Bolt O-ring 19262<br />
27 Velocity Adjuster 19263<br />
28 Velocity Adjuster O-ring 19264<br />
29 Main spring 19265<br />
30 Hammer Assembly 19266<br />
31 Sear Assembly (sear, pin, and spring) 19267<br />
32 Power Tube 19268<br />
33 Power Tube Nut 19269<br />
34 Power Tube Nut O-ring 19270<br />
35 Cupseal 19387<br />
36 Cupseal Nut 19394<br />
37 Valve Spring 19273<br />
38 Valve Housing 19274<br />
39 Detent 19275<br />
40 Trigger Set Screw 19276<br />
www.<strong>Wolfpack</strong><strong>Paintball</strong><strong>Team</strong>.com<br />
E M P I R E P A I N T B A L L . C O M 7
8<br />
www.<strong>Wolfpack</strong><strong>Paintball</strong><strong>Team</strong>.com<br />
E M P I R E P A I N T B A L L . C O M
<strong>Trracer</strong> Limited Lifetime Warranty<br />
LIMITED LIFETIME WARRANTY INFORMATION<br />
(ORIGINAL PURCHASE RECEIPT REQUIRED)<br />
KEE Action Sports (“KEE”) warrants that this product is free from defects in<br />
materials and workmanship for as long as it is owned by the original purchaser, subject to the<br />
terms and conditions set forth below. KEE Action Sports will repair or replace with the same or<br />
equivalent model, without charge, any of its products that have failed in normal use because<br />
of a defect in material or workmanship.<br />
KEE Action Sports is dedicated to providing you with products of the highest quality and the<br />
industry’s best product support available for satisfactory play.<br />
Purchaser should register product to activate warranty. Register your product by:<br />
1. Online at www.paintballsolutions.com<br />
2. Complete the product registration card (if applicable) and mail along with a copy of your<br />
receipt to <strong>Paintball</strong> Solutions, 11723 Lime Kiln Rd., Neosho, MO 64850.<br />
WHAT THIS WARRANTY DOES NOT COVER<br />
This warranty does not cover problems resulting from abuse, the unauthorized modification<br />
or alteration of our product, problems resulting from the addition of aftermarket products<br />
and scratches or minor superficial imperfections. Due to the nature of paintball products it<br />
is important that the product be maintained by the user as indicated in the product manual<br />
to remain in good operating condition. Your Limited Lifetime Warranty will be void if you<br />
fail to maintain the product as recommended in the product instruction manual. In addition,<br />
certain parts of a product may be subject to wear through regular usage. Replacement and<br />
repair of such parts is the responsibility of the user throughout the life of the product. These<br />
parts are not covered under the Limited Warranty. Examples of this type of part include (but<br />
are not limited to) goggle lens, straps, o-ring seals, cup seals, springs, ball detents, batteries,<br />
hoses, drive belts, gears and any part of a product subject to continuous impact from paintballs.<br />
Hydrotesting of air cylinders is not covered under this warranty.<br />
The Limited Lifetime Warranty also does not cover incidental or consequential damages.<br />
This warranty is the sole written warranty on KEE’s product and limits any implied warranty<br />
to the period that the product is owned by the original purchaser.<br />
Some states, provinces and nations do not allow the limitation of implied warranties or of<br />
E M P I R E P A I N T B A L L . C O M<br />
incidental or consequential damages, so the above limitations or exclusions may not apply<br />
to you. This warranty gives you specific legal rights and you may also have other rights which<br />
vary from state to state, province to province, nation to nation.<br />
If you should encounter any problems with your product and you have added aftermarket parts<br />
on your product, please test it with the original stock parts before sending it in. Always unload<br />
and remove air supply before shipping markers. Do not ship your air supply tank if it is not completely<br />
empty. Shipping a pressurized air supply tank is unsafe and unlawful. Remove all batteries<br />
from products prior to shipping.<br />
This Limited Warranty gives you specific legal rights, and you may also have other rights which vary<br />
from state to state. Some states do not allow the exclusion of incidental or consequential damages.<br />
For warranty parts, service or information contact:<br />
<strong>Paintball</strong> Solutions • www.paintballsolutions.com<br />
E-mail: tech@paintballsolutions.com • Phone: 1-800-220-3222<br />
Patent pending.<br />
PAINTBALL GUNS AND PAINTBALL GUN<br />
ACCESSORIES ARE NOT TOYS!<br />
- Careless use or misuse may result in serious bodily injury or death!<br />
- Eye protection designed for paintball must be worn by the user and all persons within range.<br />
- Not for sale to persons under 18 years of age.<br />
- Must be 18 years of age or older to operate or handle any paintball gun and paintball gun<br />
accessories without adult or parental supervision.<br />
- Read and understand all cautions, warnings, and operating manuals before using any paintball<br />
gun or paintball gun accessory.<br />
- Do not aim paintball gun at eyes or head of people or at animals.<br />
- <strong>Paintball</strong> guns are to be used with .68 caliber paintballs only.<br />
- Use common sense and have fun.<br />
www.<strong>Wolfpack</strong><strong>Paintball</strong><strong>Team</strong>.com<br />
Empire <strong>Trracer</strong> <strong>Manual</strong> Version 1.0 06/10.<br />
E
www.<strong>Wolfpack</strong><strong>Paintball</strong><strong>Team</strong>.com