Trracer Gun Manual - Wolfpack Paintball Team
Trracer Gun Manual - Wolfpack Paintball Team
Trracer Gun Manual - Wolfpack Paintball Team

Create successful ePaper yourself
Turn your PDF publications into a flip-book with our unique Google optimized e-Paper software.
Loader Installation<br />
• To install a loader check the feed elbow and loader to make sure<br />
they are free from debris and obstructions.<br />
• Press the loader into the opening of the feed elbow until it stops.<br />
• Align the loader so that the lid is pointing to the rear and the<br />
loader is parallel with the marker.<br />
• Clamp the loader in place by tightening the clamp arm; it may<br />
be necessary to adjust the clamp. Do not over tighten the loader.<br />
Feed Elbow Clamp Adjustment<br />
The feed elbow clamp may need adjustment for different<br />
types/brands of loaders. Adjust the clamp using a 3/32" Allen<br />
wrench; turning the screw clockwise will increase the clamping<br />
force, while turning in counter-clockwise will decrease the clamping<br />
force.<br />
Before Pressurizing your Marker<br />
Consult the place where you purchased your Empire marker, or a<br />
recognized and competent air smith, for instruction in the safe<br />
handling of compressed-air cylinders before purchasing or connecting<br />
one to your Empire marker.<br />
• Check to make sure that you and anyone within range are wearing<br />
eye protection designed specifically for paintball.<br />
• Double check that all screws are tightened and no parts are<br />
loose before installing your tank.<br />
• Ensure you have a barrel plug, barrel sock, or other specifically<br />
designed barrel-blocking device in place.<br />
• Make sure there are no paintballs in the marker.<br />
• Set marker to “safe mode”.<br />
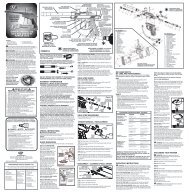
Pressurizing your Marker<br />
• While pointing the marker in a safe direction, locate the ASA (air<br />
source adapter). The <strong>Trracer</strong> ASA is located at the back of the body.<br />
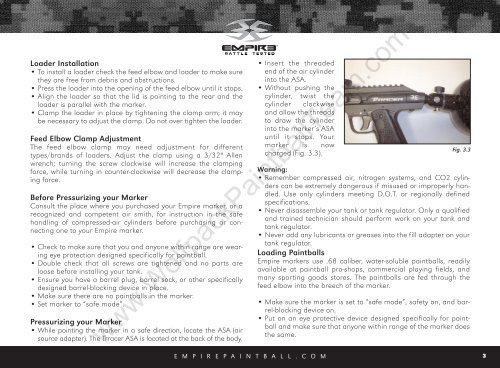
• Insert the threaded<br />
end of the air cylinder<br />
into the ASA.<br />
• Without pushing the<br />
cylinder, twist the<br />
cylinder clockwise<br />
and allow the threads<br />
to draw the cylinder<br />
into the marker’s ASA<br />
until it stops. Your<br />
marker is now<br />
charged (Fig. 3.3).<br />
Warning:<br />
• Remember compressed air, nitrogen systems, and CO2 cylinders<br />
can be extremely dangerous if misused or improperly handled.<br />
Use only cylinders meeting D.O.T. or regionally defined<br />
specifications.<br />
• Never disassemble your tank or tank regulator. Only a qualified<br />
and trained technician should perform work on your tank and<br />
tank regulator.<br />
• Never add any lubricants or greases into the fill adapter on your<br />
tank regulator.<br />
Loading <strong>Paintball</strong>s<br />
Empire markers use .68 caliber, water-soluble paintballs, readily<br />
available at paintball pro-shops, commercial playing fields, and<br />
many sporting goods stores. The paintballs are fed through the<br />
feed elbow into the breech of the marker.<br />
• Make sure the marker is set to “safe mode”, safety on, and barrel-blocking<br />
device on.<br />
• Put on an eye protective device designed specifically for paintball<br />
and make sure that anyone within range of the marker does<br />
the same.<br />
www.<strong>Wolfpack</strong><strong>Paintball</strong><strong>Team</strong>.com<br />
Fig. 3.3<br />
E M P I R E P A I N T B A L L . C O M 3