
Create successful ePaper yourself
Turn your PDF publications into a flip-book with our unique Google optimized e-Paper software.
Page 1 of 10<br />
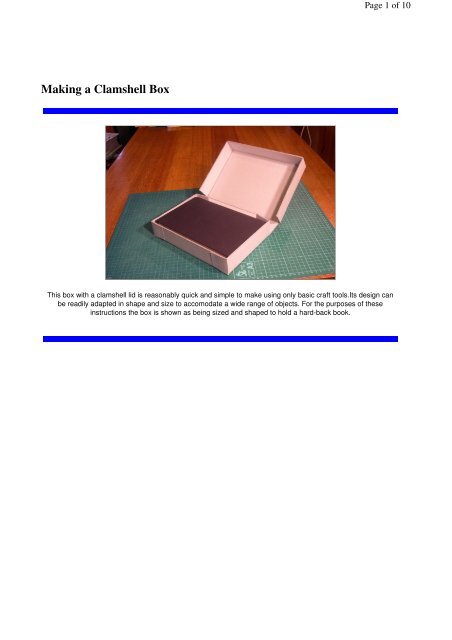
<strong>Making</strong> a <strong>Clamshell</strong> <strong>Box</strong><br />
This box with a clamshell lid is reasonably quick and simple to make using only basic craft tools.Its design can<br />
be readily adapted in shape and size to accomodate a wide range of objects. For the purposes of these<br />
instructions the box is shown as being sized and shaped to hold a hard-back book.
Page 2 of 10<br />
[1] The tools required are quite simple - a craft knife,<br />
a steel rule, a set-square or carpenter's square, a<br />
pencil and a bone folder for creasing and folding<br />
card. As a substitute for the bone folder a table knife<br />
with a rounded blade end, or a pate knife can be<br />
used. A cutting board or a pad of paper is needed to<br />
protect your work surface when cutting. To glue the<br />
box together you can use hot glue from a hot glue<br />
gun or archival-quality PVA adhesive, available from<br />
art shops and suppliers of archival materials. Hot<br />
glue dries quickly (in a matter of seconds) but this<br />
can be a disadvantage at times if you don't get things<br />
quite right in positioning the pieces to be joined. PVA<br />
glue gives you more time to adjust things yet still<br />
dries quite quickly. If you are not familiar with working<br />
with hot glue it might be better to use PVA, at least<br />
for your first boxes.<br />
[2] Begin by measuring the object for which the box<br />
is being made. Here we are using a book as a<br />
convenient object example. Measure the length,<br />
width and depth of the object, making sure that your<br />
measurements include any projecting bits and<br />
pieces. If the object has an irregular shape you will<br />
need to decide what you are going to measure as its<br />
length, width and depth.<br />
[3] Next you need to decide how much space you<br />
need to leave around the object when it is in the box.<br />
For example, will you be able to lift the object from<br />
the box by handling only the top of the object (it<br />
might have a handle), or will you need to be able to<br />
get your fingers or hands down to the base of the<br />
object to safely lift it? If it is a heavy or very fragile<br />
object, will two people have to be able to get their<br />
hands to the base of the object? If the object is<br />
fragile, there might need to be room for padding,<br />
particularly if the object is to travel.<br />
Once you have decided the clearance you need you<br />
can do the simple maths shown above to work out<br />
the inside length (l), inside width (w) and inside depth<br />
(d) of your box.<br />
[4] Another (and last) simple calculation before you<br />
start to draw lines on your board. To allow for the<br />
thickness of the board when you fold it into the shape<br />
of the box, you need to add twice the board thickness<br />
to the length l, and to the width w. You need to add<br />
one board thickness to the depth d. Thus the final<br />
marking out dimensions are as shown above.<br />
The material used to make the box is blue-grey<br />
archival corrugated cardboard. For most purposes<br />
the single-wall board is more than adequate. It is 3<br />
mm thick and is available in sheets of several sizes.<br />
So using this board, you need to add 6 mm to l and<br />
w, and 3 mm to d to give your marking out<br />
dimensions of L, W and D respectively.
Page 3 of 10<br />
[5] This picture shows what the marked-out box<br />
should look like, ready for cutting and folding. The<br />
dimensions L, W and D are indicated. Note that 3<br />
mm is trimmed off what will become the lower edge<br />
of each rear corner flap.<br />
[6] Go ahead with marking out, using ruler, pencil<br />
and set-square. Note that your piece of board must<br />
be large enough to include the lid which will be<br />
attached to your box.<br />
[7] Once you have marked out the box on the board,<br />
check that your object will fit inside the lines defining<br />
the bottom of the box. Do this BEFORE you start<br />
cutting! Always remember -- measure twice, cut<br />
once!<br />
[8] Once you've checked the fit of your object, go<br />
ahead with cutting the outline of the marked-out box.<br />
Use a steel rule and a sharp knife - and make sure<br />
your fingers holding the rule stay well clear of the<br />
knife blade!<br />
[9] Next we turn our attention to the front corners of<br />
the box. We want a flap at the front end of each side<br />
of the box which can be folded round the corner and<br />
glued to the front of the box. Start by marking a taper<br />
on the lower edge of one corner flap, as shown in the<br />
picture above. Here the outer end of the corner flap<br />
is tapered by 5 mm, but the amount of the taper is<br />
not critical. Cut the tapering edge of one flap. Repeat<br />
the process for the other corner flap.<br />
[10] Now you can start folding the box. Use a bone<br />
folder and a rule to score the line between the bottom<br />
of the box and one of the sides, as shown in the<br />
picture. Score the board firmly and quite deeply,<br />
without, of course, cutting it right through.
Page 4 of 10<br />
[11] Now fold up one side of the box as shown. [12] Score and fold up the other side. Your box<br />
should now look something like the picture above.<br />
[13] Before folding up the box front it needs to be<br />
trimmed to fit properly between the box sides. With a<br />
side folded up and held in position, carefully mark on<br />
the box front the point directly below the inner<br />
surface of the box side, as shown above.<br />
[14] Now draw a line perpendicular to the board edge<br />
and passing through the point you marked in step<br />
[13].<br />
[15] Cut carefully along the line marked in step [16]<br />
using a steel rule as a guide. Remove the triangular<br />
piece of board to give the result shown above. (You<br />
will probably have to make a small additional cut at<br />
the apex of the triangle to free the piece of board).<br />
Repeat this process for the other corner.<br />
[16] You can now score the fold between the box<br />
bottom and box front, as you did with the sides, and<br />
fold up the front as shown.
Page 5 of 10<br />
[17] Flatten out one side of the box again. Score the<br />
line marking the fold between the side and the rear<br />
corner flap. Fold the corner flap upwards,<br />
perpendicular to the box side.<br />
[18] Fold the side upwards again. The box should<br />
look something like the picture above. Repeat for the<br />
other rear corner flap.<br />
[19] Now to fold and glue the corners. The object<br />
here is to remove the inner wall and the corrugations<br />
of the front corner flap to leave only the outer wall to<br />
be folded around the corner and glued to the box<br />
front. To start, fold the box front up into position and<br />
hold the box side pressed against the front. The<br />
picture above should indicate the set-up. If you have<br />
enough fingers or can get some help, it is good to<br />
have a set-square or carpenter's square in position to<br />
ensure that the box front is perpendicular to the box<br />
bottom. When everything is in position, run the pencil<br />
along the edge of the box front to mark a line on the<br />
inside of the corner flap.<br />
[20] Now for the tricky bit. Using the knife and steel<br />
rule, carefully cut along the line you've just marked<br />
on the inside of the corner flap.You want to cut<br />
through only the inner wall of the board so take it<br />
slowly.
Page 6 of 10<br />
[21] Another tricky bit. Position the corner flap close<br />
to the edge of your table or bench. Hold the flap in<br />
position using the bone folder, as in the picture<br />
above. With the knife, begin to split the flap by cutting<br />
through the corrugations between the inner and outer<br />
walls. Be very careful to keep your fingers well away<br />
in case the knife slips. As you cut through the<br />
corrugations you will be able to peel back the inner<br />
wall. (NOTE: You might like to practice this splitting<br />
process on some scrap before tackling the corner<br />
flap.)<br />
[22] Here the splitting has progressed. The inner<br />
surface of the remaining wall of the corner flap can<br />
be cleaned up by gently scraping with the knife blade<br />
to remove traces of the corrugations.<br />
[23] After cleaning the flap should look something like<br />
this.<br />
[24] Next, lightly score the flap along the line where it<br />
meets the box side, as shown.<br />
[25] With the box side and box front raised to their<br />
correct positions fold the corner flap on to the box<br />
front. Glue it in place using PVA adhesive or hot<br />
glue.<br />
[26] The completed corner should look like this.<br />
Repeat the process for the other front corner.
Page 7 of 10<br />
[27] This is the completed basic box. [28] Now the acid test . Check to see if your object<br />
fits in the box.<br />
[29] Success! [30] Now for the lid. With one of the rear corner flaps<br />
positioned at right angles to the box side, hold a<br />
piece of scrap board against the flap and make a<br />
pencil mark along the base of the scrap board.<br />
Repeat for the other side of the box.<br />
[31] Rule a line between the two marks made in the<br />
previous step. This line marks the fold between the<br />
bottom of the box and the back of the box, as shown<br />
above.<br />
[32] Use the bone folder to score the line drawn in<br />
the previous step.
Page 8 of 10<br />
[33] Fold the box upwards along the scored line as<br />
shown above.<br />
[34] With the box raised until the rear corner flaps are<br />
flat against the back of the box, position a piece of<br />
scrap board against the box side as shown above<br />
and make a pencil mark at the base of the scrap<br />
board. Repeat for the other side of the box.<br />
[35] Rule a line between the two marks made in the<br />
previous step. This line marks the fold between the<br />
back of the box and the top of the lid, as shown<br />
above.<br />
[36] Now trim the ends of the back of the box as<br />
shown above. Do not extend the cut past the line<br />
drawn in the previous step.<br />
[37] Score the fold between the back of the box and<br />
the top of the lid. Fold the box over and down on to<br />
the board as shown in the picture.<br />
[38] With the box pushed firmly against the back of<br />
the box use a piece of scrap board as a spacer to<br />
mark points a board thickness away from the front<br />
and sides of the box.
Page 9 of 10<br />
[39] Draw a line between the marks made in the<br />
previous step. The result should look something like<br />
the picture above.<br />
[40] Now fold the box back out of the way and mark<br />
out the lid using ruler and set-aquare, just as you did<br />
for the original box. In this case, the depth of the lid is<br />
equal to the measured depth of the box plus 3 mm.<br />
[41] Cut round the outline of the lid and do a final<br />
check of the fit of the lid and box as shown above.<br />
[42] Go ahead and cut and fold the lid and its corner<br />
flaps just as you did for the box itself. The result<br />
should be something like that shown in the picture<br />
above.<br />
[43] Glue the front corner flaps into position and<br />
position your object in the box.<br />
[44] Fingers crossed! A final check of the fit of the lid.
The final product, with closed lid.<br />
Page 10 of 10