Screw pumps acg/ucg 7
Screw pumps acg/ucg 7
Screw pumps acg/ucg 7

Create successful ePaper yourself
Turn your PDF publications into a flip-book with our unique Google optimized e-Paper software.
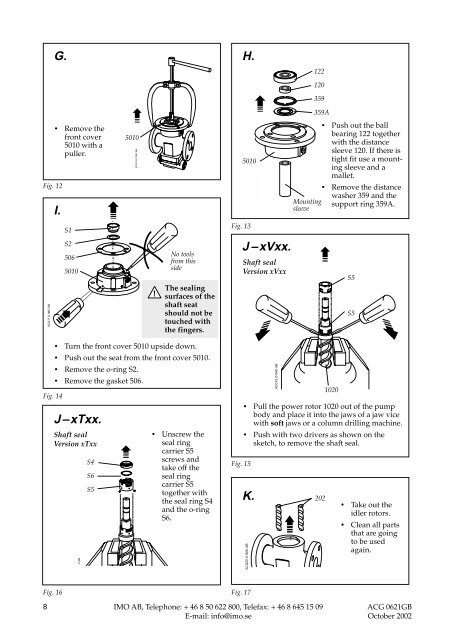
G. H.122120359359AFig. 12• Remove thefront cover5010 with apuller.I.5010ACG15 © IMO AB5010ACG16 ' IMO AB• Push out the ballbearing 122 togetherwith the distancesleeve 120. If there istight fit use a mountingsleeve and amallet.• Remove the distancewasher 359 and theMounting support ring 359A.sleeveS1Fig. 13ACG17 © IMO ABS25065010!No toolsfrom thissideThe sealingsurfaces of theshaft seatshould not betouched withthe fingers.J –xVxx.Shaft sealVersion xVxxS5S5• Turn the front cover 5010 upside down.• Push out the seat from the front cover 5010.• Remove the o-ring S2.• Remove the gasket 506.Fig. 14J–xTxx.Shaft sealVersion xTxxO ABS4S6S5• Unscrew theseal ringcarrier S5screws andtake off theseal ringcarrier S5together withthe seal ring S4and the o-ringS6.Fig. 15K.ACG20 © IMO ABACG18 © IMO AB• Pull the power rotor 1020 out of the pumpbody and place it into the jaws of a jaw vicewith soft jaws or a column drilling machine.• Push with two drivers as shown on thesketch, to remove the shaft seal.2021020• Take out theidler rotors.• Clean all partsthat are goingto be usedagain.Fig. 16Fig. 178 IMO AB, Telephone: + 46 8 50 622 800, Telefax: + 46 8 645 15 09ACG 0621GBE-mail: info@imo.seOctober 2002