Aquatec Wet Area Flooring - The Building Materials Mall
Aquatec Wet Area Flooring - The Building Materials Mall
Aquatec Wet Area Flooring - The Building Materials Mall

Create successful ePaper yourself
Turn your PDF publications into a flip-book with our unique Google optimized e-Paper software.
AQUATEC WET AREA FLOORING<br />
INSTALLATION MANUAL<br />
AUSTRALIA<br />
AUGUST 2005
CONTENTS<br />
1 INTRODUCTION 2<br />
2 SAFE WORKING PRACTICES 4<br />
Warning 4<br />
Recommended safe working practices 4<br />
Working instructions 4<br />
Hole-forming 4<br />
Storage and handling 4<br />
Quality 4<br />
3 DESIGN 5<br />
General 5<br />
Responsibility 5<br />
Loading 5<br />
4 FRAMING 5<br />
General 5<br />
Timber framing 5<br />
Steel framing 5<br />
Tolerances 5<br />
5 INSTALLATION 6<br />
Panel layout 6<br />
Installation steps 6<br />
6 PRODUCT INFORMATION 9<br />
General 9<br />
Product mass 9<br />
Durability 9<br />
Resistance to fire 9<br />
Membranes and finishes 9<br />
Maintenance 9<br />
7 WARRANTY 11<br />
WE VALUE YOUR FEEDBACK<br />
To continuously improve the development of our products and<br />
systems, we value your input. Please send any suggestions,<br />
including your name, contact details, and relevant sketches to:<br />
Ask James Hardie <br />
Fax 02 9638 9535<br />
literaturefeedback@jameshardie.com.au<br />
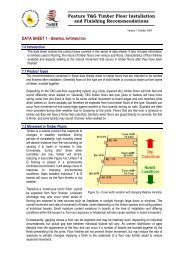
1 INTRODUCTION<br />
<strong>The</strong> James Hardie AquaTec wet area flooring is a 19mm thick alternative<br />
product to timber, particle board or plywood flooring and is an excellent<br />
substrate for ceramic tiles in wet and dry areas.<br />
AquaTec wet area flooring is an equal alternative to compressed fibre<br />
cement which means that full floor waterproofing is not required outside<br />
of the enclosed shower area under the new waterproofing requirements.<br />
AquaTec wet area flooring has been appraised by CSIRO (Technical<br />
Assessment 318, July 2005) as satisfying the relevant requirements for<br />
use in wet areas)<br />
■ Sheets are tongue and grooved on the long edges for ease of<br />
installation.<br />
■ Suitable for 450mm maximum floor joist centres.<br />
■ Lighter than conventional compressed fibre cement.<br />
■ Much faster and easier to cut than conventional compressed fibre<br />
cement.<br />
■ Can be nailed easily by nail gun or by hand.<br />
■ Resistant to moisture, rotting, cracking and fire when installed and<br />
maintained as directed.<br />
Tile adhesive<br />
Mortar bed<br />
Sealant bead<br />
Tiles<br />
Tongue and groove joint AquaTec wet area flooring<br />
<strong>The</strong> specifier or other responsible party for the project must ensure the<br />
information and details in this manual are appropriate for the intended<br />
application and that specific design and detailing is undertaken for areas<br />
which fall outside the scope of this documentation.<br />
This manual covers the use of AquaTec wet are flooring as an internal<br />
structural flooring substrate in domestic applications for ceramic tile<br />
finishes over lightweight timber or steel floor joists.<br />
For wet area construction this manual must be read in conjunction with<br />
James Hardie’s wet area construction Design Manual which provides wet<br />
area waterproofing requirements and details.<br />
For commercial or external decking applications refer to James Hardie’s:<br />
■ HardiPanel ® compressed sheet internal flooring Installation Manual<br />
■ HardiPanel ® compressed sheet external decking construction Technical<br />
Specification<br />
Make sure your information is up to date<br />
When specifying or installing James Hardie products, ensure you have the<br />
current manual. If you’re not sure you do, or you need more information,<br />
visit www.jameshardie.com.au or Ask James Hardie on 13 11 03.
TABLE 1<br />
JAMES HARDIE AQUATEC WET AREA FLOORING<br />
PRODUCT DESCRIPTION<br />
TABLE 2<br />
PRODUCT / ACCESSORIES / TOOLS<br />
COMPONENTS SUPPLIED BY JAMES HARDIE<br />
19mm<br />
James Hardie AquaTec wet area flooring<br />
Low density fibre cement structural flooring. Long edges have<br />
tongue and groove feature for easy jointing. Tongue-and-groove on<br />
two long edges.<br />
Size: 19 x 900 x 1800mm<br />
ACCESSORIES DESCRIPTION ACCESSORIES DESCRIPTION<br />
HardiBlade ® saw blade James Hardie joint sealant<br />
Ø 185mm poly diamond blade, for fast, clean cutting Polyurethane joint sealant for sheet jointing in<br />
of James Hardie fibre cement. wet areas.<br />
HardiDrive ® screw<br />
For fastening to 0.75mm to 1.6mm BMT steel<br />
frames. Class 3 finish.<br />
Length 40mm<br />
COMPONENTS NOT SUPPLIED BY JAMES HARDIE<br />
James Hardie recommends the following products for use in conjunction with its AquaTec wet area flooring. James Hardie does not supply these products<br />
and does not provide a warranty for their use. Please contact the component manufacturer for information on their warranties and further information on their<br />
products.<br />
ACCESSORIES DESCRIPTION ACCESSORIES DESCRIPTION<br />
Nails Gun nailer<br />
■ 2.8 x 50 galv fibre cement nails Suitable pneumatic or coil gun nailer.<br />
■ 50 mm galv D Head gun nails<br />
■ 50mm galv T Head finishing nails (brad nails)<br />
Screws Cordless drill<br />
■ Nº 10 x 45mm self embedding head for screwing Recommended tool for screw fixing the AquaTec<br />
to timber. Class 3 finish. wet area flooring to steel joists.<br />
Construction adhesive Spatula<br />
Suitable construction adhesive for gluing panels For removal of excess adhesive from the panel<br />
to joists. surface (shown with narrower blade).<br />
AQUATEC WET AREA FLOORING INSTALLATION MANUAL AUGUST 2005 3
2 SAFE WORKING PRACTICES<br />
WARNING - DO NOT BREATHE DUST AND CUT<br />
ONLY IN WELL VENTILATED AREA<br />
James Hardie products contain sand, a source of respirable crystalline<br />
silica which is considered by some international authorities to be a cause<br />
of cancer from some occupational sources. Breathing excessive amounts<br />
of respirable silica dust can also cause a disabling and potentially fatal<br />
lung disease called silicosis, and has been linked with other diseases.<br />
Some studies suggest smoking may increase these risks. During<br />
installation or handling: (1) work in outdoor areas with ample ventilation;<br />
(2) minimise dust when cutting by using either 'score and snap' knife,<br />
fibre cement shears or, where not feasible, use a HardiBlade ® saw blade<br />
and dust-reducing circular saw attached to a HEPA vacuum; (3) warn<br />
others in the immediate area to avoid breathing dust; (4) wear a properlyfitted,<br />
approved dust mask or respirator (e.g. P1 or P2) in accordance<br />
with applicable government regulations and manufacturer instructions to<br />
further limit respirable silica exposures. During clean-up, use HEPA<br />
vacuums or wet cleanup methods - never dry sweep. For further<br />
information, refer to our installation instructions and Material Safety Data<br />
Sheets available at www.jameshardie.com.au. FAILURE TO ADHERE<br />
TO OUR WARNINGS, MATERIAL SAFETY DATA SHEETS, AND<br />
INSTALLATION INSTRUCTIONS MAY LEAD TO SERIOUS PERSONAL<br />
INJURY OR DEATH.<br />
Additional installation information, warranties, and warnings are available<br />
at www.jameshardie.com.au.<br />
JAMES HARDIE RECOMMENDED SAFE WORKING PRACTICES<br />
CUTTING OUTDOORS<br />
1. Position cutting station so wind will blow dust away from the user or<br />
others in working area.<br />
2. Use a dust reducing circular saw equipped with HardiBlade ® saw blade<br />
and HEPA vacuum extraction.<br />
SANDING/DRILLING/OTHER MACHINING<br />
When sanding, drilling or machining you should always wear a P1 or P2<br />
dust mask and warn others in the immediate area.<br />
IMPORTANT NOTES<br />
1. NEVER use a power saw indoors.<br />
2. NEVER use a circular saw blade that does not carry the HardiBlade ® logo.<br />
3. NEVER dry sweep - Use wet suppression or HEPA vacuum.<br />
4. NEVER use grinders.<br />
5. ALWAYS follow tool manufacturers’ safety recommendations.<br />
P1 or P2 respirators should be used in conjunction with above cutting<br />
practices to further reduce dust exposures. Additional exposure information<br />
is available at www.jameshardie.com.au to help you determine the most<br />
appropriate cutting method for your job requirements. If concern still exists<br />
about exposure levels or you do not comply with the above practices, you<br />
should always consult a qualified industrial hygienist or contact James<br />
Hardie for further information.<br />
4 AQUATEC WET AREA FLOORING INSTALLATION MANUAL AUGUST 2005<br />
WORKING INSTRUCTIONS<br />
Refer to recommended safe working practices before starting any cutting<br />
or machining of product.<br />
HardiBlade ® saw blade<br />
<strong>The</strong> HardiBlade ® saw blade used with a dust-reducing saw is ideal for fast,<br />
clean cutting of James Hardie fibre cement products. A dust-reducing saw<br />
uses a dust deflector or a dust collector which can be connected to a<br />
vacuum system. When sawing, clamp a straight-edge to the sheet as a<br />
guide and run the saw base plate along the straight edge when making<br />
the cut.<br />
HOLE-FORMING<br />
For smooth clean cut circular holes:<br />
■ Mark the centre of the hole on the sheet.<br />
■ Pre-drill a pilot hole.<br />
■ Using the pilot hole as a guide, cut the hole to the appropriate diameter<br />
with a hole saw fitted to a heavy duty electric drill.<br />
For irregular holes:<br />
■ Small rectangular or circular holes can be cut by drilling a series of small<br />
holes around the perimeter of the hole then tapping out the waste piece<br />
from the sheet face.<br />
■ Tap carefully to avoid damage to sheets, ensuring the sheet edges are<br />
properly supported.<br />
STORAGE AND HANDLING<br />
To avoid damage, all James Hardie building products should be stored<br />
with edges and corners of the sheets protected from chipping.<br />
James Hardie building products must be installed in a dry state and<br />
protected from weather during transport and storage. <strong>The</strong> product must<br />
be laid flat under cover on a smooth level surface clear of the ground to<br />
avoid exposure to water, moisture, etc.<br />
QUALITY<br />
James Hardie conducts stringent quality checks to ensure any product<br />
manufactured falls within our quality spectrum. It is the responsibility of<br />
the builder to ensure the product meets aesthetic requirements before<br />
installation. James Hardie will not be responsible for rectifying obvious<br />
aesthetic surface variations following installation.
3 DESIGN<br />
GENERAL<br />
All design and construction must comply with the appropriate<br />
requirements of the current <strong>Building</strong> Code of Australia (BCA) and other<br />
applicable regulations and standards.<br />
RESPONSIBILITY<br />
<strong>The</strong> specifier or other party responsible for the project must ensure that<br />
the details in this specification are appropriate for the intended application<br />
and that additional detailing is performed for specific design or any areas<br />
that fall outside the scope of this specification.<br />
LOADING<br />
<strong>The</strong> James Hardie flooring systems in this manual have been designed to<br />
satisfy the requirements for domestic and residential activities (Category A)<br />
of Table 3.1 of AS/NZS 1170.1 - ‘Structural design actions - Permanent,<br />
imposed and other actions’.<br />
NOTE<br />
<strong>The</strong> code specifies higher loads in areas subject to crowd loading, storage<br />
of materials and heavy wheel loads. For these application James Hardie<br />
recommends the use of HardiPanel compressed. For more information<br />
see the HardiPanel compressed flooring Installation Manual.<br />
4 FRAMING<br />
GENERAL<br />
AquaTec wet area flooring may be fixed to timber or steel joists installed<br />
at 450mm centres. Floor joists must be 45mm wide as a minimum to<br />
enable adequate jointing of panels.<br />
TIMBER FRAMING<br />
Use of timber framing must be in accordance with AS 1684 - ‘Residential<br />
timber-framed construction’ and the framing manufacturer’s specifications.<br />
Use only seasoned timber. Unseasoned timber must not be used because<br />
it is prone to shrinkage and can cause sheets and frames to move.<br />
‘Timber used for house construction must have the level of durability<br />
appropriate for the relevant climate and expected service life and<br />
conditions including exposure to insect attacks or to moisture, which<br />
could cause decay.’<br />
Reference AS 1684.2.<br />
STEEL FRAMING<br />
Use of steel framing must be in accordance with AS 3623 - ‘Domestic<br />
metal framing’ and the framing manufacturers specifications. Framing<br />
members must be in the range 0.55mm to 1.6mm BMT (base metal<br />
thickness).<br />
<strong>The</strong> steel framing must have the appropriate level of durability required to<br />
prevent corrosion.<br />
TOLERANCES<br />
In order to achieve an acceptable finish, it is imperative that framing is<br />
straight and true. Framing tolerances must comply with the relevant<br />
codes and the manufacturer’s specifications.<br />
Floor joists must be<br />
reasonably level.<br />
FIGURE 1 FRAME PREPARATION<br />
450mm<br />
max. joist<br />
spacings<br />
AQUATEC WET AREA FLOORING INSTALLATION MANUAL AUGUST 2005 5
5 INSTALLATION<br />
PANEL LAYOUT<br />
AquaTec wet area flooring is installed perpendicular to the direction of the<br />
floor joists with the short sheet edges being butt jointed on joists.<br />
See Figure 2.<br />
Staggered sheet layout<br />
(brick pattern)<br />
FIGURE 2 PANEL LAYOUT<br />
Being 19mm thick, AquaTec wet area flooring can be combined with<br />
traditional particleboard or plywood flooring substrates. This is typically<br />
done by installing AquaTec wet area flooring in the intended wet areas as<br />
shown in Figure 3a.<br />
AquaTec wet<br />
area flooring<br />
WET<br />
AREA<br />
Trim back of AquaTec wet<br />
area flooring where adjoining<br />
particleboard or plywood flooring.<br />
DRY<br />
AREA<br />
NOTE: Trimmers must be provided at joint under a wall.<br />
6 AQUATEC WET AREA FLOORING INSTALLATION MANUAL AUGUST 2005<br />
Particle board or<br />
plywood flooring<br />
Extent of wet area<br />
Install trimmers to support<br />
sheet edges where adjoining<br />
particleboard or plywood<br />
flooring. Alternatively, refer<br />
to Figure 3b.<br />
FIGURE 3A COMBINING WITH MANUFACTURED TIMBER FLOORING<br />
Adhesive fill transition joint as an alternative<br />
to trimmers supporting joint<br />
AquaTec wet area flooring Particle board or plywood<br />
FIGURE 3B ALTERNATIVE JOINTING DETAIL<br />
INSTALLATION STEPS<br />
<strong>The</strong> following illustrations show how to install the AquaTec wet area<br />
flooring.<br />
STEP 1<br />
Apply continuous bead<br />
of construction adhesive<br />
to joists.<br />
FIGURE 4 CONSTRUCTION ADHESIVE<br />
FIGURE 5 FIXING 1ST PANEL<br />
TABLE 3<br />
FASTENER SELECTION<br />
PRODUCT TIMBER STEEL JOISTS STEEL JOISTS<br />
JOISTS 0.75 - 1.6mm OVER 1.6mm<br />
BMT BMT<br />
2.8 x 50mm FC<br />
nails<br />
✓<br />
50mm D Head<br />
gun nails<br />
✓<br />
50mm T Head<br />
finishing nails<br />
(brad nails)<br />
✓<br />
40mm HardiDrive<br />
screw<br />
✓<br />
40mm CSK self<br />
drilling screws<br />
✓ *<br />
NOTE: All fasteners must have a Class 3 finish minimum.<br />
* Refer to manufacturer’s specifications for suitability.<br />
STEP 2<br />
Install first sheet fixing as<br />
shown on Figure 6.<br />
NOTE:<br />
<strong>The</strong> final row of fasteners<br />
adjacent to the joint<br />
should be installed later.
Groove end<br />
12mm min.<br />
fastener edge<br />
distance<br />
200mm<br />
max.<br />
FIGURE 6 FASTENER LAYOUT<br />
FIGURE 7 JOINING 2ND PANEL<br />
STEP 4<br />
Nail second<br />
sheet in place.<br />
FIGURE 8 NAILING 2ND PANEL<br />
50mm min.<br />
corner<br />
distance<br />
Joists at<br />
450mm<br />
max. centres<br />
25mm min.<br />
distance from<br />
tongue and<br />
groove<br />
Tongue end<br />
STEP 3<br />
Install second sheet<br />
using tongue and<br />
groove joint.<br />
Nail<br />
spacer<br />
Construction<br />
adhesive<br />
FIGURE 9 SEALING PANEL EDGES<br />
FIGURE 10 JOINING 3RD PANEL<br />
STEP 7<br />
Fill tongue and groove and<br />
butt joints with James Hardie<br />
joint sealant.<br />
See Figure 12<br />
FIGURE 11 SEALING THE JOINT<br />
2mm<br />
gap<br />
STEP 5<br />
Install two 2mm nails<br />
as shown to act as<br />
spacers at butt joint<br />
for the next sheet.<br />
Construction<br />
adhesive<br />
STEP 6<br />
Install next sheet joining<br />
at tongue and creating<br />
butt joint on joist as<br />
shown in Figure 12.<br />
Remove spacing nails<br />
once sheet is installed.<br />
AQUATEC WET AREA FLOORING INSTALLATION MANUAL AUGUST 2005 7
2mm gap filled<br />
with James Hardie<br />
joint sealant<br />
<strong>Flooring</strong><br />
panel<br />
FIGURE 12 BUTT JOINT<br />
FIGURE 13 REMOVING EXCESS SEALANT<br />
STEP 9<br />
Apply James Hardie<br />
joint sealant to the<br />
head of fasteners.<br />
FIGURE 14 SEALING OVER FASTENERS<br />
12mm min.<br />
edge distance<br />
Two continuous<br />
beads of construction<br />
adhesive<br />
50mm nails<br />
Joist<br />
STEP 8<br />
Remove excess sealant with spatula.<br />
8 AQUATEC WET AREA FLOORING INSTALLATION MANUAL AUGUST 2005<br />
FIGURE 15 CLEANING SURFACE<br />
STEP 10<br />
Clean surface with<br />
damp cloth. Install tiles<br />
or other surface finish.
6 PRODUCT INFORMATION<br />
GENERAL<br />
AquaTec wet area flooring is a cellulose fibre reinforced cement building<br />
product. <strong>The</strong> basic composition is Portland cement, ground sand,<br />
cellulose fibre and water.<br />
AquaTec wet area flooring is manufactured to AS/NZS 2908.2 ’Cellulose-<br />
Cement Products Part 2: Flat Panels’ (ISO 8336 ‘Fibre Cement Flat<br />
Panels’).<br />
AquaTec wet area flooring is classified Type B, Category 2 in accordance<br />
with AS/NZS 2908.2.<br />
For Material Safety Data Panels (MSDS) visit www.jameshardie.com.au or<br />
Ask James Hardie on 13 11 03.<br />
PRODUCT MASS<br />
Based on equilibrium moisture content the approximate mass of AquaTec<br />
wet area flooring is 22.5kg/m2.<br />
DURABILITY<br />
AquaTec wet area flooring has demonstrated resistance to permanent<br />
moisture induced deterioration (rotting) by passing the following tests in<br />
accordance with AS/NZS2908.2:<br />
■ Water permeability (Clause 8.2.2)<br />
■ Warm water (Clause 8.2.4)<br />
■ Heat rain (Clause 6.5)<br />
■ Soak dry (Clause 8.2.5)<br />
RESISTANCE TO FIRE<br />
AquaTec wet area flooring is suitable where non-combustible materials<br />
are required in accordance with C1.12 of the <strong>Building</strong> Code of Australia.<br />
AquaTec wet area flooring has the following early fire hazard indices<br />
(tested to AS 1530 Part 3).<br />
EARLY FIRE HAZARD INDICES<br />
Ignition index 0<br />
Flame spread index 0<br />
Heat evolved index 0<br />
Smoke developed index 0 - 1<br />
MEMBRANES AND FINISHES<br />
For wet area applications this manual must be read in conjunction with<br />
James Hardie’s wet area construction Design Manual which provides wet<br />
area waterproofing requirements and details. <strong>The</strong> waterproofing<br />
requirements of AS 3740 must be met.<br />
Once AquaTec wet area flooring has been fixed in place, install floor tiles<br />
in accordance with tile manufacturer’s specifications within 3 months of<br />
installation.<br />
MAINTENANCE<br />
Regular cleaning and maintenance of the finished surface, joints,<br />
junctions, penetrations etc must be carried out at regular intervals to<br />
maintain waterproofing to meet the objectives of AS 3740 and as per the<br />
requirements of the relevant component manufacturer.<br />
AQUATEC WET AREA FLOORING INSTALLATION MANUAL AUGUST 2005 9
NOTES<br />
10 AQUATEC WET AREA FLOORING INSTALLATION MANUAL AUGUST 2005
7 WARRANTY<br />
James Hardie Australia Pty Limited ("James Hardie") warrants for a period<br />
of 10 years from the date of purchase that the AquaTec wet area flooring<br />
(the "Product"), will be free from defects due to defective factory<br />
workmanship or materials and, subject to compliance with the conditions<br />
below, will be resistant to cracking, rotting and fire to the extent set out in<br />
James Hardie’s relevant published literature current at the time of<br />
installation. James Hardie warrants for a period of 12 months from the<br />
date of purchase that the accessories supplied by James Hardie will be<br />
free from defects due to defective factory workmanship<br />
or materials.<br />
Nothing in this document shall exclude or modify any legal rights a<br />
customer may have under the Trade Practices Act or otherwise which<br />
cannot be excluded or modified at law.<br />
CONDITIONS OF WARRANTY<br />
<strong>The</strong> warranty is strictly subject to the following conditions:<br />
a) James Hardie will not be liable for breach of warranty unless the<br />
claimant provides proof of purchase and makes a written claim either<br />
within 30 days after the defect would have become reasonably<br />
apparent or, if the defect was reasonably apparent prior to<br />
installation, then the claim must be made prior to installation;<br />
b) this warranty is not transferable;<br />
c) the Product must be installed and maintained strictly in accordance<br />
with the relevant James Hardie literature current at the time of<br />
installation and must be installed in conjunction with the components<br />
or products specified in the literature. Further, all other products,<br />
including coating and jointing systems, applied to or used in<br />
conjunction with the Product must be applied or installed and<br />
maintained strictly in accordance with the relevant manufacturer’s<br />
instructions and good trade practice;<br />
d) the project must be designed and constructed in strict compliance<br />
with all relevant provisions of the current BCA, regulations and<br />
standards;<br />
e) the claimant’s sole remedy for breach of warranty is (at James<br />
Hardie’s option) that James Hardie will either supply replacement<br />
product, rectify the affected product or pay for the cost of the<br />
replacement or rectification of the affected product;<br />
f) James Hardie will not be liable for any losses or damages (whether<br />
direct or indirect) including property damage or personal injury,<br />
consequential loss, economic loss or loss of profits, arising in<br />
contract or negligence or howsoever arising. Without limiting the<br />
foregoing James Hardie will not be liable for any claims, damages or<br />
defects arising from or in any way attributable to poor workmanship,<br />
poor design or detailing, settlement or structural movement and/or<br />
movement of materials to which the Product is attached, incorrect<br />
design of the structure, acts of God including but not limited to<br />
earthquakes, cyclones, floods or other severe weather conditions or<br />
unusual climatic conditions, efflorescence or performance of<br />
paint/coatings applied to the Product, normal wear and tear, growth<br />
of mould, mildew, fungi, bacteria, or any organism on any Product<br />
surface or Product (whether on the exposed or unexposed surfaces);<br />
g) all warranties, conditions, liabilities and obligations other than those<br />
specified in this warranty are excluded to the fullest extent allowed<br />
by law;<br />
h) if meeting a claim under this warranty involves re-coating of<br />
Products, there may be slight colour differences between the original<br />
and replacement Products due to the effects of weathering and<br />
variations in materials over time.<br />
DISCLAIMER<br />
<strong>The</strong> recommendations in James Hardie’s literature are based on good<br />
building practice, but are not an exhaustive statement of all relevant<br />
information and are subject to conditions (c), (d), (f) and (g) above.<br />
Further, as the successful performance of the relevant system depends<br />
on numerous factors outside the control of James Hardie (eg quality of<br />
workmanship and design) James Hardie shall not be liable for the<br />
recommendations in that literature and the performance of the relevant<br />
system, including its suitability for any purpose or ability to satisfy the<br />
relevant provisions of the <strong>Building</strong> Code of Australia ("BCA"), regulations<br />
and standards.<br />
AQUATEC WET AREA FLOORING INSTALLATION MANUAL AUGUST 2005 11
COPYRIGHT AUGUST 2005<br />
© JAMES HARDIE AUSTRALIA PTY LTD ABN 12 084 635 558<br />
TM AND ® DENOTES A TRADEMARK OR REGISTERED MARK<br />
OWNED BY JAMES HARDIE INTERNATIONAL FINANCE BV.