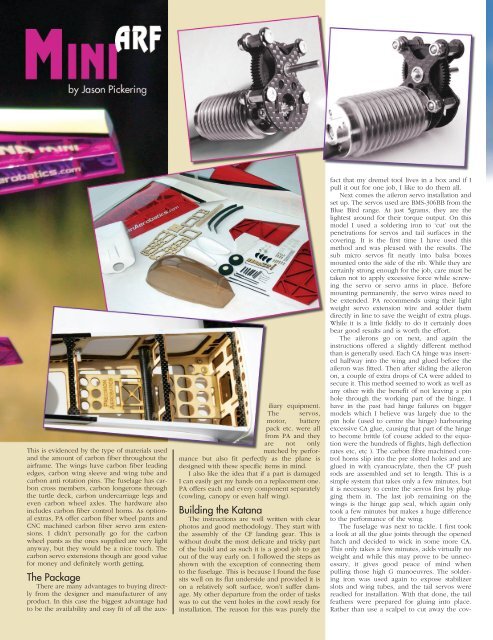
This is evidenced by the type of materials usedand the amount of carbon fiber throughout theairframe. The wings have carbon fiber leadingedges, carbon wing sleeve and wing tube andcarbon anti rotation pins. The fuselage has carboncross members, carbon longerons throughthe turtle deck, carbon undercarriage legs andeven carbon wheel axles. The hardware alsoincludes carbon fiber control horns. As optionalextras, PA offer carbon fiber wheel pants andCNC machined carbon fiber servo arm extensions.I didn’t personally go for the carbonwheel pants as the ones supplied are very lightanyway, but they would be a nice touch. Thecarbon servo extensions though are good valuefor money and definitely worth getting.The PackageThere are many advantages to buying directlyfrom the designer and manufacturer of anyproduct. In this case the biggest advantage hadto be the availability and easy fit of all the auxiliaryequipment.The servos,motor, batterypack etc. were allfrom PA and theyare not onlymatched by performancebut also fit perfectly as the plane isdesigned with these specific items in mind.I also like the idea that if a part is damagedI can easily get my hands on a replacement one.PA offers each and every component separately(cowling, canopy or even half wing).Building the <strong>Katana</strong>The instructions are well written with clearphotos and good methodology. They start withthe assembly of the CF landing gear. This iswithout doubt the most delicate and tricky partof the build and as such it is a good job to getout of the way early on. I followed the steps asshown with the exception of connecting themto the fuselage. This is because I found the fusesits well on its flat underside and provided it ison a relatively soft surface, won’t suffer damage.My other departure from the order of taskswas to cut the vent holes in the cowl ready forinstallation. The reason for this was purely thefact that my dremel tool lives in a box and if Ipull it out for one job, I like to do them all.Next comes the aileron servo installation andset up. The servos used are BMS-306BB from theBlue Bird range. At just 5grams, they are thelightest around for their torque output. On thismodel I used a soldering iron to ‘cut’ out thepenetrations for servos and tail surfaces in thecovering. It is the first time I have used thismethod and was pleased with the results. Thesub micro servos fit neatly into balsa boxesmounted onto the side of the rib. While they arecertainly strong enough for the job, care must betaken not to apply excessive force while screwingthe servo or servo arms in place. Beforemounting permanently, the servo wires need tobe extended. PA recommends using their lightweight servo extension wire and solder themdirectly in line to save the weight of extra plugs.While it is a little fiddly to do it certainly doesbear good results and is worth the effort.The ailerons go on next, and again theinstructions offered a slightly different methodthan is generally used. Each CA hinge was insertedhalfway into the wing and glued before theaileron was fitted. Then after sliding the aileronon, a couple of extra drops of CA were added tosecure it. This method seemed to work as well asany other with the benefit of not leaving a pinhole through the working part of the hinge. Ihave in the past had hinge failures on biggermodels which I believe was largely due to thepin hole (used to centre the hinge) harbouringexcessive CA glue, causing that part of the hingeto become brittle (of course added to the equationwere the hundreds of flights, high deflectionrates etc, etc ). The carbon fibre machined controlhorns slip into the pre slotted holes and areglued in with cyanoacrylate, then the CF pushrods are assembled and set to length. This is asimple system that takes only a few minutes, butit is necessary to centre the servos first by pluggingthem in. The last job remaining on thewings is the hinge gap seal, which again onlytook a few minutes but makes a huge differenceto the performance of the wing.The fuselage was next to tackle. I first tooka look at all the glue joints through the openedhatch and decided to wick in some more CA.This only takes a few minutes, adds virtually noweight and while this may prove to be unnecessary,it gives good peace of mind whenpulling those high G manoeuvres. The solderingiron was used again to expose stabilizerslots and wing tubes, and the tail servos werereadied for installation. With that done, the tailfeathers were prepared for gluing into place.Rather than use a scalpel to cut away the cov-
ering on the fin andstabilizer, I used ahot wire made from apaper clip and heatedwith a cigarette lighter.This method ensures nodamage is made to the balsaand leaves a nicely trimmed cut.I then used the wing tube insertedthrough the fuselage to line the stabilizer upwith for both directions and glued with PVA.The fin was glued on at the same time and leftover night. Once set the elevator was attachedusing the same method as the ailerons alongwith the control horn. The last control surfaceto attach was the rudder.The undercarriage was then attached alongwith the tail skid. After this part of the set up wascomplete the motor cage was assembled and themotor and ESC were installed. The motor is the“Blue Shark” also available directly from<strong>Precision</strong> <strong>Aerobatics</strong>. It is an in-runner weighing65g designed for 200-250watts and when usedon the supplied gear box puts out some efficientpower. Its case incorporates a built in heat sinkthat wraps around the perimeter and full lengthof the motor. The gear box comprises the carbonfront and back plates with the main gearbetween them. The motor mounts neatly on theback plate and the entire apparatus is mountedoff the front plate directly to the motor cage. Thisprovides good crash isolation for the motor aswell as being straightforward to install. Being ofcarbon fibre, it is not only extremely light, butalso very rigid which is important as any flexunder load would affect the mesh. Assembly ofthe cage is very easy with all parts marked clearlyand the fit up of the joints being very precise.The last job remaining was to mount the cowland propeller. The Jeti mini 5 channel Rx wasconnected using channel 5 for the right aileron.This afforded the ability to mix flaps and spoilersat a later date. My initial set up was as followsand with a slightly aft CG.The Test FlightAs is often the case,the day of the test flightbrought less than perfectconditions. It had beenblowing hard all day so Iwaited till last light wentthe thermals dropped offand it had all settled a bit.There were still the oddgusts present, so Ithought the flight mightbe somewhat limited. Themandatory range checkwas performed andwith all systems go,the <strong>Katana</strong> wasplaced on the flightline. Pointed directlyinto the headwind,the powerwas added slowlyand she was off theground in less than 2meters.The only trim addedwas a touch of down anda click of right, and shetracked as straight as any planeI’ve ever flown. Despite windy conditions,she handled extremely well, showing goodhandling throughout. On maiden flights, I alwaysdo a trim first, usually in the space of a circuit,and then land to conduct a quick visual to makesure nothing is about to drop off. This has savedmore than one plane in the past.I lined the <strong>Katana</strong> up on final and adjustedthe throttle to obtain a gentle descent. No trimchange was needed to achieve this and the finalapproach looked good. I was very surprised athow easily this thing tracked, even on a windyday. The <strong>Katana</strong> continued its decent with myonly input being to keep the wings level and itvirtually landed itself.A lot is learned about the behaviour of aplane in just one circuit, and so far this one wasa delight. With the quick inspection out of theway, I was off for another couple of shortflights. I actually found the first landing so easyI had to do it again several times to make sureit wasn’t a fluke. I can truly say the <strong>Katana</strong> isone of the easiest planes to land that I haveever had, especially for something so small. Butthis plane isn’t designed for just touch and goesso it was time to try some aerobatics.This aircraft excelled at pattern aerobatics.Its directional stability made straight loops, slowrolls, hammerheads and snap rolls very easyand very clean. The large control surfaces gaveplenty of response throughout the entire flightspeed envelope. Slow flight was amazing andconversions into harriers were easy, with solidpost stall characteristics.Knife edges were held at half throttle,although a small amount of pitch and roll couplingwill need to be mixed out.The second flight was on a much better daywith no wind and in the afterglow of a warmday. This is the best time to fly this sized model,and as conditions were perfect is was time togive it a work out. I’d made some changes to theCG in both axis, and this seemed to work verywell. The battery pack was placed on a smallfoam block, so it could slip over the wing tubeand move aft as desired. With this set up, the CGwas 96mm from the leading edge in the forward/aftaxis and centre of wing in the up/downaxis. This made 3D manoeuvres much easier toperform with hovers and torque rolls being easierto enter and hold. In fact the torque rolls ifentered properly took only a small amount ofright rudder to maintain and virtually no otherinput was required. Again, even with the CGchange it was ridiculously easy to land, and Iactually enjoyed doing a few circuits and touchand goes. The rest of the flight was spent cruisingup and down the runway exploring the slowflight capabilities which were some of the best Ihave experienced, giving good authority at allspeeds. You could really be comfortable flyingthis in a park or small paddock as many do.For those who have never flown electric, onedelight is the lack of engine management needed,and reliability and precision of motorresponse. In many cases this can be a subtle differencebut it indeed is noticeable. For that reasona plane like this can be very good forimproving your aerobatic skills, particularly 3D,especially if you’re not a simulator junky. In mycase the <strong>Katana</strong> is far more capable than thepilot, so there is much I can learn through flyingthis plane.ConclusionOver the years I have had many ARFs gothrough my stable. Every once and a whilethough, one will come through that you justcan’t help but reaching for every time you goout for a fly. I can tell this is going to be one ofthose planes. The finish of the kit is very goodwith high quality hardware putting it in a classof its own for a plane this size. Its hassle freepower plant and manageable size make it a perfectchoice for that evening fly down at the park,and its flight characteristics and capabilitieswould suit a wide range of skill levels. I wouldhighly recommend this package to anyone as agood small field practice plane, or even as a primaryweekend flier. To see this plane in action,you can view numerous videos on atwww.<strong>Precision</strong>Aerobtics.com (recommendeddownload is the latest by Kyle from e-flightline).


