Ubiquiti Nanostation 2 Setup Guide (PDF) - 4Gon
Ubiquiti Nanostation 2 Setup Guide (PDF) - 4Gon
Ubiquiti Nanostation 2 Setup Guide (PDF) - 4Gon

Create successful ePaper yourself
Turn your PDF publications into a flip-book with our unique Google optimized e-Paper software.
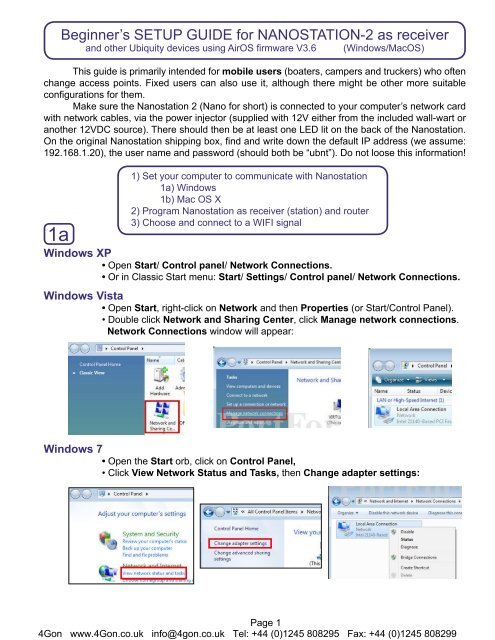
Beginner’s SETUP GUIDE for NANOSTATION-2 as receiverand other Ubiquity devices using AirOS firmware V3.6 (Windows/MacOS)This guide is primarily intended for mobile users (boaters, campers and truckers) who oftenchange access points. Fixed users can also use it, although there might be other more suitableconfigurations for them.Make sure the <strong>Nanostation</strong> 2 (Nano for short) is connected to your computer’s network cardwith network cables, via the power injector (supplied with 12V either from the included wall-wart oranother 12VDC source). There should then be at least one LED lit on the back of the <strong>Nanostation</strong>.On the original <strong>Nanostation</strong> shipping box, find and write down the default IP address (we assume:192.168.1.20), the user name and password (should both be “ubnt”). Do not loose this information!1a1) Set your computer to communicate with <strong>Nanostation</strong>1a) Windows1b) Mac OS X2) Program <strong>Nanostation</strong> as receiver (station) and router3) Choose and connect to a WIFI signalWindows XP• Open Start/ Control panel/ Network Connections.• Or in Classic Start menu: Start/ Settings/ Control panel/ Network Connections.Windows Vista• Open Start, right-click on Network and then Properties (or Start/Control Panel).• Double click Network and Sharing Center, click Manage network connections.Network Connections window will appear:Windows 7• Open the Start orb, click on Control Panel,• Click View Network Status and Tasks, then Change adapter settings:Page 1<strong>4Gon</strong> www.<strong>4Gon</strong>.co.uk info@4gon.co.uk Tel: +44 (0)1245 808295 Fax: +44 (0)1245 808299
• Enable your network card: right-click on Local Area Connection and select Enable (if it’salready enabled, the option would be “Disable” and just leave it as is).• If there is a built in WIFI card, it should be disabled (right click and choose “Disable” if notalready so).• Right click on Local Area Connectionand select Properties:• If you do not need to share files or a printer onyour local network you should disable (un-tick)“Client...” and “File and...”for added security.• WinXP: double click on Internet Protocol:• Vista and Win7: double click onInternet Protocol Version 4(TCP/IPv4):• Fill in as pictured here:We’re entering a static (fixed) IP addressThis will be your computer’s IP *This is always soThis is the IP of the Nano*Nano IP here too(The Nano will be actingas a DNS server)* Note: The last number can be any numberfrom 1 to 254 except 20 which is taken.• Click OK twice. There should be 2 LEDs lit on the <strong>Nanostation</strong> (power + network cable).• Go to page 5.Page 2<strong>4Gon</strong> www.<strong>4Gon</strong>.co.uk info@4gon.co.uk Tel: +44 (0)1245 808295 Fax: +44 (0)1245 808299
1b Mac OS XIf the AirPort is on, best to turn it off:Mac OS X 10.4• Click on the Apple icon then System Peferences:• Click on Network:• Select the Built-in Ethernet:• then click on Configure.(Option: create a new Location configurationnamed Nano to quickly return tothese settings in the future)• Fill in as pictured here:(= default gateway)• Click on Apply.• There should now be 2 LEDs lit on the <strong>Nanostation</strong> (power + network cable).• Goto page 5.Page 3<strong>4Gon</strong> www.<strong>4Gon</strong>.co.uk info@4gon.co.uk Tel: +44 (0)1245 808295 Fax: +44 (0)1245 808299
AC OS X 10.5 (Leopard)• Click on the Apple icon then System Peferences• Click on Network:(Option: create aLocation configurationnamed Nano to quicklyreturn to these settingsin the future)• Select Ethernet:• Fill in like like this:• Click on Apply:• There should now be 2 LEDs lit on the <strong>Nanostation</strong> (power + network cable).NOTE for other Mac versions: if you have two TCP/IP settings, then choose IPv4.GENERAL NOTES• AirOS firmware versions (firmware on a device is like the operating system on acomputer): the current version is AirOS 3.6 as pictured here in the screen shots. If youreceive a unit with a later firmware (or if you update it later), additional settings may bevisible.• Directional antenna: The built in antenna points to the front of unit (LEDs are on back)with a horizontal beam width of about 60 degrees.• Resetting device: Should you be unable to connect to the <strong>Nanostation</strong> after changingany settings (by mistake), it can be reset to it’s original default configuration (a hard reset)by pressing the reset button (little hole, inside cover) for 20-30 seconds, with the poweron. The LED light should flash after releasing button.Page 4<strong>4Gon</strong> www.<strong>4Gon</strong>.co.uk info@4gon.co.uk Tel: +44 (0)1245 808295 Fax: +44 (0)1245 808299
2Setting up the Nano• Open your browser (e.g. Internet Explorer, Firefox, Opera, etc.) and type in address bar:http://192.168.1.20 (the default address of the Nano) then press the Enter key.• Type in ubnt twice and click OK →(If this window did not appear, there may bea problem with the wiring, the network cardor a firewall).• Select the Network tab and change Nano settings as follows:The <strong>Nanostation</strong> will act as a routerwhich makes WIFI cruising much easier.(This refers to the WIFI side of the <strong>Nanostation</strong>)The Nano will automatically be assigned an IPaddress, gateway and DNS server by the WIFIaccess point you connect to later.(This refers to the local wired side = you)This will be the Nano’s new IP addressAlways soAllows the LAN to communicate with the WLANWill allow you to connect a computer which hasit’s network setting to “Obtain an IP address andDNS server automatically”.• Click ChangePage 5<strong>4Gon</strong> www.<strong>4Gon</strong>.co.uk info@4gon.co.uk Tel: +44 (0)1245 808295 Fax: +44 (0)1245 808299
• You’ll notice that this now appears at the top of the window:The changes made on the previous page are memorized but not yetin effect. Only after clicking “Apply” with they take effect. Since westill need to make some other changes, we’ll “Apply” them all later.DO NOT APPLY YET!• Click on the Advanced tab →Verify items marked by ovals:Change to Adaptive. The devicewill choose the best of the 2 built-inantennas (vertical or horizontalpolarization).(Optional: adjust at which signalstrength the LEDs at the back ofthe Nano light up)Click Change(Do not click Apply yet)NOTES• Just like there are several ways to skin a cat, the network settings of the <strong>Nanostation</strong> and computer can bemany. The settings here have been found most convenient while cruising because connecting to new WIFIaccess points in different places require a minimum of effort.• Since the default Nano IP address is in the very common range 192.168.1.x, and we cannot risk havingthe same range on our own local LAN as the WLAN ashore, we have changed the original Nano IP from192.168.1.20 to 192.168.10.20. We have also activated the Nano’s DHCP server which means that the computercan get network settings assigned automatically (an IP in the range 192.168.10.100 to 200, plus the Gatewayand DNS server = IP of the Nano). We still need to set the computer to acquire the IP automatically (see end ofnext page).Page 6<strong>4Gon</strong> www.<strong>4Gon</strong>.co.uk info@4gon.co.uk Tel: +44 (0)1245 808295 Fax: +44 (0)1245 808299
• Click on the Link <strong>Setup</strong> tab→Change Nano mode to Station(i.e. receiver or ‘client’)Make sure output power is on maxLeave rest as shown.Click Change• Click Apply when it appears at the top:Now all the changes will come into effect.YES• Note: At this point communication with the Nano is lost because we still need to change thecomputers IP address to be in the same (new) range as the Nano (192.168.10.x). The settingcan be either fixed (manually to e.g. IP=192 168.10.21, Gateway/Router/DNS=192 168.10.20),or automatic which is simpler and more flexible (as it allows you to take the computer to anotherwired network and automatically acquire the settings):• Windows: refer back to page 1 and 2 toopen Internet Protocol Properties:Change like this:Then click OK twice.• Mac OS: refer to pages 3 and 4 and changeConfigure from Manually to DHCP, thenclick Apply.From now on, all these settings will remain in place and you’ll only need to takestep #3 to connect to an new WIFI access point. That’s a relief!Page 7<strong>4Gon</strong> www.<strong>4Gon</strong>.co.uk info@4gon.co.uk Tel: +44 (0)1245 808295 Fax: +44 (0)1245 808299
3 Connecting to a WIFI signal• In the browser address bar type http://192.168.10.20 (the new address of the Nano) then press theEnter key.• Click on the Link setup tab, then on Select (second line at right):Clicking once on“Signal” will sort thelist with the strongestone at the bottomSelect a strong signal(without encryption)by clicking in the button.Then click “Select”This is thestrongest in the list.Any figure lowerthan about 90 isnormally usable.• Click on Change, wait; click Apply at top of new page, wait a few seconds for connection (someaccess points take a while to connect). That’s it. There should be 3 or more LEDs lit on the back ofthe Nano.• Optional: to verify the connection, click on Main tab. This page has no settings, only information toconfirm a connection. (You may have to refresh the browser page after a while).A number heremeans that the<strong>Nanostation</strong> hasassociated with theWIFI stationThis numberwill increase withlong distanceconnectionsA number heremeans that the<strong>Nanostation</strong> hasreceived an IPaddress(also see below).Note: The numbers here tell us that theWIFI access point has assigned all thenecessary numbers to the <strong>Nanostation</strong>for connecting to the internet.Numbers will vary with access points.If blank, internet access will not work.Page 8<strong>4Gon</strong> www.<strong>4Gon</strong>.co.uk info@4gon.co.uk Tel: +44 (0)1245 808295 Fax: +44 (0)1245 808299
• Clicking on Tools, Align antenna will bring up a received signal strength indicator, useful forimproving signals by rotating the <strong>Nanostation</strong>:Since the numberis negative,a lower figureis stronger.Moving this sliderallows the signalbar indicator tobetter displaydifferent strengths.• Assuming you have connected to an ‘live’ WIFI access point, you should be ready to access theinternet. This may involve logging-in to a marina or hotel welcome page, or paying for access.• To connect to another WIFI access point in the future, just log-in to the Nano with your browserand repeat step #3. Also see second recommendation below.• An alternative to step #3 is to type “Any” in ESSID (second line on tab “Link <strong>Setup</strong>”), then Saveand Apply. From then onwards, the Nano will automatically connect to any un-encrypted accesspoint, without any intervention from your part. However, in locations with many WIFI signals, itmight not end up being the most desirable one.• Connecting to an encrypted wireless network (WEP or WPA) requires knowing the encryptionkey and performing additional steps in #3.Recommendations• For security, use a firewall (e.g. Windows firewall or free Zone Alarm) and a virusscanner (e.g. Norton or free AVG).• Make a bookmark (or ‘favorite’) to the <strong>Nanostation</strong> address (http://192.168.10.20)and save the log-in info (ubnt; ubnt) in your browser for quick access.• The supplied white cable ties for mounting the device may fail after exposure tosunlight. It’s much better to use black ties, a good string, or hose clamps.• If you do not use your computer elsewhere, you may prefer to give it a fixednetwork setting (manually to e.g. IP=192 168.10.21, Subnetmask=255.255.255.0,Gateway/Router/DNS=192 168.10.20), as this removes the initial delay of beingassigned settings when switching on the computer.Online resources• Download a more recent firmware (improvements and bug fixes; not necessarybut recommended) at: http://www.ubnt.com/support/downloads.Once downloaded, log-in to the Nano, click on System tab, then Upgrade.Previous configuration settings will not be lost.• For an advanced manual on the AirOS firmware go to http://www.ubnt.com/wiki/Main_Page and look under 802.11a/b/g Products.• For technical support use the UBNT Forum at: http://ubnt.com/forumLeo Lindstrand, nano@3dym.com ©02/2011 (not connected with Ubiquity Networks)Page 9<strong>4Gon</strong> www.<strong>4Gon</strong>.co.uk info@4gon.co.uk Tel: +44 (0)1245 808295 Fax: +44 (0)1245 808299
ADDENDUMPossible reasons for not getting online• Cannot associate with AP (access point)- AP fault or intentional restriction- Your signal not good enough/ distance too far (using a directional antenna helps)- Interference from many other WIFI users (using a directional antenna helps)- Look for another AP on a less busy channel (as an example, in the USA only channels 1,6, and 11 do not overlap/interfere with each other).• Associated with AP (access point) but not online- AP may be disconnected from internet- AP’s DHCP server may not work and this would be evident on the Nano Main tab. If youcan find or guess the settings, then these can be enterned manually on Nano tab Network,WLAN Network Settings: static. You’ll have to enter the IP (often 192.168.0.90 or 1.90,Netmask 225.225.255.0), the Default Gateway (often 192.168.0.1 or 1.1) and at least oneDNS Server (208.67.222.222 goes to OpenDNS and will always work). Then Save andApply.• If only some of your services work (e.g. Skype)- It could be that only the DNS server is wrong or missing. Manually enter (as above) theIP and Default Gateway that were assigned automatically, but change the DNS server to208.67.222.222.• Problems sending email with SMTP- Your usual SMTP server may not accept your outgoing email if you get online via a differentprovider and/or you are not autheticated. Your SMTP provider can usually tell you whattheir authenticated connecting settings should be. Alternatively try another SMTP provider,or use browser webmail instead of an email program (e.g. Outlook).Page 10<strong>4Gon</strong> www.<strong>4Gon</strong>.co.uk info@4gon.co.uk Tel: +44 (0)1245 808295 Fax: +44 (0)1245 808299