Calcaneal Plating System Brochure & Surgical Technique
Calcaneal Plating System Brochure & Surgical Technique
Calcaneal Plating System Brochure & Surgical Technique

You also want an ePaper? Increase the reach of your titles
YUMPU automatically turns print PDFs into web optimized ePapers that Google loves.
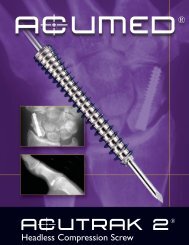
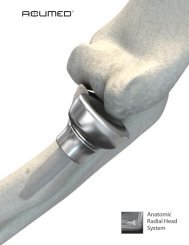
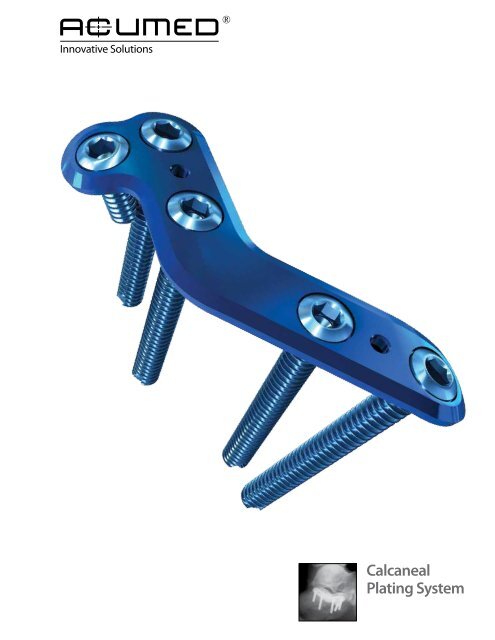
<strong>Calcaneal</strong> <strong>Plating</strong> <strong>System</strong>Acumed® is a global leader of innovativeorthopaedic and medical solutions.We are dedicated to pioneering products, servicemethods and approaches that improve patientcare.A New Standard of Treatment for <strong>Calcaneal</strong>Fractures.<strong>Calcaneal</strong> fractures are the most common tarsalbone fractures and they are challenging to treat.The extensile lateral incision, which is today’s mostcommon approach, often results in nearly 30% ofpatients developing wound complications. 1With the expertise of Greg A. Horton, MD andSteven A. Herbst, MD, Acumed® has developed afamily of calcaneal plates specifically designed fora minimally invasive approach using a sinus tarsiincision, a technique with less chance of woundcomplications when compared to extensile lateralsurgeries. 1 While this kind of incision is not new, itsuse for calcaneal fractures in conjunction with theAcumed® MINI-Calc Plates is a revolutionary stepforward in the treatment of calcaneal fractures.The Acumed® <strong>Calcaneal</strong> <strong>Plating</strong> <strong>System</strong> is comprised of severalMINI-Calc and lateral wall plates to meet a variety of proceduralneeds. To minimize soft tissue irritation while still providing adurable construct, the <strong>Calcaneal</strong> Plates were specifically designedto be low-profile and target the best quality bone in the calcaneus.Surgeons now have more options for this complex surgery.ContentsIntroducing the <strong>System</strong> 2<strong>System</strong> Features 3Anterior Process <strong>Calcaneal</strong> Plate <strong>Technique</strong> 4Posterior Tuberosity <strong>Calcaneal</strong> Plate <strong>Technique</strong> 6Combo <strong>Calcaneal</strong> Plate <strong>Technique</strong> 8Lateral Wall <strong>Calcaneal</strong> Plate <strong>Technique</strong> 10Instrumentation and Screws 11Ordering Information 122
<strong>Surgical</strong> <strong>Technique</strong> By Steven A. Herbst, MD5PLATE INSERTION AND INITIAL FIXATION• Insert plate through incision and confirm position underfluoroscopy.• Use K-wires or plate tacks to provisionally fix the plate tothe bone.6SCREW INSERTION• Thread locking drill guide (80-0384 or 80-0385) intothe plate.• Drill and measure for screws buttressing the posterior facet.• Use yellow-banded drill (80-0386) for 2.7 mm screws andgreen-banded drill (80-0387) for 3.5 mm screws.7ANTERIOR PROCESS SCREW INSERTION• Drill, measure, and insert screws on the anterior process.Caution: Anterior screws may collide at lengths longerthan 10 mm.8WOUND CLOSURE AND POSTOPERATIVE PROTOCOL• Verify reduction and screw placement under fluoroscopy.• Close wound in layers.When X-rays indicate adequate healing, full weight-bearing isallowed, based on surgeon judgment.B5
Combo <strong>Calcaneal</strong> Plate <strong>Technique</strong>1PATIENT POSITIONING• Obtain lateral and axial views of calcaneus, as well asCT views of the sagittal and coronal planes; compare toopposite extremity.• Place patient in a lateral position with the operativeextremity facing up.2EXPOSURE AND APPROACH• Make a slightly S-shaped incision from base of the lateralmalleolus to the calcaneocuboid joint. Carry dissection downto the subtalar joint.• Retract peroneal tendons plantarly.• To improve exposure, sharply take the calcaneofibularligament.Caution: Avoid peroneal tendon and sural nerve duringdissection.3REDUCTION OF ARTICULAR SURFACE• Use K-wires and Freer elevator to reduce posterior facetfragment to the sustentaculum tali.• Ensure the Angle of Gissane is approximately 100° or equalto the opposite side.4REDUCTION OF POSTERIOR TUBEROSITY• Place Steinmann Pin lateral-to-medial in the approximatelocation shown.• Pull tuberosity out of varus and back to length using theSteinmann Pin.• Ensure Bohler’s Angle is between 25°-40°.• Verify reduction under fluoroscopy.8