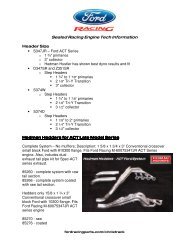
M-9430-ZX3C 2.0L Focus Header ... - Ford Racing Parts
M-9430-ZX3C 2.0L Focus Header ... - Ford Racing Parts
M-9430-ZX3C 2.0L Focus Header ... - Ford Racing Parts

Create successful ePaper yourself
Turn your PDF publications into a flip-book with our unique Google optimized e-Paper software.
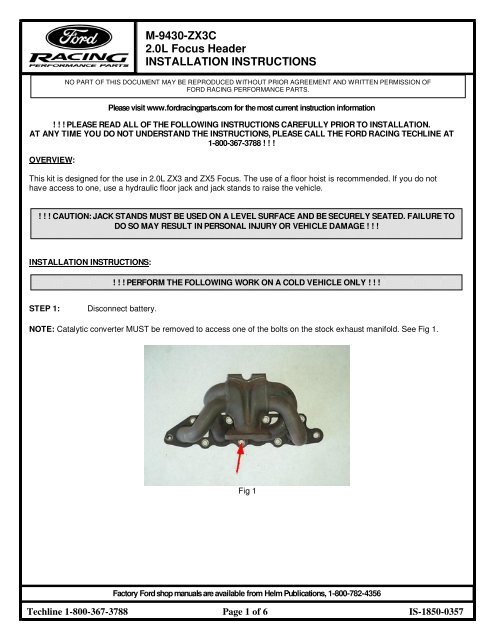
M-<strong>9430</strong>-<strong>ZX3C</strong><strong>2.0L</strong> <strong>Focus</strong> <strong>Header</strong>INSTALLATION INSTRUCTIONSNO PART OF THIS DOCUMENT MAY BE REPRODUCED WITHOUT PRIOR AGREEMENT AND WRITTEN PERMISSION OFFORD RACING PERFORMANCE PARTS.Please visit www.fordracingparts.com for the most current instruction information! ! ! PLEASE READ ALL OF THE FOLLOWING INSTRUCTIONS CAREFULLY PRIOR TO INSTALLATION.AT ANY TIME YOU DO NOT UNDERSTAND THE INSTRUCTIONS, PLEASE CALL THE FORD RACING TECHLINE AT1-800-367-3788 ! ! !OVERVIEW:This kit is designed for the use in <strong>2.0L</strong> ZX3 and ZX5 <strong>Focus</strong>. The use of a floor hoist is recommended. If you do nothave access to one, use a hydraulic floor jack and jack stands to raise the vehicle.! ! ! CAUTION: JACK STANDS MUST BE USED ON A LEVEL SURFACE AND BE SECURELY SEATED. FAILURE TODO SO MAY RESULT IN PERSONAL INJURY OR VEHICLE DAMAGE ! ! !INSTALLATION INSTRUCTIONS:! ! ! PERFORM THE FOLLOWING WORK ON A COLD VEHICLE ONLY ! ! !STEP 1:Disconnect battery.NOTE: Catalytic converter MUST be removed to access one of the bolts on the stock exhaust manifold. See Fig 1.Fig 1Factory <strong>Ford</strong> shop manuals are available from Helm Publications, 1-800-782-4356Techline 1-800-367-3788 Page 1 of 6 IS-1850-0357
M-<strong>9430</strong>-<strong>ZX3C</strong><strong>2.0L</strong> <strong>Focus</strong> <strong>Header</strong>INSTALLATION INSTRUCTIONSNO PART OF THIS DOCUMENT MAY BE REPRODUCED WITHOUT PRIOR AGREEMENT AND WRITTEN PERMISSION OFFORD RACING PERFORMANCE PARTS.STEP 2:Remove Heat Shielda) Remove four (4) bolts holding the heat shield to the exhaust manifold [8mm] See Fig 2.Fig 2b) To remove shield, lift right side first, then left, angle forward and pull out.STEP 3:Remove Catalysta) From above, remove three (3) nuts which attach catalyst to exhaust manifold [15mm] See Fig 3.Fig 3b) Disconnect the O2 sensor connectionFactory <strong>Ford</strong> shop manuals are available from Helm Publications, 1-800-782-4356Techline 1-800-367-3788 Page 2 of 6 IS-1850-0357
M-<strong>9430</strong>-<strong>ZX3C</strong><strong>2.0L</strong> <strong>Focus</strong> <strong>Header</strong>INSTALLATION INSTRUCTIONSNO PART OF THIS DOCUMENT MAY BE REPRODUCED WITHOUT PRIOR AGREEMENT AND WRITTEN PERMISSION OFFORD RACING PERFORMANCE PARTS.c) From below, remove the EGR connection to the catalyst [1 1/16"] See Fig 4.Fig 4d) Remove the two (2) nuts holding the catalyst outlet to the exhaust [15mm] See Fig 5e) Remove the two (2) bolts for the bracket for the catalyst outlet [13mm] See Fig 5Fig 5Factory <strong>Ford</strong> shop manuals are available from Helm Publications, 1-800-782-4356Techline 1-800-367-3788 Page 3 of 6 IS-1850-0357
M-<strong>9430</strong>-<strong>ZX3C</strong><strong>2.0L</strong> <strong>Focus</strong> <strong>Header</strong>INSTALLATION INSTRUCTIONSNO PART OF THIS DOCUMENT MAY BE REPRODUCED WITHOUT PRIOR AGREEMENT AND WRITTEN PERMISSION OFFORD RACING PERFORMANCE PARTS.f) Loosen the two (2) nuts holding the catalyst to the engine bracket [13mm] See Fig 6Fig 6g) Disconnect the downstream O2 sensor connectionh) Remove the nuts holding the catalyst to the block and remove catalystSTEP 4:Remove Stock Exhaust Manifolda) Remove the three (3) nuts and six (6) bolts holding the stock exhaust manifold to the head [10mm,13mm] See Fig 7Fig 7Factory <strong>Ford</strong> shop manuals are available from Helm Publications, 1-800-782-4356Techline 1-800-367-3788 Page 4 of 6 IS-1850-0357
M-<strong>9430</strong>-<strong>ZX3C</strong><strong>2.0L</strong> <strong>Focus</strong> <strong>Header</strong>INSTALLATION INSTRUCTIONSNO PART OF THIS DOCUMENT MAY BE REPRODUCED WITHOUT PRIOR AGREEMENT AND WRITTEN PERMISSION OFFORD RACING PERFORMANCE PARTS.Note: It may help to remove both the bolt holding the dipstick tube to the cylinder head [8mm] and the boltholding the power steering line bracket to the cylinder head [15mm] See Fig 8Some combination of extensions and u-joints may be helpfulFig 8b) Note that there are plastic centering rings around the left and right studs. They will be replaced.c) Remove stock exhaust manifold from the top of the engine compartmentd) Remove the old exhaust manifold gasket and plastic centering rings if they remainSTEP 5:STEP 6:Install FRT <strong>Header</strong>a) Position new exhaust manifold gasket in place [968Z-9448-AA]b) Position new plastic centering rings on the right and left studs [W703974-S300]c) Position FRT <strong>Header</strong> in place over studs, ensure that plastic centering rings are not displacedd) Install nuts and bolts and torquee) If removed, reinstall dipstick tube and power steering line bracketsReinstall Catalysta) Pry old gasket out of cat and install new one [YS4Z-9450-CA]b) From below, position catalyst in place and install one of the nuts holding the catalyst to the header tohold it in placec) Loosen the two (2) nuts which hold catalyst bracket to the engine [13mm], loosely install the nutsholding the catalyst bracket to engine.Note: This will allow the catalyst to align properly to the new exhaust header.d) Install new gasket and loosely install nuts holding catalyst outlet to exhaust and bracket [YS4Z-9450-FA]e) From above, install and torque the three (3) nuts holding the catalyst to the headerf) From below, tighten the remaining nutsg) Reattach both O2 sensor connectors and check to make sure everything has been tightenedFactory <strong>Ford</strong> shop manuals are available from Helm Publications, 1-800-782-4356Techline 1-800-367-3788 Page 5 of 6 IS-1850-0357
M-<strong>9430</strong>-<strong>ZX3C</strong><strong>2.0L</strong> <strong>Focus</strong> <strong>Header</strong>INSTALLATION INSTRUCTIONSNO PART OF THIS DOCUMENT MAY BE REPRODUCED WITHOUT PRIOR AGREEMENT AND WRITTEN PERMISSION OFFORD RACING PERFORMANCE PARTS.STEP 7:Heat Shieldinga) Install provided convolute tube by slipping onto the power steering line that runs over the header.Note: It may help to adjust the orientation of the line by re-positioning the brackets holding the powersteering line to the cylinder head. Ensure that there is no contact between the line and othercomponentsb) Install the under hood insulation by removing the appropriate fasteners and using the new fastenersto attach the included insulation. Silicone applied to the underside of the shield will aid retention.c) Install the coolant hose insulation by wrapping around the coolant tubes ahead of the header and usethe nylon zip ties to fasten to the hoses.Factory <strong>Ford</strong> shop manuals are available from Helm Publications, 1-800-782-4356Techline 1-800-367-3788 Page 6 of 6 IS-1850-0357