Arctic Cat 1100 Turbo Ez-Jacker 1.9 Part# CBA-A020 ... - Boondocker
Arctic Cat 1100 Turbo Ez-Jacker 1.9 Part# CBA-A020 ... - Boondocker
Arctic Cat 1100 Turbo Ez-Jacker 1.9 Part# CBA-A020 ... - Boondocker

You also want an ePaper? Increase the reach of your titles
YUMPU automatically turns print PDFs into web optimized ePapers that Google loves.
<strong>Arctic</strong> <strong>Cat</strong> <strong>1100</strong> <strong>Turbo</strong><br />
EZ-<strong>Jacker</strong> <strong>1.9</strong><br />
<strong>Part#</strong> <strong>CBA</strong>-<strong>A020</strong><br />
Installation and Operating Instructions<br />
The EZ-<strong>Jacker</strong> <strong>1.9</strong> is a simple plug-in module that will provide maximum power on premium pump fuel for <strong>Arctic</strong> <strong>Cat</strong> <strong>1100</strong> turbo<br />
machines. The EZ-<strong>Jacker</strong> <strong>1.9</strong> requires no tuning or adjustments but is equipped with a handlebar mounted rapid response<br />
button that when pressed at low turbo boost conditions will allow boost to increase faster leading to quicker acceleration. All<br />
factory safety measures like detonation sensors still function as stock with the EZ-<strong>Jacker</strong> <strong>1.9</strong> installed. Depending on elevation<br />
and type of fuel used it is possible that a user will experience detonation/octane codes using the EZ-<strong>Jacker</strong>. If users experience<br />
detonation/octane codes it is recommended to run higher octane fuel.<br />
Additional information and updates on BoonDocker products may be available on the following sites.<br />
• www.boondockers.com<br />
• www.youtube.com/boondockerusa<br />
• www.facebook.com/boondockerperformance<br />
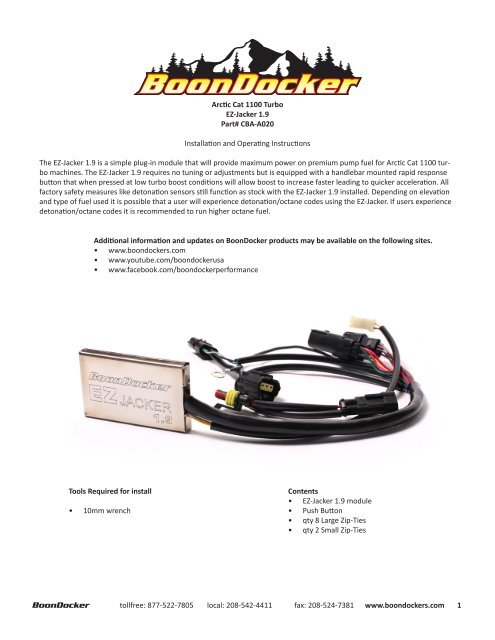
Tools Required for install<br />
• 10mm wrench<br />
Contents<br />
• EZ-<strong>Jacker</strong> <strong>1.9</strong> module<br />
• Push Button<br />
• qty 8 Large Zip-Ties<br />
• qty 2 Small Zip-Ties<br />
BoonDocker tollfree: 877-522-7805 local: 208-542-4411 fax: 208-524-7381 www.boondockers.com 1
1. Remove side-panel on clutch side by removing the<br />
cotter pin located behind the upper a-arm.<br />
3. Pull back the cowl and locate the MAP sensor. Remove<br />
the stock connector from the MAP sensor.<br />
2. Un-fasten the dzus fastener on the bottom of the rear<br />
cowl next to the footwell.<br />
4. Plug the matching EZ-<strong>Jacker</strong> connector into the MAP<br />
sensor and the stock MAP sensor connector into the<br />
other matching EZ-<strong>Jacker</strong> connector.<br />
5. Locate the stock EFI connector. 6. Plug the matching EZ-<strong>Jacker</strong> connectors inline with<br />
the EFI connector.<br />
BoonDocker tollfree: 877-522-7805 local: 208-542-4411 fax: 208-524-7381 www.boondockers.com 2
7. Locate the stock Boost Solenoid connector 8. Plug the matching EZ-<strong>Jacker</strong> connectors inline with<br />
the EFI connector.<br />
9. Using a 10 mm wrench remove the nut on the engine<br />
side of the Boost Solenoid. Attach the ground<br />
connection on the EZ-<strong>Jacker</strong> and re-install the 10mm<br />
nut.<br />
11. Route the push button wiring down the steering column<br />
to under the hood and connect to the matching<br />
connector on the EZ <strong>Jacker</strong>.<br />
10. Install the supplied push button onto the handlebar.<br />
The push button can be installed using a zip-tie as<br />
shown in the image or super glued to the switch pod<br />
bellow the thumb warmer switch.<br />
12. Using the supplied velcro attach the EZ-<strong>Jacker</strong> enclosure<br />
to the factory ECU enclosure.<br />
BoonDocker tollfree: 877-522-7805 local: 208-542-4411 fax: 208-524-7381 www.boondockers.com 3
13. It is very improtant to secure the EZ <strong>Jacker</strong> wiring so that is out of the way of heat and moving parts. Using the supplied<br />
zip-ties we recommend securing the harness in the locations shown above.<br />
Diagnostic LEDs<br />
Three LEDs are located on the EZ-<strong>Jacker</strong> next to where the wire harness exits the enclosure. These LEDs are used to help identify<br />
possible connection issues.<br />
Green LED on indicates that EZ <strong>Jacker</strong> has power<br />
Red LED on indicates that the EZ <strong>Jacker</strong> is receiving a MAP sensor signal<br />
Yellow LED on indicates that the EZ <strong>Jacker</strong> is receivng a Boost Solenoid signal<br />
If any of the three LEDs are not on while the machine is running check the corresponding connection.<br />
WARRANTY TERMS AND CONDITIONS<br />
Returned Goods – No merchandise will be accepted without prior approval. A RMA number (Return Merchandise Authorization)<br />
provided by <strong>Boondocker</strong> is required before a return will be accepted. A 20% handling and restocking charge will be applied to<br />
returned merchandise. No unauthorized returns will be accepted.<br />
Limited Warranty – <strong>Boondocker</strong> warrants its product to the original purchaser against workmanship defects for a period of 90<br />
days, commencing from the date of product delivery to the Consumer.<br />
Maximum Liability – The maximum liability of <strong>Boondocker</strong> in connection with this warranty shall not under any circumstances<br />
exceed the price of the product claimed to be defective.<br />
BoonDocker tollfree: 877-522-7805 local: 208-542-4411 fax: 208-524-7381 www.boondockers.com 4