

rapid deployment hf nvis and vhf/uhf antenna - EMCOMM.org
rapid deployment hf nvis and vhf/uhf antenna - EMCOMM.org
rapid deployment hf nvis and vhf/uhf antenna - EMCOMM.org

You also want an ePaper? Increase the reach of your titles
YUMPU automatically turns print PDFs into web optimized ePapers that Google loves.
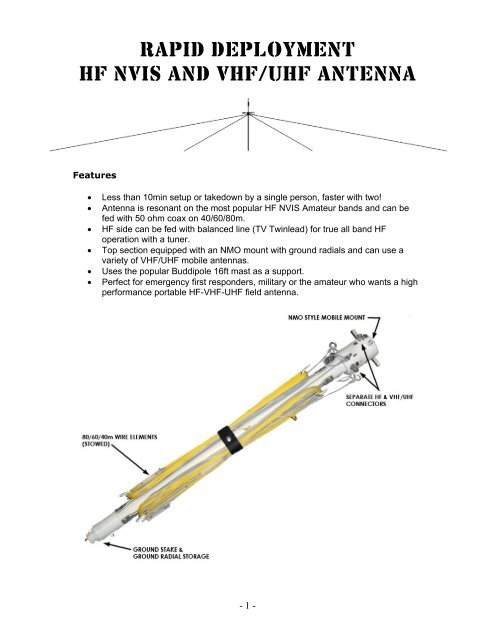
RAPID DEPLOYMENTHF NVIS AND VHF/UHF ANTENNAFeatures• Less than 10min setup or takedown by a single person, faster with two!• Antenna is resonant on the most popular HF NVIS Amateur b<strong>and</strong>s <strong>and</strong> can befed with 50 ohm coax on 40/60/80m.• HF side can be fed with balanced line (TV Twinlead) for true all b<strong>and</strong> HFoperation with a tuner.• Top section equipped with an NMO mount with ground radials <strong>and</strong> can use avariety of VHF/UHF mobile <strong>antenna</strong>s.• Uses the popular Buddipole 16ft mast as a support.• Perfect for emergency first responders, military or the amateur who wants a highperformance portable HF-VHF-UHF field <strong>antenna</strong>.- 1 -
Assembly Instructions1. Locate an <strong>antenna</strong> site at least 188 X 128ft <strong>and</strong> clear of obstructions.2. St<strong>and</strong>ing in the center of the <strong>antenna</strong> site, unwrap the #1 wire <strong>antenna</strong> element<strong>and</strong> fully extend in one direction chosen for the longest elements. Secure thiselement by driving a ground stake at the far end of the support rope at a 45degangle up <strong>and</strong> away from the <strong>antenna</strong> mast.3. Unwrap the #2 wire element <strong>and</strong> fully extend in the opposite direction of wire #1.Stake as above.4. Unwrap the wire #3 element <strong>and</strong> fully extend perpendicular to wire #1 & 2. Stakeas above.5. Unwrap wire # 4 <strong>and</strong> fully extend opposite wire #3. Stake as above.6. Install the VHF/UHF NMO <strong>antenna</strong> at this time. Attach the 4 ground radials asshown.7. Connect the HF <strong>and</strong> VHF/UHF feedlines. Route them so they will not tangle inthe wire elements when the mast is extended.8. Attach the 16ft mast as shown holding the PVC assembly fixed <strong>and</strong> rotate theloosened top section of the mast into the PVC assembly.- 2 -
Assembly Instructions Continued9. Fully extend the mast or extend until the wire elements are taught. If the mastfully extends <strong>and</strong> the wire elements are sagging, or the mast cannot fully extend,pull <strong>and</strong> re-stake the appropriate wire elements. When completed, the wiresshould be taught without the mast bending. You may need to re-center the mastby moving the base around slightly.10. Connect transceiver(s) <strong>and</strong> verify operation.Stowing Instructions1. Disconnect transceiver(s).2. Collapse the mast leaving the top section loose to rotate.3. Remove ground radials <strong>and</strong> VHF/UHF whip.4. Remove the mast from the PVC section by holding the PVC assembly fixed <strong>and</strong>unscrew the loosened top section of the mast from the PVC assembly.5. Pull up all ground stakes.6. Stow all <strong>antenna</strong> wires on the hooks below <strong>and</strong> to the right of the respective wireeyelet when viewing the PVC section upright.7. Stow the ground stakes with bent ends in first <strong>and</strong> then stow the ground radialswith threads facing out. Replace bottom pipe cap.8. Coil up feedline(s).- 3 -