Front Mount Exterior (FME) Transponder Roof Mounting Instructions
Front Mount Exterior (FME) Transponder Roof Mounting Instructions
Front Mount Exterior (FME) Transponder Roof Mounting Instructions

Create successful ePaper yourself
Turn your PDF publications into a flip-book with our unique Google optimized e-Paper software.
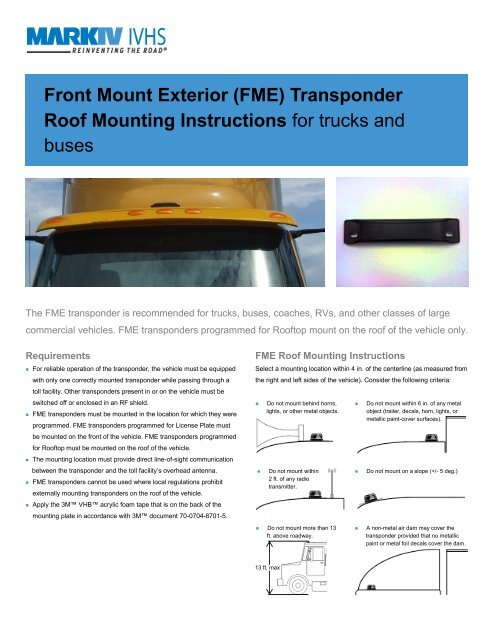
<strong>Front</strong> <strong>Mount</strong> <strong>Exterior</strong> (<strong>FME</strong>) <strong>Transponder</strong><strong>Roof</strong> <strong>Mount</strong>ing <strong>Instructions</strong> for trucks andbusesThe <strong>FME</strong> transponder is recommended for trucks, buses, coaches, RVs, and other classes of largecommercial vehicles. <strong>FME</strong> transponders programmed for <strong>Roof</strong>top mount on the roof of the vehicle only.Requirements• For reliable operation of the transponder, the vehicle must be equippedwith only one correctly mounted transponder while passing through atoll facility. Other transponders present in or on the vehicle must beswitched off or enclosed in an RF shield.• <strong>FME</strong> transponders must be mounted in the location for which they wereprogrammed. <strong>FME</strong> transponders programmed for License Plate mustbe mounted on the front of the vehicle. <strong>FME</strong> transponders programmedfor <strong>Roof</strong>top must be mounted on the roof of the vehicle.• The mounting location must provide direct line-of-sight communicationbetween the transponder and the toll facility’s overhead antenna.• <strong>FME</strong> transponders cannot be used where local regulations prohibitexternally mounting transponders on the roof of the vehicle.• Apply the 3M VHB acrylic foam tape that is on the back of themounting plate in accordance with 3M document 70-0704-8701-5.<strong>FME</strong> <strong>Roof</strong> <strong>Mount</strong>ing <strong>Instructions</strong>Select a mounting location within 4 in. of the centerline (as measured fromthe right and left sides of the vehicle). Consider the following criteria:• Do not mount behind horns,lights, or other metal objects.• Do not mount within2 ft. of any radiotransmitter.• Do not mount within 6 in. of any metalobject (trailer, decals, horn, lights, ormetallic paint-cover surfaces).• Do not mount on a slope (+/- 5 deg.)• Do not mount more than 13ft. above roadway.• A non-metal air dam may cover thetransponder provided that no metallicpaint or metal foil decals cover the dam.13 ft. max
801850-005 rev B.©MARK IV IVHS. All rights reserved Subject to alteration without notice.If securing the transponder WITH the mounting plate:1. The back of the mounting plate is covered with 3M VHB acrylicfoam tape. Prepare the mounting location in accordance with 3Mdocument 70-0704-8701-5.NOTE: Ensure the mounting plate is installed on the vehicle so that whenthe transponder is installed on the mounting plate, the orientationarrows on the transponder point in the direction of forward travel.2. Remove the protective backing from the adhesive on the back of themounting plate and firmly press the mounting plate against themounting surface with either a roller or platen pressure, maintainingpressure for 15 seconds to ensure a good bond.3. Using the supplied tamper-proof nuts, lock washers, and flat washers,secure the transponder to the mounting plate with the notches on thetransponder and mounting plate aligned and with the orientationarrows on the transponder pointing in the direction of forward travel.If securing the transponder WITHOUT the mounting plate:NOTE: The transponder mounting holes must be used when securing thetransponder to the roof of the vehicle using this method.1. Place the transponder in the selected mounting location. Using thetransponder mounting holes as a guide, mark the locations on the roofthrough which the mounting bolts will pass. Remove the transponder.2. Drill a mounting bolt hole at both locations marked in step 1.3. Using two, ¼- in.-diameter stainless steel mounting bolts of sufficientlength, two tamper-proof nuts, two lock washers, and two stainlesssteel flat washers, secure the transponder to the roof of the vehiclewith the orientation arrows on the transponder pointing in the directionof forward travel.4. Apply sealant to the mounting bolts and mounting location asnecessary.tamper-proof nutorientation arrownotchlock washerflat washertamper-proof nutlock washermounting boltflat washertransponderorientation arrownotchmounting plate studmounting platetransponder<strong>FME</strong> <strong>Transponder</strong> with <strong>Mount</strong>ing Plate<strong>FME</strong> <strong>Transponder</strong> without <strong>Mount</strong>ing PlateREINVENTING THE ROAD ®MARK IV IVHS | 6020 Ambler Drive | Mississauga, Ontario L4W 2P1 | CANADA | Phone +1 905 624 3020 | Fax +1 905 625 619754 S. Commerce Way, Suite 100 | Bethlehem, PA 18017 | USA | Phone +1 610 419 1479 | Fax +1 610 419 1489